Microsoft 365 Copilot for Sales deployment guide for Salesforce CRM customers
Follow the instructions in this guide to deploy Copilot for Sales for your Salesforce CRM customers. Here's a quick video overview of the steps involved:
Prerequisites
- You must be a tenant administrator to install the integrated app from the Microsoft 365 admin center. How do I find my tenant admin?
- You must be a Teams administrator to create a setup policy in the Teams admin center.
- You must assign the Copilot for Sales license to each user that will be using the product. Learn more about assigning licenses from the Microsoft 365 admin center
Step 1: Install Copilot for Sales in Outlook
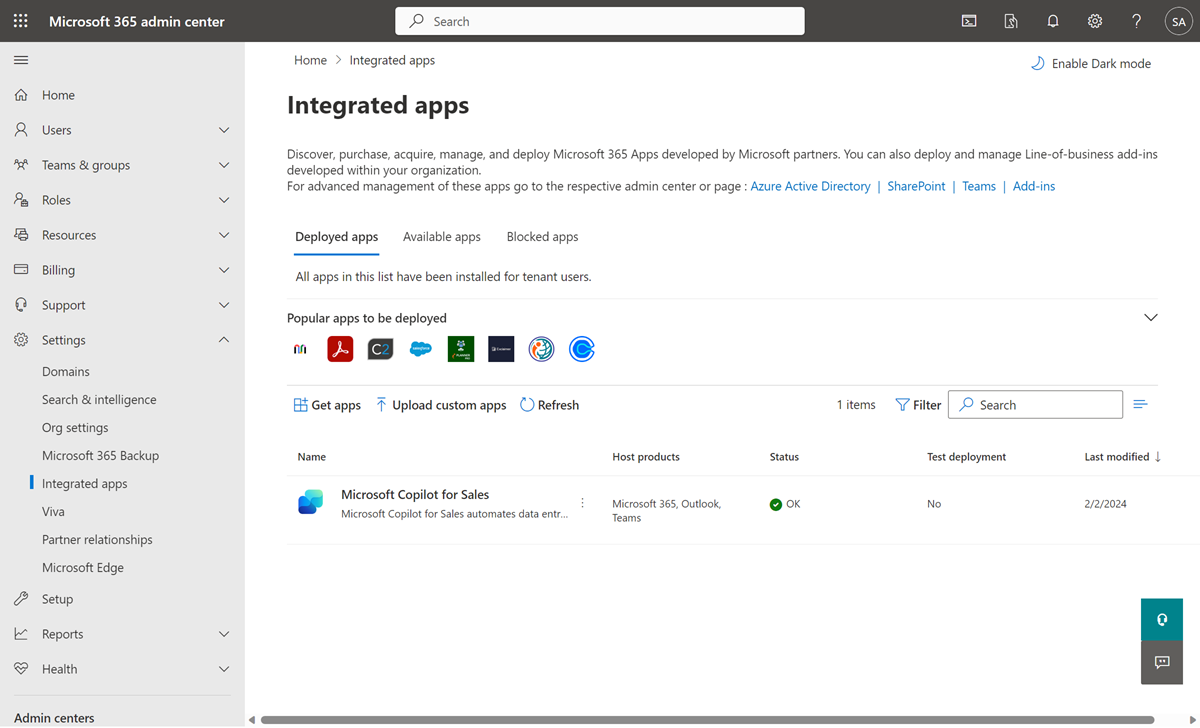
Install Copilot for Sales in Outlook

Note
It can take up to 24 hours for the add-in to show up for your users.
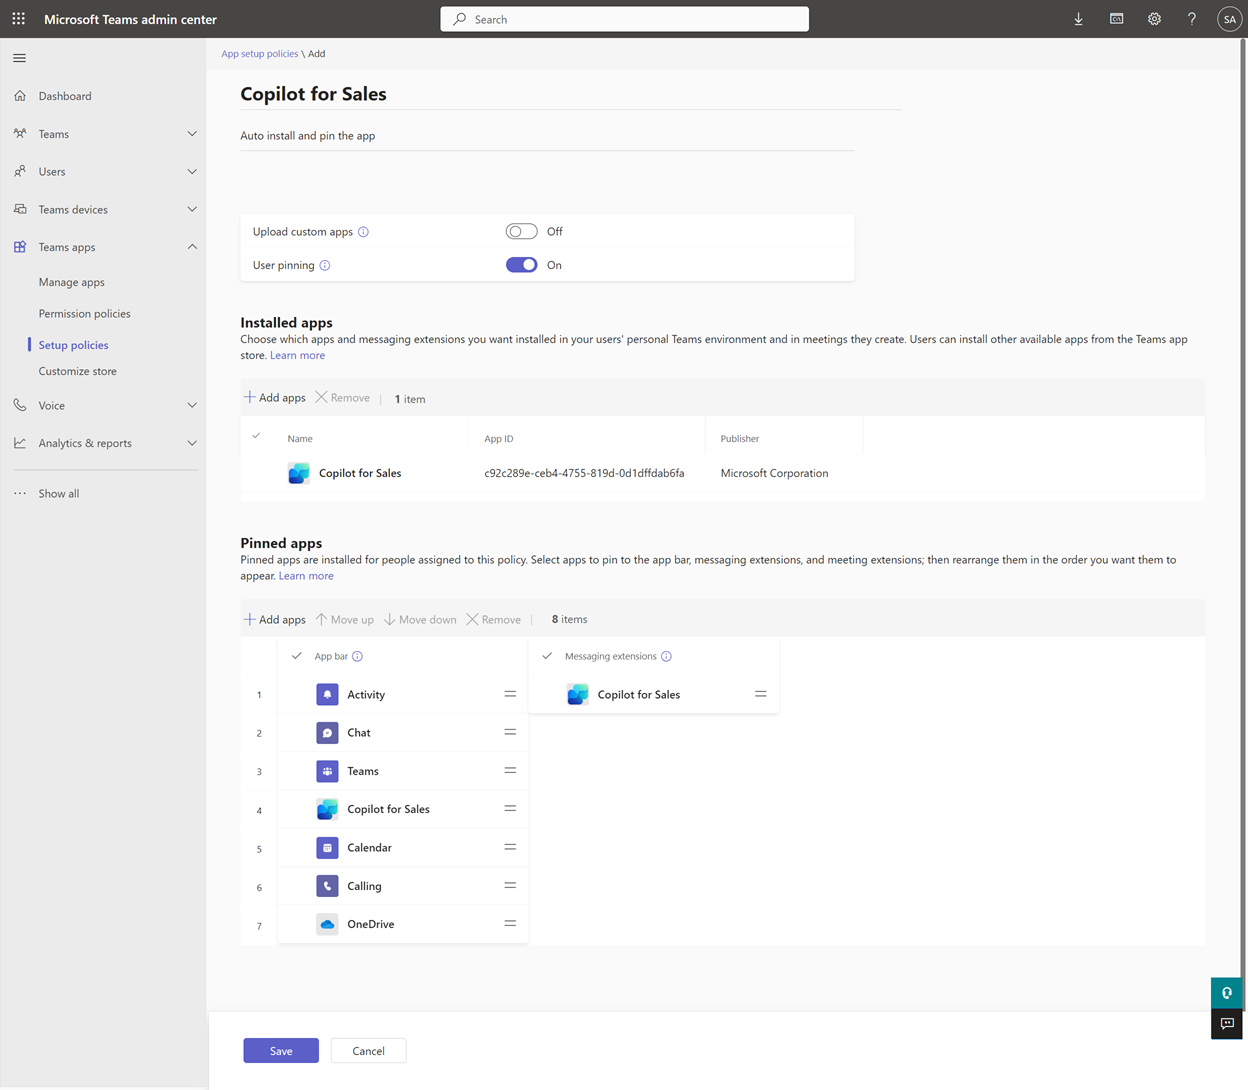
Step 2: Create a setup policy to auto install and pin the Copilot for Sales app in Teams

Step 3: Enable Teams meeting transcripts
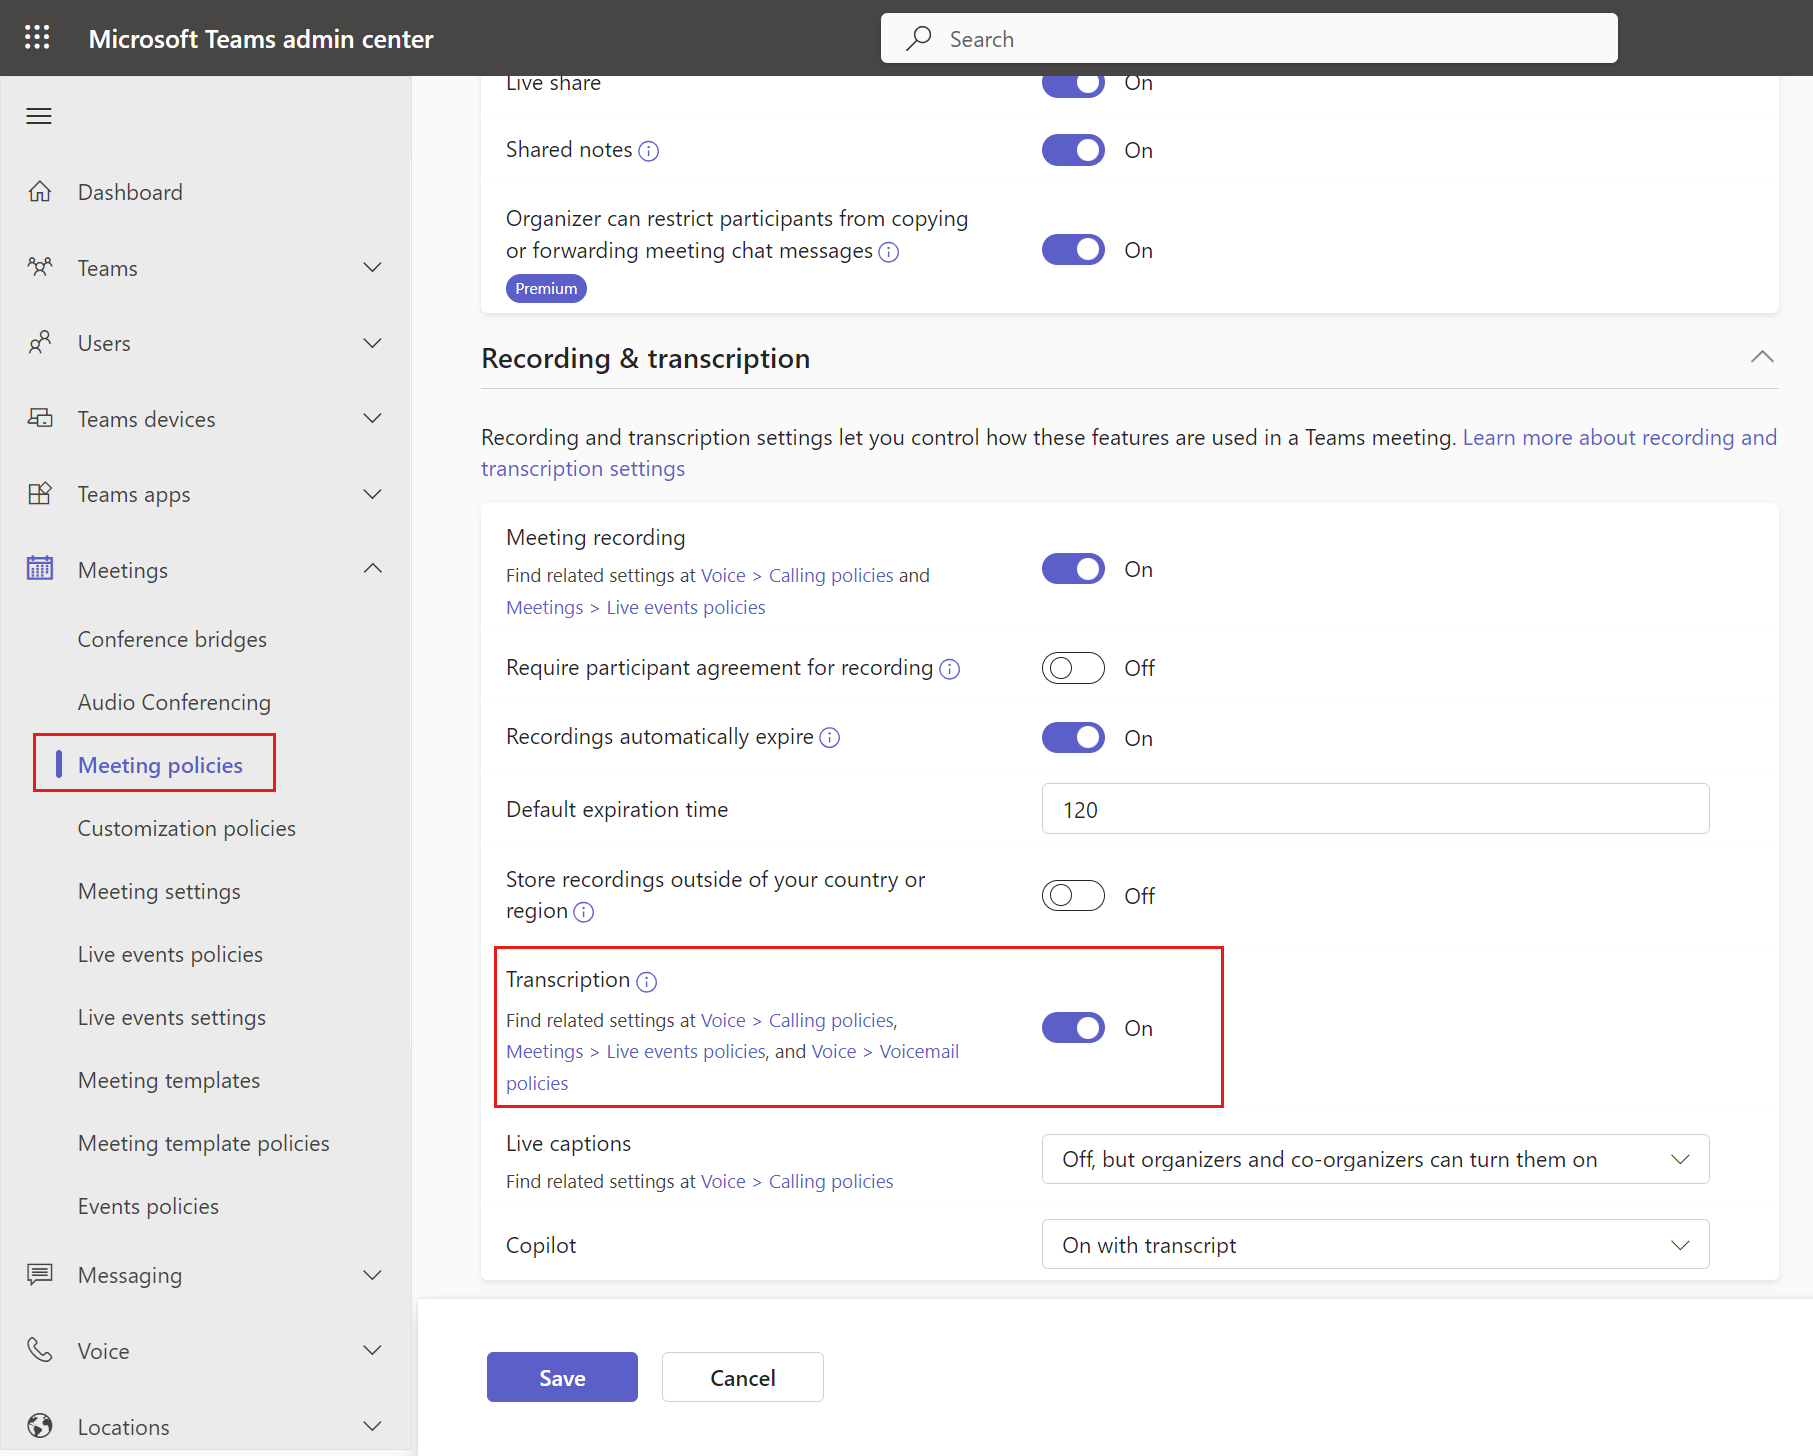
Enable transcripts for Teams calls so that when Copilot for Sales is added to a recorded Teams meeting, it can generate a meeting summary.
Sign in to the Teams admin center.
In the left pane, select Meetings > Meeting policies.
On the Manage policies tab, select Global (Org-wide default).
On the Global (Org-wide default) page, scroll down to the Recording & transcription section, and turn on the Transcription toggle.
Select Save.

Step 4: Confirm users have the right security roles
Copilot for Sales applies your organization's existing CRM access controls and user permissions. Administrators must have correct permissions to customize their CRM systems, and users must have the correct permissions to view, update, and create records in their CRM systems from Copilot for Sales.
Salesforce administrators who need to customize Copilot for Sales must have appropriate permissions.
Users of Copilot for Sales need to be API enabled in Salesforce so that they can access Salesforce using APIs. Learn how to grant API Enabled permission.
Step 5: Ensure Salesforce connector isn't blocked in Power Platform
If there are Data Loss Prevention (DLP) policies defined in Power Platform for the msdyn_viva environment, ensure that the Salesforce connector is on the allow list. Learn more about allowing Salesforce connector in the DLP policy
Step 6: Ensure Microsoft Power Platform connected app isn't blocked in Salesforce
Copilot for Sales uses the Power Platform connector to connect to Salesforce CRM. Ensure that the connector is enabled for the Copilot for Sales users.
Sign in to Salesforce CRM as an administrator.
Go to Setup > Platform Tools > Apps > Connected Apps > Managed Connected Apps.
Ensure that Microsoft Power Platform is listed under Connected Apps.
Note
If Microsoft Power Platform is not listed under Connected Apps, go to the Connected Apps OAuth Usage page, and then select Install for Microsoft Power Platform.
Select Microsoft Power Platform to view details about the connected app.
Under OAuth Policies, ensure that you've set the following values:
Value for Permitted Users is set to Admin approved users are pre-authorized or All users may self-authorize.
Note
If Admin approved users are pre-authorized is selected, you must explicitly grant permissions to individual users through policies and permissions sets.
Value for IP Relaxation is set to Relax IP restrictions.
Value for Refresh Token Policy is set to Refresh token is valid until revoked.
Under Session Policies, ensure that the value for Timeout Value is set to None.
Under Profiles or Permission Sets, check whether there are any existing profiles or permission sets or if they're empty. Check and add the appropriate target for your users.
Step 7: First user sign in
When the first user signs in to Salesforce CRM from the Copilot for Sales app in Outlook or Teams, an API call is triggered to provision a msdyn_viva Dataverse environment for the tenant to store the data generated while using Copilot for Sales.
The environment is provisioned using server-to-server (S2S) authentication, which means any user can initiate the process. The platform API provisions the trial environment and assigns the administrator role to a predefined admin user rather than the initiating user. For more details on the architecture and how data is stored, go to Copilot for Sales architecture.
Administer roles in the provisioned environment
Copilot for Sales automatically assigns all Power Platform administrators and Microsoft 365 global administrators to the System Administrator role in the trial environment. After the environment is created, it is recommended to review the list of administrators to ensure appropriate access levels.
Important
In the Power Platform Admin Center, tenant administrators can restrict trial environment creation to administrators. However, due to the current provisioning flow, this setting is bypassed because the system assigns a predefined administrator during provisioning. This means tenant administrators cannot gate these environments from being created.
Step 8 (optional): Customize Copilot for Sales
Administrator settings control the seller's Copilot for Sales experience in Outlook and Teams. You can customize Copilot for Sales to meet your organization's needs.
Set up Copilot AI features
You can set up AI features in Copilot for Sales to use AI features that are in preview or generally available.
Customize forms and fields
Copilot for Sales comes configured to allow users to be productive out-of-the-box. You can customize forms and fields as needed.
Integrate with other applications
You can integrate Copilot for Sales with other applications to extend the capabilities of Copilot for Sales.
Step 9: Welcome sellers to Copilot for Sales
Now that you've installed and configured Copilot for Sales in Outlook and Teams, get your sellers to use it. Here's an example email message you can share.
Important
It can take up to 48 hours for the app to appear in Outlook and other Microsoft 365 apps. If users can't see the app after 48 hours, it might be due to the public attachment handling policy. More information: Why can't users see the Copilot for Sales app in Outlook after it's deployed?
Community
We encourage all Copilot for Sales users to visit and register on the Copilot for Sales community. The community has:
Forums to connect with peers and discuss shared experiences.
Forums to contribute and receive support on common issues, which are routinely reviewed by our team of experts.
Spaces to share ideas and engage with the product development team.