將推播通知新增至 Xamarin.Android 應用程式
概觀
在本教學課程中,您會將推播通知新增至 Xamarin.Android 快速入門專案,以便在每次插入一筆記錄時傳送推播通知至裝置。
如果您不要使用下載的快速入門伺服器專案,則需要推播通知擴充套件。 如需詳細資訊,請參閱使用適用於 Azure Mobile Apps 的 .NET 後端伺服器 SDK 指南。
必要條件
本教學課程需要設定:
- 有效的 Google 帳戶。 您可以在 accounts.google.com註冊 Google 帳戶。
- Google Cloud Messaging 用戶端元件。
設定通知中樞
Azure App Service 的 Mobile Apps 使用 Azure 通知中樞來傳送推送,因此您將為行動應用程式設定通知中樞。
在 Azure 入口網站中,移至 [應用程式服務],然後選取應用程式後端。 在 [設定] 底下,選取 [推播]。
將通知中樞資源新增至應用程式,選取 [連線]。 您可以建立中樞或連線到現有的中樞。
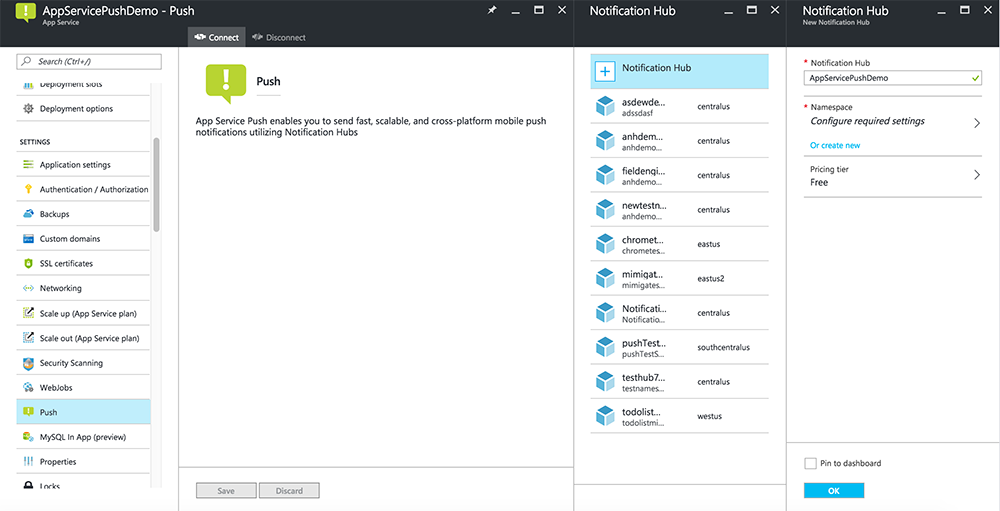
現在您已將通知中樞連接到 Mobile Apps 後端專案。 稍後您要設定此通知中樞,使其連線到平台通知系統 (PNS) 以推播至裝置。
啟用 Firebase 雲端傳訊
登入 Firebase 主控台。 建立新的 Firebase 專案 (如果您還沒有 Firebase 專案的話)。
建立專案之後,請選取 [將 Firebase 新增至 Android 應用程式]。
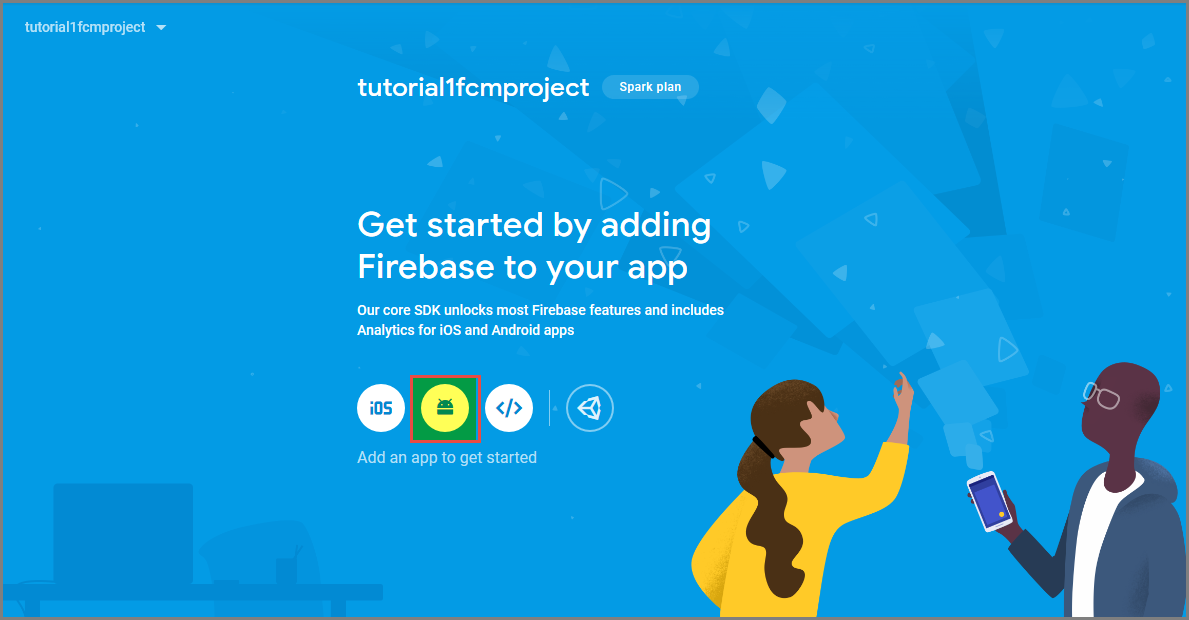
在 [將 Firebase 新增至 Android 應用程式] 頁面上,採取下列步驟:
對於 [Android 套件名稱],複製應用程式 build.gradle 檔案的 applicationId 值。 在此範例中為
com.fabrikam.fcmtutorial1app。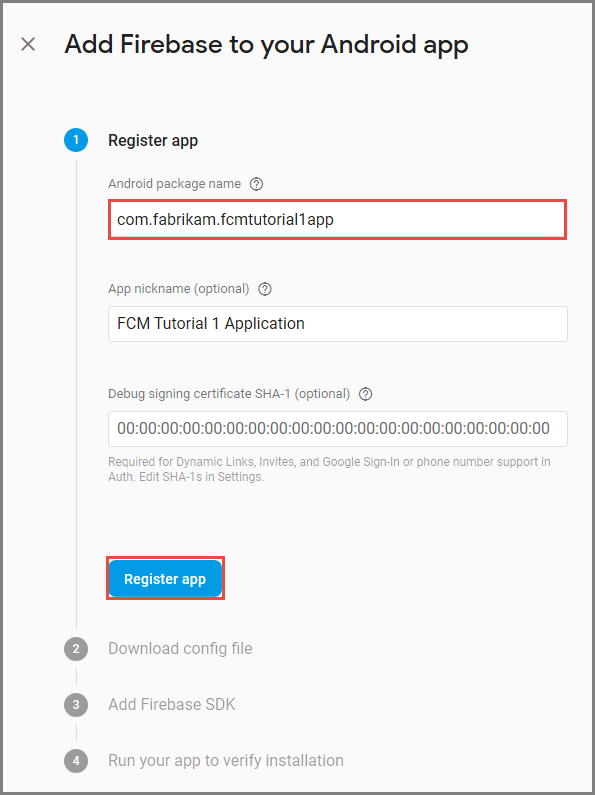
選取 [註冊應用程式]。
選取 [下載 google-services.json],將檔案儲存到專案的應用程式資料夾,然後選取 [下一步]。
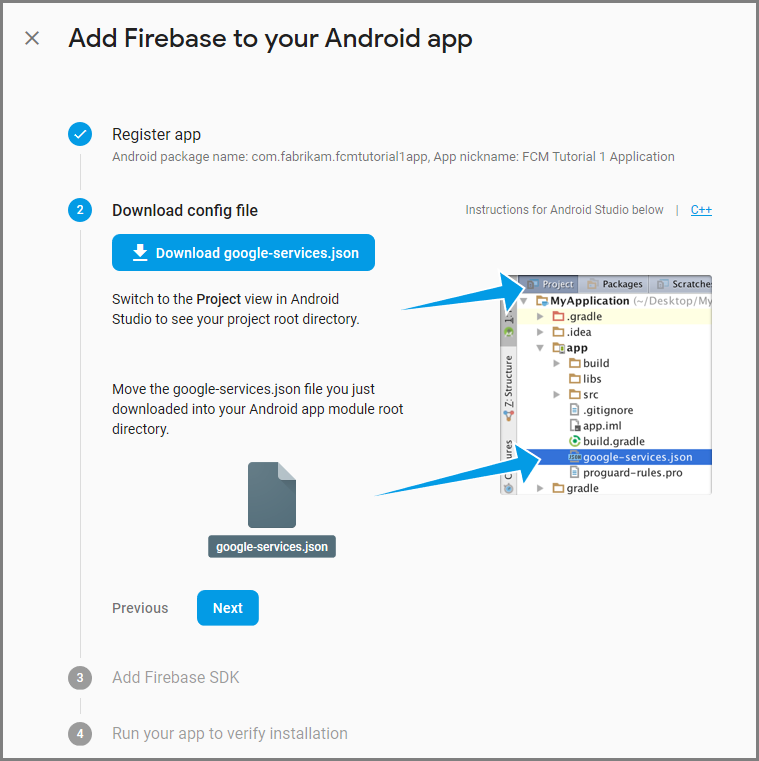
在 Android Studio 中對於專案進行下列設定變更。
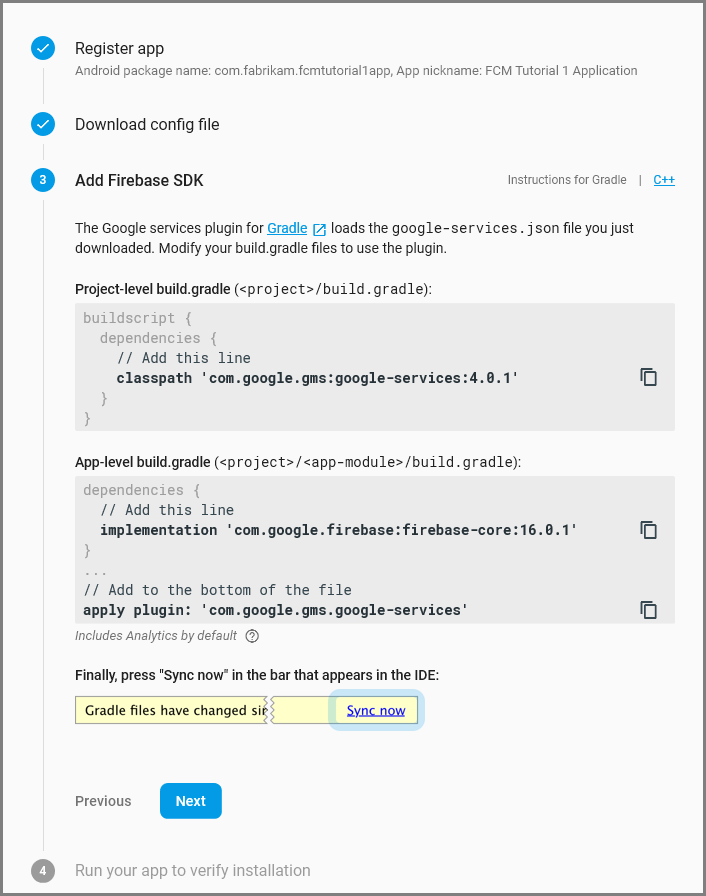
在專案層級 build.gradle檔案 (<專案>/build.gradle) 中,將下列陳述式加入到相依性區段。
classpath 'com.google.gms:google-services:4.0.1'在應用程式層級 build.gradle 檔案 (<project>/<app-module>/build.gradle) 中,將下列陳述式新增至 dependencies 區段。
implementation 'com.google.firebase:firebase-core:16.0.8'
implementation 'com.google.firebase:firebase-messaging:17.3.4'
將下行新增至應用程式層級 build.gradle 檔案結尾的相依性區段之後。
apply plugin: 'com.google.gms.google-services'在工具列上選取 [立即同步]。
選取 [下一步] 。
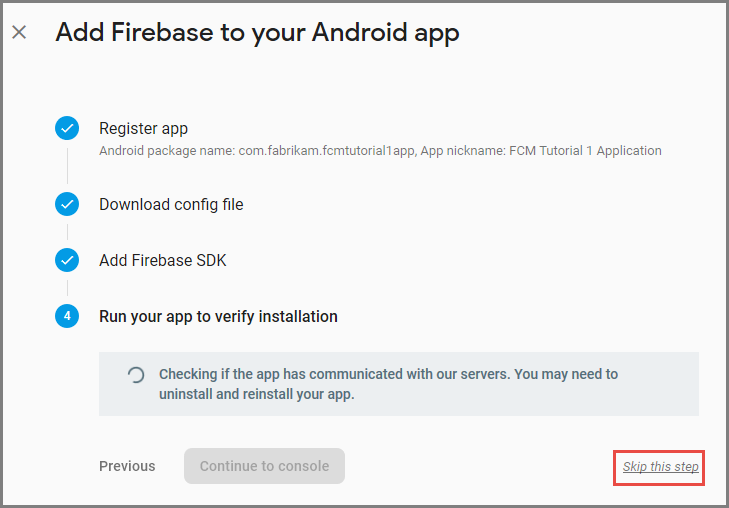
選取 [略過此步驟]。
在 Firebase 主控台中,選取您專案的齒輪圖示。 然後選取 [專案設定]。

如果您尚未將 google-services.json 檔案下載到 Android Studio 專案的 app 資料夾,可以在此頁面下載。
切換到頂端的 [雲端通訊] 索引標籤。
複製並儲存伺服器金鑰以供稍後使用。 您可以使用此值來設定中樞。
設定 Azure 來傳送推播要求
在 Azure 入口網站中,按一下 [瀏覽全部]>[應用程式服務],再按一下 [Mobile Apps 後端]。 在 [設定] 中,按一下 [App Service 推播],然後按一下通知中樞名稱。
移至 Google (GCM),輸入在先前程序中透過 Firebase 取得的伺服器金鑰值,然後按一下 [儲存]。
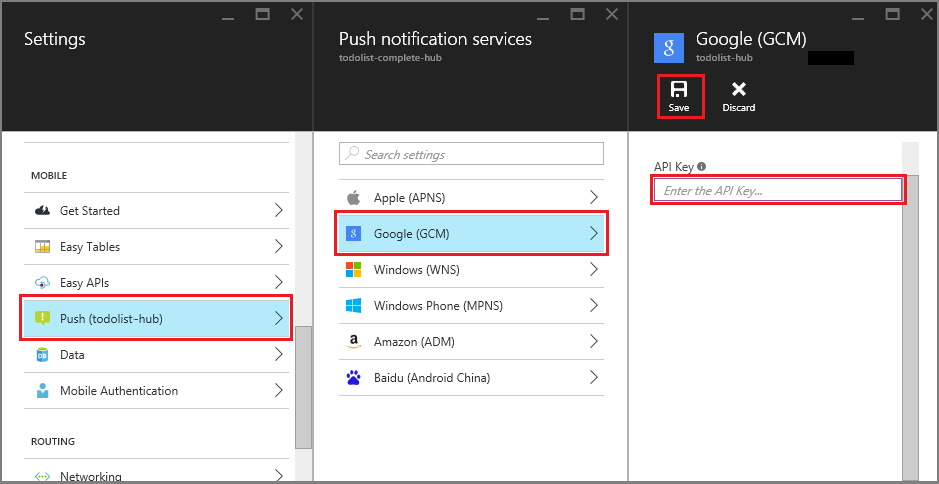
Mobile Apps 後端現已設定成使用 Firebase 雲端通訊。 這個設定可讓您透過通知中樞,將推播通知傳送到在 Android 裝置上執行的應用程式。
更新伺服器專案以傳送推播通知
在本節中,您會更新現有 Mobile Apps 後端專案中的程式碼,以在每次新增項目時傳送推播通知。 此程序是由 Azure 通知中樞的範本功能所提供,可啟用跨平台推播。 各種用戶端會使用範本來註冊推播通知,而單一通用推播即可送達所有的用戶端平台。
選擇符合後端專案類型的下列其中一個程式: .NET 後端 或 Node.js後端。
.NET 後端專案
在 Visual Studio 中,以滑鼠右鍵按一下伺服器專案。 然後選取 [管理 NuGet 套件] 。 搜尋
Microsoft.Azure.NotificationHubs,然後選取 [安裝]Microsoft.Azure.NotificationHubs。 此程序會安裝通知中樞程式庫,以便從後端傳送通知。在伺服器專案中,開啟Controllers>TodoItemController.cs。 然後新增下列 using 陳述式:
using System.Collections.Generic;
using Microsoft.Azure.NotificationHubs;
using Microsoft.Azure.Mobile.Server.Config;
在 PostTodoItem 方法中,於呼叫 InsertAsync 之後新增下列程式碼:
// Get the settings for the server project.
HttpConfiguration config = this.Configuration;
MobileAppSettingsDictionary settings =
    this.Configuration.GetMobileAppSettingsProvider().GetMobileAppSettings();

// Get the Notification Hubs credentials for the mobile app.
string notificationHubName = settings.NotificationHubName;
string notificationHubConnection = settings
    .Connections[MobileAppSettingsKeys.NotificationHubConnectionString].ConnectionString;

// Create a new Notification Hub client.
NotificationHubClient hub = NotificationHubClient
.CreateClientFromConnectionString(notificationHubConnection, notificationHubName);

// Send the message so that all template registrations that contain "messageParam"
// receive the notifications. This includes APNS, GCM, WNS, and MPNS template registrations.
Dictionary<string,string> templateParams = new Dictionary<string,string>();
templateParams["messageParam"] = item.Text + " was added to the list.";

try
{
    // Send the push notification and log the results.
    var result = await hub.SendTemplateNotificationAsync(templateParams);

    // Write the success result to the logs.
    config.Services.GetTraceWriter().Info(result.State.ToString());
}
catch (System.Exception ex)
{
    // Write the failure result to the logs.
    config.Services.GetTraceWriter()
        .Error(ex.Message, null, "Push.SendAsync Error");
}
插入新的項目時,此程序會傳送包含 item.Text 的範本通知。
發佈伺服器專案。
Node.js後端專案
設定後端專案。
在 todoitem.js 中,以下列程式碼取代現有的程式碼:
var azureMobileApps = require('azure-mobile-apps'),
promises = require('azure-mobile-apps/src/utilities/promises'),
logger = require('azure-mobile-apps/src/logger');

var table = azureMobileApps.table();

table.insert(function (context) {
// For more information about the Notification Hubs JavaScript SDK,
// see https://aka.ms/nodejshubs.
logger.info('Running TodoItem.insert');

// Define the template payload.
var payload = '{"messageParam": "' + context.item.text + '" }';

// Execute the insert. The insert returns the results as a promise.
// Do the push as a post-execute action within the promise flow.
return context.execute()
    .then(function (results) {
        // Only do the push if configured.
        if (context.push) {
            // Send a template notification.
            context.push.send(null, payload, function (error) {
                if (error) {
                    logger.error('Error while sending push notification: ', error);
                } else {
                    logger.info('Push notification sent successfully!');
                }
            });
        }
        // Don't forget to return the results from the context.execute().
        return results;
    })
    .catch(function (error) {
        logger.error('Error while running context.execute: ', error);
    });
});

module.exports = table;
插入新的項目時,此程序會傳送包含 item.Text 的範本通知。
當您在本機電腦上編輯檔案時,請重新發佈伺服器專案。
設定用於推播通知的用戶端專案
在 Visual Studio) 的 [方案] 檢視 (或方案總管中,以滑鼠右鍵按一下 [元件] 資料夾,按一下 [取得其他元件...],搜尋Google Cloud Messaging Client元件,並將其新增至專案。
開啟 ToDoActivity.cs 專案檔案,然後將下列 using 陳述式加入至類別:
using Gcm.Client;將下列新程式碼加入至 ToDoActivity 類別:
// Create a new instance field for this activity.
static ToDoActivity instance = new ToDoActivity();

// Return the current activity instance.
public static ToDoActivity CurrentActivity
{
    get
    {
        return instance;
    }
}
// Return the Mobile Services client.
public MobileServiceClient CurrentClient
{
    get
    {
        return client;
    }
}
這樣做可讓您從推播處理常式服務處理程序存取行動服務用戶端執行個體。
在建立 MobileServiceClient 之後,將下列程式碼加入至 OnCreate 方法:
// Set the current instance of TodoActivity.
instance = this;

// Make sure the GCM client is set up correctly.
GcmClient.CheckDevice(this);
GcmClient.CheckManifest(this);

// Register the app for push notifications.
GcmClient.Register(this, ToDoBroadcastReceiver.senderIDs);
您的 ToDoActivity 現在可供新增推送通知。
將推播通知程式碼新增至應用程式
在名為
ToDoBroadcastReceiver的專案中建立新類別。在 ToDoBroadcastReceiver 類別中新增下列 using 陳述式:
using Gcm.Client;
using Microsoft.WindowsAzure.MobileServices;
using Newtonsoft.Json.Linq;
在 using 陳述式與 namespace 宣告之間新增下列權限要求:
[assembly: Permission(Name = "@PACKAGE_NAME@.permission.C2D_MESSAGE")]
[assembly: UsesPermission(Name = "@PACKAGE_NAME@.permission.C2D_MESSAGE")]
[assembly: UsesPermission(Name = "com.google.android.c2dm.permission.RECEIVE")]
//GET_ACCOUNTS is only needed for android versions 4.0.3 and below
[assembly: UsesPermission(Name = "android.permission.GET_ACCOUNTS")]
[assembly: UsesPermission(Name = "android.permission.INTERNET")]
[assembly: UsesPermission(Name = "android.permission.WAKE_LOCK")]
使用下列程式碼取代現有的 ToDoBroadcastReceiver 類別定義:
[BroadcastReceiver(Permission = Gcm.Client.Constants.PERMISSION_GCM_INTENTS)]
[IntentFilter(new string[] { Gcm.Client.Constants.INTENT_FROM_GCM_MESSAGE },
    Categories = new string[] { "@PACKAGE_NAME@" })]
[IntentFilter(new string[] { Gcm.Client.Constants.INTENT_FROM_GCM_REGISTRATION_CALLBACK },
    Categories = new string[] { "@PACKAGE_NAME@" })]
[IntentFilter(new string[] { Gcm.Client.Constants.INTENT_FROM_GCM_LIBRARY_RETRY },
Categories = new string[] { "@PACKAGE_NAME@" })]
public class ToDoBroadcastReceiver : GcmBroadcastReceiverBase<PushHandlerService>
{
    // Set the Google app ID.
    public static string[] senderIDs = new string[] { "<PROJECT_NUMBER>" };
}
在上述程式碼中,您必須使用在 Google 開發人員入口網站佈建您的應用程式時由 Google 指派給您的專案編號來取代
<PROJECT_NUMBER>。在 ToDoBroadcastReceiver.cs 專案檔案中,加入下列可定義 PushHandlerService 類別的程式碼:
// The ServiceAttribute must be applied to the class.
[Service]
public class PushHandlerService : GcmServiceBase
{
    public static string RegistrationID { get; private set; }
    public PushHandlerService() : base(ToDoBroadcastReceiver.senderIDs) { }
}
請注意,此類別衍生自 GcmServiceBase 而且必須對此類別套用 Service 屬性。
注意
GcmServiceBase 類別實作 OnRegistered()、OnUnRegistered()、OnMessage() 及 OnError() 方法。 您必須覆寫 PushHandlerService 類別中的這些方法。
在 PushHandlerService 類別中加入下列程式碼,以覆寫 OnRegistered 事件處理常式。
protected override void OnRegistered(Context context, string registrationId)
{
    System.Diagnostics.Debug.WriteLine("The device has been registered with GCM.", "Success!");

    // Get the MobileServiceClient from the current activity instance.
    MobileServiceClient client = ToDoActivity.CurrentActivity.CurrentClient;
    var push = client.GetPush();

    // Define a message body for GCM.
    const string templateBodyGCM = "{\"data\":{\"message\":\"$(messageParam)\"}}";

    // Define the template registration as JSON.
    JObject templates = new JObject();
    templates["genericMessage"] = new JObject
    {
        {"body", templateBodyGCM }
    };

    try
    {
        // Make sure we run the registration on the same thread as the activity,
        // to avoid threading errors.
        ToDoActivity.CurrentActivity.RunOnUiThread(

            // Register the template with Notification Hubs.
            async () => await push.RegisterAsync(registrationId, templates));

        System.Diagnostics.Debug.WriteLine(
            string.Format("Push Installation Id", push.InstallationId.ToString()));
    }
    catch (Exception ex)
    {
        System.Diagnostics.Debug.WriteLine(
            string.Format("Error with Azure push registration: {0}", ex.Message));
    }
}
此方法使用傳回的 GCM 註冊識別碼,向 Azure 註冊以取得推送通知。 只能在建立註冊之後加入標記。 如需詳細資訊,請參閱 做法:將標記新增至裝置安裝以啟用發送到標記。
以下列程式碼覆寫 PushHandlerService 中的 OnMessage 方法:
protected override void OnMessage(Context context, Intent intent)
{
    string message = string.Empty;

    // Extract the push notification message from the intent.
    if (intent.Extras.ContainsKey("message"))
    {
        message = intent.Extras.Get("message").ToString();
        var title = "New item added:";

        // Create a notification manager to send the notification.
        var notificationManager =
            GetSystemService(Context.NotificationService) as NotificationManager;

        // Create a new intent to show the notification in the UI.
        PendingIntent contentIntent =
            PendingIntent.GetActivity(context, 0,
            new Intent(this, typeof(ToDoActivity)), 0);

        // Create the notification using the builder.
        var builder = new Notification.Builder(context);
        builder.SetAutoCancel(true);
        builder.SetContentTitle(title);
        builder.SetContentText(message);
        builder.SetSmallIcon(Resource.Drawable.ic_launcher);
        builder.SetContentIntent(contentIntent);
        var notification = builder.Build();

        // Display the notification in the Notifications Area.
        notificationManager.Notify(1, notification);

    }
}
使用下列程式碼覆寫 OnUnRegistered() 和 OnError() 方法。
protected override void OnUnRegistered(Context context, string registrationId)
{
    throw new NotImplementedException();
}

protected override void OnError(Context context, string errorId)
{
    System.Diagnostics.Debug.WriteLine(
        string.Format("Error occurred in the notification: {0}.", errorId));
}
在應用程式中測試推播通知
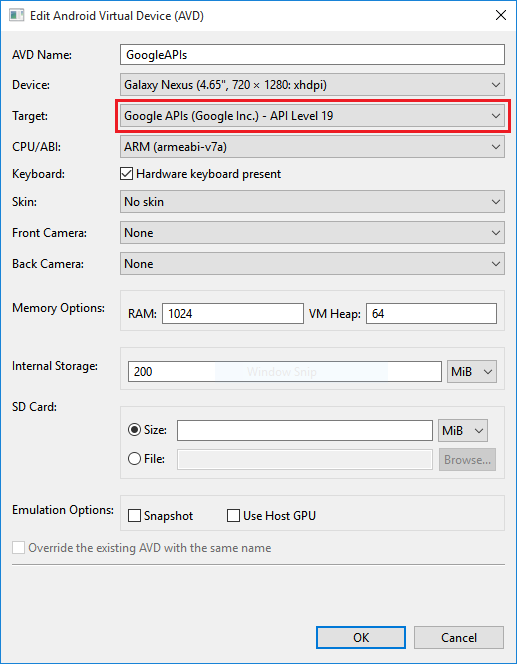
您可以在模擬器中使用虛擬裝置來測試應用程式。 在模擬器上執行時,您需要採取其他設定步驟。
虛擬裝置必須將 Google API 設定為 Android 虛擬裝置 (AVD) 中的目標。
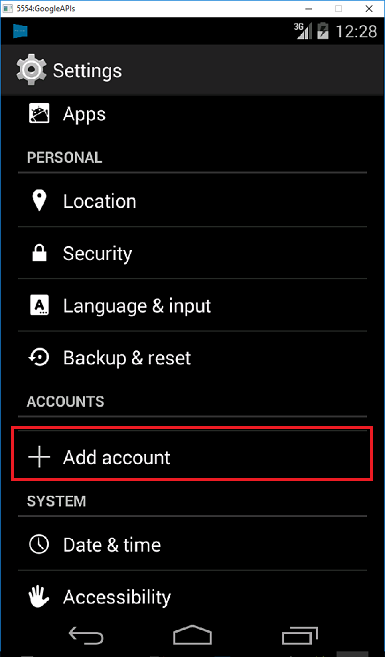
按一下 [應用程式>設定>] [新增帳戶],將 Google 帳戶新增至 Android 裝置,然後遵循提示。
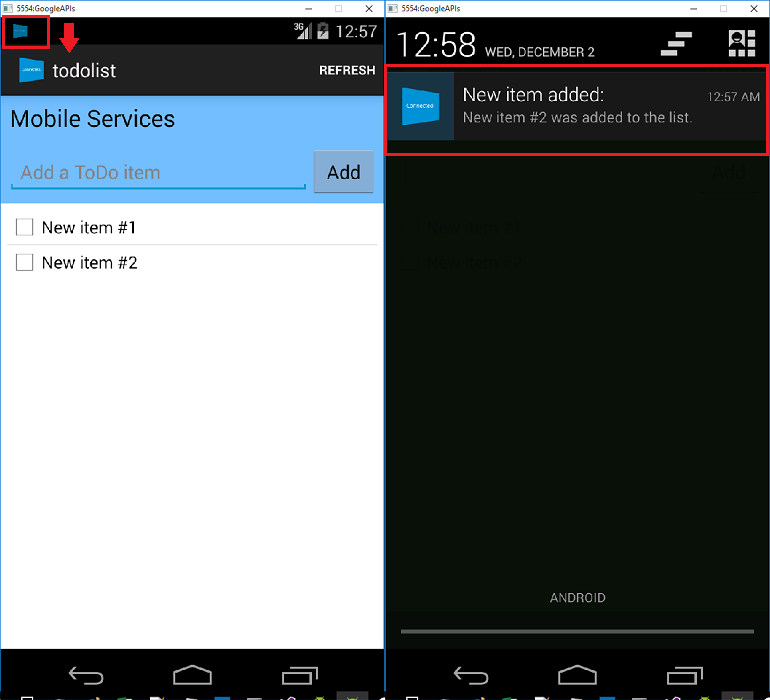
按照先前的方法執行 todolist 應用程式,然後插入新的 todo 項目。 這次,通知圖示會顯示在通知區域中。 您可以開啟通知抽屜來檢視通知的完整內容。
