概觀
在本教學課程中,您會將推播通知新增至 Windows 快速入門 專案,以便在每次插入記錄時將推播通知傳送至裝置。
如果您未使用下載的快速入門伺服器專案,您將需要推播通知擴充功能套件。 如需詳細資訊,請參閱 使用適用於 Azure Mobile Apps 的 .NET 後端伺服器 SDK。
設定通知中樞
Azure App Service 的 Mobile Apps 功能會使用 Azure 通知中樞 來傳送推播,因此您將設定行動應用程式的通知中樞。
在 azure 入口網站的 中,移至 App Services,然後選取您的應用程式後端。 在 [設定]中,選取 [推送]。
若要將通知中樞資源新增至應用程式,請選取 [Connect]。 您可以建立集線器或連接到現有的集線器。
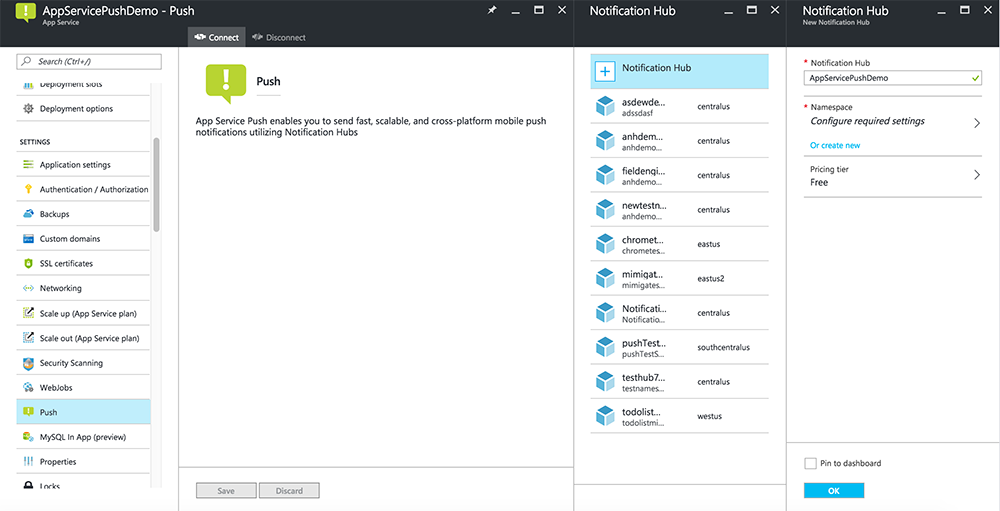
現在您已將通知中樞連線到Mobile Apps 後端專案。 稍後您會將此通知中樞設定為連線到平臺通知系統 (PNS) 以推送至裝置。
註冊應用程式以啟用推播通知
您必須將應用程式提交至 Microsoft 市集,然後設定您的伺服器專案,使其與 Windows 推送通知服務(WNS) 整合來傳送推送通知。
在 Visual Studio 方案總管中,以滑鼠右鍵點一下 UWP 應用程式專案,點一下 市集>將應用程式與市集建立關聯...。
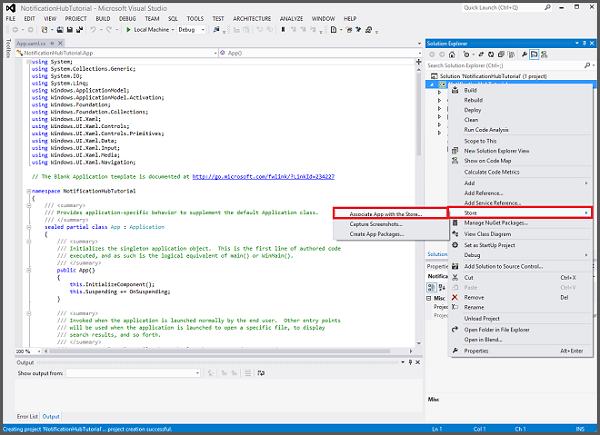
在精靈中,按 [下一步],使用您的 Microsoft 帳戶登入,在 [保留新的應用程式名稱]中輸入應用程式的名稱,然後按 [保留]。
成功建立應用程式註冊之後,請選取新的應用程式名稱,按一下 [下一步],然後按一下 [關聯]。 這會將必要的 Microsoft Store 註冊資訊新增至應用程式指令清單。
流覽至 應用程式註冊入口網站,並使用您的Microsoft帳戶登入。 點擊您在上一個步驟中選定的 Windows 市集應用程式。
在註冊頁面中,記下 [應用程式秘密] 底下的值, 和 套件 SID,您接下來將用來設定行動應用程式後端。

這很重要
用戶端密碼和套件 SID 是重要的安全性認證。 請勿與任何人共用這些值,或與您的應用程式一起散發這些值。 應用程式識別碼 會與秘密金鑰搭配使用,以設定 Microsoft 帳戶驗證。
App Center 也有配置 UWP 應用程式以進行推播通知的說明。
設定後端以傳送推播通知
在 Azure 入口網站的 中,選取 瀏覽所有>App Services。 然後選取您的行動應用程式的後端。 在 [設定]下,選取 [App Service 推送]。 然後選取您的通知中樞名稱。
移至 Windows(WNS)。 然後輸入您從 Live Services 網站取得 安全性密鑰(客戶端密碼)和 套件 SID。 接下來,選取 儲存。
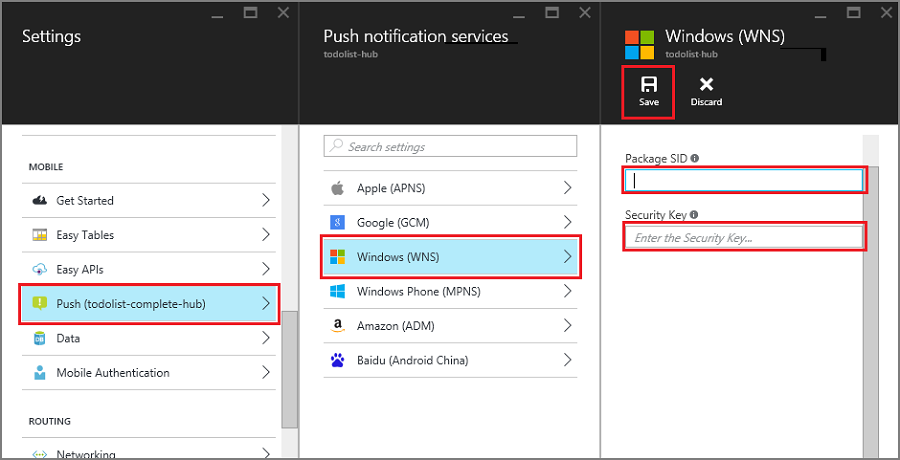
您的後端現在已設定為使用WNS來傳送推播通知。
更新伺服器以傳送推播通知
請使用下列符合後端項目類型的程式:.NET 後端 或 Node.js 後端。
.NET 後端專案
在 Visual Studio 中,以滑鼠右鍵按兩下伺服器專案,然後按兩下 [管理 NuGet 套件],搜尋 Microsoft.Azure.NotificationHubs,然後按兩下 [安裝]。 這會安裝通知中樞用戶端程式庫。
展開 Controllers,開啟 TodoItemController.cs,然後新增下列 using 語句:
using System.Collections.Generic;
using Microsoft.Azure.NotificationHubs;
using Microsoft.Azure.Mobile.Server.Config;
在 PostTodoItem 方法中,於呼叫 InsertAsync之後新增下列程式碼:
// Get the settings for the server project.
HttpConfiguration config = this.Configuration;
MobileAppSettingsDictionary settings =
    this.Configuration.GetMobileAppSettingsProvider().GetMobileAppSettings();

// Get the Notification Hubs credentials for the Mobile App.
string notificationHubName = settings.NotificationHubName;
string notificationHubConnection = settings
    .Connections[MobileAppSettingsKeys.NotificationHubConnectionString].ConnectionString;

// Create the notification hub client.
NotificationHubClient hub = NotificationHubClient
    .CreateClientFromConnectionString(notificationHubConnection, notificationHubName);

// Define a WNS payload
var windowsToastPayload = @"<toast><visual><binding template=""ToastText01""><text id=""1"">"
                        + item.Text + @"</text></binding></visual></toast>";
try
{
    // Send the push notification.
    var result = await hub.SendWindowsNativeNotificationAsync(windowsToastPayload);

    // Write the success result to the logs.
    config.Services.GetTraceWriter().Info(result.State.ToString());
}
catch (System.Exception ex)
{
    // Write the failure result to the logs.
    config.Services.GetTraceWriter()
        .Error(ex.Message, null, "Push.SendAsync Error");
}
此程式代碼會告知通知中樞在插入新項目之後傳送推播通知。
重新發佈伺服器專案。
Node.js 後端專案
設定後端專案。
將 todoitem.js 檔案中的現有程式代碼替換為以下內容:
var azureMobileApps = require('azure-mobile-apps'),
promises = require('azure-mobile-apps/src/utilities/promises'),
logger = require('azure-mobile-apps/src/logger');

var table = azureMobileApps.table();

table.insert(function (context) {
// For more information about the Notification Hubs JavaScript SDK,
// see https://aka.ms/nodejshubs
logger.info('Running TodoItem.insert');

// Define the WNS payload that contains the new item Text.
var payload = "<toast><visual><binding template=\ToastText01\><text id=\"1\">"
                            + context.item.text + "</text></binding></visual></toast>";

// Execute the insert.  The insert returns the results as a Promise,
// Do the push as a post-execute action within the promise flow.
return context.execute()
    .then(function (results) {
        // Only do the push if configured
        if (context.push) {
            // Send a WNS native toast notification.
            context.push.wns.sendToast(null, payload, function (error) {
                if (error) {
                    logger.error('Error while sending push notification: ', error);
                } else {
                    logger.info('Push notification sent successfully!');
                }
            });
        }
        // Don't forget to return the results from the context.execute()
        return results;
    })
    .catch(function (error) {
        logger.error('Error while running context.execute: ', error);
    });
});

module.exports = table;
在插入新的待辦項目時,這會傳送一個包含 item.text 的 WNS 快顯通知。
在本機計算機上編輯檔案時,請重新發佈伺服器專案。
將推播通知新增至您的應用程式
接下來,您的應用程式必須在啟動時註冊推播通知。 當您已啟用驗證時,請先確定使用者先登入,再嘗試註冊推播通知。
開啟 App.xaml.cs 項目檔,並新增下列
using語句:using System.Threading.Tasks; using Windows.Networking.PushNotifications;在相同的檔案中,將下列 InitNotificationsAsync 方法定義新增至 App 類別:
private async Task InitNotificationsAsync()
{
    // Get a channel URI from WNS.
    var channel = await PushNotificationChannelManager
        .CreatePushNotificationChannelForApplicationAsync();

    // Register the channel URI with Notification Hubs.
    await App.MobileService.GetPush().RegisterAsync(channel.Uri);
}
此程式代碼會從 WNS 擷取應用程式的 ChannelURI,然後向 App Service 行動應用程式註冊該 ChannelURI。
在 App.xaml.cs中 OnLaunched 事件處理程式頂端,將 async 修飾詞新增至方法定義,並將下列呼叫新增至新的 InitNotificationsAsync 方法,如下列範例所示:
protected async override void OnLaunched(LaunchActivatedEventArgs e)
{
    await InitNotificationsAsync();

    // ...
}
這可確保每次啟動應用程式時,短暫的 ChannelURI 都會被註冊。
重建UWP應用程式專案。 您的應用程式現在已準備好接收通知訊息。
在應用程式中測試推播通知
在 Windows 市集專案上按一下滑鼠右鍵,選擇 [設定為啟始專案],然後按 F5 鍵以執行 Windows 市集應用程式。
應用程式啟動之後,裝置會註冊推播通知。
停止 Windows 市集應用程式,並針對 Windows Phone 市集應用程式重複上一個步驟。
此時,這兩個裝置都會註冊以接收推播通知。
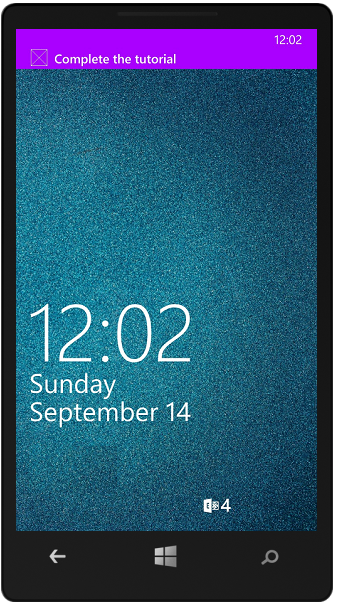
重新執行 Windows 市集應用程式,然後在 插入 TodoItem中輸入文字,然後點擊 儲存。
請注意,插入完成之後,Windows 市集和 Windows Phone 應用程式都會從 WNS 接收推播通知。 即使應用程式未執行,通知也會顯示在 Windows Phone 上。
後續步驟
深入瞭解推播通知:
- 如何使用 Azure Mobile Apps 的受控用戶端 範本,可讓您彈性地傳送跨平臺推播和當地語系化推播。 瞭解如何註冊範本。
- 診斷推播通知問題 有各種原因會導致通知遭到捨棄或最終不在裝置上。 本主題說明如何分析和找出推播通知失敗的根本原因。
請考慮繼續進行下列其中一個教學課程:
- 將驗證新增至您的應用程式 瞭解如何使用識別提供者驗證應用程式的使用者。
- 啟用應用程式的離線同步處理 瞭解如何使用行動應用程式後端新增離線支援您的應用程式。 離線同步可讓使用者與行動應用程式互動,即使沒有網路連線,也能檢視、新增或修改數據。