Import historical response data in Viva Glint
For highly trained users, Microsoft Viva Glint Advanced Configuration offers the ability to import external, historical response data for items that trend with items that you select for your Viva Glint survey program.
1. Learn about the Viva People Science perspective
It’s common for an organization to ask the same survey items that leaders are comfortable with. Revisit items to ensure they're aligned to your organization’s current strategy and consider these Viva People Science factors before moving forward with historical imports:
When did you conduct your last survey?
How recent is your data? Has your business gone through significant change like organizational restructure or significant growth or reduction of your employee base? If major changes like these occurred, historical data as your comparison may not be meaningful, especially if the data is more than one year old.
How does your previous response scale compare to Viva Glint’s?
Glint’s response scale is a one to five Likert scale ranging from strongly disagree to strongly agree. If your previous items don't use this exact scale, it’s difficult to map items to make meaningful comparisons.
Do your items map to Viva Glint items?
As you review Viva Glint standard items, do these items map to your previous items? It's important to consider intent of the question and the referent. If the items don't align to Viva Glint items, the comparisons aren't relevant.
Does a historical data import further your engagement strategy?
Importing historical data for a non-Viva Glint source can be complex. Different vendors use various outcome measures, scales, and question wording. Previous items' results in Viva Glint don't often lead to furthering a modern approach to engagement and often results in a less agile approach.
2. Review prerequisites
Data from an external source must meet the prerequisites listed here to be eligible for import to Viva Glint. If your data don't meet these requirements, don't import via the Advanced Configuration External Import feature.
Survey program
- The confidentiality threshold for your Viva Glint survey program is equal to or greater than the source survey for the external data.
- Data are imported to a Recurring or Ad Hoc survey.
Important
External imports aren't available for Always-on or Lifecycle surveys.
Survey items
- External data are tied to items that map to Viva Glint items. Learn more.
- The response scale for rated items is compatible with Viva Glint:
- 5-point Likert scale: 1 = Strongly Disagree, 2 = Disagree, 3 = Neither, 4 = Agree, 5 = Strongly Agree.
- Reversed 5-point Likert scales require conversion before import to Viva Glint.
Respondent data
- Raw, respondent-level data, NOT aggregated data.
- All respondents are identified with their unique employee ID.
- External data attributes and values map to values in Viva Glint.
- The file layout aligns with Viva Glint requirements:
- Horizontal layout with individual response data and attributes. See more details in the Prepare data files section.
3. Map historical survey items
Complete a mapping of historical and Viva Glint items to determine exactly where you see trend in reporting. Learn more.
4. Set up a survey program
Set up your Viva Glint program, including items that trend with your external survey data. Learn more.
After you complete setup:
Go to the survey's Program Summary and choose Actions.
Select Export Program Content from the dropdown menu.
In the dialog that appears, select Survey Content, choose at least one language, and select an Export Format.
Select Export to download a compressed folder (.zip) to your device.
The Question file included in the downloaded folder contains a Question ID (DO NOT EDIT) column. This field includes unique question ID values that become columns in the raw score file imported to Viva Glint.
Tip
Before importing users for the external import, select a placeholder Distribution List to complete program setup, such as Company Admin.
Note
Exclusion lists and question targeting configured in your survey don't apply to a historical import.
5. Prepare data files
External imports of historical data require three data files, each with their own requirements. To see a sample of each file, select the file name in the following table.
Important
The Raw Score and Respondent User files must be in .csv format with a comma separator and UTF-8 or UTF-8 with BOM encoding. Enclose values that contain commas with double quotation marks. For example: "Manager, Customer Experience."
| File | Description | Email address label | Import to | Required format |
|---|---|---|---|---|
| User File | All employees from a historical, external source formatted to align with your Viva Glint attribute setup | Match with your attribute setup | Viva Glint People page |
|
| Raw Score File | Respondent email address + question columns populated with numeric response values | Must be: User e-mail | Advanced Configuration: External Import | .csv with UTF-8 or UTF-8 with BOM encoding and a comma separator |
| Respondent User File | Required fields for all respondents from historical, external source: email, first name, last name, ID, status | Must be: Email Address | Advanced Configuration: External Import | .csv with UTF-8 or UTF-8 with BOM encoding and a comma separator |
User File
To import historical data and generate reports, first add all historical employees to Viva Glint with an employee import. This file includes all employees from a historical, external source formatted to align with your Viva Glint attribute setup. See this sample User File.
Caution
Coordinate with other teams that regularly import employee data to Viva Glint so they can pause uploads while you perform a historical import.
Confirm that:
- Attribute setup is complete in Viva Glint. Learn more.
- Employee IDs and Email Addresses between current Viva Glint and historical users are aligned.
- You include accurate Employee ID and Manager ID relationships to calculate your manager hierarchy for historical data and reporting. Learn more.
- Attributes and values between current Viva Glint and historical users are aligned.
- For example: Department = Human Resources doesn't trend with Department = HR.
- Derived attributes (if set up), Tenure Groups and Age Groups, are disabled before you import historical data. Manually calculate age groups and tenure based on the survey launch date for historical data. To disable:
- Go to Configuration and choose People.
- Select Actions and then Manage User Attributes.
- In the Derived Attributes section, select Manage Derived Attributes.
- Deselect Tenure Groups and Age Groups and select Save Changes.
- To add Tenure Groups and Age Groups derivations to your attribute setup again after the historical import is finished, return to the Manage User Attributes page and reselect and remap attributes.
Raw Score File
Your Raw Score File should be in a horizontal layout and contain an email address value to identify each user and columns of question and comment data. See this sample Raw Score File.
- First column:
- Email which must be: User e-mail
- Additional columns:
- Question IDs: Use unique question IDs exported in Step 4. Set up a survey program to assign Viva Glint Question IDs to your historical response data.
- Key Outcome Items: Ensure that these items are included in your Raw Score File (for example: eSat and Recommend). If Viva Glint Key Outcome items don't exist in historical data, include the Question IDs as blank columns in your Raw Score File.
- Rating Question Comments: For open-ended feedback associated with rating questions, place a column to the right of the question column and add _COMMENTS to the question ID.
- Open-ended Questions: Use the same column layout as for rating question comments but populate 0 where there's a comment and -1 where there's no comment. For more information on cleaning up open-ended feedback before importing to Viva Glint, see the Comment cleanup section.
- Multi-select Questions: Separate numerical response values with a colon (:). If importing raw data exported from Viva Glint, convert text responses to numerical responses. For example: If a user selects response options two, three, and five, their response value should be:
2:3:5. If comments are attached to responses, use the same column layout as for rating question comments.
- Question IDs: Use unique question IDs exported in Step 4. Set up a survey program to assign Viva Glint Question IDs to your historical response data.
Comment cleanup
To ensure that open-ended feedback from historical data doesn't cause import errors and displays correctly in the Comments report, take these steps to clean up comments.
To retain special characters and formatting, use the Text Import Wizard to import data into Excel.
- Replace any back slashes ( \ ) with forward slashes ( / ).
- For example: Replace My manager is kind\caring. with My manager is kind/caring.
- Replace words or phrases enclosed in double quotation marks (" ") with single quotation marks (' ').
- For example: Replace I appreciate the "Quality Assurance" team. with I appreciate the 'Quality Assurance' team.
- Enclose all comments in double quotation marks (" ") when saving as .csv with UTF-8 encoding.
- For example: I would like more dedicated time for personal development. becomes "I would like more dedicated time for personal development."
Note
Review data in a text editor application (like Sublime or Notepad) to ensure that comments aren't enclosed in multiple sets of double quotation marks. For example: ""This is my comment.""
Important
Comments that exceed 1,024 characters are truncated.
Respondent User File
Your Respondent User File needs to contain the following fields for the survey respondents associated with your historical data. See this sample Respondent User File.
- Email Address: must be labeled Email Address
- First Name: label must match your attribute setup
- Last Name: label must match your attribute setup
- Employee ID: label must match your attribute setup
- Status: label must match your attribute setup
6. Import users
To establish users and attributes for historical data, import your prepared User File to the Viva Glint People page.
Caution
Avoid external, historical imports while Viva Glint surveys are live.
- Import employee data.
- Create a Distribution List with these historical employees. Learn more.
- Update the Distribution section of your survey program with your new Distribution List. Learn more.
7. Import external data
To complete your external, historical import, access Viva Glint’s Advanced Configuration page. If you don't have access, confirm that:
- You are in the Company Admin User Role.
- The Advanced Configuration feature is enabled for you as a user. Learn more.
Caution
Your Viva Glint survey program must be in an approved state while you import external, historical data and while reports generate. Ensure that your survey is approved before continuing.
To import historical users and their responses:
From your admin dashboard, select the Configuration symbol, then in Service Configuration choose Advanced Configuration.
In the menu on the left, select External Import.
On the External Import page, make selections to import your data:
Manual Mode: Leave this toggle switched to Off.
Survey Name: Select your survey from the dropdown list.
Exception Date: This field determines the start date displayed in reporting for this survey and must be at least one week before the current date and not overlap with any scheduled surveys in this program.
Caution
Selecting a date three or fewer days before the current date can result in unwanted email invites sent to employees.
Raw Score File: Select Choose File and browse to select your Raw Score File.
New Distribution List Name: Enter a name for a Distribution List that is used for historical import only and doesn't appear in your Distribution List page. Recommended: External-import-yyyymmdd.
User File: Select Choose File and browse to select your Respondent User File.
Are you looking to append data to a survey cycle?: Leave this toggle switched to Off.
Extra Options menu: Leave collapsed, not applicable.
Select Preview and review the Totals, Warnings, and Counts per Question that appear.
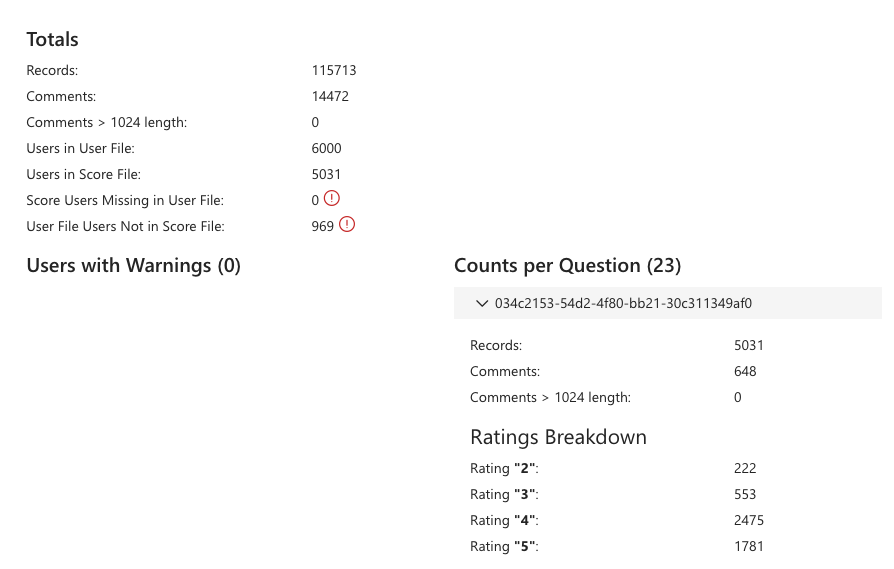
Confirm that:
- Users in User File matches the number of users in your Respondent User File.
- Users in Score File matches the number of users in your Raw Score File.
- Score Users Missing in User File is 0.
- User File Users Not in Score File matches the number of people who were invited but didn't respond to the survey.
- Counts per Question, when expanded, match the expected counts for each comment and response value.
After confirming the Preview, select Save.
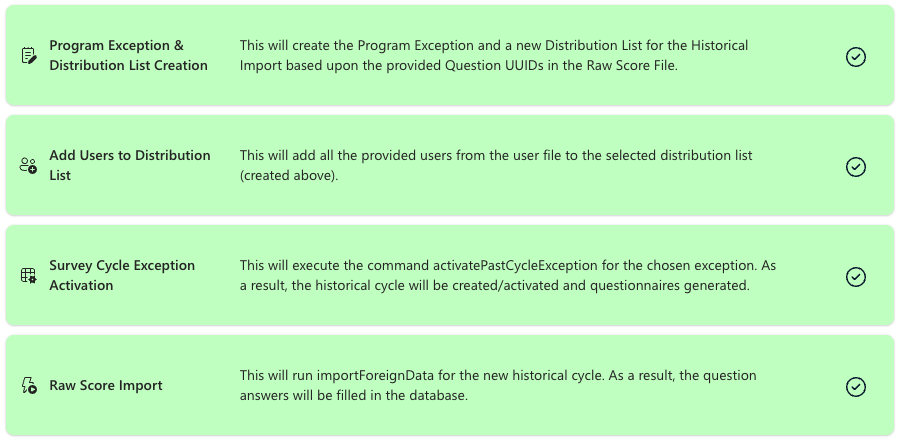
Each section at the bottom of the page turns yellow as it processes and all turn green when the import is complete.
8. Troubleshoot warnings and errors
If you encounter issues during your import, use this guidance at the following links to troubleshoot.
- Error: Duplicate entry
- Error: Exception date overlap
- Error: Missing required field
- Error: User not in client
9. Confirm expected results in your dashboard
After your External Import processes successfully in Viva Glint, go to your Dashboard and Reports to confirm that scores and data display as expected. Confirm that:
- Reporting hierarchies display as expected.
- Question scores are accurate.
- Respondent counts are accurate.
- Questions that exist in historical data and Viva Glint data trend as expected.
- Attributes and values that exist in historical data and Viva Glint data trend as expected.
- If comments were included, review the Comments report to confirm that counts are accurate.
Note
Viva Glint’s Narrative Intelligence may take time to process large amounts of open-ended feedback. Revisit the Comments report after 24 hours if data isn't fully populated.
10. Import current employee data
After your historical import is complete and results appear as expected, load your current employee data to Viva Glint to overwrite historical user information. Coordinate with other teams that regularly import employee data to Viva Glint to confirm when and how to load current user information.
Important
If you disabled derived attributes to import historical users and attributes, add Tenure Groups and Age Groups to your attribute setup again on the Manage User Attributes page by reselecting and remapping attributes.
Choose between two upload methods:
Upload employee data to the People page Upload employee data directly in the Viva Glint platform on the People page.
Automatically import employee data with Viva Glint SFTP Use Viva Glint Secure File Transfer Protocol (SFTP) to use an automated import of employee data.