自訂專員的外觀
您的專員的畫布決定了它的外觀和感覺。 您可以用兩種方式自訂畫布,這要視所需變更的複雜度而定:
在部署 JavaScript 的網站的 HTML 代碼中使用專員樣式自定義默認畫布 。
如果您想要進行小型自訂而不需投資程式碼開發,這方法會很有用。根據 Bot Framework 網路聊天畫布使用自訂畫布。
這種方法需要廣泛的開發人員知識。 這適用於需要完全自訂體驗的組織。
重要
您可以安裝和使用本文中包含的範例代碼,但僅用於 Copilot Studio。 範例程式碼是依「現況」授權,不包含在任何服務等級協定或支援服務中。 您必須承擔使用本文件的風險。
Microsoft 不提供任何明示擔保、保證或條件,並排除所有默示擔保,包括適售性、適合特定用途,以及未侵權。
創建併 發佈專員 後,您的客戶可以使用 專員的 Web Chat 畫布與其交互。
您還可以將自定義畫布與 配置專員相結合,以自動開始對話。
最後,您可以直接 從門戶更改專員的名稱和圖示 (當它被 共用 Microsoft Teams時)。
更改專員名稱和圖示
重要
如果您的專員連接到 Customer Service 全通路,則其名稱由 Azure 門戶註冊中的顯示名稱 屬性定義。
您可以變更專員的名稱和圖示。 這將影響您發佈專員的所有頻道中的圖示。
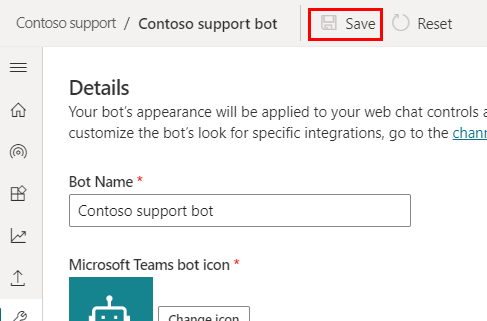
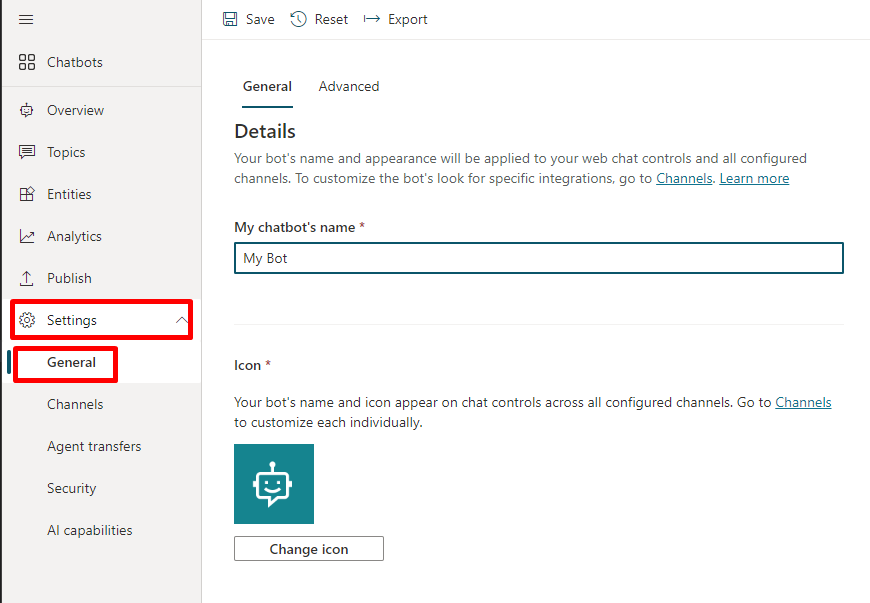
在導覽功能表的設定底下,選取詳細資料。
更改專員的名稱和圖示。 請查閱 Microsoft Teams 圖示格式的建議 。
選取儲存認可您的變更。
重要
更新專員的圖示后,新圖示最多可能需要 24 小時才會顯示在所有位置。
擷取權杖端點
要自定義畫布,無論是默認畫布還是您連線的自定義畫布,您都需要檢索專員詳細資訊。
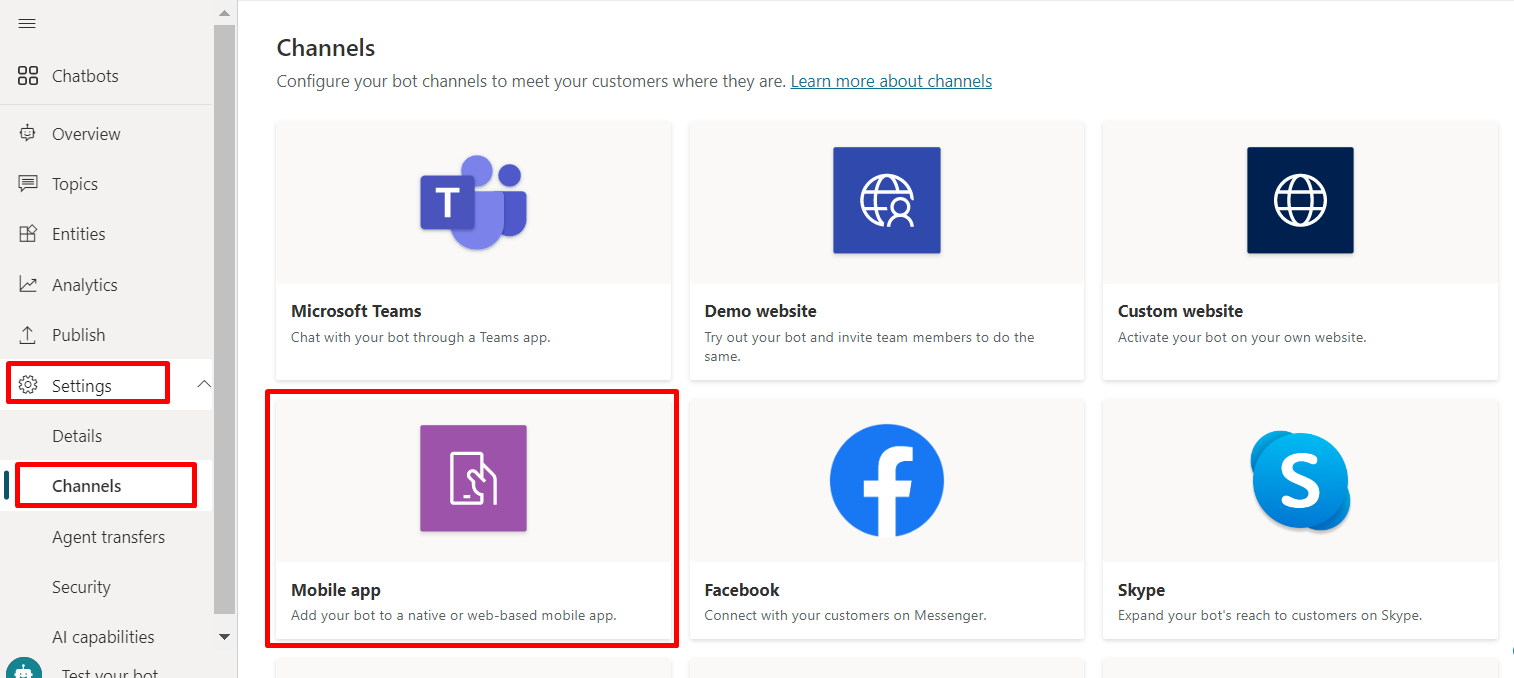
在導覽功能表的設定底下,選取管道。
選取行動裝置應用程式。
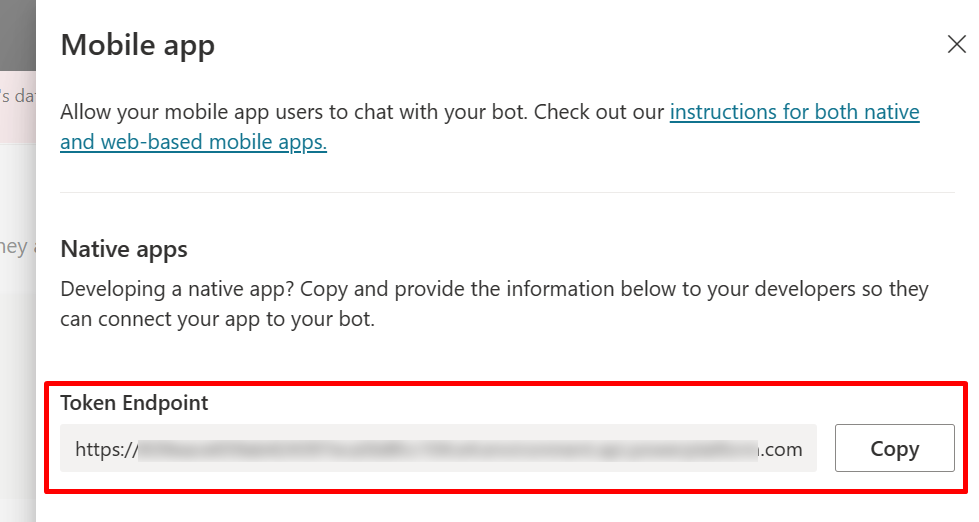
在權杖端點旁邊,選取複製。
自訂預設畫布 (簡易)
使用一些簡單 CSS 和 JavaScript 樣式選項來設定聊天畫布的外觀。
首先,您需要配置部署專員畫布的位置。
複製並貼上 HTML 程式碼,並將它儲存為 index.html。
您也可以將下面的程式碼複製並貼到 w3schools.com HTML try it editor 中。 您仍需新增權杖端點。<!doctype html> <html lang="en"> <head> <title>Contoso Sample Web Chat</title> <!-- This styling is for the Web Chat demonstration purposes. It is recommended that style is moved to a separate file for organization in larger projects. Please visit https://github.com/microsoft/BotFramework-WebChat for details about Web Chat. --> <style> html, body { height: 100%; } body { margin: 0; } h1 { color: whitesmoke; font-family: Segoe UI; font-size: 16px; line-height: 20px; margin: 0; padding: 0 20px; } #banner { align-items: center; background-color: black; display: flex; height: 50px; } #webchat { height: calc(100% - 50px); overflow: hidden; position: fixed; top: 50px; width: 100%; } </style> </head> <body> <div> <div id="banner"> <h1>Contoso agent name</h1> </div> <div id="webchat" role="main"></div> </div> <!-- In this sample, the latest version of Web Chat is being used. In production environment, the version number should be pinned and version bump should be done frequently. Please visit https://github.com/microsoft/BotFramework-WebChat/tree/main/CHANGELOG.md for changelog. --> <script crossorigin="anonymous" src="https://cdn.botframework.com/botframework-webchat/latest/webchat.js"></script> <script> (async function () { // Specifies style options to customize the Web Chat canvas. // Please visit https://microsoft.github.io/BotFramework-WebChat for customization samples. const styleOptions = { // Hide upload button. hideUploadButton: true }; // Specifies the token endpoint URL. // To get this value, visit Copilot Studio > Settings > Channels > Mobile app page. const tokenEndpointURL = new URL('<AGENT TOKEN ENDPOINT>'); // Specifies the language the agent and Web Chat should display in: // - (Recommended) To match the page language, set it to document.documentElement.lang // - To use current user language, set it to navigator.language with a fallback language // - To use another language, set it to supported Unicode locale // Setting page language is highly recommended. // When page language is set, browsers will use native font for the respective language. const locale = document.documentElement.lang || 'en'; // Uses language specified in <html> element and fallback to English (United States). // const locale = navigator.language || 'ja-JP'; // Uses user preferred language and fallback to Japanese. // const locale = 'zh-HAnt'; // Always use Chinese (Traditional). const apiVersion = tokenEndpointURL.searchParams.get('api-version'); const [directLineURL, token] = await Promise.all([ fetch(new URL(`/powervirtualagents/regionalchannelsettings?api-version=${apiVersion}`, tokenEndpointURL)) .then(response => { if (!response.ok) { throw new Error('Failed to retrieve regional channel settings.'); } return response.json(); }) .then(({ channelUrlsById: { directline } }) => directline), fetch(tokenEndpointURL) .then(response => { if (!response.ok) { throw new Error('Failed to retrieve Direct Line token.'); } return response.json(); }) .then(({ token }) => token) ]); // The "token" variable is the credentials for accessing the current conversation. // To maintain conversation across page navigation, save and reuse the token. // The token could have access to sensitive information about the user. // It must be treated like user password. const directLine = WebChat.createDirectLine({ domain: new URL('v3/directline', directLineURL), token }); // Sends "startConversation" event when the connection is established. const subscription = directLine.connectionStatus$.subscribe({ next(value) { if (value === 2) { directLine .postActivity({ localTimezone: Intl.DateTimeFormat().resolvedOptions().timeZone, locale, name: 'startConversation', type: 'event' }) .subscribe(); // Only send the event once, unsubscribe after the event is sent. subscription.unsubscribe(); } } }); WebChat.renderWebChat({ directLine, locale, styleOptions }, document.getElementById('webchat')); })(); </script> </body> </html>在您所建立 index.html 檔案的
const tokenEndpointURL = "<YOUR TOKEN ENDPOINT>";行中,輸入您的權杖端點。使用現代瀏覽器打開 index.html (例如), Microsoft Edge以打開自定義畫布中的專員。
測試專員以確保您收到來自它的回應並且它正常工作。
如果您遇到問題,請確保您已發佈專員,並且您的令牌端點已插入到正確的位置。 它應該位於
const tokenEndpointURL = "<YOUR TOKEN ENDPOINT>"行的等號 (=) 後面,並以雙引號 (") 括住。
自訂專員圖示、背景顏色和名稱
一旦您讓自定義畫布與您的專員一起使用,您就可以對其進行更改。
您可以使用 JavaScript styleOptions 選項來設定數種預先定義的樣式。
請參見 Web 聊天自訂以取得 defaultStyleOptions.js 檔案的連結,以及有關您可以自訂的內容及其外觀的詳細資訊。
更改專員圖示
使用下列範例程式碼更新 index.html 檔案:
const styleOptions = {
  accent: '#00809d',
  botAvatarBackgroundColor: '#FFFFFF',
  botAvatarImage: 'https://learn.microsoft.com/azure/bot-service/v4sdk/media/logo_bot.svg',
  botAvatarInitials: 'BT',
  userAvatarImage: 'https://avatars.githubusercontent.com/u/661465'
};
將專員和使用者頭像圖像替換為您的公司圖像。
如果您沒有影像 URL,則可以改用 Base64 編碼的影像字串。
變更背景色彩
使用下列範例程式碼更新 index.html 檔案:
const styleOptions = {
  backgroundColor: 'lightgray'
};
變更
backgroundColor為您想要的任何顏色。 您可以使用標準 CSS 色彩名稱、RGB 值或十六進位。
更改專員名稱
使用下列程式碼更新 index.html 檔案中的
<h1>文字:<body> <div id="banner"> <h1><img src="contosocopilot-teams.png"> Contoso agent name</h1> </div>將文字更改為您想要稱為專員的任何名稱。 您也可以插入影像,雖然您可能需要為它進行樣式以確保它符合標題區段。
自訂和主控您的聊天畫布 (進階)
您可以使用作為獨立 Web 應用程式託管的自訂畫布連線 # Copilot Studio 專員。 若需要在多個網頁上嵌入自訂 iFrame,則最好使用此選項。
Note
代管自訂的畫布需要軟體開發。 這裡的指南適用於有經驗的 IT 專業人員,例如 IT 系統管理員或開發人員,他們深刻了解開發人員工具、公用程式及 IDE。
挑選要自訂的範例
我們建議您從為 Copilot Studio 自訂建置的下列其中一種範例開始使用:
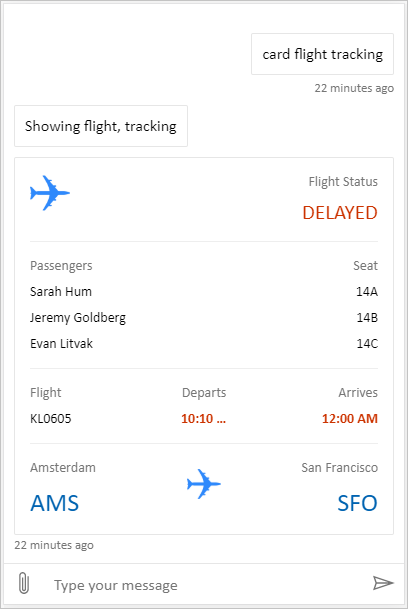
完整搭售方案是自訂畫布,能顯示 Copilot Studio 中的所有豐富內容。 例如:
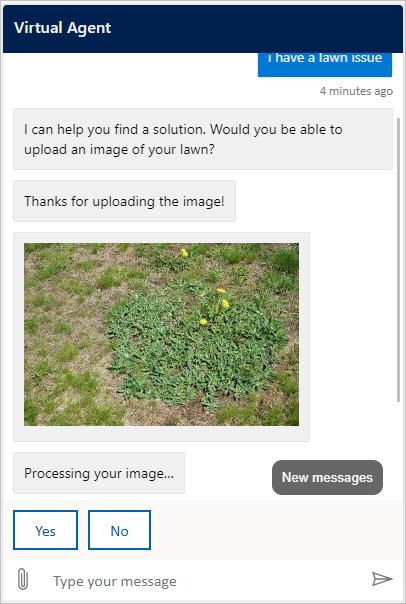
位置和檔上傳 是一個自定義畫布,能夠獲取使用者的位置並將其發送到 a Copilot Studio 專員。 例如:
或者,您也可以從其他範例網路聊天畫布Bot Framework中挑選。
使用 styleSetOptions 自訂畫布
與自訂預設畫布一樣,您可以使用 styleSetOptions 來自訂自訂畫布。 所有可自訂的屬性都會列在 defaultStyleOptions.js 中。 如需自訂及其外觀的詳細資訊,請參閱 Web 聊天自訂。
部署您的自訂畫布
為了託管您的自訂畫布,請將所有檔案部署至 Web 應用程式。
