将产品评论显示为卡
此示例演示如何使用清单扩展 Web 模板,以卡形式在网页上显示产品评论。
如何创建用于显示产品评论的 Web 模板组件
第 1 步:准备
- 使用匹配的列(名称、内容和评级)在环境中创建一个表
- 复制表的逻辑名称。
- 在新表中创建一些示例记录。
第 2 步:设置 Web 模板
将源代码复制到您的环境中的新 Web 模板中。 有关更多详细信息,请参阅如何创建 Web 模板组件。
{% fetchxml postsQuery %}
  <fetch mapping='logical'>
    <entity name='cr50f_review'>
      <attribute name='cr50f_name' />
      <attribute name='cr50f_content' />
      <attribute name='cr50f_rating' />
      <attribute name='createdon' />
      <order attribute='createdon' descending='false' />
    </entity>
  </fetch>
{% endfetchxml %}

{% assign posts_count = count | integer %}
{% assign column_count = columns | integer %}
{% assign cutoff = cutoff | integer %}

<h2>{{ name | default: "Feedback entries (default)" }}
</h2>

<span>Showing {{ posts_count }} out of {{ postsQuery.results.entities.size }}</span>
{% if postsQuery.results.entities.size > 0 %}
  <div class="col-sm-12">
    <ul style="list-style:none" class="grid">
      {% for post in postsQuery.results.entities limit: posts_count %}
        <li class="col-md-{{ 12 | divided_by: column_count }}">
          <div class="panel panel-{% if post.cr50f_rating < cutoff %}danger{%elsif post.cr50f_rating == cutoff%}warning{%elsif post.cr50f_rating == 10%}success{% else %}default{% endif %}">
            <div class="panel-heading">{{ post.cr50f_name }}
              <span class="badge" style="float:right">{{ post.cr50f_rating }}</span>
            </div>
            <div class="panel-body" style="height:150px">
              <p>{{ post.cr50f_content }}</p>
            </div>
            <div class="panel-footer" style="height:55px">
              <span>{{ post.createdon }}</span>
              {% if post.cr50f_rating < cutoff %}
                <button
                  type="button"
                  class="btn btn-danger"
                  style="float:right"
                  onclick="alert('Flagging this review!')">
                  <span class="glyphicon glyphicon-flag" aria-hidden="true"></span>
                </button>
              {% endif %}
            </div>
          </div>
        </li>
      {% endfor %}
    </ul>
  </div>
  {% if postsQuery.results.entities.size > count %}
    <hr/>
    <button
      onclick="alert('Not yet implemented :)')"
      class="button1"
      style="margin: 0 auto; display:block">{{ load_more_label | default: "Load More" }}</button>
  {% endif %}
{% endif %}

{% manifest %}
  {
  "type": "Functional",
    "displayName": "Posts",
    "description": "Shows all posts",
    "tables": ["cr50f_review"],
    "params": [
      {
        "id": "name",
        "displayName": "Title",
        "description": "Let's give it a title"
      },
      {
        "id": "count",
        "displayName": "Count",
        "description": "No. of items"
      },
      {
        "id": "columns",
        "displayName": "# of Columns",
        "description": "less than 12"
      },
      {
        "id": "cutoff",
        "displayName": "Limit for review",
        "description": "Number between 1 and 10"
      },
      {
        "id": "load_more_label",
        "displayName": "Load more label",
        "description": ""
      }
    ]
  }
{% endmanifest %}
将 cr50f 的所有实例替换为新表的架构名称。 这样需要注意 fetchXML 属性及整个 HTML 和
{% manifest %}。
第 3 步:使用 Web 模板
- 将新 Web 模板添加到页面副本,例如使用 Web 版 Visual Studio Code 添加
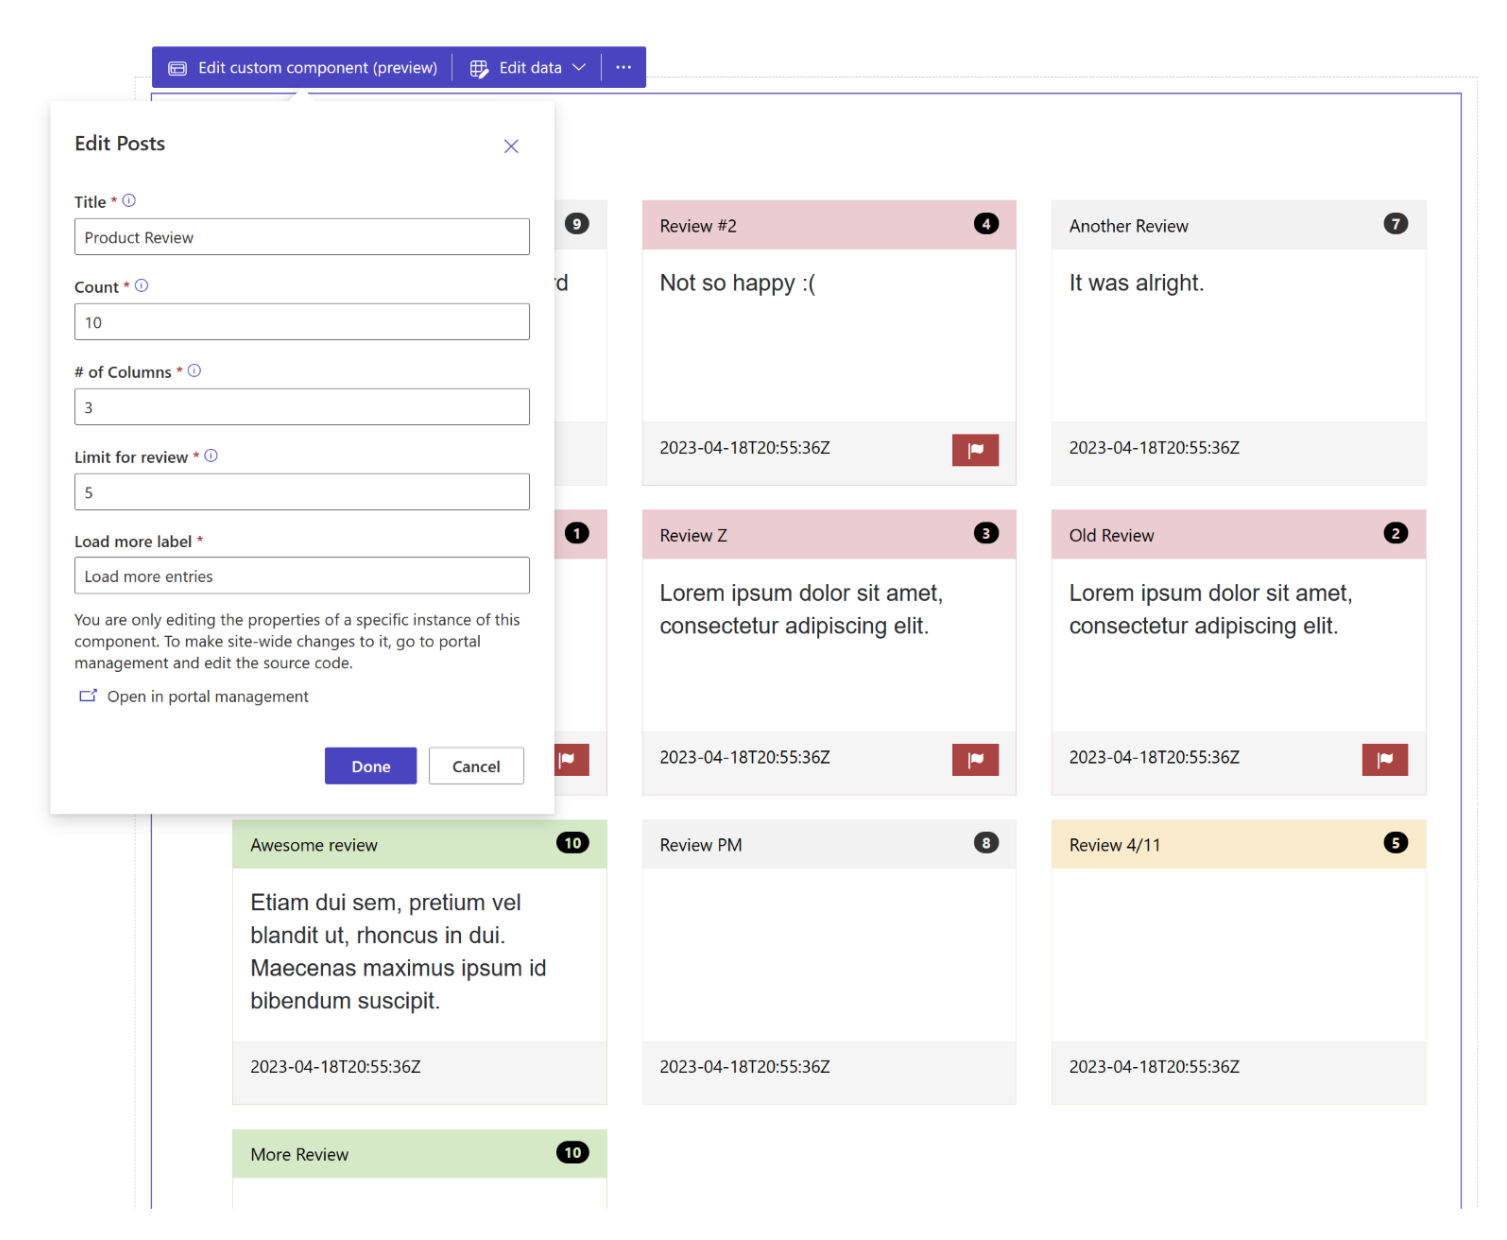
{% include 'product-reviews' name:'Product Review' count:'15' columns:'3' cutoff:'5' load_more_label:'Load more entries' %}或{% include 'product-reviews' name:'Product Review' count:'3' columns:'3' cutoff:'5' load_more_label:'Load more entries' %}。 - 在设计工作室中编辑和配置 Web 模板的属性。
- 根据需要在不同网页中重用该组件,并重复上一步以基于您的要求配置显示内容。
- 选择编辑数据以更新新创建的表中的记录。