Submitting a port request
This article is an accompaniment for IT professionals and Teams Phone administrators in the process of porting phone numbers to Microsoft Calling Plans.
Prerequisites
Review the information in Planning number ports.
Gather related documentation pertaining to porting numbers for your country or region.
Use the drop-down to select the country/region where you're getting numbers. Find information about availability and the downloadable PDF LOA forms required for porting numbers. Other documentation might be necessary.
- Australia
- Austria
- Belgium
- Canada
- Czech Republic
- Denmark
- Estonia
- Finland
- France
- Germany
- Hong Kong
- Hungary
- Ireland
- Italy
- Japan
- Latvia
- Lithuania
- Luxembourg
- Mexico
- New Zealand
- Norway
- Poland
- Portugal
- Romania
- Singapore
- Slovakia
- Slovenia
- South Africa
- Spain
- Sweden
- Switzerland
- Netherlands
- United Kingdom
- United States & Puerto Rico
Access the Teams Admin Center (TAC) with one of the following roles:
- Teams Telephony Administrator
- Teams Communications Administrator
- Teams Administrator
Create a port order and transfer your phone numbers to Teams
Launch the port wizard
In the Teams admin center's left navigation rail, go to Voice > Phone numbers. Select Numbers, and then select Port.
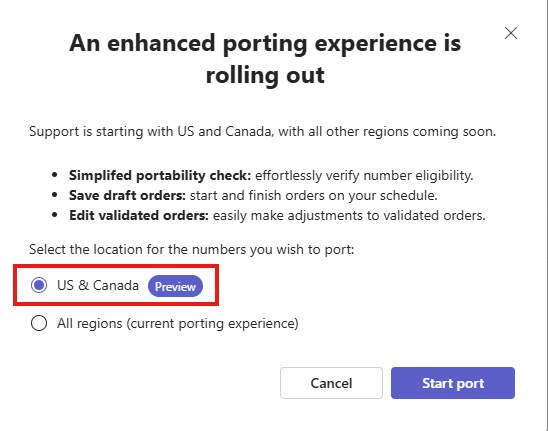
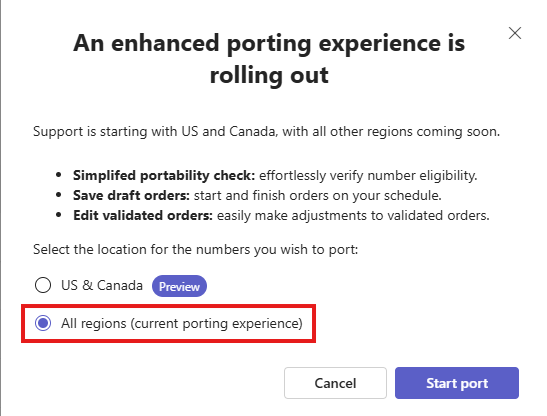
The wizard’s splash screen allows you to select the location for the numbers you wish to port.
- If you're porting U.S. or Canada numbers and would like to use the new porting wizard, then select US & Canada Preview.
- If you'd like to submit your port request using the classic porting wizard, then choose All regions (current porting experience).
Select US & Canada and select Start port.
Get started
Review the information on the Get started page, and then from the drop-down, select the country/region currently hosting the telephone numbers to be ported.
When you specify a country or region, the wizard calls out the documents from the current carrier that you need to complete your port order.
Make note of these documents required for later steps.
Phone numbers
Add your phone numbers manually or by uploading a list.
- To add phone numbers manually, enter numbers in 10-digit or E.164 format, separated by a comma or semi-colon. Ranges aren't supported. Optional dashes or hyphens are supported.
- To upload a list of phone numbers, the list must be in CSV format and must have only one column with a header designated as PhoneNumber. Each phone number must be in a separate row and can be in 10-digit or E.164 format.
Upon adding phone numbers, the wizard compiles the numbers, categorize them, and then display a table of the numbers in groups by account, service provider, and type.
- The wizard allows you to select one of the groups for processing. The wizard only processes a port request with one type of group at a time.
- If the wizard categorized your numbers into more than one group, you must submit a separate port request for each. See Planning number ports.
- If the wizard detects that your requested numbers are invalid for porting, the error is shown here.
Once your numbers are validated in the wizard, you have the option to save your progress and continue later. If you need to exit and return to your order, follow these steps:
- Go to Teams Admin Center
- Navigate to Voice > Phone Numbers
- Select Order History
- Select the desired order name hyperlink
- Continue from where you left off.
Billing telephone number (BTN)
Enter the Billing telephone number (BTN) for the account with your existing service provider.
- The Billing telephone number (BTN) for the phone numbers being ported must match what the current service provider has on file for the account. Also, if there's a freeze on the account it must be removed. If the BTN is incorrect or there's a freeze on the account, your port request will be rejected after it's submitted.
- The BTN can also be referred to as the 'Account telephone number.' It's the primary phone number associated with your account. Your service provider uses the BTN to track activities, payments, and customer service records.
- You can usually find your BTN on an account statement. If you're unsure, ask your current service provider's account representative to help you identify your BTN.
- In a full port request, all numbers associated with the BTN are ported to Microsoft, including the BTN, and the respective account with the current provider is closed.
- In a partial port request, you have two scenarios:
- You're porting only the phone numbers previously specified, not including the BTN which stays in service with the current provider.
- You're porting only the phone numbers previously specified, including the BTN. If you choose this partial port option, you can designate one of the numbers that isn't being ported to become the replacement BTN for the account that is still open with your current service provider. Designating a replacement BTN is optional.
Account information
As with the BTN, it's essential to document the account information exactly the way the current service provider has it in their records.
Note
You can save your work as you work through this page and the wizard.
- The organization name should match, exactly as represented in the current service provider's records.
- If the wizard identifies the service provider's name, don't change it here.
- The account number should be discoverable on an account statement or invoice, or in your provider's online account portal.
- The account might have an account PIN and if so, it must be provided here. The account PIN isn't the same as a BTN Freeze PIN. A BTN Freeze PIN allows an authorized user to unfreeze an account for maintenance, such as porting activities. The account PIN is used for security, to prevent unauthorized access to account management and records. The account PIN is required in this step for all mobile numbers being ported.
- The authorized user is one or more persons associated with the account and is authorized for account management and records. Only one authorized user needs to be designated on your port request. If you're unsure of the account's authorized user, contact your service provider's account manager.
- Updating the authorized user during the port request isn't supported. If you wish to change the authorized user, you can do so with the current service provider before the port. Once your port request is complete, Microsoft considers your tenant admins as authorized users.
- The service address is specific to the phone numbers that you're porting, and it represents the associated, physical, service address where the number is operational.
- If the location isn't defined in your tenant, then select Add a location.
Documents
Upload the required and recommended articles from your service provider.
- Files should be in .pdf format.
- Files are stored within your tenant and shared with Microsoft's Telephone Number Service Center.
Porting details
Indicate the specifics for your Microsoft service.
- The order name becomes viewable by you in the Teams Admin Center during the porting process and after order completion for your records.
- For the port details, remember to review Planning number ports.
- The Requester details are necessary so that Microsoft's Telephone Number Service Center has contact information for port request updates.
- If adding multiple email addresses for more contacts, separate with a semi-colon.
Authorize and submit
You have two options for submitting.
- Sign with e-signature (recommended)
- In this case, an email is sent to the current authorized user that you specified in Account information page, and they're prompted to authorize with Microsoft's e-signature tool.
- Once the authorized user approves, the request is automatically submitted to Microsoft.
- Offline signature.
- In this case, you download the Letter of Authorization, get it signed, upload it, and submit to Microsoft.
In Edit Mode, you can modify any field of your validated order, except for the Country or Region that was selected on the Get Started page. If your updates impact the LOA (Letter of Authorization) and the LOA has already been signed and uploaded, we must refresh the LOA with your modifications. Download, sign, and reupload the updated LOA. Only after re-uploading the refreshed LOA will you be able to submit edits to your order.
Confirmation
Confirmation of the request is acknowledged within 72 business hours.
You can check the status of your order in the Teams Admin Center. In left side rail under Voice > Phone Numbers navigate to Order History and search by the name you gave your order in the porting details page.
You can research more about the process, here: Porting status.
What happens next
When we receive your port order, you receive an email that verifies your request. Your request is updated daily, and you're notified of its progress and status in email. If your current carrier rejects the port request, contact the Phone Number Service Center for assistance.
Note
If you already have a case open with the TNS-Service Desk for your port request, update that existing ticket instead of creating a new case.
For more information about Letters of Authorization to port existing phone numbers and other considerations, see Manage phone numbers for Calling Plan and Planning number ports.
Report phone number issues
If you notice any issues with the ported numbers within the first 24-48 hours after the port is completed, contact the Phone Number Service Center. For any issues beyond 48 hours, contact the Microsoft Support Team.