将推送通知添加到 iOS 应用
概述
在本教程中,将推送通知添加到 iOS 快速入门 项目,以便在每次插入记录时向设备发送推送通知。
如果不使用下载的快速入门服务器项目,则需要推送通知扩展包。 有关详细信息,请参阅 使用适用于 Azure 移动应用的 .NET 后端服务器 SDK 指南。
iOS 模拟器不支持推送通知。 你需要实体 iOS 设备和 Apple开发者计划会员资格。
配置通知中心
Azure 应用服务的移动应用功能使用 Azure 通知中心 发送推送,因此你将为移动应用配置通知中心。
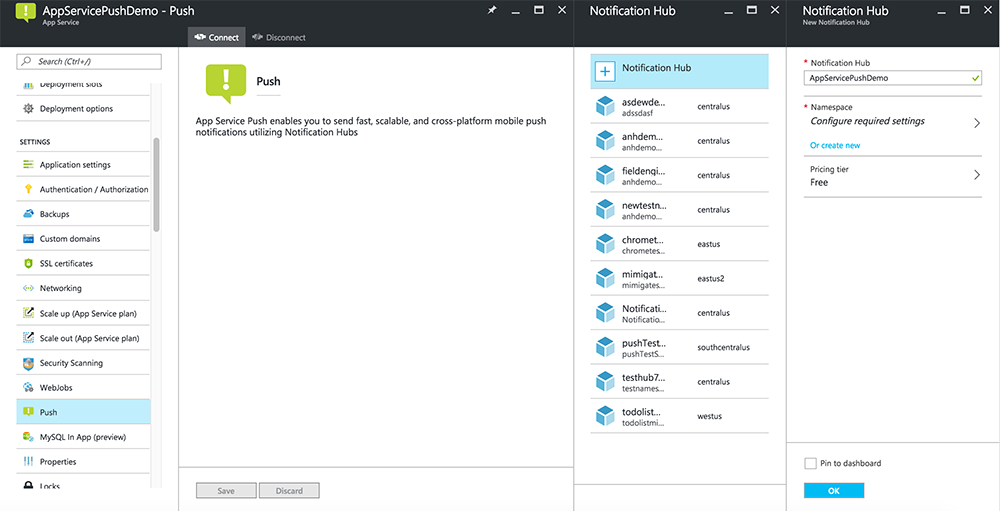
在 Azure 门户中,转到 应用服务,然后选择应用后端。 在 设置中,选择 推送。
若要向应用添加通知中心资源,请选择 连接。 可以创建中心或连接到现有中心。
现在,已将通知中心连接到移动应用后端项目。 稍后,请将此通知中心配置为连接到平台通知系统(PNS),以推送到设备。
为推送通知注册应用
- 为您的应用注册一个应用 ID。 创建显式应用 ID(而不是通配符应用 ID),对于 捆绑 ID,请使用 Xcode 快速入门项目中的确切捆绑 ID。 选择 推送通知 选项也至关重要。
- 接下来,为了准备配置推送通知 ,请创建“开发”或“分发”SSL证书。
配置 Azure 以发送推送通知
- 在 Mac 上,启动 密钥链访问。 在左侧导航栏的 类别下,打开“我的证书”。 找到在上一部分下载的 SSL 证书,然后披露其内容。 仅选择证书(不选择私钥)。 然后 进行导出。
- 在 Azure 门户中,选择“”浏览所有>应用服务。 然后选择移动应用后端。
- 在 设置中,选择 应用服务推送。 然后选择通知中心名称。
- 转到 Apple Push Notification Services>上传证书。 上传 .p12 文件,选择正确的 模式(具体取决于先前的客户端 SSL 证书是生产证书还是沙盒证书)。 保存任何更改。
服务现已配置为在 iOS 上使用推送通知。
更新后端以发送推送通知
.NET 后端 (C#):
在 Visual Studio 中,右键单击服务器项目,然后单击 管理 NuGet 包,搜索
Microsoft.Azure.NotificationHubs,然后单击 安装。 这会安装通知中心库,用于从后端发送通知。在后端的 Visual Studio 项目中,打开 控制器>TodoItemController.cs。 在文件的顶部,添加以下
using语句:using Microsoft.Azure.Mobile.Server.Config; using Microsoft.Azure.NotificationHubs;将
PostTodoItem方法替换为以下代码:public async Task<IHttpActionResult> PostTodoItem(TodoItem item) { TodoItem current = await InsertAsync(item); // Get the settings for the server project. HttpConfiguration config = this.Configuration; MobileAppSettingsDictionary settings = this.Configuration.GetMobileAppSettingsProvider().GetMobileAppSettings(); // Get the Notification Hubs credentials for the Mobile App. string notificationHubName = settings.NotificationHubName; string notificationHubConnection = settings .Connections[MobileAppSettingsKeys.NotificationHubConnectionString].ConnectionString; // Create a new Notification Hub client. NotificationHubClient hub = NotificationHubClient .CreateClientFromConnectionString(notificationHubConnection, notificationHubName); // iOS payload var appleNotificationPayload = "{\"aps\":{\"alert\":\"" + item.Text + "\"}}"; try { // Send the push notification and log the results. var result = await hub.SendAppleNativeNotificationAsync(appleNotificationPayload); // Write the success result to the logs. config.Services.GetTraceWriter().Info(result.State.ToString()); } catch (System.Exception ex) { // Write the failure result to the logs. config.Services.GetTraceWriter() .Error(ex.Message, null, "Push.SendAsync Error"); } return CreatedAtRoute("Tables", new { id = current.Id }, current); }重新发布服务器项目。
Node.js 后端:
搭建你的后端项目。
将 todoitem.js 表脚本替换为以下代码:
var azureMobileApps = require('azure-mobile-apps'),
    promises = require('azure-mobile-apps/src/utilities/promises'),
    logger = require('azure-mobile-apps/src/logger');

var table = azureMobileApps.table();

// When adding record, send a push notification via APNS
table.insert(function (context) {
    // For details of the Notification Hubs JavaScript SDK,
    // see https://aka.ms/nodejshubs
    logger.info('Running TodoItem.insert');

    // Create a payload that contains the new item Text.
    var payload = "{\"aps\":{\"alert\":\"" + context.item.text + "\"}}";

    // Execute the insert; Push as a post-execute action when results are returned as a Promise.
    return context.execute()
        .then(function (results) {
            // Only do the push if configured
            if (context.push) {
                context.push.apns.send(null, payload, function (error) {
                    if (error) {
                        logger.error('Error while sending push notification: ', error);
                    } else {
                        logger.info('Push notification sent successfully!');
                    }
                });
            }
            return results;
        })
        .catch(function (error) {
            logger.error('Error while running context.execute: ', error);
        });
});

module.exports = table;
在本地计算机上编辑文件时,重新发布服务器项目。
向应用添加推送通知
Objective-C:
在 QSAppDelegate.m中,导入 iOS SDK 和 QSTodoService.h:
#import <MicrosoftAzureMobile/MicrosoftAzureMobile.h>
#import "QSTodoService.h"
在 QSAppDelegate.m中的
didFinishLaunchingWithOptions中,在return YES;之前插入以下行:UIUserNotificationSettings* notificationSettings = [UIUserNotificationSettings settingsForTypes:UIUserNotificationTypeAlert | UIUserNotificationTypeBadge | UIUserNotificationTypeSound categories:nil]; [[UIApplication sharedApplication] registerUserNotificationSettings:notificationSettings]; [[UIApplication sharedApplication] registerForRemoteNotifications];在 QSAppDelegate.m中,添加以下处理程序方法。 应用现已更新以支持推送通知。
// Registration with APNs is successful
- (void)application:(UIApplication *)application
didRegisterForRemoteNotificationsWithDeviceToken:(NSData *)deviceToken {

    QSTodoService *todoService = [QSTodoService defaultService];
    MSClient *client = todoService.client;

    [client.push registerDeviceToken:deviceToken completion:^(NSError *error) {
        if (error != nil) {
            NSLog(@"Error registering for notifications: %@", error);
        }
    }];
}

// Handle any failure to register
- (void)application:(UIApplication *)application didFailToRegisterForRemoteNotificationsWithError:
(NSError *)error {
    NSLog(@"Failed to register for remote notifications: %@", error);
}

// Use userInfo in the payload to display an alert.
- (void)application:(UIApplication *)application
        didReceiveRemoteNotification:(NSDictionary *)userInfo {
    NSLog(@"%@", userInfo);

    NSDictionary *apsPayload = userInfo[@"aps"];
    NSString *alertString = apsPayload[@"alert"];

    // Create alert with notification content.
    UIAlertController *alertController = [UIAlertController
                                    alertControllerWithTitle:@"Notification"
                                    message:alertString
                                    preferredStyle:UIAlertControllerStyleAlert];

    UIAlertAction *cancelAction = [UIAlertAction
                                    actionWithTitle:NSLocalizedString(@"Cancel", @"Cancel")
                                    style:UIAlertActionStyleCancel
                                    handler:^(UIAlertAction *action)
                                    {
                                        NSLog(@"Cancel");
                                    }];

    UIAlertAction *okAction = [UIAlertAction
                                actionWithTitle:NSLocalizedString(@"OK", @"OK")
                                style:UIAlertActionStyleDefault
                                handler:^(UIAlertAction *action)
                                {
                                    NSLog(@"OK");
                                }];

    [alertController addAction:cancelAction];
    [alertController addAction:okAction];

    // Get current view controller.
    UIViewController *currentViewController = [[[[UIApplication sharedApplication] delegate] window] rootViewController];
    while (currentViewController.presentedViewController)
    {
        currentViewController = currentViewController.presentedViewController;
    }

    // Display alert.
    [currentViewController presentViewController:alertController animated:YES completion:nil];

}
Swift:
添加一个包含以下内容的文件 ClientManager.swift。 将 %AppUrl% 替换为 Azure 移动应用后端的 URL。
class ClientManager {
    static let sharedClient = MSClient(applicationURLString: "%AppUrl%")
}
在 ToDoTableViewController.swift中,将初始化
MSClient的let client行替换为以下行:let client = ClientManager.sharedClient在 AppDelegate.swift中,按如下方式替换
func application的内容:func application(application: UIApplication, didFinishLaunchingWithOptions launchOptions: [NSObject: AnyObject]?) -> Bool { application.registerUserNotificationSettings( UIUserNotificationSettings(forTypes: [.Alert, .Badge, .Sound], categories: nil)) application.registerForRemoteNotifications() return true }在 AppDelegate.swift中,添加以下处理程序方法。 应用现已更新以支持推送通知。
func application(application: UIApplication,
    didRegisterForRemoteNotificationsWithDeviceToken deviceToken: NSData) {
    ClientManager.sharedClient.push?.registerDeviceToken(deviceToken) { error in
        print("Error registering for notifications: ", error?.description)
    }
}

func application(application: UIApplication,
    didFailToRegisterForRemoteNotificationsWithError error: NSError) {
    print("Failed to register for remote notifications: ", error.description)
}

func application(application: UIApplication,
    didReceiveRemoteNotification userInfo: [NSObject: AnyObject]) {

    print(userInfo)

    let apsNotification = userInfo["aps"] as? NSDictionary
    let apsString       = apsNotification?["alert"] as? String

    let alert = UIAlertController(title: "Alert", message: apsString, preferredStyle: .Alert)
    let okAction = UIAlertAction(title: "OK", style: .Default) { _ in
        print("OK")
    }
    let cancelAction = UIAlertAction(title: "Cancel", style: .Default) { _ in
        print("Cancel")
    }

    alert.addAction(okAction)
    alert.addAction(cancelAction)

    var currentViewController = self.window?.rootViewController
    while currentViewController?.presentedViewController != nil {
        currentViewController = currentViewController?.presentedViewController
    }

    currentViewController?.presentViewController(alert, animated: true) {}

}
测试推送通知
- 在 Xcode 中,按 运行 并在 iOS 设备上启动应用(请注意推送在模拟器上不起作用)。 单击 “确定” 接受推送通知;此请求在应用首次运行时发生。
- 在应用中,添加新项并单击 +。
- 验证是否已收到通知,然后单击 “确定” 以消除通知。 现已成功完成本教程。
更多
- 模板使你可以灵活地发送跨平台推送和本地化推送。 如何使用适用于 Azure 移动应用的 iOS 客户端库 演示如何注册模板。