捕获 Customer Insights - Journeys 中的窗体
窗体捕获用于从不是使用 Customer Insights - Journeys 窗体编辑器创建的现有窗体获取提交内容。 如果您的现有窗体还向 Dynamics 365 以外的系统发送提交内容,或者现有窗体包含无法在 Customer Insights - Journeys 窗体编辑器中轻松重新创建的复杂逻辑,建议使用窗体捕获。 如果可以使用 Customer Insights - Journeys 窗体编辑器重新创建现有窗体,则不建议使用窗体捕获功能。
窗体捕获使用与标准窗体相同的 API 来处理提交。 同样的安全通知适用于窗体捕获。
重要提示
窗体捕获需要开发人员的帮助。 使用 Customer Insights - Journeys 窗体编辑器创建窗体并将窗体嵌入到现有页面更容易。
重要提示
窗体捕获需要 DynamicsMKT_Forms 解决方案版本 1.1.35355 或更高版本。 预配试用实例时,您不会始终自动获得最新版本。 在尝试窗体捕获之前,请确保您已更新 Customer Insights - Journeys。
启用窗体捕获
默认情况下,窗体捕获功能被禁用。 您可以在设置>功能切换>窗体中启用窗体捕获切换。

窗体捕获的工作原理
窗体捕获模拟标准 Customer Insights - Journeys 窗体的提交。 要将现有窗体的提交关联到 Customer Insights - Journeys,您需要使用 Customer Insights - Journeys 窗体编辑器创建窗体。 发布该窗体后,您可以获得窗体捕获脚本,该脚本需要嵌入到包含现有窗体的网页中。 该脚本包括映射潜在顾客或联系人实体属性的现有窗体字段的定义。 您可以在 Customer Insights - Journeys 内查看所有提交和分析。 您还可以通过已提交市场营销窗体触发器在旅程业务流程中使用此窗体。 此窗体提交还可以创建或更新联系点同意和相关目的或主题。
捕获窗体分步指南
在 Customer Insights - Journeys 窗体编辑器中创建窗体捕获
要创建新捕获窗体脚本,转到Customer Insights - Journeys>渠道>窗体,在命令栏上选择新建。
为窗体命名并选择正确的访问群体。 目标访问群体的选择很重要。 窗体捕获脚本字段->属性映射仅对所选目标访问群体(实体)的属性可用。
添加您要映射到现有窗体字段的所有字段。 此步骤不是强制的;字段 > 属性映射在窗体捕获代码中定义。 将正确的字段添加到窗体将生成窗体捕获脚本中属性映射的占位符,使映射定义更容易。
将同意元素(如目的或主题)添加到窗体并进行配置。 了解有关如何在 Customer Insights - Journeys 中管理电子邮件和短信许可的更多信息。
重要提示
同意定义必须在窗体编辑器中完成。 在窗体捕获代码片段中对同意设置所做的更改将被忽略。
添加提交按钮。 发布前成功验证窗体需要使用提交按钮。
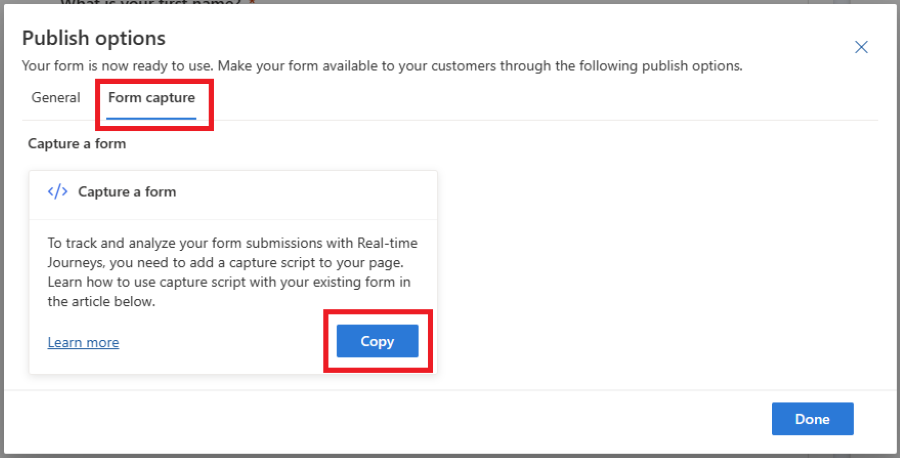
使用屏幕右上角的发布按钮发布窗体。 复制窗体捕获代码片段并将代码片段嵌入到现有窗体所在的网页,或者将代码片段交给开发人员。 代码片段已包含文档链接,可为您的开发人员提供指导。

重要提示
托管现有窗体的域名必须启用外部窗体托管,否则将无法捕获窗体提交。 了解有关域身份验证的更多信息。
将捕获脚本嵌入到页面和映射定义
上一步中复制的代码片段是一个模板,必须根据具体用例进行调整。 您需要替换生成的模板中标记为 ***Please fill*** 的所有元素,并根据您的场景调整逻辑。
您现有的窗体提交将使用 JavaScript API 发送到 Customer Insights - Journeys,其在文件 FormCapture.bundle.js 中定义,包含在片段中。
窗体捕获设置包含以下步骤:
- 获取对页面上窗体元素的引用。
- 在 Customer Insights - Journeys 中定义字段(实体属性)上窗体字段的映射。
- 在 Customer Insights - Journeys 中定义同意模型上同意字段的映射。
- 将窗体提交发送到 Customer Insights - Journeys。
1. 获取对窗体元素的引用
要获取对窗体元素的引用,您可以使用 waitForElement 辅助函数。 它还适用于动态呈现元素,将返回在页面上找到具有给定选择器的元素后将解决的承诺。 有关 CSS 选择器的参考,请参阅此文档。
示例:
<form id="form1">
...
</form>

<script>
d365mktformcapture.waitForElement("#form1").then(form => {
  ...
});
</script>
2. 定义窗体字段的映射
窗体中的字段需要映射到 Customer Insights - Journeys 中的相应字段(实体属性)。 映射在函数 d365mktformcapture.serializeForm(form, mappings) 中定义。
示例:
<form id="form1">
  <p>FirstName: <input type="text" name="firstName"/></p>
</form>

<script>
d365mktformcapture.waitForElement("#form1").then(form => {
  const mappings = [
    {
      FormFieldName: "firstName",
      DataverseFieldName: "firstname",
    },
  ];

  ...

  const serializedForm = d365mktformcapture.serializeForm(form, mappings);
  // console.log(JSON.stringify(serializedForm)); // NOTE: enable for debugging
  const payload = serializedForm.SerializedForm.build();
});
</script>
参数 form 由上一节中所述的 waitForElement 函数检索。 参数 mappings 是一个包含以下结构元素的数组:
export interface IFormFieldMapping {
    FormFieldName?: string; // name of form field
    DataverseFieldName: string; // name of field on Dynamics 365 side
    DataverseFieldValue?: string | IFormValueMapping[]; // optional - either a fixed value or a value mapping
}

export interface IFormValueMapping {
    FormValue: string; // form field value
    DataverseValue: string; // mapped value for that form field value that will be sent to Dynamics 365
}
此函数是同步的,使用以下约定返回序列化结果:
export interface IFormSerializationResult {
    FormFieldMappingResults: IFormFieldMappingResult[]; // Status for each of the defined mappings
    SerializedForm: IFormSerializationBuilder; // The serialized form
}

export interface IFormFieldMappingResult {
    Mapping: IFormFieldMapping; // The defined mapping
    FormFieldMappingStatus: FormFieldMappingStatus; // Status of the mapping (see below for status values)
    Message: string; // Optional - an error/warning message for the mapping
}

export enum FormFieldMappingStatus {
    Success = 0,
    NotFound = 1,
    Error = 2
}
确保您处理 FormFieldMappingResults 返回的所有错误。 您可以通过调用 serializedForm.SerializedForm.build() 在 Customer Insights - Journeys 中创建有效负载。
2.1 OptionSet 字段的映射
对于 OptionSet 字段,您需要定义映射到应存储在 Customer Insights - Journeys 中的相应值。 您可以在 DataverseFieldValue 属性中映射现有窗体 OptionSet 字段值。
示例:
<form id="form1">
  <p>Radio: <input type="radio" name="radioInput" value="option1"/><input type="radio" name="radioInput" value="option2"/></p>
</form>

<script>
  ...
  const mappings = [
    {
        FormFieldName: "radioInput",
        DataverseFieldName: "dvradioInput",
        DataverseFieldValue: [
            { FormValue: "option1", DataverseValue: "1" },
            { FormValue: "option2", DataverseValue: "2" },
        ]
    },
  ];
  ...
</script>
2.2 查找字段的映射
设置查找字段的默认值
您可以在查找字段的映射逻辑中使用静态(默认)值。 您需要定义字段的名称和应存储在 Customer Insights - Journeys 中的值。
示例:
<form id="form1">
  ...
</form>

<script>
  ...
  const mappings = [
    {
        DataverseFieldName: "currency",
        DataverseFieldValue: "{\"Id\":\"ffffd6c1-b32d-ee11-bdf3-6045bded6105\",\"LogicalName\":\"transactioncurrency\"}"
    },
  ];
  ...
</script>
将查找字段的值映射到窗体中的字段
您还可以将查找字段值映射到现有窗体字段中的相应值。
示例:
<form id="form1">
  <p>Radio: <input type="radio" name="currency" value="usd"/><input type="radio" name="currency" value="eur"/></p>
</form>

<script>
  ...
  const mappings = [
    {
        FormFieldName: "currency",
        DataverseFieldName: "transactioncurrencyid",
        DataverseFieldValue: [
              { FormValue: "usd", DataverseValue: "{\"Id\":\"cd2cff48-08a3-ea11-a813-000d3a0a82b4\",\"LogicalName\":\"transactioncurrency\"}", },
              { FormValue: "eur", DataverseValue: "{\"Id\":\"91f1a052-259c-4719-a3ae-3a1d2987a3ed\",\"LogicalName\":\"transactioncurrency\"}", },
        ]
    },
  ];
  ...
</script>
2.3 映射多选字段值
对于 multi-select 字段,您需要定义映射到应存储在 Customer Insights - Journeys 中的相应值。 您可以在 DataverseFieldValue 属性中映射现有的窗体多选字段值。
示例:
  <form id="form1">
    <p>Fieldset: <fieldset name="multiOptionInput">
      <input type="checkbox" name="multiOptionInput" value="100000000">0</input>
      <input type="checkbox" name="multiOptionInput" value="100000001">1</input>
      <input type="checkbox" name="multiOptionInput" value="100000002">2</input>
    </fieldset></p>
  </form>

<script>
...
const mappings = [
  {
    FormFieldName: "multiOptionInput",
    DataverseFieldName: "dvmultiOptionInput",
    DataverseFieldValue: [
      { FormValue: "100000000", DataverseValue: "0" },
      { FormValue: "100000001", DataverseValue: "1" },
      { FormValue: "100000002", DataverseValue: "2" },
    ]
  },
];
...
</script>
3. 定义同意字段映射
同意字段需要在 Customer Insights - Journeys 中的窗体编辑器中配置。 DataverseFieldName 和 DataverseFieldValue 映射会相应自动生成。
示例:
<form id="form1">
  <p>Consent: <input type="checkbox" name="consentField"/></p>
</form>

<script>
  ...
  const mappings = [
    {
        FormFieldName: "consentField",
        DataverseFieldName: "msdynmkt_purposeid;channels;optinwhenchecked",
        DataverseFieldValue: "10000000-0000-0000-0000-000000000004;Email;true",
    },
  ];
  ...
</script>
4. 将窗体提交发送到 Customer Insights - Journeys
获得对窗体的引用、定义映射并序列化窗体后,您可以向 submit 事件添加事件侦听器并使用 d365mktformcapture.submitForm(captureConfig, payload) 函数发送它。 此调用将返回一个承诺,错误可以在 catch 逻辑中处理。
重要提示
如果您已有自定义验证或有 Captcha 检查,确保仅在验证成功的情况下将窗体提交到 Customer Insights - Journeys(例如,检查 submit 事件上的 isDefaultPrevented,或仅在验证通过后显式调用 submitForm)
示例:
<form id="form1">
  <p>FirstName: <input type="text" name="firstName"/></p>
</form>

<script>
d365mktformcapture.waitForElement("#form1").then(form => {
  const mappings = [
    {
      FormFieldName: "firstName",
      DataverseFieldName: "firstname",
    },
  ];

  form.addEventListener("submit", (e) => {
    const serializedForm = d365mktformcapture.serializeForm(form, mappings);
    // console.log(JSON.stringify(serializedForm)); // NOTE: enable for debugging
    const payload = serializedForm.SerializedForm.build();

    const captureConfig = {
      FormId: "...", // the form id on Dynamics 365 side
      FormApiUrl: "..." // the API url of the Dynamics 365 backend service where the form will be submitted to
    }
    d365mktformcapture.submitForm(captureConfig, payload)
    .catch(e => {
      // error handling
    });
  }, true);
});
</script>
故障排除
对提交终结点的调用失败并出现 CORS 错误
跨源资源共享 (CORS) 可能会导致窗体提交捕获失败。 启用域以进行外部窗体托管。 了解有关域身份验证的更多信息。
同意值未正确更新
确保您已在窗体编辑器中设置相应的同意字段(请参阅在 Customer Insights - Journeys 窗体编辑器中创建窗体捕获),并使用在发布过程中生成的正确映射。