你当前正在访问 Microsoft Azure Global Edition 技术文档网站。 如果需要访问由世纪互联运营的 Microsoft Azure 中国技术文档网站,请访问 https://docs.azure.cn。
使用 Azure 通信服务聊天中的 UI 库与 Azure Blob 存储启用文件共享
重要
Azure 通信服务的这一功能目前以预览版提供。
预览版 API 和 SDK 在没有服务级别协议的情况下提供。 建议不要将它们用于生产工作负荷。 某些功能可能不受支持或者已受限。
有关详细信息,请参阅 Microsoft Azure 预览版补充使用条款。
在 Azure 通信服务聊天中,我们可以在通信用户之间启用文件共享。 请注意,Azure 通信服务聊天不同于 Teams 互操作性聊天(“互操作聊天”)。 如果要在“互操作聊天”中启用文件共享,请参阅在 Teams 互操作性聊天中添加与 UI 库的文件共享。
在本教程中,我们将配置 Azure 通信服务 UI 库聊天复合组件来启用文件共享。 UI 库聊天复合组件提供一组丰富的组件和 UI 控件用于启用文件共享。 我们将使用 Azure Blob 存储来启用通过聊天线程共享的文件的存储。
重要
Azure 通信服务不提供文件存储服务。 你需要使用自己的文件存储服务来共享文件。 在本教程中,我们使用的是 Azure Blob 存储。**
下载代码
在 GitHub 上访问本教程的完整代码。 若要通过 UI 组件使用文件共享,请参考此示例。
先决条件
- 具有活动订阅的 Azure 帐户。 有关详细信息,请参阅创建免费账户。
- 安装在某个受支持的平台上的 Visual Studio Code。
-
Node.js,活动 LTS 和维护 LTS 版本(建议使用 10.14.1)。 可以使用
node --version命令检查你的版本。 - 活动的通信服务资源和连接字符串。 创建通信服务资源。
本教程假设你已知道如何设置和运行聊天复合组件。 可以参阅聊天复合组件教程来了解如何设置和运行聊天复合组件。
概述
UI 库聊天复合组件使开发人员能够将 URL 传递给通过 Azure 通信服务聊天服务发送的托管文件,并凭此支持文件共享。 UI 库呈现附加的文件,并支持通过多个扩展来配置发送的文件的外观。 更具体地说,它支持以下功能:
- “附加文件”按钮,用于通过 OS 文件选取器选取文件
- 配置允许的文件扩展名。
- 启用/禁用多文件上传。
- 各种文件类型的文件图标。
- 带进度指示器的文件上传/下载卡片。
- 能够动态验证每次文件上传的结果并在 UI 中显示错误。
- 能够在发送文件之前取消上传以及删除上传的文件。
- 在 MessageThread 中查看上传的文件以及下载这些文件。 允许异步下载。
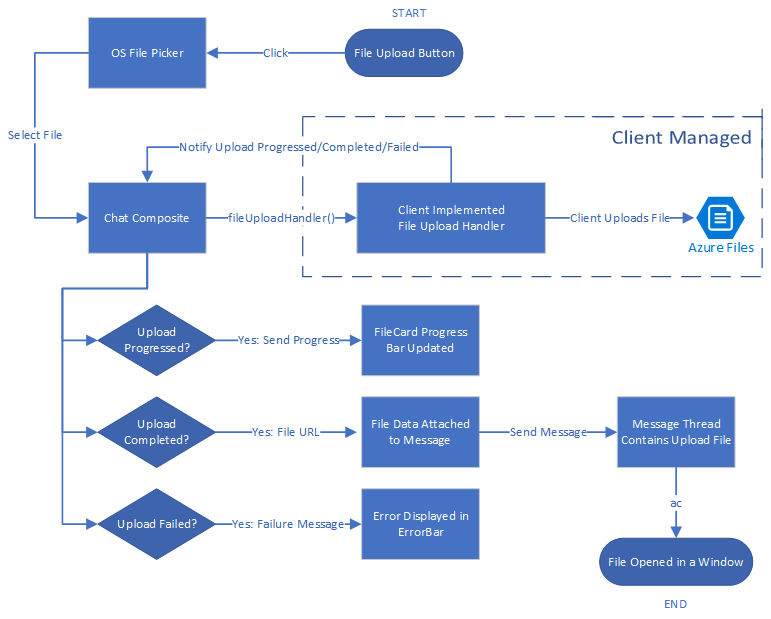
此图显示了用于上传和下载的文件共享方案的典型流程。 标记为 Client Managed 的部分显示了开发人员需要在其中实现它们的构建基块。

使用 Azure Blob 设置文件存储
可以按照教程使用 Azure 函数将文件上传到 Azure Blob 存储来编写文件共享所需的后端代码。
实现后,可以在 handleAttachmentSelection 函数中调用此 Azure 函数,以将文件上传到 Azure Blob 存储。 本教程的余下内容假设你已使用之前链接的 Azure Blob 存储教程生成了该函数。
保护 Azure Blob 存储容器
本教程假定 Azure blob 存储容器允许公开访问上传的文件。 不建议将 Azure 存储容器公开用于实际生产应用程序。
若要下载上传到 Azure Blob 存储的文件,可以使用共享访问签名 (SAS)。 共享访问签名 (SAS) 提供对存储帐户中资源的安全委托访问。 使用 SAS 可以精细控制客户端访问数据的方式。
可下载的 GitHub 示例展示了如何使用 SAS 创建指向 Azure 存储内容的 SAS URL。 此外,还可以阅读有关 SAS 的详细信息。
UI 库要求设置 React 环境。 我们接下来就完成该操作。 如果你已有 React 应用,则可跳过此部分。
设置 React 应用
我们对本快速入门使用“create-react-app”模板。 有关详细信息,请参阅:React 入门
npx create-react-app ui-library-quickstart-composites --template typescript

cd ui-library-quickstart-composites
此过程结束时,你在 ui-library-quickstart-composites 文件夹中应该会有一个完整的应用程序。
在本快速入门中,我们将修改 src 文件夹中的文件。
安装包
使用 npm install 命令安装适用于 JavaScript 的 beta 版本 Azure 通信服务 UI 库。
npm install @azure/communication-react@1.16.0-beta.1
@azure/communication-react 将核心 Azure 通信服务指定为 peerDependencies,使你能够在应用程序中以最为一致的方式使用核心库中的 API。 还需要安装以下库:
npm install @azure/communication-calling@1.24.1-beta.2
npm install @azure/communication-chat@1.6.0-beta.1
创建 React 应用
运行以下内容来测试“创建 React 应用”安装项:
npm run start
配置聊天复合组件以启用文件共享
我们需要替换初始化聊天复合组件所需的两个通用变量的变量值。
App.tsx
import { initializeFileTypeIcons } from '@fluentui/react-file-type-icons';
import {
  ChatComposite,
  AttachmentUploadTask,
  AttachmentUploadOptions,
  AttachmentSelectionHandler,
  fromFlatCommunicationIdentifier,
  useAzureCommunicationChatAdapter
} from '@azure/communication-react';
import React, { useMemo } from 'react';

initializeFileTypeIcons();

function App(): JSX.Element {
  // Common variables
  const endpointUrl = 'INSERT_ENDPOINT_URL';
  const userId = ' INSERT_USER_ID';
  const displayName = 'INSERT_DISPLAY_NAME';
  const token = 'INSERT_ACCESS_TOKEN';
  const threadId = 'INSERT_THREAD_ID';

  // We can't even initialize the Chat and Call adapters without a well-formed token.
  const credential = useMemo(() => {
    try {
      return new AzureCommunicationTokenCredential(token);
    } catch {
      console.error('Failed to construct token credential');
      return undefined;
    }
  }, [token]);

  // Memoize arguments to `useAzureCommunicationChatAdapter` so that
  // a new adapter is only created when an argument changes.
  const chatAdapterArgs = useMemo(
    () => ({
      endpoint: endpointUrl,
      userId: fromFlatCommunicationIdentifier(userId) as CommunicationUserIdentifier,
      displayName,
      credential,
      threadId
    }),
    [userId, displayName, credential, threadId]
  );
  const chatAdapter = useAzureCommunicationChatAdapter(chatAdapterArgs);

  if (!!chatAdapter) {
    return (
      <>
        <div style={containerStyle}>
          <ChatComposite
            adapter={chatAdapter}
            options={{
              attachmentOptions: {
                uploadOptions: uploadOptions,
                downloadOptions: downloadOptions,
              }
            }} />
        </div>
      </>
    );
  }
  if (credential === undefined) {
    return <h3>Failed to construct credential. Provided token is malformed.</h3>;
  }
  return <h3>Initializing...</h3>;
}

const uploadOptions: AttachmentUploadOptions = {
  // default is false
  disableMultipleUploads: false,
  // define mime types
  supportedMediaTypes: ["image/jpg", "image/jpeg"]
  handleAttachmentSelection: attachmentSelectionHandler,
}

const attachmentSelectionHandler: AttachmentSelectionHandler = async (uploadTasks) => {
  for (const task of uploadTasks) {
    try {
      const uniqueFileName = `${v4()}-${task.file?.name}`;
      const url = await uploadFileToAzureBlob(task);
      task.notifyUploadCompleted(uniqueFileName, url);
    } catch (error) {
      if (error instanceof Error) {
        task.notifyUploadFailed(error.message);
      }
    }
  }
}

const uploadFileToAzureBlob = async (uploadTask: AttachmentUploadTask) => {
  // You need to handle the file upload here and upload it to Azure Blob Storage.
  // This is how you can configure the upload
  // Optionally, you can also update the file upload progress.
  uploadTask.notifyUploadProgressChanged(0.2);
  return {
    url: 'https://sample.com/sample.jpg', // Download URL of the file.
  };
配置上传方法以使用 Azure Blob 存储
为了启用 Azure Blob 存储上传,我们将使用以下代码修改之前声明的 uploadFileToAzureBlob 方法。 我们需要替换 Azure 函数信息以上传文件。
App.tsx
const uploadFileToAzureBlob = async (uploadTask: AttachmentUploadTask) => {
  const file = uploadTask.file;
  if (!file) {
    throw new Error("uploadTask.file is undefined");
  }

  const filename = file.name;
  const fileExtension = file.name.split(".").pop();

  // Following is an example of calling an Azure Function to handle file upload
  // The https://learn.microsoft.com/azure/developer/javascript/how-to/with-web-app/azure-function-file-upload
  // tutorial uses 'username' parameter to specify the storage container name.
  // the container in the tutorial is private by default. To get default downloads working in
  // this sample, you need to change the container's access level to Public via Azure Portal.
  const username = "ui-library";

  // You can get function url from the Azure Portal:
  const azFunctionBaseUri = "<YOUR_AZURE_FUNCTION_URL>";
  const uri = `${azFunctionBaseUri}&username=${username}&filename=${filename}`;

  const formData = new FormData();
  formData.append(file.name, file);

  const response = await axios.request({
    method: "post",
    url: uri,
    data: formData,
    onUploadProgress: (p) => {
      // Optionally, you can update the file upload progress.
      uploadTask.notifyUploadProgressChanged(p.loaded / p.total);
    },
  });

  const storageBaseUrl = "https://<YOUR_STORAGE_ACCOUNT>.blob.core.windows.net";

  return {
    url: `${storageBaseUrl}/${username}/${filename}`,
  };
};
错误处理。
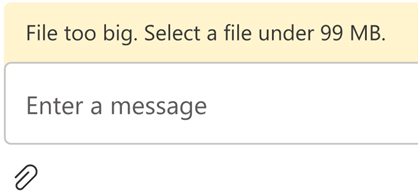
上传失败时,UI 库聊天复合组件将显示错误消息。

下面是演示如何由于大小验证错误而导致上传失败的示例代码:
App.tsx
import { AttachmentSelectionHandler } from from '@azure/communication-react';

const attachmentSelectionHandler: AttachmentSelectionHandler = async (uploadTasks) => {
  for (const task of uploadTasks) {
    if (task.file && task.file.size > 99 * 1024 * 1024) {
      // Notify ChatComposite about upload failure.
      // Allows you to provide a custom error message.
      task.notifyUploadFailed('File too big. Select a file under 99 MB.');
    }
  }
}

export const attachmentUploadOptions: AttachmentUploadOptions = {
  handleAttachmentSelection: attachmentSelectionHandler
};
文件下载 - 高级用法
默认情况下,UI 库将打开一个新的选项卡,指向在notifyUploadCompleted时设置的 URL。 或者,可以有一个自定义逻辑来处理通过actionsForAttachment的附件下载操作。 让我们看看一个示例。
App.tsx
import { AttachmentDownloadOptions } from "communication-react";

const downloadOptions: AttachmentDownloadOptions = {
  actionsForAttachment: handler
}

const handler = async (attachment: AttachmentMetadata, message?: ChatMessage) => {
   // here we are returning a static action for all attachments and all messages
   // alternately, you can provide custom menu actions based on properties in `attachment` or `message`
   return [defaultAttachmentMenuAction];
};

const customHandler = = async (attachment: AttachmentMetadata, message?: ChatMessage) => {
   if (attachment.extension === "pdf") {
    return [
      {
        title: "Custom button",
        icon: (<i className="custom-icon"></i>),
        onClick: () => {
          return new Promise((resolve, reject) => {
              // custom logic here
              window.alert("custom button clicked");
              resolve();
              // or to reject("xxxxx") with a custom message
          })
        }
      },
      defaultAttachmentMenuAction
    ];
  } else if (message?.senderId === "user1") {
    return [
      {
        title: "Custom button 2",
        icon: (<i className="custom-icon-2"></i>),
        onClick: () => {
          return new Promise((resolve, reject) => {
            window.alert("custom button 2 clicked");
            resolve();
          })
        }
      },
      // you can also override the default action partially
      {
        ...defaultAttachmentMenuAction,
        onClick: () => {
          return new Promise((resolve, reject) => {
            window.alert("default button clicked");
            resolve();
          })
        }
      }
    ];
  }
}
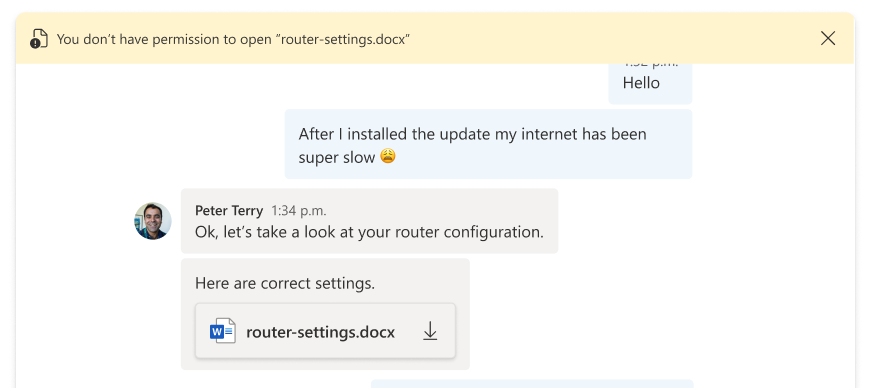
如果在下载过程中遇到任何问题,并且需要通知用户,我们只需在 onClick 函数中throw一条带有消息的错误,消息就会显示在聊天复合顶部的错误栏中。

清理资源
如果想要清理并删除通信服务订阅,可以删除资源或资源组。 删除资源组同时也会删除与之相关联的任何其他资源。 你可以深入了解如何清理 Azure 通信服务资源以及如何清理 Azure Functions 资源。
后续步骤
你可能还想要: