你当前正在访问 Microsoft Azure Global Edition 技术文档网站。 如果需要访问由世纪互联运营的 Microsoft Azure 中国技术文档网站,请访问 https://docs.azure.cn。
创建和管理访问令牌
通过访问令牌,Azure 通信服务 SDK 能够以特定身份直接针对 Azure 通信服务进行身份验证。 如果希望用户在你的应用程序中加入通话或聊天线程,则需要创建访问令牌。
本文介绍如何使用 Azure 通信服务 SDK 创建标识并管理访问令牌。 对于生产用例,我们建议在服务器端服务上生成访问令牌,如客户端和服务器体系结构中所述。
先决条件
设置你的环境
添加扩展
使用 az extension 命令为 Azure CLI 添加 Azure 通信服务扩展。
az extension add --name communication
登录 Azure CLI
你需要登录到 Azure CLI。 可以从终端运行 az login 命令并提供凭据进行登录。
(可选)使用 Azure CLI 标识操作,而无需传入连接字符串
可以配置 AZURE_COMMUNICATION_CONNECTION_STRING 环境变量来使用 Azure CLI 标识操作,而无需使用 --connection_string 来传入连接字符串。 若要配置环境变量,请打开控制台窗口,然后从以下选项卡中选择操作系统。 将 <yourConnectionString> 替换为实际的连接字符串。
打开控制台窗口并输入以下命令:
setx AZURE_COMMUNICATION_CONNECTION_STRING "<yourConnectionString>"
添加环境变量后,你可能需要重启任何需要读取环境变量的正在运行的程序(包括控制台窗口)。 例如,如果使用 Visual Studio 作为编辑器,请在运行示例之前重启 Visual Studio。
在环境变量中存储你的访问令牌
若要配置环境变量,请打开控制台窗口,然后从以下选项卡中选择操作系统。 将 <yourAccessToken> 替换为你的实际访问令牌。
打开控制台窗口并输入以下命令:
setx AZURE_COMMUNICATION_ACCESS_TOKEN "<yourAccessToken>"
添加环境变量后,你可能需要重启任何需要读取环境变量的正在运行的程序(包括控制台窗口)。 例如,如果使用 Visual Studio 作为编辑器,请在运行示例之前重启 Visual Studio。
Operations
创建标识
若要创建访问令牌,需要一个标识。 为此,Azure 通信服务维护了一个轻量级标识目录。 使用 user create 命令可在目录中创建具有唯一 Id 的新条目。 稍后颁发访问令牌时需要该标识。
az communication identity user create --connection-string "<yourConnectionString>"
- 将
<yourConnectionString>替换为你的连接字符串。
在同一请求中创建标识并颁发访问令牌
运行以下命令创建通信服务标识并为它颁发访问令牌。
scopes 参数定义了一组访问令牌权限和角色。 有关详细信息,请参阅向 Azure 通信服务进行身份验证中列出的支持的操作。
az communication identity token issue --scope chat --connection-string "<yourConnectionString>"
在代码中进行此替换:
- 将
<yourConnectionString>替换为你的连接字符串。
颁发访问令牌
运行以下命令为你的通信服务标识颁发访问令牌。
scopes 参数定义了一组访问令牌权限和角色。 有关详细信息,请参阅向 Azure 通信服务进行身份验证中列出的支持的操作。
az communication identity token issue --scope chat --user "<userId>" --connection-string "<yourConnectionString>"
在代码中进行此替换:
- 将
<yourConnectionString>替换为你的连接字符串。 - 将
<userId>替换为你的 userId。
访问令牌是短期凭据,需要重新颁发。 如果不重新颁发,可能会导致应用程序用户的体验中断。
expires_on 响应属性指示访问令牌的生存期。
颁发具有多个范围的访问令牌
运行以下命令为你的通信服务标识颁发具有多个范围的访问令牌。
scopes 参数定义了一组访问令牌权限和角色。 有关详细信息,请参阅标识模型中受支持的操作列表。
az communication identity token issue --scope chat voip --user "<userId>" --connection-string "<yourConnectionString>"
在代码中进行此替换:
- 将
<yourConnectionString>替换为你的连接字符串。 - 将
<userId>替换为你的 userId。
访问令牌是短期凭据,需要重新颁发。 如果不重新颁发,可能会导致应用程序用户的体验中断。
expires_on 响应属性指示访问令牌的生存期。
将 Teams 用户的 Microsoft Entra 访问令牌交换为通信标识访问令牌
使用 token get-for-teams-user 命令为 Teams 用户颁发可与 Azure 通信服务 SDK 一起使用的访问令牌。
az communication identity token get-for-teams-user --aad-token "<yourAadToken>" --client "<yourAadApplication>" --aad-user "<yourAadUser>" --connection-string "<yourConnectionString>"
在代码中进行此替换:
- 将
<yourConnectionString>替换为你的连接字符串。 - 将
<yourAadUser>替换为 Microsoft Entra userId。 - 将
<yourAadApplication>替换为 Microsoft Entra 应用程序 ID。 - 将
<yourAadToken>替换为 Microsoft Entra 访问令牌。
撤销访问令牌
你可能需要显式撤销访问令牌。 例如,当应用程序用户更改了自身用于向你的服务进行身份验证的密码时,你可能要执行此操作。
token revoke 命令使颁发给标识的所有活动访问令牌无效。
az communication identity token revoke --user "<userId>" --connection-string "<yourConnectionString>"
在代码中进行此替换:
- 将
<yourConnectionString>替换为你的连接字符串。 - 将
<userId>替换为你的 userId。
删除标识
当你删除一个标识时,你将撤销所有活动的访问令牌并阻止进一步为该标识颁发访问令牌。 这样做还会移除与标识关联的所有持久性内容。
az communication identity user delete --user "<userId>" --connection-string "<yourConnectionString>"
在代码中进行此替换:
- 将
<yourConnectionString>替换为你的连接字符串。 - 将
<userId>替换为你的 userId。
先决条件
- 具有活动订阅的 Azure 帐户。 免费创建帐户。
- 适用于操作系统的最新 .NET Core SDK 版本。
- 活动的通信服务资源和连接字符串。 创建通信服务资源。
最终代码
在 GitHub 查找最终的代码。
设置你的环境
新建 C# 应用程序
在命令提示符窗口(例如 cmd、PowerShell 或 Bash)中,运行
dotnet new命令来创建名为AccessTokensQuickstart的新控制台应用。 此命令将创建包含单个源文件的简单“Hello World”C# 项目:Program.cs。dotnet new console -o AccessTokensQuickstart将目录更改为新建的应用文件夹,并使用
dotnet build命令编译应用程序。cd AccessTokensQuickstart dotnet build将显示一个简单的
Hello World输出。 如果显示正确,则设置正常工作,你可以开始编写 Azure 通信服务代码。
安装包
仍在应用程序目录中时,使用 dotnet add package 命令安装适用于 .NET 的 Azure 通信服务标识库包。
dotnet add package Azure.Communication.Identity
设置应用框架
在项目目录中,完成以下步骤:
- 在文本编辑器中打开
Program.cs文件。 - 添加
using指令以包括Azure.Communication.Identity命名空间。 - 若要支持异步代码,请更新
Main方法声明。
若要开始,请运行以下代码:
using System;
using Azure;
using Azure.Core;
using Azure.Communication.Identity;

namespace AccessTokensQuickstart
{
    class Program
    {
        static async System.Threading.Tasks.Task Main(string[] args)
        {
            Console.WriteLine("Azure Communication Services - Access Tokens Quickstart");

            // Quickstart code goes here
        }
    }
}
验证客户端
使用连接字符串初始化 CommunicationIdentityClient。 你添加到 Main 方法中的以下代码将从名为 COMMUNICATION_SERVICES_CONNECTION_STRING 的环境变量中检索资源的连接字符串。
有关详细信息,请参阅创建和管理通信服务资源 > 存储连接字符串。
// This code demonstrates how to retrieve your connection string
// from an environment variable.
string connectionString = Environment.GetEnvironmentVariable("COMMUNICATION_SERVICES_CONNECTION_STRING");
var client = new CommunicationIdentityClient(connectionString);
或者,你可以通过运行以下代码来分离终结点和访问密钥:
// This code demonstrates how to fetch your endpoint and access key
// from an environment variable.
string endpoint = Environment.GetEnvironmentVariable("COMMUNICATION_SERVICES_ENDPOINT");
string accessKey = Environment.GetEnvironmentVariable("COMMUNICATION_SERVICES_ACCESSKEY");
var client = new CommunicationIdentityClient(new Uri(endpoint), new AzureKeyCredential(accessKey));
如果已设置 Microsoft Entra 应用程序,则可以使用 Microsoft Entra ID 进行身份验证。
TokenCredential tokenCredential = new DefaultAzureCredential();
var client = new CommunicationIdentityClient(new Uri(endpoint), tokenCredential);
创建标识
若要创建访问令牌,需要一个标识。 为此,Azure 通信服务维护了一个轻量级标识目录。 使用 createUser 方法可在目录中创建具有唯一 Id 的新项。 稍后,请使用该标识颁发访问令牌。
var identityResponse = await client.CreateUserAsync();
var identity = identityResponse.Value;
Console.WriteLine($"\nCreated an identity with ID: {identity.Id}");
存储接收到的标识并映射到应用程序的用户(例如,通过将其存储在应用程序服务器数据库中)。
发布访问令牌
拥有通信服务身份后,使用 GetToken 方法为其颁发访问令牌。
scopes 参数定义了一组访问令牌权限和角色。 有关详细信息,请参阅标识模型中受支持的操作列表。 还可以基于 Azure 通信服务标识的字符串表示构造 communicationUser 的一个新实例。
// Issue an access token with a validity of 24 hours and the "voip" scope for an identity
var tokenResponse = await client.GetTokenAsync(identity, scopes: new [] { CommunicationTokenScope.VoIP });

// Get the token from the response
var token =  tokenResponse.Value.Token;
var expiresOn = tokenResponse.Value.ExpiresOn;
Console.WriteLine($"\nIssued an access token with 'voip' scope that expires at {expiresOn}:");
Console.WriteLine(token);
访问令牌是短期凭据,需要重新颁发。 如果不重新颁发,可能会导致应用程序用户的体验中断。
expiresOn 属性指示访问令牌的生存期。
设置自定义令牌过期时间
默认令牌过期时间为 24 小时,但可以通过为可选参数 tokenExpiresIn 提供一个介于一小时到 24 小时之间的值来配置它。 请求新令牌时,请针对令牌过期时间指定通信会话的预期典型时长。
// Issue an access token with a validity of an hour and the "voip" scope for an identity
TimeSpan tokenExpiresIn = TimeSpan.FromHours(1);
CommunicationTokenScope[] scopes = new[] { CommunicationTokenScope.VoIP };
var tokenResponse = await client.GetTokenAsync(identity, scopes, tokenExpiresIn);
在同一请求中创建标识并颁发令牌
可以使用 CreateUserAndTokenAsync 方法来同时创建通信服务标识并为其颁发访问令牌。
scopes 参数定义了一组访问令牌权限和角色。 有关详细信息,请参阅向 Azure 通信服务进行身份验证中列出的支持的操作。
// Issue an identity and an access token with a validity of 24 hours and the "voip" scope for the new identity
var identityAndTokenResponse = await client.CreateUserAndTokenAsync(scopes: new[] { CommunicationTokenScope.VoIP });

// Retrieve the identity, token, and expiration date from the response
var identity = identityAndTokenResponse.Value.User;
var token = identityAndTokenResponse.Value.AccessToken.Token;
var expiresOn = identityAndTokenResponse.Value.AccessToken.ExpiresOn;
Console.WriteLine($"\nCreated an identity with ID: {identity.Id}");
Console.WriteLine($"\nIssued an access token with 'voip' scope that expires at {expiresOn}:");
Console.WriteLine(token);
刷新访问令牌
若要刷新访问令牌,请将 CommunicationUserIdentifier 对象的实例传递到 GetTokenAsync。 如果已存储此 Id 并且需要创建一个新的 CommunicationUserIdentifier,可以通过将存储的 Id 传递到 CommunicationUserIdentifier 构造函数中来实现,如下所示:
var identityToRefresh = new CommunicationUserIdentifier(identity.Id);
var tokenResponse = await client.GetTokenAsync(identityToRefresh, scopes: new [] { CommunicationTokenScope.VoIP });
撤销访问令牌
你可能需要显式撤销访问令牌。 例如,当应用程序用户更改了自身用于向你的服务进行身份验证的密码时。
RevokeTokensAsync 方法使颁发给标识的所有活动访问令牌无效。
await client.RevokeTokensAsync(identity);
Console.WriteLine($"\nSuccessfully revoked all access tokens for identity with ID: {identity.Id}");
删除标识
当你删除一个标识时,你将撤销所有活动的访问令牌并阻止进一步为该标识颁发访问令牌。 这样做还会移除与标识关联的所有持久性内容。
await client.DeleteUserAsync(identity);
Console.WriteLine($"\nDeleted the identity with ID: {identity.Id}");
运行代码
完成访问令牌创建操作后,你可以使用 dotnet run 命令从应用程序目录运行应用程序。
dotnet run
应用的输出描述了每个已完成的操作:
Azure Communication Services - Access Tokens Quickstart

Created an identity with ID: 8:acs:4ccc92c8-9815-4422-bddc-ceea181dc774_00000006-19e0-2727-80f5-8b3a0d003502

Issued an access token with 'voip' scope that expires at 10/11/2022 7:34:29 AM +00:00:
eyJhbGciOiJSUzI1NiIsImtpZCI6IjEwNiIsIng1dCI6Im9QMWFxQnlfR3hZU3pSaXhuQ25zdE5PU2p2cyIsInR5cCI6IkpXVCJ9.eyJza3lwZWlkIjoiYWNzOjAwMDAwMDAwLTAwMDAtMDAwMC0wMDAwLTAwMDAwMDAwMDAwMF8wMDAwMDAwMC0wMDAwLTAwMDAtMDAwMC0wMDAwMDAwMDAwMDAiLCJzY3AiOjE3OTIsImNzaSI6IjE2NjUzODcyNjkiLCJleHAiOjE2NjUzOTA4NjksImFjc1Njb3BlIjoidm9pcCIsInJlc291cmNlSWQiOiIwMDAwMDAwMC0wMDAwLTAwMDAtMDAwMC0wMDAwMDAwMDAwMDAiLCJyZXNvdXJjZUxvY2F0aW9uIjoidW5pdGVkc3RhdGVzIiwiaWF0IjoxNjY1Mzg3MjY5fQ.kTXpQQtY7w6O82kByljZXrKtBvNNOleDE5m06LapzLeoWfRZCCpJQcDzBoLRA146mOhNzLZ0b5WMNTa5tD-0hWCiicDwgKLMASEGY9g0EvNQOidPff47g2hh6yqi9PKiDPp-t5siBMYqA6Nh6CQ-Oeh-35vcRW09VfcqFN38IgSSzJ7QkqBiY_QtfXz-iaj81Td0287KO4U1y2LJIGiyJLWC567F7A_p1sl6NmPKUmvmwM47tyCcQ1r_lfkRdeyDmcrGgY6yyI3XJZQbpxyt2DZqOTSVPB4PuRl7iyXxvppEa4Uo_y_BdMOOWFe6YTRB5O5lhI8m7Tf0LifisxX2sw

Created an identity with ID: 8:acs:4ccc92c8-9815-4422-bddc-ceea181dc774_00000006-1ce9-31b4-54b7-a43a0d006a52

Issued an access token with 'voip' scope that expires at 10/11/2022 7:34:29 AM +00:00:
eyJhbGciOiJSUzI1NiIsImtpZCI6IjEwNiIsIng1dCI6Im9QMWFxQnlfR3hZU3pSaXhuQ25zdE5PU2p2cyIsInR5cCI6IkpXVCJ9.eyJza3lwZWlkIjoiYWNzOjAwMDAwMDAwLTAwMDAtMDAwMC0wMDAwLTAwMDAwMDAwMDAwMF8wMDAwMDAwMC0wMDAwLTAwMDAtMDAwMC0wMDAwMDAwMDAwMDAiLCJzY3AiOjE3OTIsImNzaSI6IjE2NjUzODcyNjkiLCJleHAiOjE2NjUzOTA4NjksImFjc1Njb3BlIjoidm9pcCIsInJlc291cmNlSWQiOiIwMDAwMDAwMC0wMDAwLTAwMDAtMDAwMC0wMDAwMDAwMDAwMDAiLCJyZXNvdXJjZUxvY2F0aW9uIjoidW5pdGVkc3RhdGVzIiwiaWF0IjoxNjY1Mzg3MjY5fQ.kTXpQQtY7w6O82kByljZXrKtBvNNOleDE5m06LapzLeoWfRZCCpJQcDzBoLRA146mOhNzLZ0b5WMNTa5tD-0hWCiicDwgKLMASEGY9g0EvNQOidPff47g2hh6yqi9PKiDPp-t5siBMYqA6Nh6CQ-Oeh-35vcRW09VfcqFN38IgSSzJ7QkqBiY_QtfXz-iaj81Td0287KO4U1y2LJIGiyJLWC567F7A_p1sl6NmPKUmvmwM47tyCcQ1r_lfkRdeyDmcrGgY6yyI3XJZQbpxyt2DZqOTSVPB4PuRl7iyXxvppEa4Uo_y_BdMOOWFe6YTRB5O5lhI8m7Tf0LifisxX2sw

Successfully revoked all access tokens for identity with ID: 8:acs:4ccc92c8-9815-4422-bddc-ceea181dc774_00000006-19e0-2727-80f5-8b3a0d003502

Deleted the identity with ID: 8:acs:4ccc92c8-9815-4422-bddc-ceea181dc774_00000006-19e0-2727-80f5-8b3a0d003502
先决条件
- 具有活动订阅的 Azure 帐户。 免费创建帐户。
- Node.js,活动 LTS 和维护 LTS 版本(建议使用 8.11.1 和 10.14.1)。
- 活动的通信服务资源和连接字符串。 创建通信服务资源。
最终代码
在 GitHub 查找最终的代码。
设置你的环境
创建新的 Node.js 应用程序
在终端或命令提示符窗口中,为你的应用创建一个新目录,然后打开此目录。
mkdir access-tokens-quickstart && cd access-tokens-quickstart运行
npm init -y以使用默认设置创建package.json文件。npm init -y
安装包
使用 npm install 命令安装适用于 JavaScript 的 Azure 通信服务标识 SDK。
npm install @azure/communication-identity@latest --save
--save 选项将该库作为 package.json 文件中的依赖项列出。
设置应用框架
在项目目录中创建一个名为
issue-access-token.js的文件,并添加以下代码:const { CommunicationIdentityClient } = require('@azure/communication-identity'); const main = async () => { console.log("Azure Communication Services - Access Tokens Quickstart") // Quickstart code goes here }; main().catch((error) => { console.log("Encountered an error"); console.log(error); })
验证客户端
使用连接字符串实例化 CommunicationIdentityClient。 你添加到 Main 方法中的以下代码将从名为 COMMUNICATION_SERVICES_CONNECTION_STRING 的环境变量中检索资源的连接字符串。
有关详细信息,请参阅创建和管理通信服务资源 > 存储连接字符串。
// This code demonstrates how to fetch your connection string
// from an environment variable.
const connectionString = process.env['COMMUNICATION_SERVICES_CONNECTION_STRING'];

// Instantiate the identity client
const identityClient = new CommunicationIdentityClient(connectionString);
或者,你可以通过运行以下代码来分离终结点和访问密钥:
// This code demonstrates how to fetch your endpoint and access key
// from an environment variable.
const endpoint = process.env["COMMUNICATION_SERVICES_ENDPOINT"];
const accessKey = process.env["COMMUNICATION_SERVICES_ACCESSKEY"];

// Create the credential
const tokenCredential = new AzureKeyCredential(accessKey);

// Instantiate the identity client
const identityClient = new CommunicationIdentityClient(endpoint, tokenCredential)
如果已设置 Microsoft Entra 应用程序,则可以使用 Microsoft Entra ID 进行身份验证。
const endpoint = process.env["COMMUNICATION_SERVICES_ENDPOINT"];
const tokenCredential = new DefaultAzureCredential();
const identityClient = new CommunicationIdentityClient(endpoint, tokenCredential);
创建标识
若要创建访问令牌,需要一个标识。 为此,Azure 通信服务维护了一个轻量级标识目录。 使用 createUser 方法可在目录中创建具有唯一 Id 的新项。 稍后,你将需要使用该标识来颁发访问令牌。
let identityResponse = await identityClient.createUser();
console.log(`\nCreated an identity with ID: ${identityResponse.communicationUserId}`);
存储接收到的标识并映射到应用程序的用户(例如,通过将其存储在应用程序服务器数据库中)。
发布访问令牌
使用 getToken 方法为你的通信服务标识颁发访问令牌。
scopes 参数定义了一组访问令牌权限和角色。 有关详细信息,请参阅标识模型中受支持的操作列表。 还可以基于 Azure 通信服务标识的字符串表示构造 communicationUser 的一个新实例。
// Issue an access token with a validity of 24 hours and the "voip" scope for an identity
let tokenResponse = await identityClient.getToken(identityResponse, ["voip"]);

// Get the token and its expiration date from the response
const { token, expiresOn } = tokenResponse;
console.log(`\nIssued an access token with 'voip' scope that expires at ${expiresOn}:`);
console.log(token);
访问令牌是短期凭据,需要重新颁发。 如果不重新颁发,可能会导致应用程序用户的体验中断。
expiresOn 属性指示访问令牌的生存期。
设置自定义令牌过期时间
默认令牌过期时间为 24 小时(1440 分钟),但可以通过为可选参数 tokenExpiresInMinutes 提供一个介于 60 分钟到 1440 分钟之间的值来配置它。 请求新令牌时,请针对令牌过期时间指定通信会话的预期典型时长。
// Issue an access token with a validity of an hour and the "voip" scope for an identity
const tokenOptions: GetTokenOptions = { tokenExpiresInMinutes: 60 };
let tokenResponse = await identityClient.getToken
(identityResponse, ["voip"], tokenOptions);
在一个方法调用中创建标识并颁发令牌
可以使用 createUserAndToken 方法来同时创建通信服务标识并为其颁发访问令牌。
scopes 参数定义了一组访问令牌权限和角色。 请使用 voip 范围创建标识。
// Issue an identity and an access token with a validity of 24 hours and the "voip" scope for the new identity
let identityTokenResponse = await identityClient.createUserAndToken(["voip"]);

// Get the token, its expiration date, and the user from the response
const { token, expiresOn, user } = identityTokenResponse;
console.log(`\nCreated an identity with ID: ${user.communicationUserId}`);
console.log(`\nIssued an access token with 'voip' scope that expires at ${expiresOn}:`);
console.log(token);
刷新访问令牌
令牌过期后,你需要对其进行刷新。 若要刷新令牌,请使用用于颁发令牌的相同标识再次调用 getToken。 还需要提供已刷新令牌的 scopes。
// Value of identityResponse represents the Azure Communication Services identity stored during identity creation and then used to issue the tokens being refreshed
let refreshedTokenResponse = await identityClient.getToken(identityResponse, ["voip"]);
撤销访问令牌
你可能需要撤销访问令牌。 例如,当应用程序用户更改了自身用于向你的服务进行身份验证的密码时,你将会执行此操作。
revokeTokens 方法使颁发给标识的所有活动访问令牌无效。
await identityClient.revokeTokens(identityResponse);

console.log(`\nSuccessfully revoked all access tokens for identity with ID: ${identityResponse.communicationUserId}`);
删除标识
当你删除一个标识时,你将撤销所有活动的访问令牌并阻止进一步为该标识颁发访问令牌。 这样做还会移除与标识关联的所有持久性内容。
await identityClient.deleteUser(identityResponse);

console.log(`\nDeleted the identity with ID: ${identityResponse.communicationUserId}`);
运行代码
在控制台提示符下,转到包含 issue-access-token.js 文件的目录,然后执行以下 node 命令来运行应用:
node ./issue-access-token.js
应用的输出描述了每个已完成的操作:
Azure Communication Services - Access Tokens Quickstart

Created an identity with ID: 8:acs:4ccc92c8-9815-4422-bddc-ceea181dc774_00000006-19e0-2727-80f5-8b3a0d003502

Issued an access token with 'voip' scope that expires at 2022-10-11T07:34:29.9028648+00:00:
eyJhbGciOiJSUzI1NiIsImtpZCI6IjEwNiIsIng1dCI6Im9QMWFxQnlfR3hZU3pSaXhuQ25zdE5PU2p2cyIsInR5cCI6IkpXVCJ9.eyJza3lwZWlkIjoiYWNzOjAwMDAwMDAwLTAwMDAtMDAwMC0wMDAwLTAwMDAwMDAwMDAwMF8wMDAwMDAwMC0wMDAwLTAwMDAtMDAwMC0wMDAwMDAwMDAwMDAiLCJzY3AiOjE3OTIsImNzaSI6IjE2NjUzODcyNjkiLCJleHAiOjE2NjUzOTA4NjksImFjc1Njb3BlIjoidm9pcCIsInJlc291cmNlSWQiOiIwMDAwMDAwMC0wMDAwLTAwMDAtMDAwMC0wMDAwMDAwMDAwMDAiLCJyZXNvdXJjZUxvY2F0aW9uIjoidW5pdGVkc3RhdGVzIiwiaWF0IjoxNjY1Mzg3MjY5fQ.kTXpQQtY7w6O82kByljZXrKtBvNNOleDE5m06LapzLeoWfRZCCpJQcDzBoLRA146mOhNzLZ0b5WMNTa5tD-0hWCiicDwgKLMASEGY9g0EvNQOidPff47g2hh6yqi9PKiDPp-t5siBMYqA6Nh6CQ-Oeh-35vcRW09VfcqFN38IgSSzJ7QkqBiY_QtfXz-iaj81Td0287KO4U1y2LJIGiyJLWC567F7A_p1sl6NmPKUmvmwM47tyCcQ1r_lfkRdeyDmcrGgY6yyI3XJZQbpxyt2DZqOTSVPB4PuRl7iyXxvppEa4Uo_y_BdMOOWFe6YTRB5O5lhI8m7Tf0LifisxX2sw

Created an identity with ID: 8:acs:4ccc92c8-9815-4422-bddc-ceea181dc774_00000006-1ce9-31b4-54b7-a43a0d006a52

Issued an access token with 'voip' scope that expires at 2022-10-11T07:34:29.9028648+00:00:
eyJhbGciOiJSUzI1NiIsImtpZCI6IjEwNiIsIng1dCI6Im9QMWFxQnlfR3hZU3pSaXhuQ25zdE5PU2p2cyIsInR5cCI6IkpXVCJ9.eyJza3lwZWlkIjoiYWNzOjAwMDAwMDAwLTAwMDAtMDAwMC0wMDAwLTAwMDAwMDAwMDAwMF8wMDAwMDAwMC0wMDAwLTAwMDAtMDAwMC0wMDAwMDAwMDAwMDAiLCJzY3AiOjE3OTIsImNzaSI6IjE2NjUzODcyNjkiLCJleHAiOjE2NjUzOTA4NjksImFjc1Njb3BlIjoidm9pcCIsInJlc291cmNlSWQiOiIwMDAwMDAwMC0wMDAwLTAwMDAtMDAwMC0wMDAwMDAwMDAwMDAiLCJyZXNvdXJjZUxvY2F0aW9uIjoidW5pdGVkc3RhdGVzIiwiaWF0IjoxNjY1Mzg3MjY5fQ.kTXpQQtY7w6O82kByljZXrKtBvNNOleDE5m06LapzLeoWfRZCCpJQcDzBoLRA146mOhNzLZ0b5WMNTa5tD-0hWCiicDwgKLMASEGY9g0EvNQOidPff47g2hh6yqi9PKiDPp-t5siBMYqA6Nh6CQ-Oeh-35vcRW09VfcqFN38IgSSzJ7QkqBiY_QtfXz-iaj81Td0287KO4U1y2LJIGiyJLWC567F7A_p1sl6NmPKUmvmwM47tyCcQ1r_lfkRdeyDmcrGgY6yyI3XJZQbpxyt2DZqOTSVPB4PuRl7iyXxvppEa4Uo_y_BdMOOWFe6YTRB5O5lhI8m7Tf0LifisxX2sw

Successfully revoked all access tokens for identity with ID: 8:acs:4ccc92c8-9815-4422-bddc-ceea181dc774_00000006-19e0-2727-80f5-8b3a0d003502

Deleted the identity with ID: 8:acs:4ccc92c8-9815-4422-bddc-ceea181dc774_00000006-19e0-2727-80f5-8b3a0d003502
先决条件
最终代码
在 GitHub 查找最终的代码。
设置你的环境
创建新的 Python 应用程序
在终端或命令提示符窗口中,为你的应用创建一个新目录,然后打开此目录。
mkdir access-tokens-quickstart && cd access-tokens-quickstart使用文本编辑器在项目根目录中创建名为“
issue-access-tokens.py”的文件。 然后,为程序添加结构,包括基本的异常处理。 你需要将所有源代码添加到此文件。import os from datetime import timedelta from azure.communication.identity import CommunicationIdentityClient, CommunicationUserIdentifier try: print("Azure Communication Services - Access Tokens Quickstart") # Quickstart code goes here except Exception as ex: print("Exception:") print(ex)
安装包
在应用程序目录中,使用 pip install 命令安装用于 Python 的 Azure 通信服务标识 SDK 包。
pip install azure-communication-identity
验证客户端
使用连接字符串实例化 CommunicationIdentityClient。 你添加到 try 块中的以下代码将从名为 COMMUNICATION_SERVICES_CONNECTION_STRING 的环境变量中检索资源的连接字符串。
有关详细信息,请参阅创建和管理通信服务资源 > 存储连接字符串。
# This code demonstrates how to retrieve your connection string
# from an environment variable.
connection_string = os.environ["COMMUNICATION_SERVICES_CONNECTION_STRING"]

# Instantiate the identity client
client = CommunicationIdentityClient.from_connection_string(connection_string)
或者,如果已设置 Microsoft Entra 应用程序,则可以使用 Microsoft Entra ID 进行身份验证。
endpoint = os.environ["COMMUNICATION_SERVICES_ENDPOINT"]
client = CommunicationIdentityClient(endpoint, DefaultAzureCredential())
创建标识
若要创建访问令牌,需要一个标识。 为此,Azure 通信服务维护了一个轻量级标识目录。 使用 create_user 方法可在目录中创建具有唯一 Id 的新项。 稍后颁发访问令牌时需要该标识。
identity = client.create_user()
print("\nCreated an identity with ID: " + identity.properties['id'])
存储接收到的标识并映射到应用程序的用户(例如,通过将其存储在应用程序服务器数据库中)。
发布访问令牌
使用 get_token 方法为你的通信服务标识颁发访问令牌。
scopes 参数定义了一组访问令牌权限和角色。 有关详细信息,请参阅标识模型中受支持的操作列表。 还可以基于 Azure 通信服务标识的字符串表示构造参数 CommunicationUserIdentifier 的一个新实例。
# Issue an access token with a validity of 24 hours and the "voip" scope for an identity
token_result = client.get_token(identity, ["voip"])
print("\nIssued an access token with 'voip' scope that expires at " + token_result.expires_on + ":")
print(token_result.token)
访问令牌是短期凭据,需要重新颁发。 如果不重新颁发,可能会导致应用程序用户的体验中断。
expires_on 响应属性指示访问令牌的生存期。
设置自定义令牌过期时间
默认令牌过期时间为 24 小时,但可以通过为可选参数 token_expires_in 提供一个介于一小时到 24 小时之间的值来配置它。 请求新令牌时,请针对令牌过期时间指定通信会话的预期典型时长。
# Issue an access token with a validity of an hour and the "voip" scope for an identity
token_expires_in = timedelta(hours=1)
token_result = client.get_token(identity, ["voip"], token_expires_in=token_expires_in)
在同一请求中创建标识并颁发访问令牌
可以使用 create_user_and_token 方法来同时创建通信服务标识并为其颁发访问令牌。
scopes 参数定义了一组访问令牌权限和角色。 有关详细信息,请参阅向 Azure 通信服务进行身份验证中列出的支持的操作。
# Issue an identity and an access token with a validity of 24 hours and the "voip" scope for the new identity
identity_token_result = client.create_user_and_token(["voip"])

# Get the token details from the response
identity = identity_token_result[0]
token = identity_token_result[1].token
expires_on = identity_token_result[1].expires_on
print("\nCreated an identity with ID: " + identity.properties['id'])
print("\nIssued an access token with 'voip' scope that expires at " + expires_on + ":")
print(token)
刷新访问令牌
要刷新访问令牌,请使用 CommunicationUserIdentifier 对象通过传入现有身份重新颁发令牌:
# The existingIdentity value represents the Communication Services identity that's stored during identity creation
identity = CommunicationUserIdentifier(existingIdentity)
token_result = client.get_token(identity, ["voip"])
撤销访问令牌
你可能需要显式撤销访问令牌。 例如,当应用程序用户更改了自身用于向你的服务进行身份验证的密码时。
revoke_tokens 方法使颁发给标识的所有活动访问令牌无效。
client.revoke_tokens(identity)
print("\nSuccessfully revoked all access tokens for identity with ID: " + identity.properties['id'])
删除标识
当你删除一个标识时,你将撤销所有活动的访问令牌并阻止进一步为该标识颁发访问令牌。 这样做还会移除与标识关联的所有持久性内容。
client.delete_user(identity)
print("\nDeleted the identity with ID: " + identity.properties['id'])
运行代码
在控制台提示符下,转到包含 issue-access-tokens.py 文件的目录,然后执行以下 python 命令来运行应用。
python ./issue-access-tokens.py
生成的输出描述了每个已完成的操作:
Azure Communication Services - Access Tokens Quickstart

Created an identity with ID: 8:acs:4ccc92c8-9815-4422-bddc-ceea181dc774_00000006-19e0-2727-80f5-8b3a0d003502

Issued an access token with 'voip' scope that expires at 2022-10-11T07:34:29.9028648+00:00:
eyJhbGciOiJSUzI1NiIsImtpZCI6IjEwNiIsIng1dCI6Im9QMWFxQnlfR3hZU3pSaXhuQ25zdE5PU2p2cyIsInR5cCI6IkpXVCJ9.eyJza3lwZWlkIjoiYWNzOjAwMDAwMDAwLTAwMDAtMDAwMC0wMDAwLTAwMDAwMDAwMDAwMF8wMDAwMDAwMC0wMDAwLTAwMDAtMDAwMC0wMDAwMDAwMDAwMDAiLCJzY3AiOjE3OTIsImNzaSI6IjE2NjUzODcyNjkiLCJleHAiOjE2NjUzOTA4NjksImFjc1Njb3BlIjoidm9pcCIsInJlc291cmNlSWQiOiIwMDAwMDAwMC0wMDAwLTAwMDAtMDAwMC0wMDAwMDAwMDAwMDAiLCJyZXNvdXJjZUxvY2F0aW9uIjoidW5pdGVkc3RhdGVzIiwiaWF0IjoxNjY1Mzg3MjY5fQ.kTXpQQtY7w6O82kByljZXrKtBvNNOleDE5m06LapzLeoWfRZCCpJQcDzBoLRA146mOhNzLZ0b5WMNTa5tD-0hWCiicDwgKLMASEGY9g0EvNQOidPff47g2hh6yqi9PKiDPp-t5siBMYqA6Nh6CQ-Oeh-35vcRW09VfcqFN38IgSSzJ7QkqBiY_QtfXz-iaj81Td0287KO4U1y2LJIGiyJLWC567F7A_p1sl6NmPKUmvmwM47tyCcQ1r_lfkRdeyDmcrGgY6yyI3XJZQbpxyt2DZqOTSVPB4PuRl7iyXxvppEa4Uo_y_BdMOOWFe6YTRB5O5lhI8m7Tf0LifisxX2sw

Created an identity with ID: 8:acs:4ccc92c8-9815-4422-bddc-ceea181dc774_00000006-1ce9-31b4-54b7-a43a0d006a52

Issued an access token with 'voip' scope that expires at 2022-10-11T07:34:29.9028648+00:00:
eyJhbGciOiJSUzI1NiIsImtpZCI6IjEwNiIsIng1dCI6Im9QMWFxQnlfR3hZU3pSaXhuQ25zdE5PU2p2cyIsInR5cCI6IkpXVCJ9.eyJza3lwZWlkIjoiYWNzOjAwMDAwMDAwLTAwMDAtMDAwMC0wMDAwLTAwMDAwMDAwMDAwMF8wMDAwMDAwMC0wMDAwLTAwMDAtMDAwMC0wMDAwMDAwMDAwMDAiLCJzY3AiOjE3OTIsImNzaSI6IjE2NjUzODcyNjkiLCJleHAiOjE2NjUzOTA4NjksImFjc1Njb3BlIjoidm9pcCIsInJlc291cmNlSWQiOiIwMDAwMDAwMC0wMDAwLTAwMDAtMDAwMC0wMDAwMDAwMDAwMDAiLCJyZXNvdXJjZUxvY2F0aW9uIjoidW5pdGVkc3RhdGVzIiwiaWF0IjoxNjY1Mzg3MjY5fQ.kTXpQQtY7w6O82kByljZXrKtBvNNOleDE5m06LapzLeoWfRZCCpJQcDzBoLRA146mOhNzLZ0b5WMNTa5tD-0hWCiicDwgKLMASEGY9g0EvNQOidPff47g2hh6yqi9PKiDPp-t5siBMYqA6Nh6CQ-Oeh-35vcRW09VfcqFN38IgSSzJ7QkqBiY_QtfXz-iaj81Td0287KO4U1y2LJIGiyJLWC567F7A_p1sl6NmPKUmvmwM47tyCcQ1r_lfkRdeyDmcrGgY6yyI3XJZQbpxyt2DZqOTSVPB4PuRl7iyXxvppEa4Uo_y_BdMOOWFe6YTRB5O5lhI8m7Tf0LifisxX2sw

Successfully revoked all access tokens for identity with ID: 8:acs:4ccc92c8-9815-4422-bddc-ceea181dc774_00000006-19e0-2727-80f5-8b3a0d003502

Deleted the identity with ID: 8:acs:4ccc92c8-9815-4422-bddc-ceea181dc774_00000006-19e0-2727-80f5-8b3a0d003502
先决条件
- 具有活动订阅的 Azure 帐户。 免费创建帐户。
- Java 开发工具包 (JDK) 版本 8 或更高版本。
- Apache Maven。
- 活动的通信服务资源和连接字符串。 创建通信服务资源。
最终代码
在 GitHub 查找最终的代码。
设置你的环境
创建新的 Java 应用程序
在终端或命令提示符窗口中,转到要创建 Java 应用程序的目录。 要从 maven-archetype-quickstart 模板生成 Java 项目,请运行以下命令:
mvn archetype:generate -DgroupId=com.communication.quickstart -DartifactId=communication-quickstart -DarchetypeArtifactId=maven-archetype-quickstart -DarchetypeVersion=1.4 -DinteractiveMode=false
你会注意到,generate 任务创建了与 artifactId 名称相同的目录。 在此目录下,src/main/java 目录包含项目源代码,src/test/java 目录包含测试源,pom.xml 文件是项目的项目对象模型 (POM)。 此文件用于项目配置参数。
安装通信服务包
在文本编辑器中打开 pom.xml 文件。 将以下依赖项元素添加到依赖项组:
<dependency>
    <groupId>com.azure</groupId>
    <artifactId>azure-communication-identity</artifactId>
    <version>[1.4.0,)</version>
</dependency>
此代码指示 Maven 安装通信服务标识 SDK,稍后你将需要使用该 SDK。
设置应用框架
在项目目录中,完成以下步骤:
- 转到
/src/main/java/com/communication/quickstart目录。 - 在编辑器中打开
App.java文件。 - 替换
System.out.println("Hello world!");语句。 - 添加
import指令。
使用以下代码以开始执行以下操作:
package com.communication.quickstart;

import com.azure.communication.common.*;
import com.azure.communication.identity.*;
import com.azure.communication.identity.models.*;
import com.azure.core.credential.*;

import java.io.IOException;
import java.time.*;
import java.util.*;

public class App
{
    public static void main( String[] args ) throws IOException
    {
        System.out.println("Azure Communication Services - Access Tokens Quickstart");
        // Quickstart code goes here
    }
}
验证客户端
使用资源的访问密钥和终结点将 CommunicationIdentityClient 实例化。 有关详细信息,请参阅创建和管理通信服务资源 > 存储连接字符串。
还可以使用任何实现 com.azure.core.http.HttpClient 接口的自定义 HTTP 客户端来初始化此客户端。
在 App.java 文件中,将以下代码添加到 main 方法中:
// You can find your endpoint and access key from your resource in the Azure portal
String endpoint = "https://<RESOURCE_NAME>.communication.azure.com";
String accessKey = "SECRET";

CommunicationIdentityClient communicationIdentityClient = new CommunicationIdentityClientBuilder()
        .endpoint(endpoint)
        .credential(new AzureKeyCredential(accessKey))
        .buildClient();
你可以使用 connectionString() 方法提供整个连接字符串,而不是提供终结点和访问密钥。
// You can find your connection string from your Communication Services resource in the Azure portal
String connectionString = "<connection_string>";

CommunicationIdentityClient communicationIdentityClient = new CommunicationIdentityClientBuilder()
    .connectionString(connectionString)
    .buildClient();
如果已设置 Microsoft Entra 应用程序,则可以使用 Microsoft Entra ID 进行身份验证。
String endpoint = "https://<RESOURCE_NAME>.communication.azure.com";
TokenCredential credential = new DefaultAzureCredentialBuilder().build();

CommunicationIdentityClient communicationIdentityClient = new CommunicationIdentityClientBuilder()
        .endpoint(endpoint)
        .credential(credential)
        .buildClient();
创建标识
若要创建访问令牌,需要一个标识。 为此,Azure 通信服务维护了一个轻量级标识目录。 使用 createUser 方法可在目录中创建具有唯一 Id 的新项。
CommunicationUserIdentifier user = communicationIdentityClient.createUser();
System.out.println("\nCreated an identity with ID: " + user.getId());
稍后颁发访问令牌时需要创建的标识。 存储接收到的标识并映射到应用程序的用户(例如,通过将其存储在应用程序服务器数据库中)。
发布访问令牌
使用 getToken 方法为你的通信服务标识颁发访问令牌。
scopes 参数定义了一组访问令牌权限和角色。 有关详细信息,请参阅标识模型中受支持的操作列表。
在以下代码中,使用你在上一步中创建的用户变量来获取令牌。
// Issue an access token with a validity of 24 hours and the "voip" scope for a user identity
List<CommunicationTokenScope> scopes = new ArrayList<>(Arrays.asList(CommunicationTokenScope.VOIP));
AccessToken accessToken = communicationIdentityClient.getToken(user, scopes);
OffsetDateTime expiresAt = accessToken.getExpiresAt();
String token = accessToken.getToken();
System.out.println("\nIssued an access token with 'voip' scope that expires at: " + expiresAt + ": " + token);
访问令牌是短期凭据,需要重新颁发。 如果不重新颁发,可能会导致应用程序用户的体验中断。
expiresAt 属性指示访问令牌的生存期。
设置自定义令牌过期时间
默认令牌过期时间为 24 小时,但可以通过为可选参数 tokenExpiresIn 提供一个介于一小时到 24 小时之间的值来配置它。 请求新令牌时,请针对令牌过期时间指定通信会话的预期典型时长。
// Issue an access token with a validity of an hour and the "voip" scope for a user identity
List<CommunicationTokenScope> scopes = new ArrayList<>(Arrays.asList(CommunicationTokenScope.VOIP));
Duration tokenExpiresIn = Duration.ofHours(1);
AccessToken accessToken = communicationIdentityClient.getToken(user, scopes, tokenExpiresIn);
在一个请求中创建标识并颁发令牌
另外,还可以使用“createUserAndToken”方法以同时在目录中创建一个具有唯一 Id 的新条目,并颁发一个访问令牌。
//Create an identity and issue token with a validity of 24 hours in one call
List<CommunicationTokenScope> scopes = Arrays.asList(CommunicationTokenScope.CHAT);
CommunicationUserIdentifierAndToken result = communicationIdentityClient.createUserAndToken(scopes);
CommunicationUserIdentifier user = result.getUser();
System.out.println("\nCreated a user identity with ID: " + user.getId());
AccessToken accessToken = result.getUserToken();
OffsetDateTime expiresAt = accessToken.getExpiresAt();
String token = accessToken.getToken();
System.out.println("\nIssued an access token with 'chat' scope that expires at: " + expiresAt + ": " + token);
刷新访问令牌
若要刷新访问令牌,请使用 CommunicationUserIdentifier 对象重新颁发:
// existingIdentity represents the Communication Services identity that's stored during identity creation
CommunicationUserIdentifier identity = new CommunicationUserIdentifier(existingIdentity.getId());
AccessToken response = communicationIdentityClient.getToken(identity, scopes);
撤销访问令牌
你可能需要显式撤销访问令牌。 例如,当应用程序用户更改了自身用于向你的服务进行身份验证的密码时,你可能要执行此操作。
revokeTokens 方法使特定用户的所有活动访问令牌无效。 在下面的代码中,可以使用以前创建的用户。
communicationIdentityClient.revokeTokens(user);
System.out.println("\nSuccessfully revoked all access tokens for user identity with ID: " + user.getId());
删除标识
当你删除一个标识时,你将撤销所有活动的访问令牌并阻止进一步为该标识颁发访问令牌。 这样做还会移除与标识关联的所有持久性内容。
communicationIdentityClient.deleteUser(user);
System.out.println("\nDeleted the user identity with ID: " + user.getId());
运行代码
转到包含
pom.xml文件的目录。使用以下
mvn命令编译项目:mvn compile生成包:
mvn package运行以下
mvn命令以执行应用:mvn exec:java -Dexec.mainClass="com.communication.quickstart.App" -Dexec.cleanupDaemonThreads=false
输出描述了每个已完成的操作:
Azure Communication Services - Access Tokens Quickstart

Created an identity with ID: 8:acs:4ccc92c8-9815-4422-bddc-ceea181dc774_00000006-19e0-2727-80f5-8b3a0d003502

Issued an access token with 'voip' scope that expires at 2022-10-11T07:34:29.902864800Z:
eyJhbGciOiJSUzI1NiIsImtpZCI6IjEwNiIsIng1dCI6Im9QMWFxQnlfR3hZU3pSaXhuQ25zdE5PU2p2cyIsInR5cCI6IkpXVCJ9.eyJza3lwZWlkIjoiYWNzOjAwMDAwMDAwLTAwMDAtMDAwMC0wMDAwLTAwMDAwMDAwMDAwMF8wMDAwMDAwMC0wMDAwLTAwMDAtMDAwMC0wMDAwMDAwMDAwMDAiLCJzY3AiOjE3OTIsImNzaSI6IjE2NjUzODcyNjkiLCJleHAiOjE2NjUzOTA4NjksImFjc1Njb3BlIjoidm9pcCIsInJlc291cmNlSWQiOiIwMDAwMDAwMC0wMDAwLTAwMDAtMDAwMC0wMDAwMDAwMDAwMDAiLCJyZXNvdXJjZUxvY2F0aW9uIjoidW5pdGVkc3RhdGVzIiwiaWF0IjoxNjY1Mzg3MjY5fQ.kTXpQQtY7w6O82kByljZXrKtBvNNOleDE5m06LapzLeoWfRZCCpJQcDzBoLRA146mOhNzLZ0b5WMNTa5tD-0hWCiicDwgKLMASEGY9g0EvNQOidPff47g2hh6yqi9PKiDPp-t5siBMYqA6Nh6CQ-Oeh-35vcRW09VfcqFN38IgSSzJ7QkqBiY_QtfXz-iaj81Td0287KO4U1y2LJIGiyJLWC567F7A_p1sl6NmPKUmvmwM47tyCcQ1r_lfkRdeyDmcrGgY6yyI3XJZQbpxyt2DZqOTSVPB4PuRl7iyXxvppEa4Uo_y_BdMOOWFe6YTRB5O5lhI8m7Tf0LifisxX2sw

Created an identity with ID: 8:acs:4ccc92c8-9815-4422-bddc-ceea181dc774_00000006-1ce9-31b4-54b7-a43a0d006a52

Issued an access token with 'chat' scope that expires at 2022-10-11T07:34:29.902864800Z:
eyJhbGciOiJSUzI1NiIsImtpZCI6IjEwNiIsIng1dCI6Im9QMWFxQnlfR3hZU3pSaXhuQ25zdE5PU2p2cyIsInR5cCI6IkpXVCJ9.eyJza3lwZWlkIjoiYWNzOjAwMDAwMDAwLTAwMDAtMDAwMC0wMDAwLTAwMDAwMDAwMDAwMF8wMDAwMDAwMC0wMDAwLTAwMDAtMDAwMC0wMDAwMDAwMDAwMDAiLCJzY3AiOjE3OTIsImNzaSI6IjE2NjUzODcyNjkiLCJleHAiOjE2NjUzOTA4NjksImFjc1Njb3BlIjoidm9pcCIsInJlc291cmNlSWQiOiIwMDAwMDAwMC0wMDAwLTAwMDAtMDAwMC0wMDAwMDAwMDAwMDAiLCJyZXNvdXJjZUxvY2F0aW9uIjoidW5pdGVkc3RhdGVzIiwiaWF0IjoxNjY1Mzg3MjY5fQ.kTXpQQtY7w6O82kByljZXrKtBvNNOleDE5m06LapzLeoWfRZCCpJQcDzBoLRA146mOhNzLZ0b5WMNTa5tD-0hWCiicDwgKLMASEGY9g0EvNQOidPff47g2hh6yqi9PKiDPp-t5siBMYqA6Nh6CQ-Oeh-35vcRW09VfcqFN38IgSSzJ7QkqBiY_QtfXz-iaj81Td0287KO4U1y2LJIGiyJLWC567F7A_p1sl6NmPKUmvmwM47tyCcQ1r_lfkRdeyDmcrGgY6yyI3XJZQbpxyt2DZqOTSVPB4PuRl7iyXxvppEa4Uo_y_BdMOOWFe6YTRB5O5lhI8m7Tf0LifisxX2sw

Successfully revoked all access tokens for identity with ID: 8:acs:4ccc92c8-9815-4422-bddc-ceea181dc774_00000006-19e0-2727-80f5-8b3a0d003502

Deleted the identity with ID: 8:acs:4ccc92c8-9815-4422-bddc-ceea181dc774_00000006-19e0-2727-80f5-8b3a0d003502
先决条件
创建访问令牌
先决条件
具有活动订阅的 Azure 帐户。 免费创建 Azure 帐户。
活动 Azure 通信服务资源。 创建通信服务资源。
活动的 Azure 逻辑应用资源(逻辑应用)。 请创建具有要使用的触发器的“消耗”逻辑应用工作流。 目前,Azure 通信服务标识连接器仅提供操作,因此逻辑应用至少需要一个触发器。
创建用户
使用 Azure 通信服务标识连接器在工作流中添加新步骤。 在编辑模式下打开 Power Automate 流程,以在 Power Automate 中完成这些步骤。
打开设计器。 在要添加新操作的步骤中,选择“新步骤”。 或者,若要在步骤之间添加新操作,请将鼠标悬停在这些步骤之间的箭头上,选择加号 (+),然后选择“添加操作”。
在“选择操作”搜索框中,输入通信服务标识。 从操作列表中,选择“创建用户”。
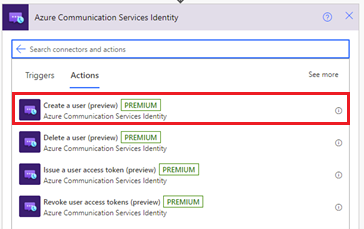
提供连接字符串。 你可以在 Microsoft Azure 门户中的 Azure 通信服务资源中找到该信息。 在左侧面板菜单中选择“密钥”选项以查看连接字符串。
提供一个连接名称。
单击“创建”
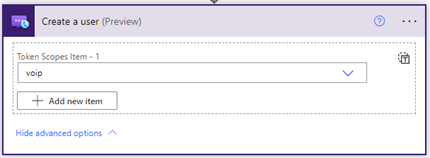
此操作将生成用户 ID,该 ID 是一个通信服务用户标识。 此外,如果单击“显示高级选项”并选择“令牌范围”,该操作还会基于指定范围生成访问令牌及其过期时间。

颁发用户访问令牌
获得通信服务标识后,你可以颁发访问令牌。 请完成下列步骤:
添加新操作并在搜索框中输入“通信服务标识”。 从操作列表中,选择“颁发用户访问令牌”。
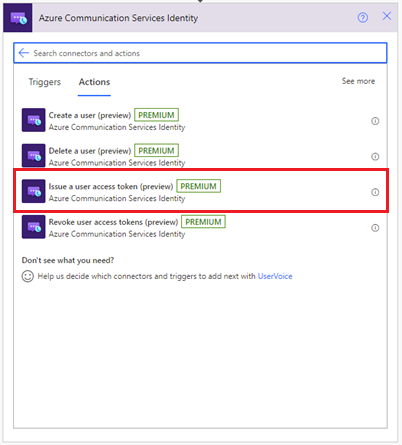
然后,可以使用上一个步“创建用户”中的用户 ID 输出。
指定令牌范围:“VoIP”或“聊天”。 了解有关令牌和身份验证的详细信息。
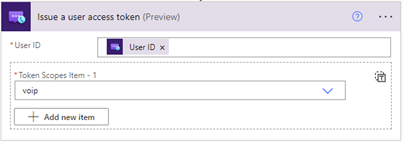
系统将基于指定范围生成访问令牌及其过期时间。
调用用户访问令牌
获得通信服务标识后,可以使用“颁发用户访问令牌”操作来撤销访问令牌。 请完成以下步骤:
添加新操作并在搜索框中输入“通信服务标识”。 从操作列表中,选择“撤销用户访问令牌”。

指定用户 ID。

系统将撤销指定用户的所有用户访问令牌,此操作没有输出。
删除用户
拥有通信服务标识后,可以使用“颁发用户访问令牌”操作删除访问令牌。 请完成下列步骤:
添加新操作并在搜索框中输入“通信服务标识”。 从操作列表中,选择“删除用户”。
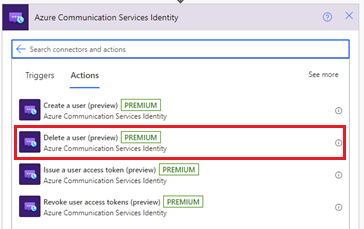
指定用户 ID。

系统将移除用户并撤销指定用户的所有用户访问令牌,此操作没有输出。
测试逻辑应用
若要手动启动工作流,请在设计器工具栏中选择“运行”。 该工作流将创建一个用户,为该用户颁发访问令牌,然后移除该令牌并删除该用户。
有关详细信息,请查看如何运行工作流。 可以在工作流成功运行后检查这些操作的输出。
使用标识来获取监视和指标数据
用户 ID 是通过 Azure Monitor 收集的日志和指标的主键。 例如,若要查看某个用户的所有通话,则可以设置身份验证以将特定的 Azure 通信服务标识(一个或多个)映射到单个用户。
有关详细信息,请参阅:
清理资源
若要清理并删除通信服务订阅,请删除资源或资源组。 删除资源组时也会删除与之关联的任何其他资源。 有关详细信息,请参阅创建和管理通信服务资源 > 清理资源。
若要清理逻辑应用工作流和相关资源,请参阅使用 Azure 门户创建示例“消耗”逻辑应用工作流 > 清理资源。
后续步骤
本文介绍了如何创建用户和删除用户, 还介绍如何如何使用 Azure 通信服务标识连接器向用户颁发访问令牌,以及移除用户访问令牌。 有关详细信息,请参阅 Azure 通信服务标识连接器。
要了解其他连接器如何使用令牌,请查看如何使用 Azure 通信服务从 Power Automate 发送聊天消息。
要详细了解如何使用 Azure 通信服务电子邮件连接器发送电子邮件,请查看使用 Azure 通信服务在 Power Automate 中发送电子邮件。
