你当前正在访问 Microsoft Azure Global Edition 技术文档网站。 如果需要访问由世纪互联运营的 Microsoft Azure 中国技术文档网站,请访问 https://docs.azure.cn。
调用 hero 示例入门
Azure 通信服务的群组通话主图示例演示了如何使用通信服务通话 Web SDK 构建群组通话体验。
在本示例快速入门中,我们将先了解示例的工作原理,然后再在本地计算机上运行示例,然后使用你自己的 Azure 通信服务资源将示例部署到 Azure。
下载代码
在 GitHub 上查找此示例项目。 示例的一个版本可在单独的分支上找到,其中包含当前处于公共预览版状态的功能,例如 Teams 互操作和通话记录功能。
概述
该示例同时包含了客户端应用程序和服务器端应用程序。 客户端应用程序是使用 Microsoft Fluent UI 框架的 React/Redux Web 应用程序。 此应用程序会将请求发送到 ASP.NET Core 服务器端应用程序,该服务器端应用程序会帮助客户端应用程序连接到 Azure。
该示例如下所示:

当你按下“开始呼叫”按钮时,Web 应用程序从服务器端应用程序获取用户访问令牌。 然后使用该令牌将客户端应用连接到 Azure 通信服务。 检索到令牌后,系统会提示你指定要使用的摄像头和麦克风。 你可以使用切换控件来禁用/启用设备:
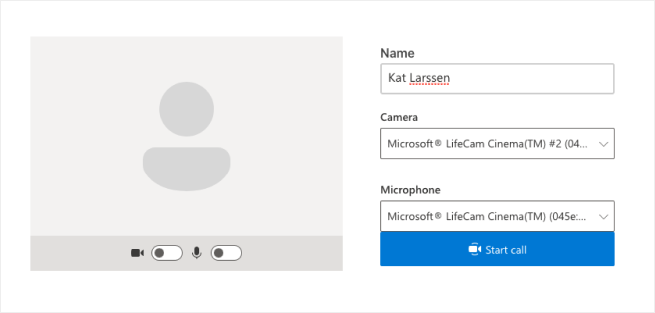
配置显示名称和设备后,即可加入呼叫会话。 你将看到核心通话体验所在的主要通话画布。
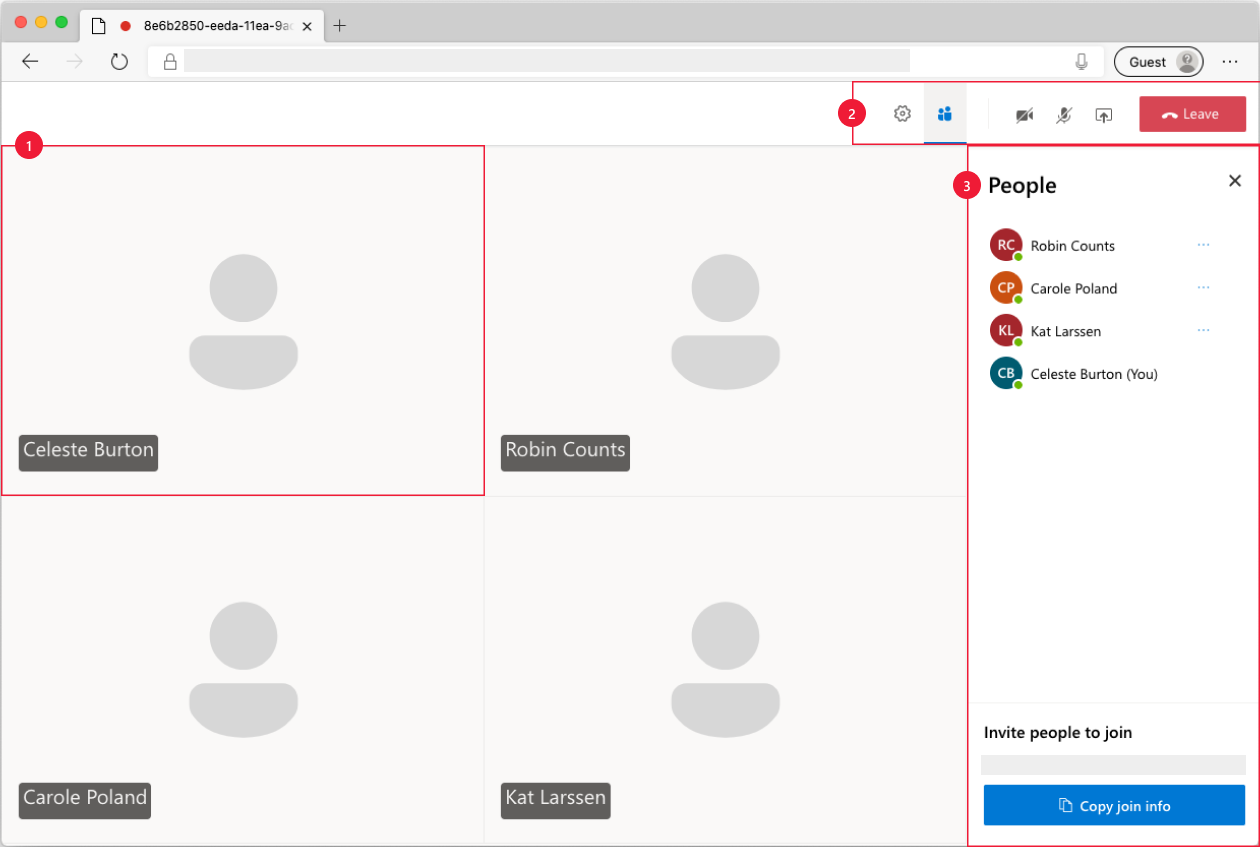
主要呼叫屏幕的各个组件:
- 媒体库:显示参与者的主要阶段。 如果参与者启用了摄像头,则会在此处显示其视频源。 每个参与者都有一个单独的磁贴,上面显示了该参与者的显示名称和视频流(如果有)
- 标头:这是主要呼叫控件所在的位置,这些控件可用来切换设置和参与者侧边栏、打开/关闭视频和混音、共享屏幕以及退出呼叫。
- 侧边栏:使用标题上的控件进行切换时,会在此处显示参与者和设置信息。 可以使用右上角的“X”关闭该组件。 “参与者”侧边栏会显示参与者列表和邀请更多用户聊天的链接。 “设置”侧边栏可用于配置麦克风和摄像头设置。
在下面你可以找到有关设置该示例的先决条件和步骤的详细信息。
先决条件
- 具有活动订阅的 Azure 帐户。 有关详细信息,请参阅创建免费帐户
- Node.js(12.18.4 及更高版本)
- Visual Studio Code(稳定版本)
- 一个 Azure 通信服务资源。 有关详细信息,请参阅创建 Azure 通信服务资源。 需要为此快速入门记录你的资源的连接字符串。
第一次运行示例之前
打开 PowerShell、Windows 终端、命令提示符或等效项的实例,然后导航到要将示例克隆到的目录。
git clone https://github.com/Azure-Samples/communication-services-web-calling-hero.git从 Azure 门户或使用 Azure CLI 获取
Connection String。az communication list-key --name "<acsResourceName>" --resource-group "<resourceGroup>"有关连接字符串的详细信息,请参阅创建 Azure 通信资源
获取
Connection String后,将连接字符串添加到 samples/Server/appsetting.json 文件中。 在变量ResourceConnectionString中输入连接字符串。从 Azure 门户或使用 Azure CLI 获取
Endpoint string。az communication list-key --name "<acsResourceName>" --resource-group "<resourceGroup>"有关终结点字符串的详细信息,请参阅创建 Azure 通信资源
获取
Endpoint String后,将终结点字符串添加到 samples/Server/appsetting.json 文件中。 在变量EndpointUrl中输入你的终结点字符串
本地运行
安装依赖项
npm run setup启动呼叫应用
npm run start这会在端口 3000 上打开为网站文件提供服务的客户端服务器,并在端口 8080 上打开一个 API 服务器,用于执行构建呼叫参与者令牌等功能。
疑难解答
应用显示“不支持的浏览器”屏幕,但我是在支持的浏览器中操作。
如果是通过 localhost 以外的主机名为你的应用提供服务,则必须通过 https 而不是 http 来为流量提供服务。
发布到 Azure
npm run setupnpm run buildnpm run package- 使用 Azure 扩展并将 Calling/dist 目录部署到应用服务
清理资源
如果想要清理并删除通信服务订阅,可以删除资源或资源组。 删除资源组同时也会删除与之相关联的任何其他资源。 了解有关清理资源的详细信息。
后续步骤
有关详细信息,请参阅以下文章:
其他阅读材料
- 示例 - 在示例概述页上查找更多示例。
- Redux - 客户端状态管理
- FluentUI - Microsoft 支持的 UI 库
- React - 用于构建用户界面的库
- ASP.NET Core - 用于构建 Web 应用程序的框架
适用于 iOS 的 Azure 通信服务群组通话主图示例演示了如何使用通信服务通话 iOS SDK 来创造一个包括语音和视频的群组通话体验。 在这篇示例快速入门中,你将了解如何设置和运行该示例。 针对上下文提供了此示例的概述。
下载代码
在 GitHub 上查找此示例项目。
概述
此示例是一款原生 iOS 应用程序,该应用程序使用 Azure 通信服务 iOS SDK 来创造一个包括语音和视频通话功能的通话体验。 该应用程序使用服务器端组件来预配访问令牌,这些令牌随后用于初始化 Azure 通信服务 SDK。 若要配置该服务器端组件,可随时按照使用 Azure Functions 的受信任服务教程操作。
该示例如下所示:
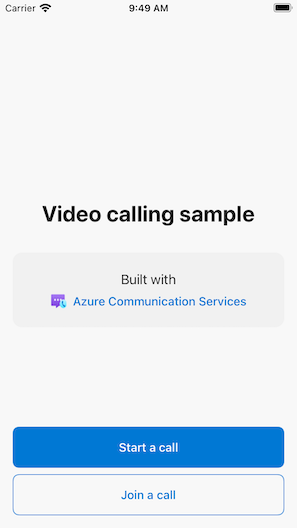
当你按“开始新通话”按钮时,iOS 应用程序将提示你输入要用于通话的显示名称。
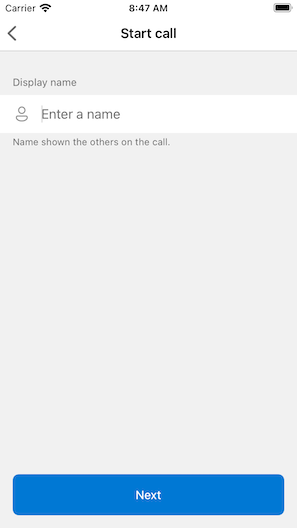
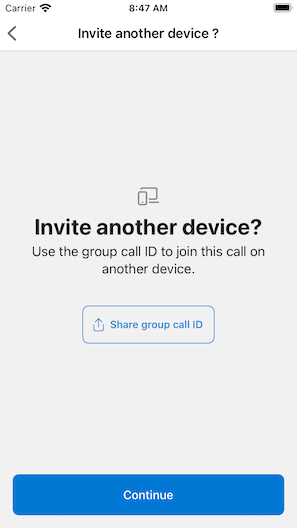
点击“开始通话”屏幕上的“下一步”后,你可以通过 iOS 共享工作表共享通话的组 ID。
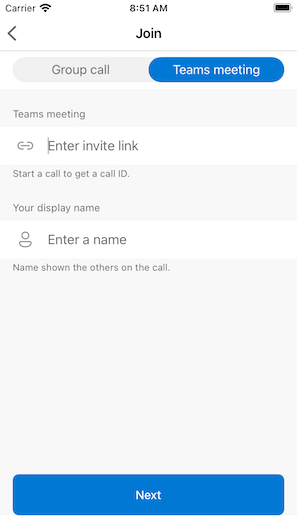
借助该应用程序,还可通过指定现有通话的 ID 或团队 ID 链接来加入现有的 Azure 通信服务通话。
加入通话后,系统将提示你向该应用程序授予访问相机和麦克风的权限(如果尚未授权)。 请记住,与所有基于 AVFoundation 的应用一样,真正的音频和视频功能仅在实际硬件上可用。
在配置显示名称并加入通话后,你将看到核心通话体验所在的主要通话画布。
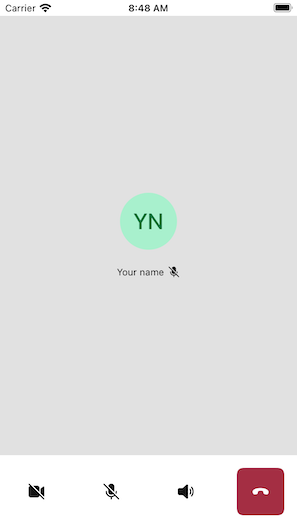
主要呼叫屏幕的各个组件:
- 媒体库:显示参与者的主要阶段。 如果参与者启用了摄像头,则会在此处显示其视频源。 每位参与者都有一个单独的磁贴,上面显示了该参与者的显示名称和视频流(如果有)。 库支持每位参与者,并在通话中添加或删除参与者时进行更新。
- 操作栏:这里有主要通话控件。 通过这些控件,你可打开/关闭视频和麦克风、共享屏幕,还可退出通话。
下面你将找到有关设置该示例的先决条件和步骤的详细信息。
必备条件
- 具有活动订阅的 Azure 帐户。 有关详细信息,请参阅创建免费账户。
- 一部运行 Xcode 的 Mac,以及一个安装到密钥链的有效开发人员证书。
- 一个 Azure 通信服务资源。 有关详细信息,请参阅创建 Azure 通信服务资源。
- 运行身份验证终结点以获取访问令牌的 Azure Function。
在本地运行示例
可使用 XCode 在本地运行群组通话示例。 开发人员可使用其物理设备或模拟器来测试该应用程序。
第一次运行示例之前
- 通过运行
pod install安装依赖项。 - 在 XCode 中打开
AzureCalling.xcworkspace。 - 在根目录中创建名为
AppSettings.xcconfig的文本文件,并设置值:communicationTokenFetchUrl = <your authentication endpoint, without the https:// component>
运行示例
使用所选模拟器或设备上的 AzureCalling 目标在 XCode 中生成并运行示例。
(可选)保护身份验证终结点
为了进行演示,此示例在默认情况下使用可公开访问的终结点来获取 Azure 通信服务访问令牌。 对于生产方案,建议使用你自己的安全终结点来预配你自己的令牌。
通过其他配置,此示例支持连接到受 Microsoft Entra ID 保护的终结点,因此用户需要登录应用程序才能获取 Azure 通信服务访问令牌。 请查看以下步骤:
- 在你的应用中启用 Microsoft Entra 身份验证。
- 转到 Microsoft Entra 应用注册下的注册应用概述页面。 记下
Application (client) ID、Directory (tenant) ID和Application ID URI

- 在根目录中创建文件
AppSettings.xcconfig(如果尚不存在)并添加值:communicationTokenFetchUrl = <Application ID URI, without the https:// component> aadClientId = <Application (client) ID> aadTenantId = <Directory (tenant) ID>
清理资源
如果想要清理并删除通信服务订阅,可以删除资源或资源组。 删除资源组同时也会删除与之相关联的任何其他资源。 了解有关清理资源的详细信息。
后续步骤
有关详细信息,请参阅以下文章:
其他阅读材料
- Azure 通信 GitHub - 在官方 GitHub 页上查找更多示例和信息
- 示例 - 在示例概述页上查找更多示例。
- Azure 通信通话功能:如欲了解有关通话 iOS SDK 的详细信息,请参阅 Azure 通信 iOS 通话 SDK
适用于 Android 的 Azure 通信服务群组通话主图示例演示了如何使用通信服务通话 Android SDK 来创造一个包括语音和视频的群组通话体验。 在这篇示例快速入门中,你将了解如何设置和运行该示例。 针对上下文提供了此示例的概述。
下载代码
在 GitHub 上查找此示例项目。
概述
此示例是一款原生 Android 应用程序,它使用 Azure 通信服务 Android UI 客户端库来生成兼具语音和视频通话功能的通话体验。 该应用程序使用服务器端组件来预配访问令牌,这些令牌随后用于初始化 Azure 通信服务 SDK。 若要配置该服务器端组件,可随时按照使用 Azure Functions 的受信任服务教程操作。
该示例如下所示:
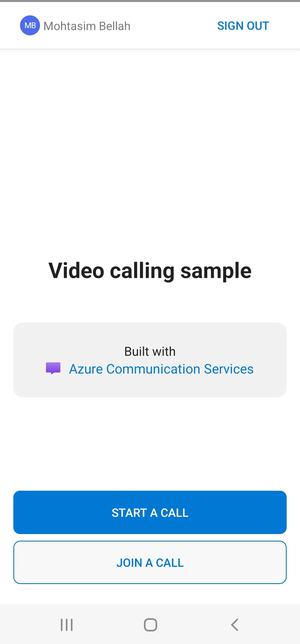
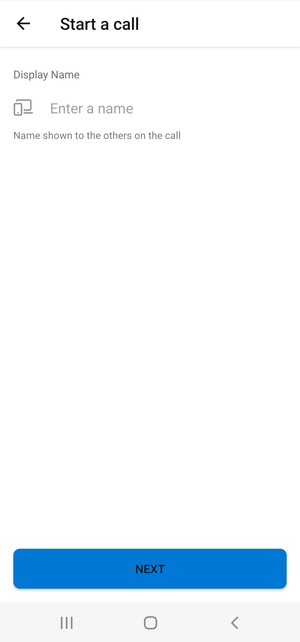
当你按“开始新通话”按钮时,Android 应用程序将提示你输入要用于通话的显示名称。
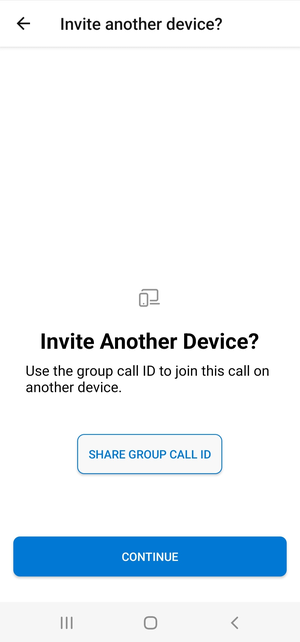
点击“开始通话”页面上的“下一步”后,可以共享“组通话 ID”。
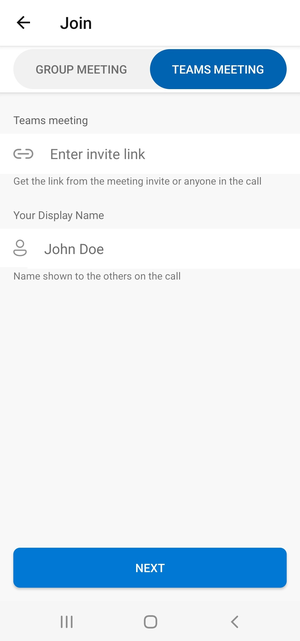
借助该应用程序,可以通过指定现有通话的 ID 或团队会议 ID 链接和显示名称来加入现有的 Azure 通信服务通话。
加入通话后,系统将提示你向该应用程序授予访问相机和麦克风的权限(如果尚未授权)。 你将看到核心通话体验所在的主要通话画布。
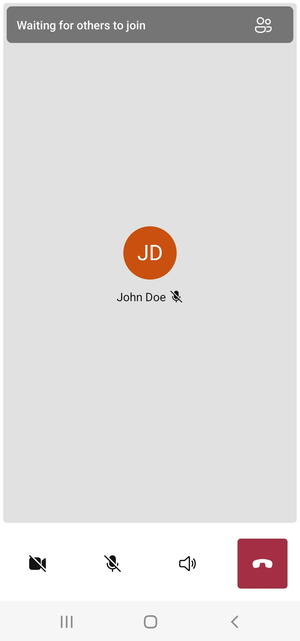
主要呼叫屏幕的各个组件:
- 媒体库:显示参与者的主要阶段。 如果参与者启用了摄像头,则会在此处显示其视频源。 每位参与者都有一个单独的磁贴,上面显示了该参与者的显示名称和视频流(如果有)。 库支持每位参与者,并在通话中添加或删除参与者时进行更新。
- 操作栏:这里有主要通话控件。 通过这些控件,你可打开/关闭视频和麦克风、共享屏幕,还可退出通话。
下面你将找到有关设置该示例的先决条件和步骤的详细信息。
必备条件
- 具有活动订阅的 Azure 帐户。 有关详细信息,请参阅创建免费账户。
- 计算机上运行的 Android Studio
- 一个 Azure 通信服务资源。 有关详细信息,请参阅创建 Azure 通信服务资源。
- 运行身份验证终结点以获取访问令牌的 Azure Function。
在本地运行示例
可使用 Android Studio 在本地运行群组通话示例。 开发人员可使用其物理设备或模拟器来测试该应用程序。
第一次运行示例之前
- 打开 Android Studio,然后选择“
Open an Existing Project” - 在 示例的下载版本内打开
AzureCalling文件夹。 - 展开要更新
appSettings.properties的应用程序/资产。 将communicationTokenFetchUrl密钥的值设置为身份验证终结点(前提条件)的 URL。
运行示例
在 Android Studio 中构建并运行示例。
(可选)保护身份验证终结点
出于演示目的,此示例在默认情况下使用可公开访问的终结点来获取 Azure 通信服务令牌。 对于生产方案,建议使用你自己的安全终结点来预配你自己的令牌。
通过其他配置,此示例支持连接到受 Microsoft Entra ID 保护的终结点,因此用户需要登录应用程序才能获取 Azure 通信服务令牌。 请查看以下步骤:
在你的应用中启用 Microsoft Entra 身份验证。
转到 Microsoft Entra 应用注册下的注册应用概述页面。 记下
Package name、Signature hash和MSAL Configuration。
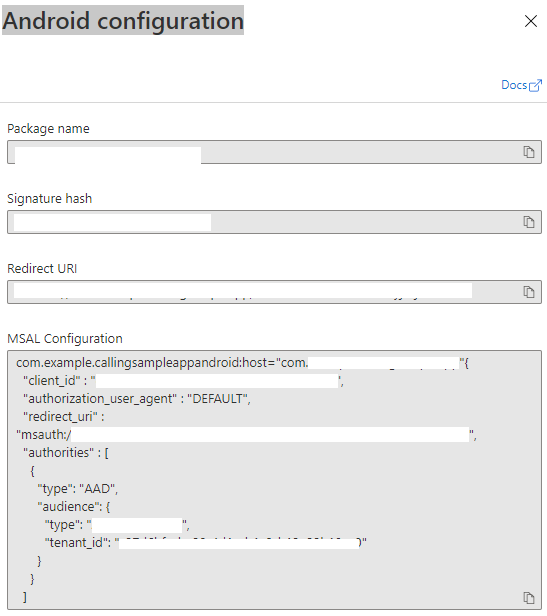
编辑
AzureCalling/app/src/main/res/raw/auth_config_single_account.json并设置isAADAuthEnabled以启用 Microsoft Entra ID。编辑
AndroidManifest.xml并设置android:path为密钥存储签名哈希。 (可选。当前值使用捆绑的 debug.keystore 的哈希。如果使用不同的密钥存储,必须更新此值。)<activity android:name="com.microsoft.identity.client.BrowserTabActivity"> <intent-filter> <action android:name="android.intent.action.VIEW" /> <category android:name="android.intent.category.DEFAULT" /> <category android:name="android.intent.category.BROWSABLE" /> <data android:host="com.azure.samples.communication.calling" android:path="/Signature hash" <!-- do not remove /. The current hash in AndroidManifest.xml is for debug.keystore. --> android:scheme="msauth" /> </intent-filter> </activity>从 Azure 门户复制 MSAL Android 配置并粘贴到
AzureCalling/app/src/main/res/raw/auth_config_single_account.json。 包括 "account_mode": "SINGLE"{ "client_id": "", "authorization_user_agent": "DEFAULT", "redirect_uri": "", "account_mode" : "SINGLE", "authorities": [ { "type": "AAD", "audience": { "type": "AzureADMyOrg", "tenant_id": "" } } ] }编辑
AzureCalling/app/src/main/res/raw/auth_config_single_account.json,并将communicationTokenFetchUrl密钥的值设置为安全身份验证终结点的 URL。编辑
AzureCalling/app/src/main/res/raw/auth_config_single_account.json并为Azure Active DirectoryExpose an API作用域中的aadScopes密钥设置值将
AzureCalling/app/assets/appSettings.properties中graphURL的值设置为图形 API 终结点以提取用户信息。编辑
AzureCalling/app/src/main/assets/appSettings.properties并设置密钥tenant的值以启用无提示登录,使用户不必在重新启动应用程序时反复地进行身份验证。
清理资源
如果想要清理并删除通信服务订阅,可以删除资源或资源组。 删除资源组同时也会删除与之相关联的任何其他资源。 了解有关清理资源的详细信息。
后续步骤
有关详细信息,请参阅以下文章:
其他阅读材料
- Azure 通信 GitHub - 在官方 GitHub 页上查找更多示例和信息
- 示例 - 在示例概述页上查找更多示例。
- Azure 通信通话功能:如欲了解有关通话 Android SDK 的详细信息,请参阅 Azure 通信 Android 通话 SDK
适用于 Windows 的 Azure 通信服务群组通话主图示例演示了如何使用通信服务通话 Windows SDK 来创造一个包括语音和视频的群组通话体验。 在本示例中,你将了解如何设置和运行该示例。 针对上下文提供了此示例的概述。
本快速入门介绍如何使用适用于 Windows 的 Azure 通信服务通话 SDK 开始 1:1 视频通话。
UWP 示例代码
先决条件
若要完成本教程,需要具备以下先决条件:
具有活动订阅的 Azure 帐户。 免费创建帐户。
安装带有通用 Windows 平台开发工作负载的 Visual Studio 2022。
已部署的通信服务资源。 创建通信服务资源。 需要为此快速入门记录连接字符串。
Azure 通信服务的用户访问令牌。 可以使用 Azure CLI,并结合你的连接字符串运行命令来创建用户和访问令牌。
az communication identity token issue --scope voip --connection-string "yourConnectionString"有关详细信息,请参阅使用 Azure CLI 创建和管理访问令牌。
设置
创建项目
在 Visual Studio 中,使用“空白应用(通用 Windows)”模板创建一个新项目,设置单页通用 Windows 平台 (UWP) 应用。
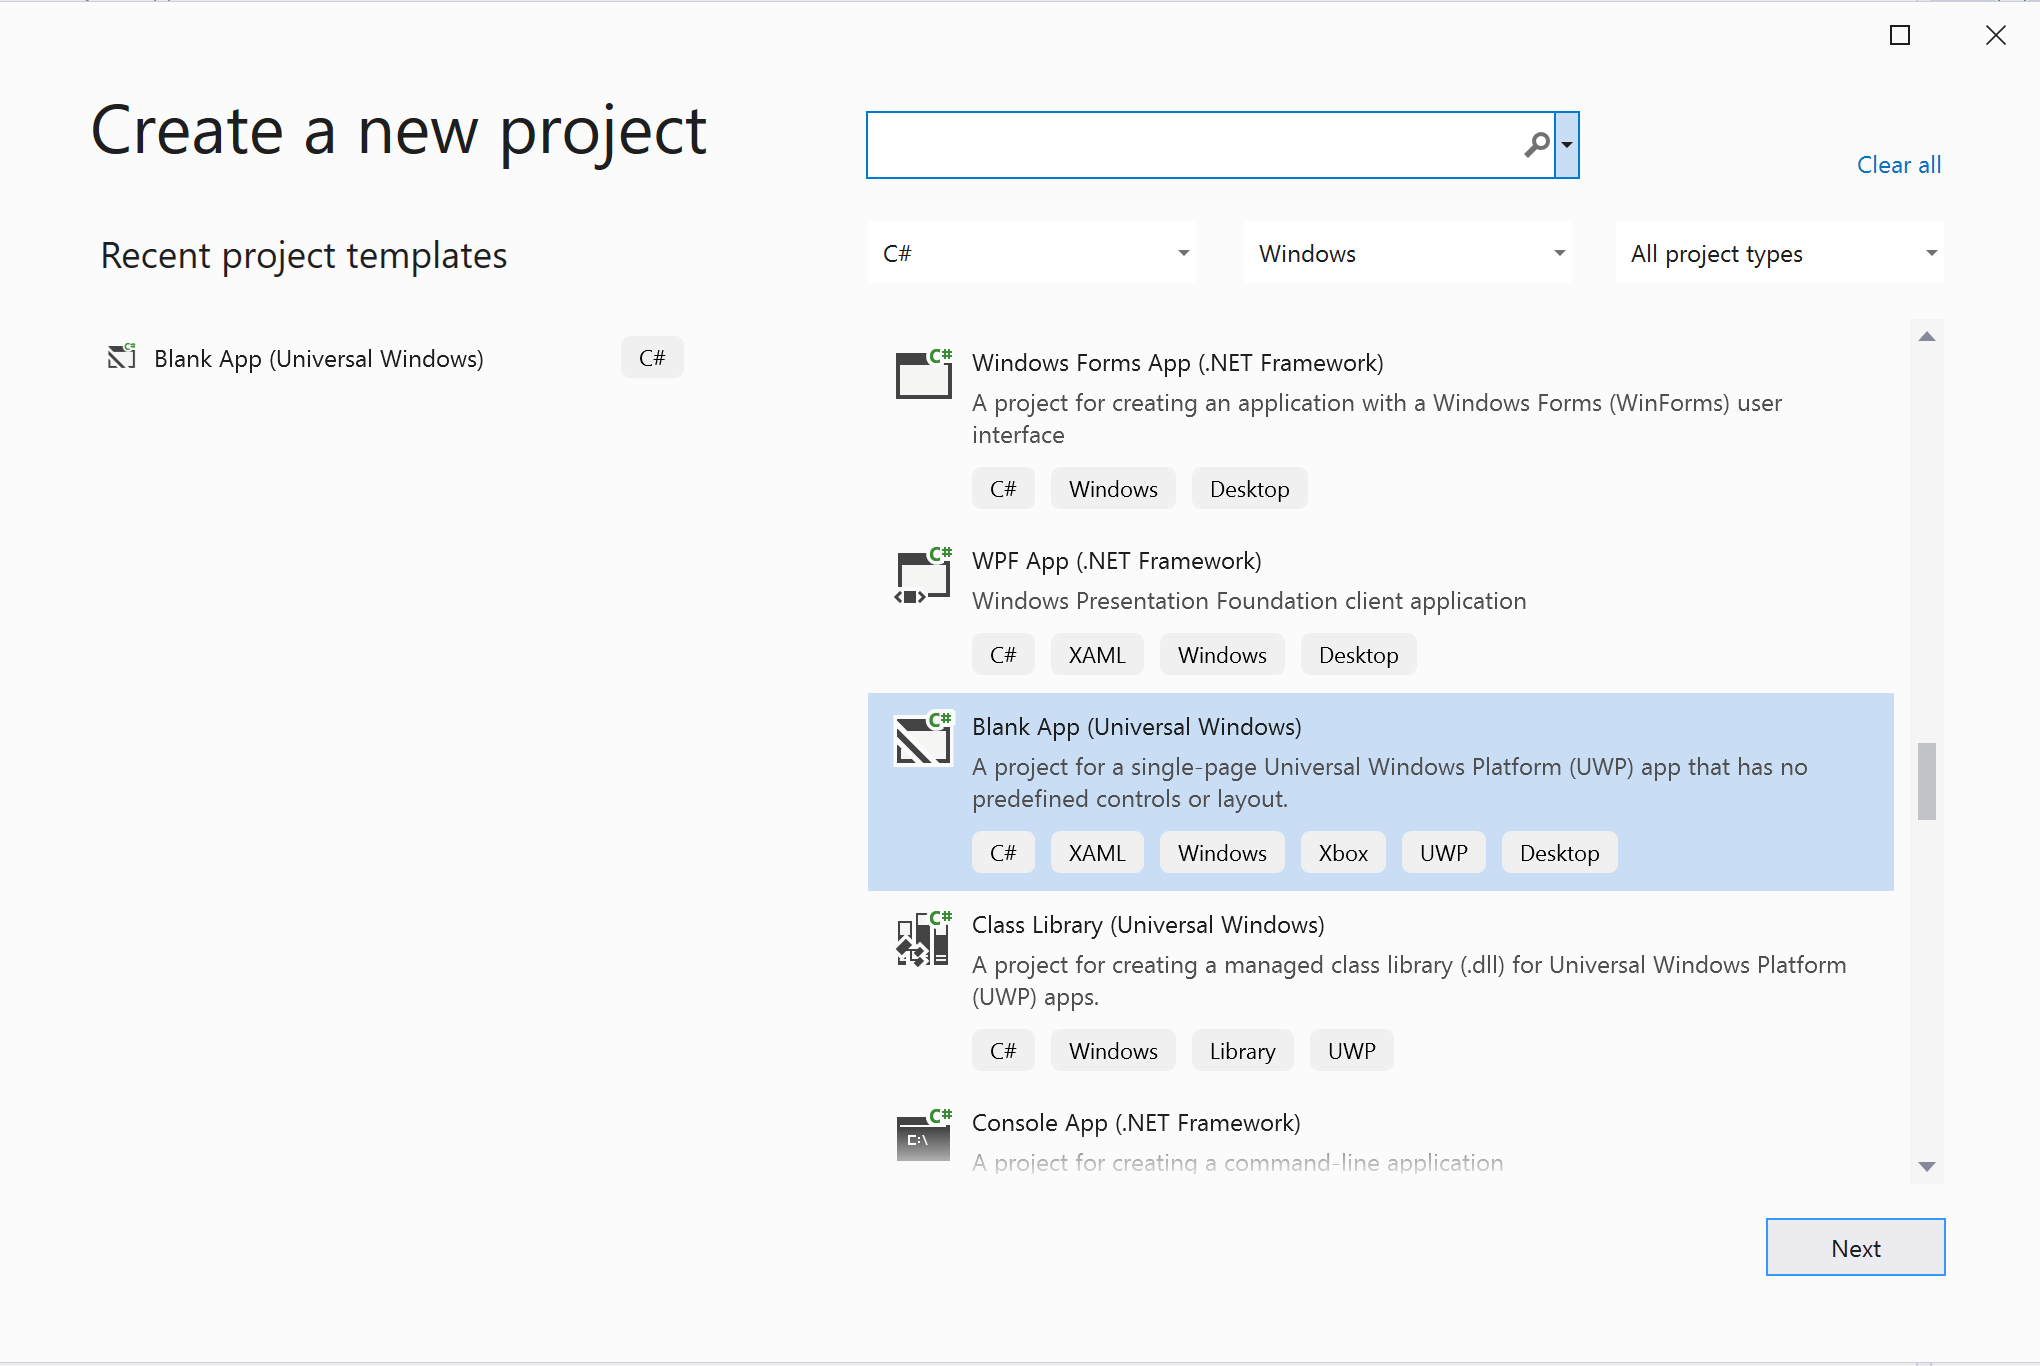
安装包
右键单击项目,转到 Manage Nuget Packages 来安装 Azure.Communication.Calling.WindowsClient 1.2.0-beta.1 或更高版本。 请务必选中“包括预发行版”。
请求访问权限
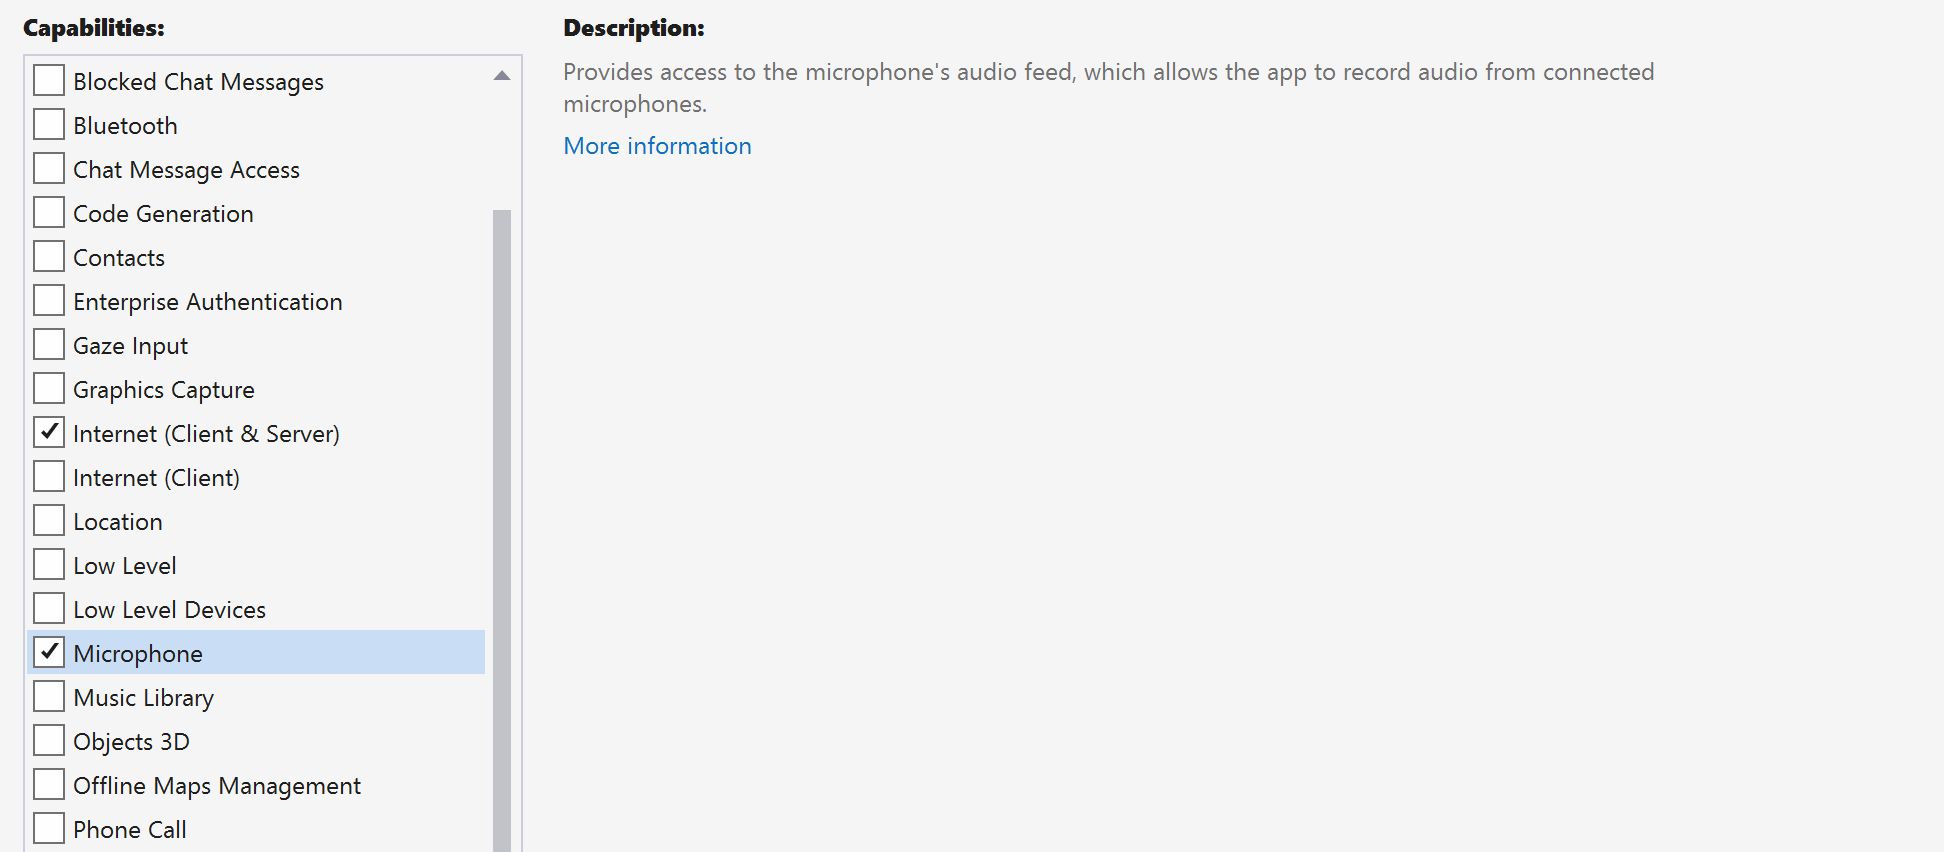
转到 Package.appxmanifest 并单击 Capabilities。
勾选 Internet (Client & Server),获取 Internet 的入站和出站访问权限。
勾选 Microphone 以访问麦克风的音频源。
勾选 WebCam 以访问设备的摄像头。
通过右键单击并选择“查看代码”,将以下代码添加到 Package.appxmanifest。
<Extensions>
<Extension Category="windows.activatableClass.inProcessServer">
<InProcessServer>
<Path>RtmMvrUap.dll</Path>
<ActivatableClass ActivatableClassId="VideoN.VideoSchemeHandler" ThreadingModel="both" />
</InProcessServer>
</Extension>
</Extensions>
设置应用框架
我们需要配置基本布局来附加逻辑。 为了发起出站呼叫,需要通过 TextBox 提供被呼叫方的用户 ID。 还需要一个 Start Call 按钮和一个 Hang Up 按钮。
我们还需要预览本地视频,并呈现其他参与者的远程视频。 因此,我们需要两个元素来显示视频流。
打开项目的 MainPage.xaml,并将内容替换为以下实现。
<Page
    x:Class="CallingQuickstart.MainPage"
    xmlns="http://schemas.microsoft.com/winfx/2006/xaml/presentation"
    xmlns:x="http://schemas.microsoft.com/winfx/2006/xaml"
    xmlns:local="using:CallingQuickstart"
    xmlns:d="http://schemas.microsoft.com/expression/blend/2008"
    xmlns:mc="http://schemas.openxmlformats.org/markup-compatibility/2006"
    mc:Ignorable="d"
    Background="{ThemeResource ApplicationPageBackgroundThemeBrush}">

    <Grid x:Name="MainGrid" HorizontalAlignment="Stretch">
        <Grid.RowDefinitions>
            <RowDefinition Height="*"/>
            <RowDefinition Height="Auto"/>
            <RowDefinition Height="200*"/>
            <RowDefinition Height="60*"/>
            <RowDefinition Height="Auto"/>
        </Grid.RowDefinitions>

        <Grid Grid.Row="0" x:Name="AppTitleBar" Background="LightSeaGreen">
            <!-- Width of the padding columns is set in LayoutMetricsChanged handler. -->
            <!-- Using padding columns instead of Margin ensures that the background paints the area under the caption control buttons (for transparent buttons). -->
            <TextBlock x:Name="QuickstartTitle" Text="Calling Quickstart sample title bar" Style="{StaticResource CaptionTextBlockStyle}" Padding="4,4,0,0"/>
        </Grid>

        <TextBox Grid.Row="1" x:Name="CalleeTextBox" PlaceholderText="Who would you like to call?" TextWrapping="Wrap" VerticalAlignment="Center" />

        <Grid Grid.Row="2" Background="LightGray">
            <Grid.RowDefinitions>
                <RowDefinition/>
            </Grid.RowDefinitions>
            <Grid.ColumnDefinitions>
                <ColumnDefinition Width="*"/>
                <ColumnDefinition Width="*"/>
            </Grid.ColumnDefinitions>
            <MediaPlayerElement x:Name="LocalVideo" HorizontalAlignment="Center" Stretch="UniformToFill" Grid.Column="0" VerticalAlignment="Center" AutoPlay="True" />
            <MediaPlayerElement x:Name="RemoteVideo" HorizontalAlignment="Center" Stretch="UniformToFill" Grid.Column="1" VerticalAlignment="Center" AutoPlay="True" />
        </Grid>
        <StackPanel Grid.Row="3" Orientation="Vertical" Grid.RowSpan="2">
            <StackPanel Orientation="Horizontal" Margin="10">
                <TextBlock VerticalAlignment="Center">Cameras:</TextBlock>
                <ComboBox x:Name="CameraList" HorizontalAlignment="Left" Grid.Column="0" DisplayMemberPath="Name" SelectionChanged="CameraList_SelectionChanged" Margin="10"/>
            </StackPanel>
            <StackPanel Orientation="Horizontal">
                <Button x:Name="CallButton" Content="Start/Join call" Click="CallButton_Click" VerticalAlignment="Center" Margin="10,0,0,0" Height="40" Width="123"/>
                <Button x:Name="HangupButton" Content="Hang up" Click="HangupButton_Click" VerticalAlignment="Center" Margin="10,0,0,0" Height="40" Width="123"/>
                <CheckBox x:Name="MuteLocal" Content="Mute" Margin="10,0,0,0" Click="MuteLocal_Click" Width="74"/>
                <CheckBox x:Name="BackgroundBlur" Content="Background blur" Width="142" Margin="10,0,0,0" Click="BackgroundBlur_Click"/>
            </StackPanel>
        </StackPanel>
        <TextBox Grid.Row="4" x:Name="Stats" Text="" TextWrapping="Wrap" VerticalAlignment="Center" Height="30" Margin="0,2,0,0" BorderThickness="2" IsReadOnly="True" Foreground="LightSlateGray" />
    </Grid>
</Page>
打开 App.xaml.cs(右键单击并选择“查看代码”),并将此行添加到顶部:
using CallingQuickstart;
打开 MainPage.xaml.cs(右键单击并选择“查看代码”),并将内容替换为以下实现:
using Azure.Communication.Calling.WindowsClient;
using System;
using System.Collections.Generic;
using System.Linq;
using System.Threading.Tasks;
using Windows.ApplicationModel;
using Windows.ApplicationModel.Core;
using Windows.Media.Core;
using Windows.Networking.PushNotifications;
using Windows.UI;
using Windows.UI.ViewManagement;
using Windows.UI.Xaml;
using Windows.UI.Xaml.Controls;
using Windows.UI.Xaml.Media;
using Windows.UI.Xaml.Navigation;

namespace CallingQuickstart
{
    public sealed partial class MainPage : Page
    {
        private const string authToken = "<Azure Communication Services auth token>";

        private CallClient callClient;
        private CallTokenRefreshOptions callTokenRefreshOptions;
        private CallAgent callAgent;
        private CommunicationCall call = null;

        private LocalOutgoingAudioStream micStream;
        private LocalOutgoingVideoStream cameraStream;

        #region Page initialization
        public MainPage()
        {
            this.InitializeComponent();

            // Hide default title bar.
            var coreTitleBar = CoreApplication.GetCurrentView().TitleBar;
            coreTitleBar.ExtendViewIntoTitleBar = true;

            QuickstartTitle.Text = $"{Package.Current.DisplayName} - Ready";
            Window.Current.SetTitleBar(AppTitleBar);

            CallButton.IsEnabled = true;
            HangupButton.IsEnabled = !CallButton.IsEnabled;
            MuteLocal.IsChecked = MuteLocal.IsEnabled = !CallButton.IsEnabled;

            ApplicationView.PreferredLaunchViewSize = new Windows.Foundation.Size(800, 600);
            ApplicationView.PreferredLaunchWindowingMode = ApplicationViewWindowingMode.PreferredLaunchViewSize;
        }

        protected override async void OnNavigatedTo(NavigationEventArgs e)
        {
            await InitCallAgentAndDeviceManagerAsync();

            base.OnNavigatedTo(e);
        }
#endregion

        private async Task InitCallAgentAndDeviceManagerAsync()
        {
            // Initialize call agent and Device Manager
        }

        private async void Agent_OnIncomingCallAsync(object sender, IncomingCall incomingCall)
        {
            // Accept an incoming call
        }

        private async void CallButton_Click(object sender, RoutedEventArgs e)
        {
            // Start a call with video
        }

        private async void HangupButton_Click(object sender, RoutedEventArgs e)
        {
            // End the current call
        }

        private async void Call_OnStateChangedAsync(object sender, PropertyChangedEventArgs args)
        {
            var call = sender as CommunicationCall;

            if (call != null)
            {
                var state = call.State;

                await Dispatcher.RunAsync(Windows.UI.Core.CoreDispatcherPriority.Normal, () =>
                {
                    QuickstartTitle.Text = $"{Package.Current.DisplayName} - {state.ToString()}";
                    Window.Current.SetTitleBar(AppTitleBar);

                    HangupButton.IsEnabled = state == CallState.Connected || state == CallState.Ringing;
                    CallButton.IsEnabled = !HangupButton.IsEnabled;
                    MuteLocal.IsEnabled = !CallButton.IsEnabled;
                });

                switch (state)
                {
                    case CallState.Connected:
                        {
                            break;
                        }
                    case CallState.Disconnected:
                        {
                            break;
                        }
                    default: break;
                }
            }
        }

        private async void CameraList_SelectionChanged(object sender, SelectionChangedEventArgs e)
        {
            // Handle camera selection
        }
    }
}
对象模型
以下类和接口用于处理 Azure 通信服务通话 SDK 的某些主要功能:
| 名称 | 说明 |
|---|---|
CallClient |
CallClient 是通话客户端库的主入口点。 |
CallAgent |
CallAgent 用于启动和加入通话。 |
CommunicationCall |
CommunicationCall 用于管理已发起或已加入的通话。 |
CallTokenCredential |
CallTokenCredential 用作实例化 CallAgent 的令牌凭据。 |
CommunicationUserIdentifier |
CommunicationUserIdentifier 用于表示用户的身份,可以是以下选项之一:CommunicationUserIdentifier、PhoneNumberIdentifier 或 CallingApplication。 |
验证客户端
若要初始化 CallAgent,需要用户访问令牌。 通常,此令牌从具有特定于应用程序的身份验证的服务生成。 有关用户访问令牌的详细信息,请查看用户访问令牌指南。
对于快速入门,请使用为你的 Azure 通信服务资源生成的用户访问令牌替换 <AUTHENTICATION_TOKEN>。
有了令牌后,使用该令牌来初始化 CallAgent 实例,以便发出和接收呼叫。 为了访问设备上的摄像头,我们还需要获取设备管理器实例。
向 InitCallAgentAndDeviceManagerAsync 函数添加以下代码。
this.callClient = new CallClient(new CallClientOptions() {
    Diagnostics = new CallDiagnosticsOptions() {
        AppName = "CallingQuickstart",
        AppVersion="1.0",
        Tags = new[] { "Calling", "ACS", "Windows" }
        }
    });

// Set up local video stream using the first camera enumerated
var deviceManager = await this.callClient.GetDeviceManagerAsync();
var camera = deviceManager?.Cameras?.FirstOrDefault();
var mic = deviceManager?.Microphones?.FirstOrDefault();
micStream = new LocalOutgoingAudioStream();

CameraList.ItemsSource = deviceManager.Cameras.ToList();

if (camera != null)
{
    CameraList.SelectedIndex = 0;
}

callTokenRefreshOptions = new CallTokenRefreshOptions(false);
callTokenRefreshOptions.TokenRefreshRequested += OnTokenRefreshRequestedAsync;

var tokenCredential = new CallTokenCredential(authToken, callTokenRefreshOptions);

var callAgentOptions = new CallAgentOptions()
{
    DisplayName = "Contoso",
    //https://github.com/lukes/ISO-3166-Countries-with-Regional-Codes/blob/master/all/all.csv
    EmergencyCallOptions = new EmergencyCallOptions() { CountryCode = "840" }
};


try
{
    this.callAgent = await this.callClient.CreateCallAgentAsync(tokenCredential, callAgentOptions);
    //await this.callAgent.RegisterForPushNotificationAsync(await this.RegisterWNS());
    this.callAgent.CallsUpdated += OnCallsUpdatedAsync;
    this.callAgent.IncomingCallReceived += OnIncomingCallAsync;

}
catch(Exception ex)
{
    if (ex.HResult == -2147024809)
    {
        // E_INVALIDARG
        // Handle possible invalid token
    }
}
开启视频通话
将实现添加到 CallButton_Click,使用视频开启呼叫。 我们需要使用设备管理器实例枚举摄像头并构造 LocalOutgoingVideoStream。 我们需要使用 LocalVideoStream 设置 VideoOptions,并随 startCallOptions 一起传递以设置通话的初始选项。 通过将 LocalOutgoingVideoStream 附加到 MediaElement,可以预览本地视频。
var callString = CalleeTextBox.Text.Trim();

if (!string.IsNullOrEmpty(callString))
{
    if (callString.StartsWith("8:")) // 1:1 Azure Communication Services call
    {
        call = await StartAcsCallAsync(callString);
    }
    else if (callString.StartsWith("+")) // 1:1 phone call
    {
        call = await StartPhoneCallAsync(callString, "+12133947338");
    }
    else if (Guid.TryParse(callString, out Guid groupId))// Join group call by group guid
    {
        call = await JoinGroupCallByIdAsync(groupId);
    }
    else if (Uri.TryCreate(callString, UriKind.Absolute, out Uri teamsMeetinglink)) //Teams meeting link
    {
        call = await JoinTeamsMeetingByLinkAsync(teamsMeetinglink);
    }
}

if (call != null)
{
    call.RemoteParticipantsUpdated += OnRemoteParticipantsUpdatedAsync;
    call.StateChanged += OnStateChangedAsync;
}
添加方法来启动或加入不同类型的通话(一对一 Azure 通信服务通话、一对一电话通话、Azure 通信服务组通话、Teams 会议加入,等等)。
private async Task<CommunicationCall> StartAcsCallAsync(string acsCallee)
{
    var options = await GetStartCallOptionsAsync();
    var call = await this.callAgent.StartCallAsync( new [] { new UserCallIdentifier(acsCallee) }, options);
    return call;
}

private async Task<CommunicationCall> StartPhoneCallAsync(string acsCallee, string alternateCallerId)
{
    var options = await GetStartCallOptionsAsync();
    options.AlternateCallerId = new PhoneNumberCallIdentifier(alternateCallerId);

    var call = await this.callAgent.StartCallAsync( new [] { new PhoneNumberCallIdentifier(acsCallee) }, options);
    return call;
}

private async Task<CommunicationCall> JoinGroupCallByIdAsync(Guid groupId)
{
    var joinCallOptions = await GetJoinCallOptionsAsync();

    var groupCallLocator = new GroupCallLocator(groupId);
    var call = await this.callAgent.JoinAsync(groupCallLocator, joinCallOptions);
    return call;
}

private async Task<CommunicationCall> JoinTeamsMeetingByLinkAsync(Uri teamsCallLink)
{
    var joinCallOptions = await GetJoinCallOptionsAsync();

    var teamsMeetingLinkLocator = new TeamsMeetingLinkLocator(teamsCallLink.AbsoluteUri);
    var call = await callAgent.JoinAsync(teamsMeetingLinkLocator, joinCallOptions);
    return call;
}

private async Task<StartCallOptions> GetStartCallOptionsAsync()
{
    return new StartCallOptions() {
        OutgoingAudioOptions = new OutgoingAudioOptions() { IsOutgoingAudioMuted = true, OutgoingAudioStream = micStream  },
        OutgoingVideoOptions = new OutgoingVideoOptions() { OutgoingVideoStreams = new OutgoingVideoStream[] { cameraStream } }
    };
}

private async Task<JoinCallOptions> GetJoinCallOptionsAsync()
{
    return new JoinCallOptions() {
        OutgoingAudioOptions = new OutgoingAudioOptions() { IsOutgoingAudioMuted = true },
        OutgoingVideoOptions = new OutgoingVideoOptions() { OutgoingVideoStreams = new OutgoingVideoStream[] { cameraStream } }
    };
}
添加代码以根据 CameraList_SelectionChanged 方法所选相机创建 LocalVideoStream。
var selectedCamera = CameraList.SelectedItem as VideoDeviceDetails;
cameraStream = new LocalOutgoingVideoStream(selectedCamera);

 var localUri = await cameraStream.StartPreviewAsync();
await Dispatcher.RunAsync(Windows.UI.Core.CoreDispatcherPriority.Normal, () =>
{
    LocalVideo.Source = MediaSource.CreateFromUri(localUri);
});

if (call != null)
{
    await call?.StartVideoAsync(cameraStream);
}
接听来电
将实现添加到 OnIncomingCallAsync,使用视频应答传入呼叫,将 LocalVideoStream 传递给 acceptCallOptions。
var incomingCall = args.IncomingCall;

var acceptCallOptions = new AcceptCallOptions() {
    IncomingVideoOptions = new IncomingVideoOptions()
    {
        IncomingVideoStreamKind = VideoStreamKind.RemoteIncoming
    }
};

_ = await incomingCall.AcceptAsync(acceptCallOptions);
远程参与者和远程视频流
通过呼叫实例上的 RemoteParticipants 集合提供所有远程参与者。 通话状态变为已连接 (CallState.Connected) 后,我们可以访问通话的远程参与者并处理远程视频流。
注意
当用户加入通话时,他们可以通过 RemoteParticipants 集合访问当前的远程参与者。 不会为这些现有参与者触发 RemoteParticipantsUpdated 事件。 仅当用户已加入通话且远程参与者加入或离开通话时,才会触发此事件。
private async void Call_OnVideoStreamsUpdatedAsync(object sender, RemoteVideoStreamsEventArgs args)
{
    foreach (var remoteVideoStream in args.AddedRemoteVideoStreams)
    {
        await Dispatcher.RunAsync(Windows.UI.Core.CoreDispatcherPriority.Normal, async () =>
        {
            RemoteVideo.Source = await remoteVideoStream.Start();
        });
    }

    foreach (var remoteVideoStream in args.RemovedRemoteVideoStreams)
    {
        remoteVideoStream.Stop();
    }
}

private async void Agent_OnCallsUpdatedAsync(object sender, CallsUpdatedEventArgs args)
{
    var removedParticipants = new List<RemoteParticipant>();
    var addedParticipants = new List<RemoteParticipant>();

    foreach(var call in args.RemovedCalls)
    {
        removedParticipants.AddRange(call.RemoteParticipants.ToList<RemoteParticipant>());
    }

    foreach (var call in args.AddedCalls)
    {
        addedParticipants.AddRange(call.RemoteParticipants.ToList<RemoteParticipant>());
    }

    await OnParticipantChangedAsync(removedParticipants, addedParticipants);
}

private async Task OnParticipantChangedAsync(IEnumerable<RemoteParticipant> removedParticipants, IEnumerable<RemoteParticipant> addedParticipants)
{
    foreach (var participant in removedParticipants)
    {
        foreach(var incomingVideoStream in  participant.IncomingVideoStreams)
        {
            var remoteVideoStream = incomingVideoStream as RemoteIncomingVideoStream;
            if (remoteVideoStream != null)
            {
                await remoteVideoStream.StopPreviewAsync();
            }
        }
        participant.VideoStreamStateChanged -= OnVideoStreamStateChanged;
    }

    foreach (var participant in addedParticipants)
    {
        participant.VideoStreamStateChanged += OnVideoStreamStateChanged;
    }
}

private void OnVideoStreamStateChanged(object sender, VideoStreamStateChangedEventArgs e)
{
    CallVideoStream callVideoStream = e.CallVideoStream;

    switch (callVideoStream.StreamDirection)
    {
        case StreamDirection.Outgoing:
            OnOutgoingVideoStreamStateChanged(callVideoStream as OutgoingVideoStream);
            break;
        case StreamDirection.Incoming:
            OnIncomingVideoStreamStateChanged(callVideoStream as IncomingVideoStream);
            break;
    }
}

private async void OnIncomingVideoStreamStateChanged(IncomingVideoStream incomingVideoStream)
{
    switch (incomingVideoStream.State)
    {
        case VideoStreamState.Available:
        {
            switch (incomingVideoStream.Kind)
            {
                case VideoStreamKind.RemoteIncoming:
                    var remoteVideoStream = incomingVideoStream as RemoteIncomingVideoStream;
                    var uri = await remoteVideoStream.StartPreviewAsync();

                    await Dispatcher.RunAsync(Windows.UI.Core.CoreDispatcherPriority.Normal, () =>
                    {
                        RemoteVideo.Source = MediaSource.CreateFromUri(uri);
                    });
                    break;

                case VideoStreamKind.RawIncoming:
                    break;
            }
            break;
        }
        case VideoStreamState.Started:
            break;
        case VideoStreamState.Stopping:
            break;
        case VideoStreamState.Stopped:
            if (incomingVideoStream.Kind == VideoStreamKind.RemoteIncoming)
            {
                var remoteVideoStream = incomingVideoStream as RemoteIncomingVideoStream;
                await remoteVideoStream.StopPreviewAsync();
            }
            break;
        case VideoStreamState.NotAvailable:
            break;
    }

}
呈现远程视频
对于每个远程视频流,请将其附加到 MediaElement。
private async Task AddVideoStreamsAsync(IReadOnlyList<RemoteVideoStream> remoteVideoStreams)
{
    foreach (var remoteVideoStream in remoteVideoStreams)
    {
        var remoteUri = await remoteVideoStream.Start();

        await Dispatcher.RunAsync(Windows.UI.Core.CoreDispatcherPriority.Normal, () =>
        {
            RemoteVideo.Source = remoteUri;
            RemoteVideo.Play();
        });
    }
}
通话状态更新
通话断开连接后,我们需要清理视频渲染器,并处理远程参与者最初加入通话时的情况。
private async void Call_OnStateChanged(object sender, PropertyChangedEventArgs args)
{
    switch (((Call)sender).State)
    {
        case CallState.Disconnected:
            await Dispatcher.RunAsync(Windows.UI.Core.CoreDispatcherPriority.Normal, () =>
            {
                LocalVideo.Source = null;
                RemoteVideo.Source = null;
            });
            break;

        case CallState.Connected:
            foreach (var remoteParticipant in call.RemoteParticipants)
            {
                String remoteParticipantMRI = remoteParticipant.Identifier.ToString();
                remoteParticipantDictionary.TryAdd(remoteParticipantMRI, remoteParticipant);
                await AddVideoStreams(remoteParticipant.VideoStreams);
                remoteParticipant.OnVideoStreamsUpdated += Call_OnVideoStreamsUpdated;
            }
            break;

        default:
            break;
    }
}
结束呼叫
在单击 Hang Up 按钮时结束当前通话。 将实现添加到 HangupButton_Click,以结束使用我们创建的 callAgent 进行的呼叫,并拆除参与者更新和呼叫状态事件处理程序。
var call = this.callAgent?.Calls?.FirstOrDefault();
if (call != null)
{
    try
    {
        await call.HangUpAsync(new HangUpOptions() { ForEveryone = true });
    }
    catch(Exception ex)
    {
    }
}
运行代码
可在 Visual Studio 中生成并运行代码。 对于解决方案平台,我们支持 ARM64、x64 和 x86。
通过在文本字段中提供用户 ID 并单击 Start Call 按钮,可以启动出站视频呼叫。
注意:呼叫 8:echo123 会停止视频流,因为回显机器人不支持视频流。
有关用户 ID(标识)的详细信息,请查看用户访问令牌指南。
WinUI 3 示例代码
先决条件
若要完成本教程,需要具备以下先决条件:
具有活动订阅的 Azure 帐户。 免费创建帐户。
基本了解如何创建 WinUI 3 应用。 创建第一个 WinUI 3(Windows 应用 SDK)项目是很好的入门资源。
已部署的通信服务资源。 创建通信服务资源。 需要为此快速入门记录连接字符串。
Azure 通信服务的用户访问令牌。 可以使用 Azure CLI,并结合你的连接字符串运行命令来创建用户和访问令牌。
az communication identity token issue --scope voip --connection-string "yourConnectionString"有关详细信息,请参阅使用 Azure CLI 创建和管理访问令牌。
设置
创建项目
在 Visual Studio 中,使用“已打包空白应用(桌面中的 WinUI 3)”模板创建新项目,以设置单页 WinUI 3 应用。
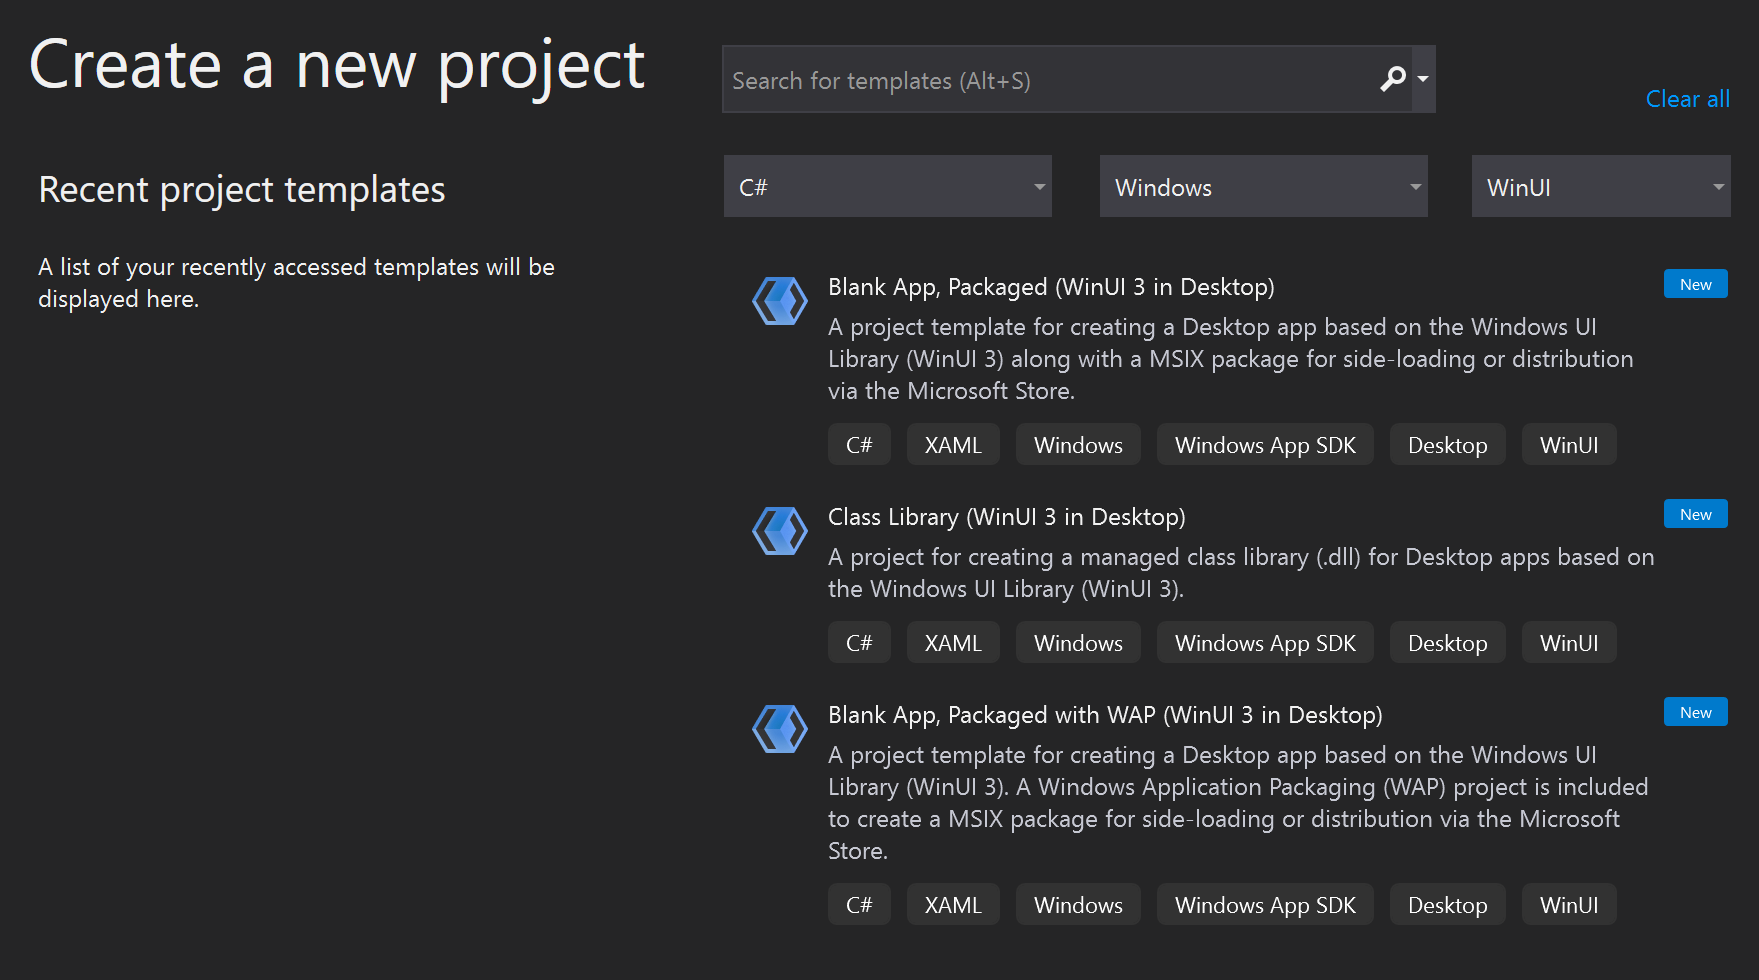
安装包
右键单击项目,转到 Manage Nuget Packages 来安装 Azure.Communication.Calling.WindowsClient 1.0.0 或更高版本。 请务必选中“包括预发行版”。
请求访问权限
将以下代码添加到 app.manifest:
<file name="RtmMvrMf.dll">
    <activatableClass name="VideoN.VideoSchemeHandler" threadingModel="both" xmlns="urn:schemas-microsoft-com:winrt.v1" />
</file>
设置应用框架
我们需要配置基本布局来附加逻辑。 为了发起出站呼叫,需要通过 TextBox 提供被呼叫方的用户 ID。 还需要一个 Start Call 按钮和一个 Hang Up 按钮。
我们还需要预览本地视频,并呈现其他参与者的远程视频。 因此,我们需要两个元素来显示视频流。
打开项目的 MainWindow.xaml,并将内容替换为以下实现。
<Page
    x:Class="CallingQuickstart.MainPage"
    xmlns="http://schemas.microsoft.com/winfx/2006/xaml/presentation"
    xmlns:x="http://schemas.microsoft.com/winfx/2006/xaml"
    xmlns:local="using:CallingQuickstart"
    xmlns:d="http://schemas.microsoft.com/expression/blend/2008"
    xmlns:mc="http://schemas.openxmlformats.org/markup-compatibility/2006"
    mc:Ignorable="d">

    <Grid x:Name="MainGrid">
        <Grid.RowDefinitions>
            <RowDefinition Height="32"/>
            <RowDefinition Height="Auto"/>
            <RowDefinition Height="200*"/>
            <RowDefinition Height="60*"/>
            <RowDefinition Height="Auto"/>
        </Grid.RowDefinitions>

        <Grid Grid.Row="0" x:Name="AppTitleBar" Background="LightSeaGreen">
            <!-- Width of the padding columns is set in LayoutMetricsChanged handler. -->
            <!-- Using padding columns instead of Margin ensures that the background paints the area under the caption control buttons (for transparent buttons). -->
            <TextBlock x:Name="QuickstartTitle" Text="Calling Quickstart sample title bar" Style="{StaticResource CaptionTextBlockStyle}" Padding="4,4,0,0"/>
        </Grid>

        <TextBox Grid.Row="1" x:Name="CalleeTextBox" PlaceholderText="Who would you like to call?" TextWrapping="Wrap" VerticalAlignment="Center" />

        <Grid Grid.Row="2" Background="LightGray">
            <Grid.RowDefinitions>
                <RowDefinition/>
            </Grid.RowDefinitions>
            <Grid.ColumnDefinitions>
                <ColumnDefinition Width="*"/>
                <ColumnDefinition Width="*"/>
            </Grid.ColumnDefinitions>
            <MediaPlayerElement x:Name="LocalVideo" HorizontalAlignment="Center" Stretch="UniformToFill" Grid.Column="0" VerticalAlignment="Center" AutoPlay="True" />
            <MediaPlayerElement x:Name="RemoteVideo" HorizontalAlignment="Center" Stretch="UniformToFill" Grid.Column="1" VerticalAlignment="Center" AutoPlay="True" />
        </Grid>
        <StackPanel Grid.Row="3" Orientation="Vertical" Grid.RowSpan="2">
            <StackPanel Orientation="Horizontal" Margin="10">
                <TextBlock VerticalAlignment="Center">Cameras:</TextBlock>
                <ComboBox x:Name="CameraList" HorizontalAlignment="Left" Grid.Column="0" DisplayMemberPath="Name" SelectionChanged="CameraList_SelectionChanged" Margin="10"/>
            </StackPanel>
            <StackPanel Orientation="Horizontal">
                <Button x:Name="CallButton" Content="Start/Join call" Click="CallButton_Click" VerticalAlignment="Center" Margin="10,0,0,0" Height="40" Width="123"/>
                <Button x:Name="HangupButton" Content="Hang up" Click="HangupButton_Click" VerticalAlignment="Center" Margin="10,0,0,0" Height="40" Width="123"/>
                <CheckBox x:Name="MuteLocal" Content="Mute" Margin="10,0,0,0" Click="MuteLocal_Click" Width="74"/>
                <CheckBox x:Name="BackgroundBlur" Content="Background blur" Width="142" Margin="10,0,0,0" Click="BackgroundBlur_Click"/>
            </StackPanel>
        </StackPanel>
        <TextBox Grid.Row="4" x:Name="Stats" Text="" TextWrapping="Wrap" VerticalAlignment="Center" Height="30" Margin="0,2,0,0" BorderThickness="2" IsReadOnly="True" Foreground="LightSlateGray" />
    </Grid>
</Page>
打开 App.xaml.cs(右键单击并选择“查看代码”),并将此行添加到顶部:
using CallingQuickstart;
打开 MainWindow.xaml.cs(右键单击并选择“查看代码”),并将内容替换为以下实现:
using Azure.Communication.Calling.WindowsClient;
using Azure.WinRT.Communication;
using Microsoft.UI.Xaml;
using System;
using System.Collections.Generic;
using System.Linq;
using System.Threading.Tasks;
using Windows.Media.Core;

namespace CallingQuickstart
{
    public sealed partial class MainWindow : Window
    {
        CallAgent callAgent;
        Call call;
        DeviceManager deviceManager;
        Dictionary<string, RemoteParticipant> remoteParticipantDictionary = new Dictionary<string, RemoteParticipant>();

        public MainWindow()
        {
            this.InitializeComponent();
            Task.Run(() => this.InitCallAgentAndDeviceManagerAsync()).Wait();
        }

        private async Task InitCallAgentAndDeviceManagerAsync()
        {
            // Initialize call agent and Device Manager
        }

        private async void Agent_OnIncomingCallAsync(object sender, IncomingCall incomingCall)
        {
            // Accept an incoming call
        }

        private async void CallButton_Click(object sender, RoutedEventArgs e)
        {
            // Start a call with video
        }

        private async void HangupButton_Click(object sender, RoutedEventArgs e)
        {
            // End the current call
        }

        private async void Call_OnStateChangedAsync(object sender, PropertyChangedEventArgs args)
        {
            var state = (sender as Call)?.State;
            this.DispatcherQueue.TryEnqueue(() => {
                State.Text = state.ToString();
            });
        }
    }
}
对象模型
以下类和接口用于处理 Azure 通信服务通话 SDK 的某些主要功能:
| 名称 | 说明 |
|---|---|
CallClient |
CallClient 是通话客户端库的主入口点。 |
CallAgent |
CallAgent 用于启动和加入通话。 |
CommunicationCall |
CommunicationCall 用于管理已发起或已加入的通话。 |
CallTokenCredential |
CallTokenCredential 用作实例化 CallAgent 的令牌凭据。 |
CommunicationUserIdentifier |
CommunicationUserIdentifier 用于表示用户的身份,可以是以下选项之一:CommunicationUserIdentifier、PhoneNumberIdentifier 或 CallingApplication。 |
验证客户端
若要初始化 CallAgent,需要用户访问令牌。 通常,此令牌从具有特定于应用程序的身份验证的服务生成。 有关用户访问令牌的详细信息,请查看用户访问令牌指南。
对于快速入门,请使用为你的 Azure 通信服务资源生成的用户访问令牌替换 <AUTHENTICATION_TOKEN>。
有了令牌后,使用该令牌来初始化 CallAgent 实例,以便发出和接收呼叫。 为了访问设备上的摄像头,我们还需要获取设备管理器实例。
向 InitCallAgentAndDeviceManagerAsync 函数添加以下代码。
var callClient = new CallClient();
this.deviceManager = await callClient.GetDeviceManagerAsync();

var tokenCredential = new CallTokenCredential("<AUTHENTICATION_TOKEN>");
var callAgentOptions = new CallAgentOptions()
{
    DisplayName = "<DISPLAY_NAME>"
};

this.callAgent = await callClient.CreateCallAgentAsync(tokenCredential, callAgentOptions);
this.callAgent.OnCallsUpdated += Agent_OnCallsUpdatedAsync;
this.callAgent.OnIncomingCall += Agent_OnIncomingCallAsync;
开启视频通话
将实现添加到 CallButton_Click,使用视频开启呼叫。 我们需要使用设备管理器实例枚举摄像头并构造 LocalVideoStream。 我们需要使用 LocalVideoStream 设置 VideoOptions,并随 startCallOptions 一起传递以设置通话的初始选项。 通过将 LocalVideoStream 附加到 MediaPlayerElement,可以预览本地视频。
var startCallOptions = new StartCallOptions();

if (this.deviceManager.Cameras?.Count > 0)
{
    var videoDeviceInfo = this.deviceManager.Cameras?.FirstOrDefault();
    if (videoDeviceInfo != null)
    {
        var selectedCamera = CameraList.SelectedItem as VideoDeviceDetails;
        cameraStream = new LocalOutgoingVideoStream(selectedCamera);

        var localUri = await cameraStream.StartPreviewAsync();
        await Dispatcher.RunAsync(Windows.UI.Core.CoreDispatcherPriority.Normal, () =>
        {
            LocalVideo.Source = MediaSource.CreateFromUri(localUri);
        });

        startCallOptions.VideoOptions = new OutgoingVideoOptions(new[] { cameraStream });
    }
}

var callees = new ICommunicationIdentifier[1]
{
    new CommunicationUserIdentifier(CalleeTextBox.Text.Trim())
};

this.call = await this.callAgent.StartCallAsync(callees, startCallOptions);
this.call.OnRemoteParticipantsUpdated += Call_OnRemoteParticipantsUpdatedAsync;
this.call.OnStateChanged += Call_OnStateChangedAsync;
接听来电
将实现添加到 Agent_OnIncomingCallAsync,使用视频应答传入呼叫,将 LocalVideoStream 传递给 acceptCallOptions。
var acceptCallOptions = new AcceptCallOptions();

if (this.deviceManager.Cameras?.Count > 0)
{
    var videoDeviceInfo = this.deviceManager.Cameras?.FirstOrDefault();
    if (videoDeviceInfo != null)
    {
        var selectedCamera = CameraList.SelectedItem as VideoDeviceDetails;
        cameraStream = new LocalOutgoingVideoStream(selectedCamera);

        var localUri = await cameraStream.StartPreviewAsync();
        await Dispatcher.RunAsync(Windows.UI.Core.CoreDispatcherPriority.Normal, () =>
        {
            LocalVideo.Source = MediaSource.CreateFromUri(localUri);
        });

        acceptCallOptions.VideoOptions = new OutgoingVideoOptions(new[] { localVideoStream });
    }
}

call = await incomingCall.AcceptAsync(acceptCallOptions);
远程参与者和远程视频流
通过呼叫实例上的 RemoteParticipants 集合提供所有远程参与者。 建立通话后,我们可以访问通话的远程参与者并处理远程视频流。
注意
当用户加入通话时,他们可以通过 RemoteParticipants 集合访问当前的远程参与者。 不会为这些现有参与者触发 OnRemoteParticipantsUpdated 事件。 仅当用户已加入通话且远程参与者加入或离开通话时,才会触发此事件。
private async void Call_OnVideoStreamsUpdatedAsync(object sender, RemoteVideoStreamsEventArgs args)
{
    foreach (var remoteVideoStream in args.AddedRemoteVideoStreams)
    {
        this.DispatcherQueue.TryEnqueue(async () => {
            RemoteVideo.Source = MediaSource.CreateFromUri(await remoteVideoStream.Start());
            RemoteVideo.MediaPlayer.Play();
        });
    }

    foreach (var remoteVideoStream in args.RemovedRemoteVideoStreams)
    {
        remoteVideoStream.Stop();
    }
}

private async void Agent_OnCallsUpdatedAsync(object sender, CallsUpdatedEventArgs args)
{
    foreach (var call in args.AddedCalls)
    {
        foreach (var remoteParticipant in call.RemoteParticipants)
        {
            var remoteParticipantMRI = remoteParticipant.Identifier.ToString();
            this.remoteParticipantDictionary.TryAdd(remoteParticipantMRI, remoteParticipant);
            await AddVideoStreamsAsync(remoteParticipant.VideoStreams);
            remoteParticipant.OnVideoStreamsUpdated += Call_OnVideoStreamsUpdatedAsync;
        }
    }
}

private async void Call_OnRemoteParticipantsUpdatedAsync(object sender, ParticipantsUpdatedEventArgs args)
{
    foreach (var remoteParticipant in args.AddedParticipants)
    {
        String remoteParticipantMRI = remoteParticipant.Identifier.ToString();
        this.remoteParticipantDictionary.TryAdd(remoteParticipantMRI, remoteParticipant);
        await AddVideoStreamsAsync(remoteParticipant.VideoStreams);
        remoteParticipant.OnVideoStreamsUpdated += Call_OnVideoStreamsUpdatedAsync;
    }

    foreach (var remoteParticipant in args.RemovedParticipants)
    {
        String remoteParticipantMRI = remoteParticipant.Identifier.ToString();
        this.remoteParticipantDictionary.Remove(remoteParticipantMRI);
    }
}
呈现远程视频
对于每个远程视频流,请将其附加到 MediaPlayerElement。
private async Task AddVideoStreamsAsync(IReadOnlyList<RemoteVideoStream> remoteVideoStreams)
{
    foreach (var remoteVideoStream in remoteVideoStreams)
    {
        var remoteUri = await remoteVideoStream.Start();

        this.DispatcherQueue.TryEnqueue(() => {
            RemoteVideo.Source = MediaSource.CreateFromUri(remoteUri);
            RemoteVideo.MediaPlayer.Play();
        });
    }
}
通话状态更新
通话断开连接后,我们需要清理视频渲染器,并处理远程参与者最初加入通话时的情况。
private async void Call_OnStateChanged(object sender, PropertyChangedEventArgs args)
{
    switch (((Call)sender).State)
    {
        case CallState.Disconnected:
            this.DispatcherQueue.TryEnqueue(() => { =>
            {
                LocalVideo.Source = null;
                RemoteVideo.Source = null;
            });
            break;

        case CallState.Connected:
            foreach (var remoteParticipant in call.RemoteParticipants)
            {
                String remoteParticipantMRI = remoteParticipant.Identifier.ToString();
                remoteParticipantDictionary.TryAdd(remoteParticipantMRI, remoteParticipant);
                await AddVideoStreams(remoteParticipant.VideoStreams);
                remoteParticipant.OnVideoStreamsUpdated += Call_OnVideoStreamsUpdated;
            }
            break;

        default:
            break;
    }
}
结束呼叫
在单击 Hang Up 按钮时结束当前通话。 将实现添加到 HangupButton_Click,以结束使用我们创建的 callAgent 进行的呼叫,并拆除参与者更新和呼叫状态事件处理程序。
this.call.OnRemoteParticipantsUpdated -= Call_OnRemoteParticipantsUpdatedAsync;
this.call.OnStateChanged -= Call_OnStateChangedAsync;
await this.call.HangUpAsync(new HangUpOptions());
运行代码
可在 Visual Studio 中生成并运行代码。 对于解决方案平台,我们支持 ARM64、x64 和 x86。
通过在文本字段中提供用户 ID 并单击 Start Call 按钮,可以启动出站视频呼叫。
注意:呼叫 8:echo123 会停止视频流,因为回显机器人不支持视频流。
有关用户 ID(标识)的详细信息,请查看用户访问令牌指南。