Windows 7-verktygsfält
Not
Den här designguiden skapades för Windows 7 och har inte uppdaterats för nyare versioner av Windows. Mycket av vägledningen gäller fortfarande i princip, men presentationen och exemplen återspeglar inte vår nuvarande designvägledning.
Verktygsfält är ett sätt att gruppera kommandon för effektiv åtkomst.

Några vanliga verktygsfält.
Använd verktygsfält utöver eller i stället för menyrader. Verktygsfält kan vara effektivare än menyrader eftersom de är direkta (visas alltid i stället för att visas vid musklickning), omedelbart (i stället för att kräva ytterligare indata) och innehåller de vanligaste kommandona (i stället för en omfattande lista). Till skillnad från menyrader behöver verktygsfälten inte vara omfattande eller självförklarande, bara snabbt, bekvämt och effektivt.
Vissa verktygsfält är anpassningsbara, så att användarna kan lägga till eller ta bort verktygsfält, ändra storlek och plats och till och med ändra innehållet. Vissa typer av verktygsfält kan kopplas från, vilket resulterar i ett palettfönster. Mer information om sorter i verktygsfält finns i Användningsmönster i den här artikeln.
Not
Riktlinjer för menyer, kommandoknapparoch ikoner visas i separata artiklar.
Är det här rätt användargränssnitt?
Du kan ta ställning till följande frågor:
- Är fönstret ett primärt fönster? Verktygsfält fungerar bra för primära fönster, men är vanligtvis överväldigande för sekundära fönster. För sekundära fönster använder du kommandoknappar, menyknapparoch länkar i stället.
- Finns det ett litet antal kommandon som används ofta? Verktygsfält kan inte hantera så många kommandon som menyrader, så de fungerar bäst som ett sätt att effektivt komma åt ett litet antal kommandon som används ofta.
- Är de flesta kommandona omedelbara? Är de oftast kommandon som inte kräver ytterligare indata? För att vara effektiva måste verktygsfälten ha en direkt och omedelbar känsla. Annars passar menyraderna bättre för kommandon som kräver ytterligare indata.
- Kan de flesta kommandon visas direkt? Användare interagerar alltså med dem med ett enda klick? Vissa kommandon kan visas med hjälp av menyknappar, men att presentera de flesta kommandon på det här sättet undergräver verktygsfältets effektivitet, vilket gör ett menyfält till ett bättre val.
- Representeras kommandona väl av ikoner? Verktygsfältsknappar representeras vanligtvis av ikoner i stället för textetiketter (även om vissa verktygsfältsknappar använder båda), medan menykommandon representeras av deras text. Om kommandoikonerna inte är av hög kvalitet och inte är självförklarande kan en menyrad vara ett bättre alternativ.
Om ditt program har ett verktygsfält utan menyrad, och de flesta kommandona är indirekt tillgängliga via menyknappar och delade knappar, är det här verktygsfältet i huvudsak en menyrad. Använd verktygsfältsmenyer mönster i riktlinjerna för menyer i stället.
Designbegrepp
En bra menyrad är en omfattande katalog med alla tillgängliga kommandon på den översta nivån, medan ett bra verktygsfält ger snabb och bekväm åtkomst till kommandon som används ofta. Ett verktygsfält försöker inte träna användare att bara göra dem produktiva. När användarna får lära sig att komma åt ett kommando i ett verktygsfält fortsätter de sällan att komma åt kommandot från menyraden. Därför behöver inte ett programs menyrad och dess verktygsfält motsvara direkt.
Verktygsfält jämfört med menyrader
Traditionellt skiljer sig verktygsfält från menyrader på följande sätt:
Frekvens. Verktygsfälten innehåller endast de kommandon som används oftast, medan menyraderna katalogiserar alla tillgängliga kommandon på den översta nivån i ett program.
Omedelbarhet. Om du klickar på ett verktygsfältskommando börjar det gälla omedelbart, medan ett menykommando kan kräva ytterligare indata. Ett utskriftskommando i en menyrad visar till exempel först dialogrutan Skriv ut, medan en knapp i verktygsfältet Skriv ut omedelbart skriver ut en enda kopia av ett dokument till standardskrivaren.

Om du i det här exemplet klickar på knappen Skriv ut verktygsfält skrivs omedelbart en enda kopia av ett dokument ut till standardskrivaren.
Direkthet. Verktygsfältskommandon anropas med ett enda klick, medan menyradskommandon kräver att du navigerar via menyn.
Tal och densitet. Skärmutrymmet som krävs av ett verktygsfält är proportionellt mot antalet kommandon och det utrymmet används alltid, även om kommandona inte är det. Därför måste verktygsfälten använda sitt utrymme effektivt. Menyradskommandon döljs däremot normalt från vyn och deras hierarkiska struktur tillåter valfritt antal kommandon.
Storlek och presentation. Om du vill packa många kommandon i ett litet utrymme använder verktygsfält vanligtvis ikonbaserade kommandon (med knappbeskrivningsbaserade etiketter), medan menyraderna använder textbaserade kommandon (med valfria ikoner). Knapparna i verktygsfältet kan ha standardtextetiketter, men de använder betydligt mer utrymme.

Etiketterade verktygsfältsknappar tar minst tre gånger så mycket utrymme som omärkta knappar.
Självklar. Väl utformade verktygsfält behöver ikoner som mestadels är självförklarande eftersom användarna inte kan hitta kommandon effektivt bara med hjälp av knappbeskrivningar. Verktygsfält fungerar dock fortfarande bra om några kommandon som används mindre ofta inte är självförklarande.

I det här exemplet är de mest använda ikonerna självförklarande.
Identifierbar och urskiljbar. För kommandon som används ofta kommer användarna ihåg knappattribut i verktygsfältet, till exempel plats, form och färg. Med väl utformade verktygsfält kan användarna snabbt hitta kommandona även om de inte kommer ihåg den exakta ikonsymbolen. Användarna minns däremot vanliga kommandoplatser för menyraden, men förlitar sig på kommandoetiketterna för att göra val.
För verktygsfältskommandon hjälper distinkt plats, form och färg till att göra ikonerna igenkännliga och särskiljbara.
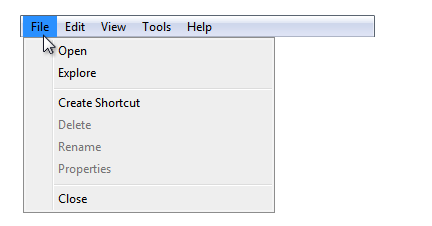
För menyradskommandon är användarna i slutändan beroende av sina etiketter.
Effektivitet
Med tanke på deras egenskaper måste verktygsfälten främst utformas för effektivitet. Ett ineffektivt verktygsfält är helt enkelt inte meningsfullt.
Om du bara gör en sak...
Se till att dina verktygsfält är utformade främst för effektivitet. Fokusera verktygsfälten på kommandon som används ofta, omedelbart, direkt och snabbt igenkännliga.
Dölj menystaplar
I allmänhet fungerar verktygsfält bra tillsammans med menyrader: bra verktygsfält ger effektivitet och bra menyrader ger omfattande. Med både menyrader och verktygsfält kan var och en fokusera på sina styrkor utan att kompromissa.
Överraskande nog delas den här modellen upp med enkla program. För program med bara ett fåtal kommandon är det inte meningsfullt att ha både en menyrad och ett verktygsfält eftersom menyraden blir en redundant, ineffektiv version av verktygsfältet.
För att eliminera redundansen fokuserar många enkla program i Windows Vista på att tillhandahålla kommandon enbart via verktygsfältet och dölja menyraden som standard. Sådana program inkluderar Windows Explorer, Windows Internet Explorer, Windows Media Player och Windows Photo Gallery.
Det här är ingen liten ändring. Om du tar bort menyraden ändras verktygsfältens karaktär i grunden eftersom sådana verktygsfält måste vara omfattande och ändras på följande sätt:
Frekvens. Om du tar bort menyraden innebär det att alla kommandon som inte är tillgängliga direkt från ett fönster eller dess snabbmenyer måste vara tillgängliga från verktygsfältet, oavsett användningsfrekvens.
Omedelbarhet. Om du tar bort menyraden blir verktygsfältet den enda synliga åtkomstpunkten för kommandon, vilket kräver att verktygsfältet har de fullt fungerande versionerna. Om det till exempel inte finns någon menyrad måste ett utskriftskommando i ett verktygsfält visa dialogrutan Skriv ut i stället för att skrivas ut omedelbart. (Även om det är en utmärkt kompromiss att använda en delningsknapp i det här fallet. Se Standard-menyn och delade knappar för standardknappen Utskriftsdelning.)

I det här exemplet har knappen Skriv ut verktygsfältet i Windows Fotogalleri ett utskriftskommando som visar dialogrutan Skriv ut.
Direkthet. För att spara utrymme och förhindra oreda kan kommandon som används mindre ofta flyttas till menyknappar, vilket gör dem mindre direkta.
Verktygsfält som används för att komplettera en menyrad är utformade på ett annat sätt än verktygsfält som är utformade för användning med en borttagen eller dold menyrad. Och eftersom du inte kan anta att användarna kommer att visa en dold menyrad för att utföra ett enda kommando, bör dölja en menyrad behandlas på samma sätt som att ta bort den helt när de fattar designbeslut. (Om du döljer menyraden som standard ska du inte anta att användarna kommer att tänka på att visa menyraden för att hitta ett kommando eller ens ta reda på hur de ska visa det.)
Att utforma ett verktygsfält för att fungera utan en menyrad innebär ofta vissa kompromisser. Men för effektivitet, kompromissa inte för mycket. Om du döljer menyraden i ett ineffektivt verktygsfält ska du inte dölja menyraden!
Hjälpmedel för tangentbord
Från tangentbordet är åtkomst till verktygsfält helt annorlunda än att komma åt menyrader. Menyraderna får indatafokus när användarna trycker på Alt-tangenten och förlorar indatafokus med Esc-tangenten. När en menyrad har indatafokus navigeras den oberoende av resten av fönstret och hanterar alla piltangenter, start-, slut- och tabbnycklar. Verktygsfälten får däremot indatafokus när användarna trycker på tabbtangenten genom hela innehållet i fönstret. Eftersom verktygsfälten är sist i flikordning kan de behöva utföra en betydande åtgärd för att aktivera på en upptagen sida (såvida inte användarna vet att använda Skift+Tabb för att flytta bakåt).
Hjälpmedel utgör ett dilemma här: även om verktygsfält är enklare för musanvändare är de mindre tillgängliga för tangentbordsanvändare. Detta är inte ett problem om det finns både en menyrad och ett verktygsfält, men det är om menyraden tas bort eller döljs.
Av hjälpmedelsskäl föredrar du att behålla menyraden i stället för att ta bort den helt till förmån för ett verktygsfält. Om du måste välja mellan att ta bort menyraden och bara dölja den, föredrar du att dölja den.
Användningsmönster
Verktygsfält har flera användningsmönster:
| Användning | Exempel |
|---|---|
|
Primära verktygsfält ett verktygsfält som är utformat för att fungera utan menyrad, antingen dolt eller borttaget. |
primära verktygsfält måste balansera behovet av effektivitet med omfattande, så att de fungerar bäst för enkla program. 
Ett primärt verktygsfält från Utforskaren. |
|
kompletterande verktygsfält ett verktygsfält som är utformat för att fungera med en menyrad. |
kompletterande verktygsfält kan fokusera på effektivitet utan att kompromissa. 
Ett extra verktygsfält från Windows Movie Maker. |
|
verktygsfältsmenyer en menyrad implementerad som ett verktygsfält. |
verktygsfältsmenyer är verktygsfält som främst består av kommandon i menyknappar och delade knappar, med bara några få direkta kommandon, om några. 
En verktygsfältsmeny i Windows Fotogalleri. |
|
Anpassningsbara verktygsfält ett verktygsfält som kan anpassas av användare. |
anpassningsbara verktygsfält gör det möjligt för användare att lägga till eller ta bort verktygsfält, ändra storlek och plats och till och med ändra innehållet. 
Ett anpassningsbart verktygsfält från Microsoft Visual Studio. |
|
Palette-fönster en lägeslös dialogruta som visar en matris med kommandon. |
palettfönster är ej dockade verktygsfält. 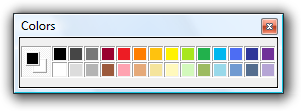

Palettfönster från Windows Paint. |
Verktygsfälten har följande format:
| Stil | Exempel |
|---|---|
|
Omärkta ikoner en eller flera rader med små omärkta ikonknappar. |
använd det här formatet om det finns för många knappar att märka eller om programmet används ofta. Med den här stilen kan program med komplexa funktioner ha flera rader, och därför är detta det enda format som behöver vara anpassningsbart. med det här formatet kan vissa kommandoknappar märkas om de används ofta. 
Ett verktygsfält för omärkta ikoner från WordPad. |
|
Stora omärkta ikoner en enda rad med stora ikonknappar som inte är etiketterade. |
använd den här stilen för enkla verktyg som enkelt kan känna igen ikoner och som vanligtvis körs i små fönster. 

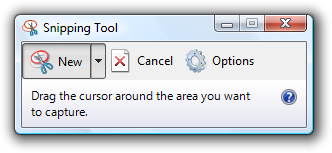
Stora omärkta ikoner verktygsfält från Windows Live Messenger och Windows Snipping Tool. |
|
etiketterade ikoner en enda rad med små etiketterade ikoner. |
använd det här formatet om det finns få kommandon eller om programmet inte används ofta. det här formatet har alltid en enda rad. 
Ett verktygsfält med etiketterade ikoner från Utforskaren i Windows. |
|
Partiella verktygsfält en delrad med små ikoner som används för att spara utrymme när ett fullständigt verktygsfält inte behövs. |
använd det här formatet för fönster med navigeringsknappar, en sökruta eller flikar för att eliminera onödig vikt överst i fönstret. 
Partiella verktygsfält kan kombineras med navigeringsknappar, en sökruta eller flikar. |
|
Stora partiella verktygsfält en delrad med stora ikoner som används för att spara utrymme när ett fullständigt verktygsfält inte behövs. |
använd den här stilen för enkla verktyg som har navigeringsknappar eller en sökruta för att eliminera onödig vikt överst i fönstret. 
Ett stort partiellt verktygsfält från Windows Defender. |
Slutligen har verktygsfältskontroller flera användningsmönster:
| Användning | Exempel |
|---|---|
|
kommandoikonknappar Om du klickar på en kommandoknapp initieras en omedelbar åtgärd. |

Exempel på ikonkommandoknappar från Windows Fax och Scan. |
|
lägesikonknappar om du klickar på en lägesknapp går du till det valda läget. |

Exempel på lägesknappar från Windows Paint. |
|
egenskapsikonknappar en egenskapsknapps tillstånd återspeglar tillståndet för de markerade objekten, om det finns några. Om du klickar på knappen tillämpas ändringen på de markerade objekten. |
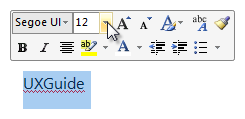
Exempel på egenskapsknappar från Microsoft Word. |
|
Ikonknappar med etiketter en kommandoknapp eller egenskapsknapp märkt med en ikon och en textetikett. |
Dessa knappar används för verktygsfältsknappar som används ofta vars ikon inte är tillräckligt självförklarande. De används också i verktygsfält som har så få knappar att varje knapp kan ha en textetikett. 
Ett verktygsfält med de mest använda knapparna märkta. |
|
menyknappar en kommandoknapp som används för att presentera en liten uppsättning relaterade kommandon. |
en enda nedåtriktad triangel anger att om du klickar på knappen visas en meny. 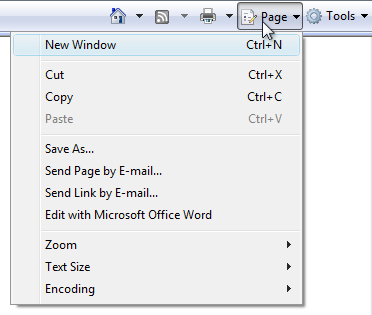
En menyknapp med en liten uppsättning relaterade kommandon. |
|
Dela upp knappar en kommandoknapp som används för att konsolidera varianter av ett kommando, särskilt när ett av kommandona används för det mesta. |

en delningsknapp i dess normala tillstånd. som en menyknapp visar en enda nedåtriktad triangel att en meny visas när du klickar på den högra delen av knappen. 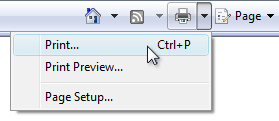
en nedbruten delningsknapp. I det här exemplet används en delningsknapp för att konsolidera alla utskriftsrelaterade kommandon. Kommandot för omedelbar utskrift används för det mesta, så användarna behöver normalt inte se de andra kommandona. till skillnad från en menyknapp utför du åtgärden direkt på etiketten genom att klicka på den vänstra delen av knappen. delningsknappar är effektiva i situationer där nästa kommando sannolikt kommer att vara detsamma som det senaste kommandot. I det här fallet ändras etiketten till det sista kommandot, som med en färgväljare: 
I det här exemplet ändras etiketten till det sista kommandot. |
|
listrutor en listruta (redigerbar eller skrivskyddad) som används för att visa eller ändra en egenskap. |
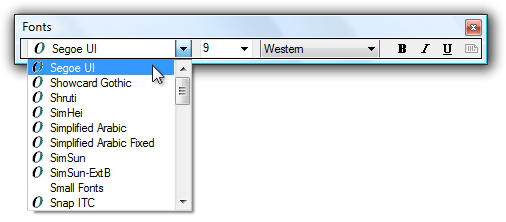
I det här exemplet används listrutor för att visa och ange teckensnittsattribut. En listruta i ett verktygsfält visar tillståndet för det markerade objektet, om det finns något. Om du ändrar listan ändras det markerade objektets tillstånd. |
Riktlinjer
Presentation
Välj ett lämpligt format i verktygsfältet baserat på antalet kommandon och deras användning. Mer information om hur du väljer finns i den föregående formattabellen för verktygsfältet. Undvik att använda en verktygsfältskonfiguration som tar för mycket utrymme från programmets arbetsyta.
Placera verktygsfält precis ovanför innehållsområdet under menyraden och adressfältet, om sådana finns.
Om utrymmet är premium sparar du utrymme genom att:
- Utelämna etiketterna för välkända ikoner och kommandon som används mindre ofta.
- Använd endast ett partiellt verktygsfält i stället för hela fönstrets bredd.
- Konsolidera relaterade kommandon med en menyknapp eller delningsknapp.
- Använda en spill-sparr för att visa kommandon som används mindre ofta.
- Visa kommandon endast när de gäller för den aktuella kontexten.

Verktygsfältet i Windows Internet Explorer sparar utrymme genom att utelämna etiketter för välkända ikoner, använda ett partiellt verktygsfält och använda en spill chevron för mindre vanliga kommandon.
För verktygsfältsmönstret för omärkta ikoner använder du en standardkonfiguration med högst två rader med verktygsfält. Om fler än två rader kan vara användbara kan du göra verktygsfälten anpassningsbara. Om du börjar med fler än två rader kan användarna bli överväldigade och ta för mycket utrymme från programarbetsytan.
felaktig:

En standardkonfiguration med fler än två rader med verktygsfält resulterar i för mycket visuell oreda.
Inaktivera enskilda verktygsfältsknappar som inte gäller för den aktuella kontexten i stället för att ta bort dem. På så sätt blir innehållet i verktygsfältet stabilt och enklare att hitta.
Inaktivera enskilda verktygsfältsknappar om du klickar på dem direkt skulle resultera i ett fel. Att göra det är nödvändigt för att upprätthålla en direkt känsla.
För verktygsfältsmönstret för omärkta ikoner tar du bort hela verktygsfält om de inte gäller för den aktuella kontexten. Visa dem endast i tillämpliga lägen.
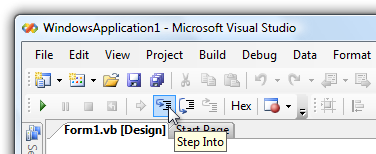
I det här exemplet visas verktygsfältet Felsökning endast när programmet körs.
Visa verktygsfältsknappar vänsterjusterade. Hjälpikonen, om den finns, är rätt justerad.

Alla verktygsfältsknappar är vänsterjusterade förutom hjälpen.
Undantag: verktygsfält i Windows 7-format vänsterjustera programspecifika kommandon, men högerjustera standardkommandon, välkända kommandon som Alternativ, Visa och Hjälp.
Ändra inte knappetiketter i verktygsfältet dynamiskt. Att göra det är förvirrande och oväntat. Du kan dock ändra ikonen så att den återspeglar det aktuella tillståndet.

I det här exemplet ändras ikonen för att ange standardkommandot.
Kontroller och kommandon
Föredrar de vanligaste kommandona.
- För primära verktygsfält tillhandahåller du omfattande kommandon. Primära verktygsfält behöver inte vara lika omfattande som menyrader, men de måste tillhandahålla alla kommandon som inte lätt kan identifieras någon annanstans. Primära verktygsfält behöver inte ha kommandon för:
- Kommandon som finns direkt i själva användargränssnittet.
- Kommandon används vanligtvis via snabbmenyer.
- Vanliga, välkända kommandon som Klipp ut, Kopiera och Klistra in.
- För kompletterande verktygsfält anger du kommandon som används oftast. Menyradskommandon är en superuppsättning av verktygsfältskommandona, så du behöver inte ange allt. Fokusera på snabb, bekväm kommandoåtkomst och hoppa över resten.
- För primära verktygsfält tillhandahåller du omfattande kommandon. Primära verktygsfält behöver inte vara lika omfattande som menyrader, men de måste tillhandahålla alla kommandon som inte lätt kan identifieras någon annanstans. Primära verktygsfält behöver inte ha kommandon för:
Föredrar direkta kontroller. Använd verktygsfältsknappar i följande prioritetsordning:
- Ikonknapp. Direkt och tar minimalt med utrymme.
- Knappen Etikettikon. Direkt, men tar mer utrymme.
- Knappen Dela. Direkt för det vanligaste kommandot, men hanterar kommandovariationer.
- Menyknapp. Indirekt, men visar många kommandon.
Föredrar omedelbara kommandon. För kommandon som antingen kan vara omedelbara eller ha ytterligare indata för flexibilitet:
- För primära verktygsfält använder du de flexibla versionerna av kommandon (till exempel Skriv ut...).
- För kompletterande verktygsfält använder du de omedelbara versionerna i verktygsfältet (till exempel Skriv ut) och använder flexibla versioner i menyraden (till exempel Skriv ut...).
Ange etiketter för kommandon som används ofta särskilt om deras ikoner inte är välkända ikoner.
acceptabelt:

Bättre:

Verktygsfältet Fax och genomsökning i Windows har få kommandon, så ju bättre version etiketter de viktigaste.
Placera inte kommandon i verktygsfältsmenyer som också finns direkt i verktygsfältet.
felaktig:
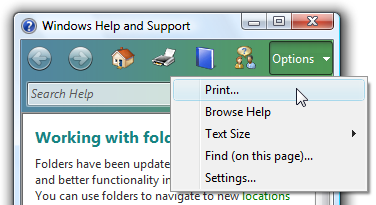
I det här exemplet finns Utskrift direkt i verktygsfältet, så det behöver inte finnas i menyn.
Organisation och ordning
Ordna kommandona i ett verktygsfält i relaterade grupper.
Placera de grupper som används oftast först. Placera kommandona i logisk ordning i en grupp. Sammantaget bör kommandona ha ett logiskt flöde för att göra dem enkla att hitta, samtidigt som de mest använda kommandona fortfarande visas först. Det är mest effektivt, särskilt om det finns spill.
Använd endast gruppavdelare om kommandona mellan grupper är svagt kopplade. Detta gör grupperingarna uppenbara och kommandona lättare att hitta.


Exempel på grupperade verktygsfält från Windows Mail.
Undvik att placera destruktiva kommandon bredvid kommandon som används ofta. Använd antingen ordning eller gruppering för att få separation. Överväg också att inte placera destruktiva kommandon i verktygsfältet, utan bara i menyraden eller snabbmenyerna i stället.
acceptabelt:

Bättre:

I det bättre exemplet är kommandot Ta bort fysiskt separerat från Utskrift.
Använd spill-sparren för att ange att inte alla kommandon kan visas. Men använd endast spill om det inte finns tillräckligt med utrymme för att visa alla kommandon.
felaktig:

Spill chevron anger att inte alla kommandon visas, men fler av dem kan vara med en bättre layout.
Kontrollera att de vanligaste kommandona är direkt åtkomliga från verktygsfältet (dvs. inte i spill) i små fönsterstorlekar. Om det behövs ändrar du ordning på kommandona, flyttar kommandon som används mindre ofta till menyknappar eller delade knappar eller tar till och med bort dem helt från verktygsfältet. Om detta fortfarande är ett problem bör du tänka över valet av formatmall i verktygsfältet.
Dölj menystaplar
I allmänhet fungerar verktygsfält bra tillsammans med menyrader eftersom båda gör att var och en kan fokusera på sina styrkor utan att kompromissa.
- Dölj menyraden som standard om verktygsfältets design gör att menyraden är redundant.
- Dölj menyraden i stället för att ta bort den helt, eftersom menyraderna är mer tillgängliga för tangentbordsanvändare.
- Om du vill återställa menyraden anger du ett alternativ för bockmarkering för menyraden i menykategorin Visa (för primära verktygsfält) eller Verktyg (för sekundära verktygsfält). Mer information finns i Standard-menyn och delade knappar.
- Visa menyraden när användarna trycker på Alt-tangenten och ange indatafokus på den första menykategorin.
Interaktion
Vid hovring visar du knappen för att indikera att ikonen är klickbar. Efter knappbeskrivningstimeouten visar du knappbeskrivningen eller informationstipset.

I det här exemplet visas de olika visningstillstånden.
Till vänster med ett enda klick:
För kommandoknappar interagerar du med kontrollen som vanligt.
För lägesknappar visar du kontrollen för att återspegla det valda läget. Om läget påverkar beteendet för musinteraktion ändrar du även pekaren.
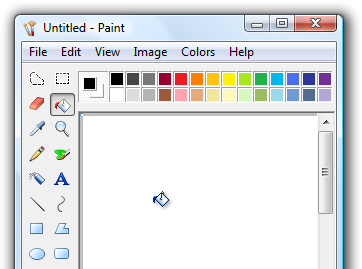
I det här exemplet ändras pekaren för att visa interaktionsläget för musen.
För egenskapsknappar och listrutor visar du kontrollen för att återspegla tillståndet för de markerade objekten, om det finns några. Vid interaktion uppdaterar du kontrollens tillstånd och tillämpar ändringen på de markerade objekten. Om inget har valts gör du ingenting.
Utför samma åtgärd som ett vänsterklick till vänster.
Undantag: I sällsynta fall kan ett verktygsfältskommando användas mer effektivt. I sådana fall använder du dubbelklickning för att växla läget.
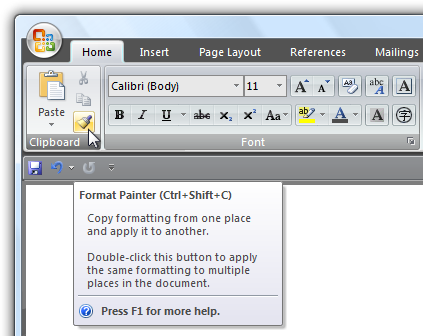
I det här exemplet går dubbelklicka på kommandot Formatera målare till ett läge där alla efterföljande klick använder formatet. Användare kan lämna läget genom att bara klicka på vänster.
Högerklicka:
- För anpassningsbara verktygsfält visar du snabbmenyn för att anpassa verktygsfältet. Visa menyn när du högerklickar på musen nedåt, inte musen uppåt.
- Gör ingenting för andra verktygsfält.
Ikoner
Ange ikoner för alla verktygsfältskontroller utom listrutor.

Listrutor behöver inte ikoner, men alla andra verktygsfältskontroller gör det.
Undantag: verktygsfält i Windows 7-format använder endast ikoner för kommandon vars ikoner är välkända. annars använder de textetiketter utan ikoner. Detta förbättrar tydligheten i etiketterna, men kräver mer utrymme.
Kontrollera att ikonerna i verktygsfältet är tydligt synliga mot bakgrundsfärgen i verktygsfältet. Utvärdera alltid verktygsfältsikoner i kontext och i högkontrastläge.
Välj ikondesigner som tydligt kommunicerar sitt syfte, särskilt för de kommandon som används oftast. Väl utformade verktygsfält behöver ikoner som är självförklarande eftersom användarna inte kan hitta kommandon effektivt med hjälp av sina knappbeskrivningar. Verktygsfält fungerar dock fortfarande bra om ikoner för några mindre ofta använda kommandon inte är självförklarande.
Välj ikoner som kan identifieras och särskiljas, särskilt för de vanligaste kommandona. Kontrollera att ikonerna har distinkta former och färger. Detta hjälper användarna att snabbt hitta kommandona även om de inte kommer ihåg ikonsymbolen.
Se till att verktygsfältsikonerna överensstämmer med riktlinjerna för aero-stilikoner.
Mer information och exempel finns i Ikoner.
Standardmeny och delade knappar
Om du använder menyknappar och delade knappar i ett verktygsfält kan du försöka använda följande standardmenystrukturer och deras relevanta kommandon när det är möjligt. Till skillnad från menyrader tar verktygsfältskommandon inte åtkomstnycklar.
Primära verktygsfält
Dessa kommandon speglar kommandona som finns i standardmenyfälten, så de bör endast användas för primära verktygsfält. I den här listan visas knappetiketterna (och typen) med deras ordning och avgränsare, genvägsnycklar och ellipser. Observera att kommandot för att visa och dölja menyraden finns på menyn Visa.
File NewCtrl+N
Öppna... Ctrl+O
Stänga
<avgränsare>
SaveCtrl+S
Spara som...
<avgränsare>
Skicka till
<avgränsare>
Trycka... Ctrl+P
Förhandsgranska
Sidkonfiguration
<avgränsare>
ExitAlt+F4(genväg ges vanligtvis inte)
Redigera(menyknapp) ÅngraCtrl+Z
RedoCtrl+Y
<avgränsare>
CutCtrl+X
CopyCtrl+C
Klistra inCtrl+V
<avgränsare>
Välj allCtrl+A
<avgränsare>
DeleteDel(genväg ges vanligtvis inte)
Byt namn...
<avgränsare>
Hitta... Ctrl+F
Hitta nextF3 (kommandot anges vanligtvis inte)
Ersätta... Ctrl+H
Gå till... Ctrl+G
Print(split button) Print... Ctrl+P
Förhandsgranska
Sidkonfiguration
Visa(menyknapp) menyrad (kontrollera om det visas)
Informationsfönstret (kontrollera om det är synligt)
Förhandsgranskningsfönster (kontrollera om det är synligt)
Statusfält (kontrollera om det är synligt)
Zooma
Zooma inCtrl++
Zooma utCtrl+-
Textstorlek (markerad inställning har punkt)
Största
Större
Medium
Mindre
Minsta
HelskärmslägeF11
RefreshF5
Tools(menyknapp) ...
Alternativ hjälp (delningsknapp, använd hjälpikonen) <program name> helpF1
Om <program name>
kompletterande verktygsfält
Dessa kommandon kompletterar standardmenystaplar. I den här listan visas knappetiketterna (och typen) med deras ordning och avgränsare, genvägsnycklar och ellipser. Observera att kommandot för att visa och dölja menyraden finns på menyn Verktyg.
De kompletterande kategorinamnen i verktygsfältet skiljer sig från standardmenykategorinamnen eftersom de måste vara mer omfattande. Kategorin Ordna används till exempel i stället för Redigera eftersom den innehåller kommandon som inte är relaterade till redigering. Använd standardmenykategorinamnen om det inte vore vilseledande om du vill behålla konsekvensen mellan menystaplar och verktygsfält.
felaktig:
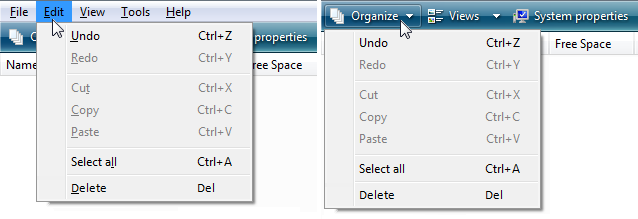
I det här exemplet bör verktygsfältet använda Redigera i stället för Ordna för konsekvens eftersom det har standardkommandona för redigera-menyn.
Palettfönster
Palettfönster använder kortare namnlister för att minimera skärmutrymmet. Placera knappen Stäng i namnlisten.
Ange rubrikfältstexten till kommandot som visade palettfönstret.
Använd versalisering i meningsformat utan att avsluta skiljetecken.
Ange en snabbmeny för kommandon för fönsterhantering. Visa den här snabbmenyn när användarna högerklickar på namnlisten.
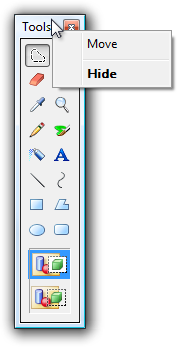
I det här exemplet kan användare högerklicka på namnlisten för att visa snabbmenyn.
När det är möjligt och användbart gör du palettfönster storleksbara. Ange att fönstret är storleksanpassat med hjälp av storlekspekare när det är över fönsterramen.
När ett palettfönster spelas upp på nytt visar du det med samma tillstånd som senast använts. Spara fönsterstorleken och platsen när du stänger. När du redigerar om återställer du den sparade fönsterstorleken och platsen. Överväg också att göra dessa attribut beständiga för programinstanser per användare.
Kundanpassning
Ange anpassning för verktygsfält som består av två eller flera rader. Endast formatmallen för omärkta ikoner behöver anpassas. Enkla verktygsfält med få kommandon behöver inte anpassas.
Ange en bra standardkonfiguration. Användarna ska inte behöva anpassa sina verktygsfält för vanliga scenarier. Var inte beroende av att användarna anpassar sig ur en felaktig inledande konfiguration. Anta att de flesta användare inte anpassar sina verktygsfält.
Ange en snabbmeny med följande kommandon:
- En kryssruta för att visa tillgängliga verktygsfält
- Lås/lås upp verktygsfält
- Anpassa...
Lås anpassningsbara verktygsfält som standardför att förhindra oavsiktliga ändringar.
För kommandot Anpassa visar du en alternativdialogruta som ger möjlighet att välja vilka verktygsfält som ska visas och kommandona i varje verktygsfält.
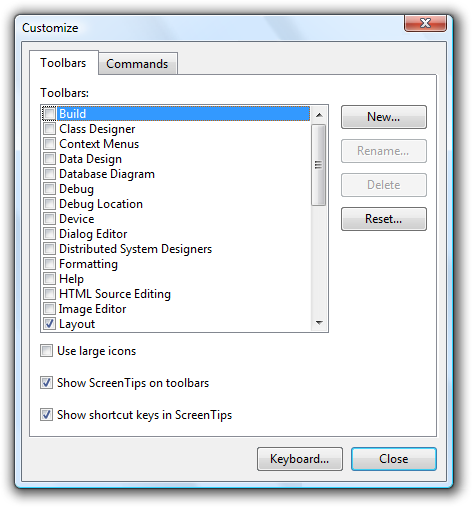
I det här exemplet innehåller Visual Studio en alternativdialogruta för att anpassa verktygsfälten.
Ange ett återställningskommando för att återgå till den ursprungliga verktygsfältskonfigurationen i dialogrutan Anpassa alternativ.
Ge möjlighet att anpassa verktygsfälten med dra och släpp på följande sätt:
- Ange ordning och positioner i verktygsfältet.
- Ange verktygsfältslängder och visa alla verktygsfält som är för små för att visa innehållet med en spillnings chevron.
- Om det stöds kan du ta bort verktygsfält för att bli palettfönster och vice versa.
När dialogrutan Anpassa alternativ visas:
- Ange innehållet i verktygsfältet.
- Ange ordning på innehållet i verktygsfältet.
På så sätt kan användarna göra ändringar mer direkt och effektivt.
Spara alla anpassningar av verktygsfältet per användare.
Använda ellipser
Även om verktygsfältskommandon används för omedelbara åtgärder, behövs ibland mer information för att utföra åtgärden. Använd en ellips för att indikera att ett kommando kräver mer information innan det kan börja gälla. Placera ellipsen i slutet av knappbeskrivningen och etiketten, om det finns en.

I det här exemplet skriver du ut... kommandot visar en utskriftsdialogruta för att samla in mer information.
Om ett kommando inte kan träda i kraft omedelbart krävs dock ingen ellips. Delningsinställningarna har till exempel ingen ellips trots att den behöver ytterligare information, eftersom kommandot inte kan träda i kraft omedelbart.

Kommandot Delningsinställningar har ingen ellips eftersom den inte kan träda i kraft omedelbart.
Eftersom verktygsfält ständigt visas och utrymmet är på premium bör ellipser användas sällan.
Not
För menyer som visas i ett verktygsfält använder du riktlinjerna för -menyn.
Rekommenderad storlek och avstånd
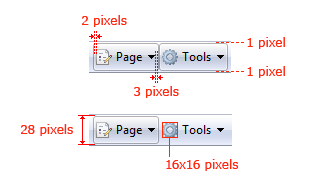
Rekommenderad storlek och avstånd för standardverktygsfält.
Etiketter
Allmänt
-
Använd versal i meningsformat.
- Undantag: För äldre program kan du använda versaler i rubrikformat om det behövs för att undvika att blanda versaler.
Ikonknappar som inte är etiketterade
Använd en knappbeskrivning för att märka kommandot. För knappbeskrivningstexten använder du vad etiketten skulle vara om knappen var märkt, men inkludera genvägsnyckeln om det finns en.

Ett exempel på knappbeskrivning för en ikon.
Ikonknappar med etiketter
Använd en koncis etikett. Använd ett enda ord om möjligt, högst fyra ord.
Placera etiketten till höger om ikonen.
Använd en infotip för att beskriva kommandot. Eftersom knapparna är märkta skulle det vara redundant att använda en knappbeskrivning i stället för en infotip.

Ett exempel på en knappbeskrivning med etiketten ikon.
Listrutor
Om listan alltid har ett värde använder du det aktuella värdet som etikett.

I det här exemplet fungerar det markerade teckensnittsnamnet som etikett.
Om en redigerbar listruta inte har något värde använder du en fråga.

I det här exemplet används en fråga för listrutans etikett.
Menyknappar och delade knappar
- Föredrar verbbaserade menyknappnamn. Utelämna dock verbet om det är Skapa, Visa, Visa eller Hantera. Till exempel har Tools- och Page-menyknappar inte verb.
- Använd ett enda, specifikt ord som tydligt och korrekt beskriver menyinnehållet. Även om namnen inte behöver vara så allmänna att de beskriver allt i menyn, bör de vara tillräckligt förutsägbara så att användarna inte blir förvånade över vad de hittar på menyn.
- Ange beskrivningar av infotip om det inte behövs om de är till hjälp.
Menyalternativ
- Använd menyalternativnamn som börjar med ett verb, substantiv eller substantivfras.
- Föredrar verbbaserade menynamn. Utelämna dock verbet om det är Skapa, Visa, Visa eller Hantera. Följande kommandon använder till exempel inte verb:
- Om
- Avancerad
- Helskärm
- Ny
- Alternativ
- Egenskaper
- Använd specifika verb. Undvik generiska, ohjälpsamma verb, till exempel Ändra och hantera.
- Använd singulära substantiv för kommandon som gäller för ett enskilt objekt, i övrigt använda plurala substantiv.
- För par med kompletterande kommandon väljer du tydligt kompletterande namn. Exempel: Lägg till, Ta bort; Visa, dölj; Infoga, Ta bort.
- Välj menyalternativsnamn baserat på användarmål och uppgifter, inte på teknik.
- Använd följande menyalternativnamn för det angivna syftet:
- Alternativ: Om du vill visa programalternativ.
- Anpassa: Om du vill visa programalternativ som är specifikt relaterade till konfiguration av mekaniskt användargränssnitt.
- Anpassa: Om du vill visa en sammanfattning av vanliga inställningar för anpassning.
- Inställningar: Använd inte. Använd Alternativ i stället.
- Egenskaper: Så här visar du ett objekts egenskapsfönster.
- Inställningar: Använd inte som menyetikett. Använd Alternativ i stället.
- Menyalternativ som visar undermenyer har aldrig en ellips på etiketten. Undermenypilen anger att en annan markering krävs.
Dokumentation
När du refererar till verktygsfält:
- Om det bara finns ett verktygsfält kan du referera till det som verktygsfältet.
- Om det finns flera verktygsfält kan du referera till dem med namn följt av ordet verktygsfält. Se huvudverktygsfältet som är aktiverat som standard och innehåller knappar för grundläggande uppgifter, till exempel att öppna och skriva ut en fil, som standardverktygsfältet.
- Verktygsfältet är ett enda, icke-kapitalt ord. (Menyraden är däremot två ord.)
- Se knapparna i verktygsfältet med hjälp av knappbeskrivningsetiketter. Använd den exakta etiketttexten, inklusive dess versaler, men ta inte med några ellipser.
- Se menyknapparna i verktygsfältet efter deras etiketter och ordmenyn. Använd den exakta etiketttexten, inklusive dess versaler.
- Referera till verktygsfältskontroller vanligtvis som verktygsfältsknappar.
- Om du vill beskriva användarinteraktion använder du klicka för verktygsfältsknappar och skrivskyddade listrutor och ange för redigerbara listrutor. Använd inte välj, välj eller välj.
- Använd inte sammanhängande, nedrullningsbara fönster, listrutor eller popup-fönster för att beskriva menyknappar, förutom i programmeringsdokumentationen.
- Referera till otillgängliga objekt som otillgängliga, inte som nedtonade, inaktiverade eller nedtonade. Använd inaktiverad i programmeringsdokumentationen.
- Formatera etiketterna med fet text när det är möjligt. Annars placerar du etiketterna endast inom citattecken om det behövs för att förhindra förvirring.
Exempel:
- På menyn page i verktygsfältet klickar du på Skicka sida via e-post.
- I rutan Teckensnitt i verktygsfältet anger du "Segoe UI".
- I verktygsfältet Formatering pekar du på Visaoch klickar sedan på Kommentarer.