Wyświetlanie informacji o funkcjach
Uwaga
Wycofanie zestawu SDK systemu Android w usłudze Azure Maps
Zestaw SDK natywny usługi Azure Maps dla systemu Android jest teraz przestarzały i zostanie wycofany w dniu 3/31/25. Aby uniknąć przerw w działaniu usługi, przeprowadź migrację do zestawu Web SDK usługi Azure Maps przez 3/31/25. Aby uzyskać więcej informacji, zobacz Przewodnik migracji zestawu SDK systemu Android usługi Azure Maps.
Dane przestrzenne są często reprezentowane przy użyciu punktów, linii i wielokątów. Te dane często zawierają skojarzone z nim informacje o metadanych. Na przykład punkt może reprezentować lokalizację restauracji i metadanych dotyczących tej restauracji może być nazwą, adresem i typem serwowanej żywności. Te metadane można dodać jako właściwości pliku GeoJSON Feature. Poniższy kod tworzy prostą funkcję punktu z właściwością title o wartości "Hello World!"
//Create a data source and add it to the map.
DataSource source = new DataSource();
map.sources.add(source);

//Create a point feature.
Feature feature = Feature.fromGeometry(Point.fromLngLat(-122.33, 47.64));

//Add a property to the feature.
feature.addStringProperty("title", "Hello World!");

//Create a point feature, pass in the metadata properties, and add it to the data source.
source.add(feature);
//Create a data source and add it to the map.
val source = DataSource()
map.sources.add(source)

//Create a point feature.
val feature = Feature.fromGeometry(Point.fromLngLat(-122.33, 47.64))

//Add a property to the feature.
feature.addStringProperty("title", "Hello World!")

//Create a point feature, pass in the metadata properties, and add it to the data source.
source.add(feature)
Aby uzyskać więcej informacji na temat tworzenia i dodawania danych do mapy, zobacz Tworzenie źródła danych.
Gdy użytkownik wchodzi w interakcję z funkcją na mapie, zdarzenia mogą służyć do reagowania na te akcje. Typowym scenariuszem jest wyświetlenie komunikatu o właściwościach metadanych funkcji, z którymi użytkownik wchodził w interakcję. Zdarzenie OnFeatureClick jest głównym zdarzeniem używanym do wykrywania, kiedy użytkownik wykorzystał funkcję na mapie. Istnieje również OnLongFeatureClick zdarzenie. OnFeatureClick Po dodaniu zdarzenia do mapy można go ograniczyć do pojedynczej warstwy, przekazując identyfikator warstwy, aby go ograniczyć. Jeśli żaden identyfikator warstwy nie zostanie przekazany, naciśnięcie dowolnej funkcji na mapie, niezależnie od warstwy, w której znajduje się, spowoduje wyzwolenie tego zdarzenia. Poniższy kod tworzy warstwę symboli w celu renderowania danych punktów na mapie, a następnie dodaje OnFeatureClick zdarzenie i ogranicza je do tej warstwy symboli.
//Create a symbol and add it to the map.
SymbolLayer layer = new SymbolLayer(source);
map.layers.add(layer);

//Add a feature click event to the map.
map.events.add((OnFeatureClick) (features) -> {
    //Retrieve the title property of the feature as a string.
    String msg = features.get(0).getStringProperty("title");

    //Do something with the message.

    //Return a boolean indicating if event should be consumed or continue bubble up.
    return false;
}, layer.getId());    //Limit this event to the symbol layer.
//Create a symbol and add it to the map.
val layer = SymbolLayer(source)
map.layers.add(layer)

//Add a feature click event to the map.
map.events.add(OnFeatureClick { features: List<Feature> ->
    //Retrieve the title property of the feature as a string.
    val msg = features[0].getStringProperty("title")

    //Do something with the message.

    //Return a boolean indicating if event should be consumed or continue bubble up.
    return false
}, layer.getId()) //Limit this event to the symbol layer.
Wyświetlanie wyskakujące wiadomości
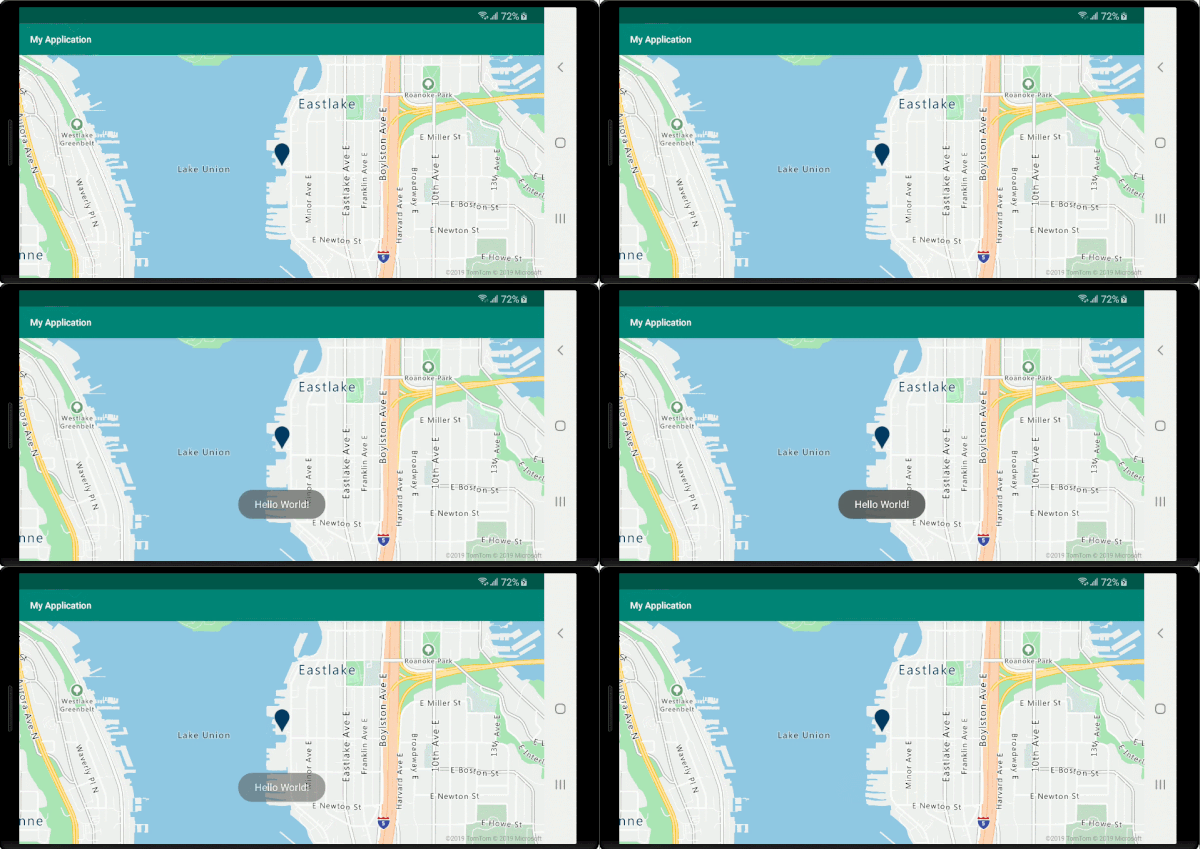
Wyskakujące wiadomości to jeden z najprostszych sposobów wyświetlania informacji użytkownikowi i jest dostępny we wszystkich wersjach systemu Android. Nie obsługuje żadnego typu danych wejściowych użytkownika i jest wyświetlany tylko przez krótki czas. Jeśli chcesz szybko poinformować użytkownika o tym, co naciśnięty, dobrym rozwiązaniem może być wyskakujące komunikat. Poniższy kod pokazuje, jak można użyć wyskakujące wiadomości ze zdarzeniem OnFeatureClick .
//Add a feature click event to the map.
map.events.add((OnFeatureClick) (features) -> {
    //Retrieve the title property of the feature as a string.
    String msg = features.get(0).getStringProperty("title");

    //Display a toast message with the title information.
    Toast.makeText(this, msg, Toast.LENGTH_SHORT).show();

    //Return a boolean indicating if event should be consumed or continue bubble up.
    return false;
}, layer.getId());    //Limit this event to the symbol layer.
//Add a feature click event to the map.
map.events.add(OnFeatureClick { features: List<Feature> ->
    //Retrieve the title property of the feature as a string.
    val msg = features[0].getStringProperty("title")

    //Display a toast message with the title information.
    Toast.makeText(this, msg, Toast.LENGTH_SHORT).show()

    //Return a boolean indicating if event should be consumed or continue bubble up.
    return false
}, layer.getId()) //Limit this event to the symbol layer.

Oprócz wyskakujące komunikaty istnieje wiele innych sposobów prezentowania właściwości metadanych funkcji, takich jak:
- Widżet -
SnackbarsSnackbar udostępnia lekkie opinie na temat operacji. Wyświetlają krótki komunikat w dolnej części ekranu na urządzeniach przenośnych i w lewym dolnym rogu na większych urządzeniach.Snackbarspojawić się powyżej wszystkich innych elementów na ekranie i tylko jeden może być wyświetlany naraz. - Okna dialogowe — okno dialogowe to małe okno, które monituje użytkownika o podjęcie decyzji lub wprowadzenie dodatkowych informacji. Okno dialogowe nie wypełnia ekranu i jest zwykle używane w przypadku zdarzeń modalnych, które wymagają od użytkowników podjęcia akcji, zanim będą mogli kontynuować.
- Dodaj fragment do bieżącego działania.
- Przejdź do innego działania lub widoku.
Wyświetlanie wyskakującego okienka
Zestaw SDK systemu Android usługi Azure Maps udostępnia klasę Popup , która ułatwia tworzenie elementów adnotacji interfejsu użytkownika, które są zakotwiczone na pozycji na mapie. W przypadku wyskakujących okienek musisz przekazać widok z układem względnym do content opcji wyskakującego okienka. Oto prosty przykład układu, który wyświetla ciemny tekst na tle.
<?xml version="1.0" encoding="utf-8"?>
<RelativeLayout xmlns:android="http://schemas.android.com/apk/res/android"
    android:layout_width="match_parent"
    android:orientation="vertical"
    android:background="#ffffff"
    android:layout_margin="8dp"
    android:padding="10dp"

    android:layout_height="match_parent">

    <TextView
        android:id="@+id/message"
        android:layout_width="wrap_content"
        android:text=""
        android:textSize="18dp"
        android:textColor="#222"
        android:layout_height="wrap_content"
        android:width="200dp"/>

</RelativeLayout>
Zakładając, że powyższy układ jest przechowywany w pliku o nazwie popup_text.xml w res -> layout folderze aplikacji, poniższy kod tworzy wyskakujące okienko, dodaje go do mapy. Po kliknięciu title funkcji właściwość jest wyświetlana przy użyciu popup_text.xml układu z dolnej środkowej części układu zakotwiczonego do określonej pozycji na mapie.
//Create a popup and add it to the map.
Popup popup = new Popup();
map.popups.add(popup);

map.events.add((OnFeatureClick)(feature) -> {
    //Get the first feature and it's properties.
    Feature f = feature.get(0);
    JsonObject props = f.properties();

    //Retrieve the custom layout for the popup.
    View customView = LayoutInflater.from(this).inflate(R.layout.popup_text, null);

    //Access the text view within the custom view and set the text to the title property of the feature.
    TextView tv = customView.findViewById(R.id.message);
    tv.setText(props.get("title").getAsString());

    //Get the position of the clicked feature.
    Position pos = MapMath.getPosition((Point)cluster.geometry());

    //Set the options on the popup.
    popup.setOptions(
        //Set the popups position.
        position(pos),

        //Set the anchor point of the popup content.
        anchor(AnchorType.BOTTOM),

        //Set the content of the popup.
        content(customView)

        //Optionally, hide the close button of the popup.
        //, closeButton(false)

        //Optionally offset the popup by a specified number of pixels.
        //pixelOffset(new Pixel(10, 10))
    );

    //Open the popup.
    popup.open();

    //Return a boolean indicating if event should be consumed or continue bubble up.
    return false;
});
//Create a popup and add it to the map.
val popup = Popup()
map.popups.add(popup)

map.events.add(OnFeatureClick { feature: List<Feature> ->
    //Get the first feature and it's properties.
    val f = feature[0]
    val props = f.properties()

    //Retrieve the custom layout for the popup.
    val customView: View = LayoutInflater.from(this).inflate(R.layout.popup_text, null)

    //Access the text view within the custom view and set the text to the title property of the feature.
    val tv: TextView = customView.findViewById(R.id.message)
    tv.text = props!!["title"].asString

    //Get the position of the clicked feature.
    val pos = MapMath.getPosition(f.geometry() as Point?);

    //Set the options on the popup.
    popup.setOptions(
        //Set the popups position.
        position(pos),

        //Set the anchor point of the popup content.
        anchor(AnchorType.BOTTOM),

        //Set the content of the popup.
        content(customView)

        //Optionally, hide the close button of the popup.
        //, closeButton(false)

        //Optionally offset the popup by a specified number of pixels.
        //pixelOffset(Pixel(10, 10))
    )

    //Open the popup.
    popup.open()

    //Return a boolean indicating if event should be consumed or continue bubble up.
    false
})
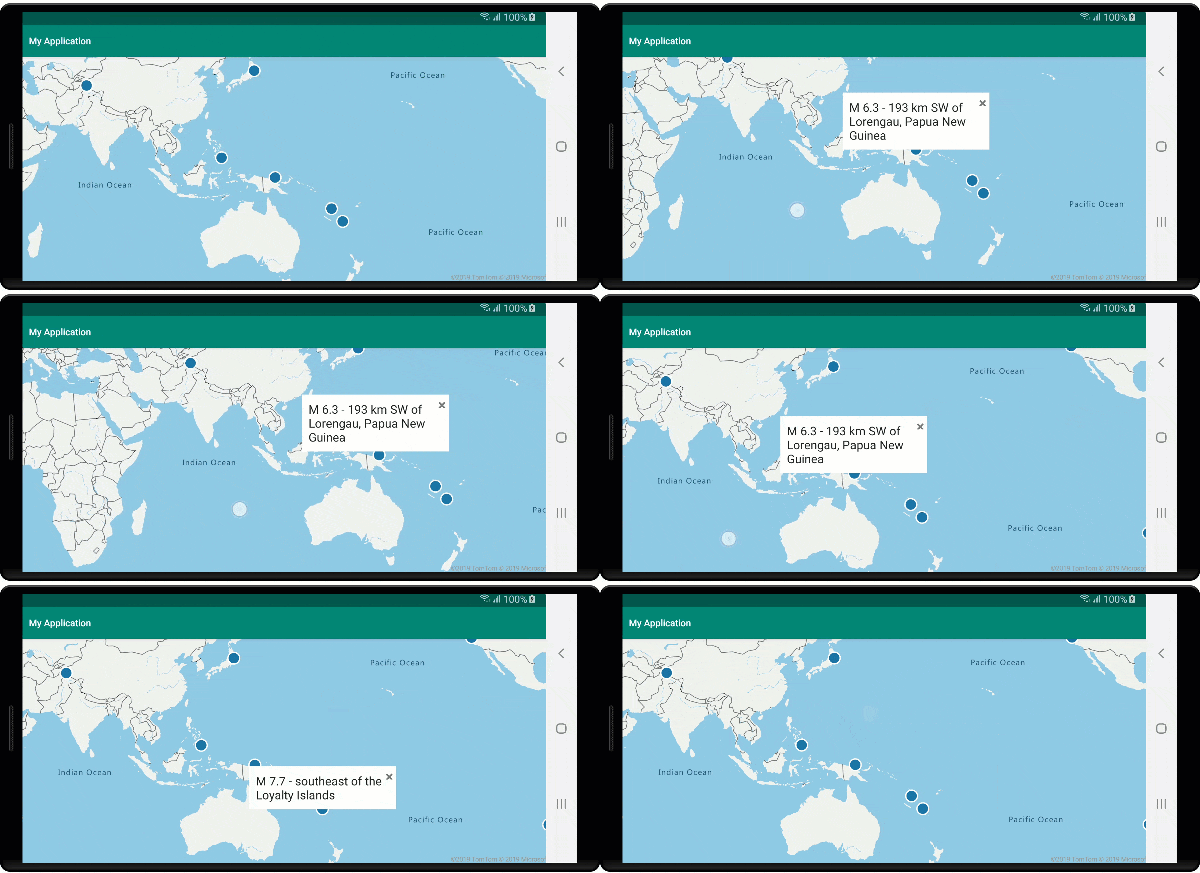
Na poniższym zrzucie ekranu są wyświetlane wyskakujące okienka po kliknięciu funkcji i pozostaniu zakotwiczonym w określonej lokalizacji na mapie podczas jego przesuwania.

Następne kroki
Aby dodać więcej danych do mapy: