iOS SDK에서 데이터 원본 만들기(미리 보기)
참고 항목
Azure Maps iOS SDK 사용 중지
이제 iOS용 Azure Maps 네이티브 SDK는 더 이상 사용되지 않으며 2025년 3월 31일에 사용 중지됩니다. 서비스 중단을 방지하려면 2025년 3월 31일까지 Azure Maps 웹 SDK로 마이그레이션합니다. 자세한 내용은 Azure Maps iOS SDK 마이그레이션 가이드를 참조하세요.
Azure Maps iOS SDK는 데이터 원본에 데이터를 저장합니다. 데이터 원본을 사용하면 쿼리 및 렌더링을 위해 데이터 작업이 최적화됩니다. 현재 다음 두 가지 유형의 데이터 원본이 지원됩니다.
- GeoJSON 원본: GeoJSON 형식의 원시 위치 데이터를 로컬로 관리합니다. 중소 규모의 데이터 세트에 적합합니다(수십만 개 이상의 형태).
- 벡터 타일 원본: 지도 바둑판식 배열 시스템을 기반으로 현재 지도 보기의 벡터 타일 형식의 데이터를 로드합니다. 대규모 데이터 세트에 이상적입니다(수백만 또는 수십억 개의 형태).
GeoJSON 데이터 원본
Azure Maps은 기본 데이터 모델 중 하나로 GeoJSON를 사용합니다. GeoJSON는 지리 공간적 데이터를 JSON 형식으로 나타내는 데 사용할 수 있는 지리 공간적 표준 방식입니다. Azure Maps iOS SDK에서 GeoJSON 클래스를 사용하여 GeoJSON 데이터를 쉽게 만들고 직렬화할 수 있습니다. DataSource 클래스에 GeoJSON 데이터를 로드 및 저장하고 레이어를 사용하여 렌더링합니다. 다음 코드는 Azure Maps에서 GeoJSON 개체를 만드는 방법을 보여줍니다.
/*
    Raw GeoJSON feature

    {
        type": "Feature",
        "geometry": {
            "type": "Point",
            "coordinates": [-100, 45]
        },
        "properties": {
            "custom-property": "value"
        }
    }

*/

//Create a point feature.
let feature = Feature(Point(CLLocationCoordinate2D(latitude: 45, longitude: -100)))

//Add a property to the feature.
feature.addProperty("custom-property", value: "value")

//Add the feature to the data source.
source.add(feature: feature)
또는 다음 코드에서 보여 주는 것처럼 속성을 먼저 사전(JSON)에 로드한 다음 만들 때 기능에 전달할 수 있습니다.
//Create a dictionary to store properties for the feature.
var properties: [String: Any] = [:]
properties["custom-property"] = "value"

let feature = Feature(Point(CLLocationCoordinate2D(latitude: 45, longitude: -100)), properties: properties)
GeoJSON 기능을 만든 후에는 지도의 속성을 통해 데이터 원본을 맵에 추가할 수 sources 있습니다. 다음 코드는 DataSource을 만들고 지도에 추가하고 데이터 소스에 지형지물을 추가하는 방법을 보여줍니다.
//Create a data source and add it to the map.
let source = DataSource()
map.sources.add(source)

//Add GeoJSON feature to the data source.
source.add(feature: feature)
다음 코드는 GeoJSON Feature, FeatureCollection 및 기하 도형을 만드는 여러 가지 방법을 보여줍니다.
// GeoJSON Point Geometry
let point = Point(location)

// GeoJSON LineString Geometry
let polyline = Polyline(locations)

// GeoJSON Polygon Geometry
let polygon = Polygon(locations)

let polygonWithInteriorPolygons = Polygon(locations, interiorPolygons: polygons)

// GeoJSON MultiPoint Geometry
let pointCollection = PointCollection(locations)

// GeoJSON MultiLineString Geometry
let multiPolyline = MultiPolyline(polylines)

let multiPolylineFromLocations = MultiPolyline(locations: arrayOfLocationArrays) // [[CLLocationCoordinate2D]]

// GeoJSON MultiPolygon Geometry
let multiPolygon = MultiPolygon(polygons)

let multiPolygonFromLocations = MultiPolygon(locations: arrayOfLocationArrays) // [[CLLocationCoordinate2D]]

// GeoJSON GeometryCollection Geometry

let geometryCollection = GeometryCollection(geometries)

// GeoJSON Feature
let pointFeature = Feature(Point(location))

// GeoJSON FeatureCollection
let featureCollection = FeatureCollection(features)
GeoJSON 직렬화 및 역직렬화
지형지물 컬렉션, 지형지물 및 기하학 클래스에는 모두 직렬화에 도움이 되는 fromJson(_:) 및 toJson() 정적 메서드가 있습니다. fromJson() 메서드를 통해 전달된 형식이 지정된 유효한 JSON 문자열은 기하 도형 개체를 만듭니다. 또한 이 fromJson() 메서드는 JSONSerialization 또는 기타 직렬화/역직렬화 전략을 사용할 수 있음을 의미합니다. 다음 코드는 문자열화된 GeoJSON 기능을 가져와 Feature 클래스로 역직렬화한 다음 다시 GeoJSON 문자열로 직렬화하는 방법을 보여줍니다.
// Take a stringified GeoJSON object.
let geoJSONString = """
    {
        "type": "Feature",
        "geometry": {
            "type": "Point",
            "coordinates": [-100, 45]
        },
        "properties": {
            "custom-property": "value"
        }
    }
"""

// Deserialize the JSON string into a feature.
guard let feature = Feature.fromJson(geoJSONString) else {
    throw GeoJSONSerializationError.couldNotSerialize
}

// Serialize a feature collection to a string.
let featureString = feature.toJson()
웹 또는 자산 폴더에서 GeoJSON 데이터 가져오기
대부분의 GeoJSON 파일에는 FeatureCollection이(가) 포함되어 있습니다. GeoJSON 파일을 문자열로 읽고 FeatureCollection.fromJson(_:) 메서드를 사용하여 역직렬화했습니다.
DataSource 클래스에는 웹 또는 디바이스의 파일에 대한 URL을 사용하여 GeoJSON 파일에서 로드할 수 있는 importData(fromURL:)이라는 내장 메서드가 있습니다.
// Create a data source.
let source = DataSource()

// Import the geojson data and add it to the data source.
let url = URL(string: "URL_or_FilePath_to_GeoJSON_data")!
source.importData(fromURL: url)

// Examples:
// source.importData(fromURL: URL(string: "asset://sample_file.json")!)
// source.importData(fromURL: URL(string: "https://example.com/sample_file.json")!)

// Add data source to the map.
map.sources.add(source)
importData(fromURL:) 메서드는 GeoJSON 피드를 데이터 원본에 로드할 수 있는 방법을 제공하지만 데이터가 로드되는 방식과 로드된 후 발생하는 일에 대한 제한된 제어를 제공합니다. 다음 코드는 웹 또는 자산 폴더에서 데이터를 가져오고 콜백 함수를 통해 UI 스레드로 반환하기 위한 재사용 가능한 클래스입니다. 그런 다음 콜백에서 더 많은 포스트 로드 로직을 추가하여 데이터를 처리하고, 지도에 추가하고, 경계 상자를 계산하고, 지도 카메라를 업데이트할 수 있습니다.
import Foundation

@objc
public class Utils: NSObject {
    /// Imports data from a web url or local file url and returns it as a string to a callback on the main thread.
    /// - Parameters:
    ///     - url: A web url or local file url that points to data to load.
    ///     - completion: The callback function to return the data to.
    @objc
    public static func importData(fromURL url: URL, completion: @escaping (String?) -> Void) {
        URLSession.shared.dataTask(with: url) { data, _, _ in
            DispatchQueue.main.async {
                if let data = data {
                    completion(String(decoding: data, as: UTF8.self))
                } else {
                    completion(nil)
                }
            }
        }.resume()
    }
}
다음 코드는 이 유틸리티를 사용하여 GeoJSON 데이터를 문자열로 가져오고 콜백을 통해 기본 스레드에 반환하는 방법을 보여 줍니다. 콜백에서 문자열 데이터는 GeoJSON 기능 컬렉션으로 직렬화되고 데이터 소스에 추가될 수 있습니다. 필요에 따라 지도 카메라를 업데이트 하 여 데이터에 초점을 맞출 수 있습니다.
// Create a data source and add it to the map.
let source = DataSource()
map.sources.add(source)

// Create a web url or a local file url
let url = URL(string: "URL_to_GeoJSON_data")!
// Examples:
// let url = Bundle.main.url(forResource: "FeatureCollectionSample", withExtension: "geojson")!
// let url = URL(string: "www.yourdomain.com/path_to_feature_collection_sample")!

// Import the geojson data and add it to the data source.
Utils.importData(fromURL: url) { result in
    guard let result = result else {
        // No data imported.
        return
    }

    // Parse the data as a GeoJSON Feature Collection.
    guard let fc = FeatureCollection.fromJson(result) else {
        // Invalid data for FeatureCollection type.
        return
    }

    // Add the feature collection to the data source.
    source.add(featureCollection: fc)

    // Optionally, update the maps camera to focus in on the data.

    // Calculate the bounding box of all the data in the Feature Collection.
    guard let bbox = BoundingBox.fromData(fc) else {
        // The feature collection is empty.
        return
    }

    // Update the maps camera so it is focused on the data.
    map.setCameraBoundsOptions([
        .bounds(bbox),
        .padding(20)
    ])
}
기능 상태 업데이트
DataSource 클래스를 사용하면 기능을 쉽게 추가하고 제거할 수 있습니다. 기능의 기하 도형 또는 속성을 업데이트 하려면 데이터 원본의 기능을 바꾸어야 합니다. 다음 두 가지 방법을 사용하여 기능을 업데이트할 수 있습니다.
- 원하는 업데이트로 새 기능을 만들고
set메서드를 사용하여 데이터 소스의 모든 기능을 바꿉니다. 이 방법은 데이터 소스의 모든 기능을 업데이트하려는 경우에 적합합니다.
var source: DataSource!

private func onReady(map: AzureMap) {
    // Create a data source and add it to the map.
    source = DataSource()
    map.sources.add(source)

    // Create a feature and add it to the data source.
    let myFeature = Feature(Point(CLLocationCoordinate2D(latitude: 0, longitude: 0)))
    myFeature.addProperty("Name", value: "Original value")
    source.add(feature: myFeature)
}

private func updateFeature() {
    // Create a new replacement feature with an updated geometry and property value.
    let myNewFeature = Feature(Point(CLLocationCoordinate2D(latitude: -10, longitude: 10)))
    myNewFeature.addProperty("Name", value: "New value")

    // Replace all features to the data source with the new one.
    source.set(feature: myNewFeature)
}
- 변수의 기능 인스턴스를 추적하고 데이터 소스
remove메서드에 전달하여 제거합니다. 원하는 업데이트로 새 기능을 만들고 변수 참조를 업데이트한 다음add메서드를 사용하여 데이터 소스에 추가합니다.
var source: DataSource!
var myFeature: Feature!

private func onReady(map: AzureMap) {
    // Create a data source and add it to the map.
    source = DataSource()
    map.sources.add(source)

    // Create a feature and add it to the data source.
    myFeature = Feature(Point(CLLocationCoordinate2D(latitude: 0, longitude: 0)))
    myFeature.addProperty("Name", value: "Original value")
    source.add(feature: myFeature)
}

private func updateFeature() {
    // Remove the feature instance from the data source.
    source.remove(feature: myFeature)

    // Get properties from original feature.
    var props = myFeature.properties

    // Update a property.
    props["Name"] = "New value"

    // Create a new replacement feature with an updated geometry.
    myFeature = Feature(
        Point(CLLocationCoordinate2D(latitude: -10, longitude: 10)),
        properties: props
    )

    // Re-add the feature to the data source.
    source.add(feature: myFeature)
}
팁
정기적으로 업데이트될 일부 데이터와 거의 변경되지 않을 다른 데이터가 있는 경우 이러한 데이터를 별도의 데이터 원본 인스턴스로 분할하는 것이 가장 좋습니다. 데이터 소스에서 업데이트가 발생하면 맵이 데이터 소스의 모든 기능을 다시 그리도록 합니다. 이 데이터를 분할 하면 해당 데이터 원본에서 업데이트가 발생 하는 동안 다른 데이터 원본의 기능을 다시 그릴 필요가 없는 경우 정기적으로 업데이트 되는 기능만 다시 그려집니다. 따라서 성능 향상에 도움이 됩니다.
벡터 타일 원본
벡터 타일 원본은 벡터 타일 레이어에 액세스하는 방법을 설명합니다. VectorTileSource 클래스를 사용하여 벡터 타일 소스를 인스턴스화합니다. 벡터 타일 레이어는 타일 레이어와 비슷하지만 동일하지는 않습니다. 타일 레이어는 래스터 이미지입니다. 벡터 타일 레이어는 PBF 형식의 압축 파일입니다. 이 압축 파일은 벡터 지도 데이터 및 하나 이상의 레이어를 포함합니다. 각 레이어의 스타일에 따라 클라이언트에서 파일을 렌더링하고 스타일을 지정할 수 있습니다. 벡터 타일의 데이터에는 점, 선 및 다각형 형식의 지리적 피처가 포함되어 있습니다. 래스터 타일 레이어 대신 벡터 타일 레이어를 사용할 경우 다음과 같은 몇 가지 이점이 있습니다.
- 벡터 타일의 파일 크기는 일반적으로 해당하는 래스터 타일보다 훨씬 작습니다. 따라서 더 적은 대역폭이 사용됩니다. 이것은 낮은 대기 시간, 더 빠른 지도 및 더 나은 사용자 환경을 의미합니다.
- 벡터 타일이 클라이언트에서 렌더링된 후에는 표시되는 디바이스의 해상도에 맞게 조정됩니다. 따라서 렌더링된 지도는 명확한 레이블을 포함하여 잘 정의된 것으로 나타납니다.
- 클라이언트에 새 스타일을 적용할 수 있으므로 벡터 지도에서 데이터의 스타일을 변경하려면 데이터를 다시 다운로드할 필요가 없습니다. 반면, 래스터 타일 레이어의 스타일을 변경하려면 일반적으로 서버에서 타일을 로드한 다음, 새 스타일을 적용해야 합니다.
- 데이터가 벡터 형식으로 전달되므로 데이터를 준비하는 데 필요한 서버 쪽 처리가 줄어듭니다. 따라서 최신 데이터를 더 빨리 사용할 수 있습니다.
Azure Maps는 Mapbox Vector 타일 사양(개방형 표준)을 준수합니다. Azure Maps는 플랫폼의 일부로 다음 벡터 타일 서비스를 제공합니다.
- 도로 타일
- 교통 사고
- 교통 흐름
- Azure Maps Creator를 사용하면 Render - Get Map Tile API를 통해 사용자 지정 벡터 타일을 만들고 액세스할 수도 있습니다.
팁
iOS SDK를 사용하여 Azure Maps 렌더링 서비스에서 벡터 또는 래스터 이미지 타일을 사용하는 경우 atlas.microsoft.com을(를) AzureMap‘s 속성’domainPlaceholder으로 바꿀 수 있습니다. 이 자리 표시자는 지도에서 사용하는 동일한 도메인으로 대체되고 동일한 인증 세부 정보도 자동으로 추가됩니다. 이를 통해 Microsoft Entra 인증을 사용할 때 렌더링 서비스에 대한 인증이 크게 간소화됩니다.
지도에 벡터 타일 원본의 데이터를 표시하려면 원본을 데이터 렌더링 레이어 중 하나에 연결합니다. 벡터 원본을 사용하는 모든 레이어는 옵션에서 sourceLayer 값을 지정해야 합니다. 다음 코드는 Azure Maps 트래픽 흐름 벡터 타일 서비스를 벡터 타일 원본으로 로드한 다음, 선 레이어를 사용하여 지도에 표시합니다. 이 벡터 타일 원본에는 "트래픽 흐름"이라는 원본 레이어에 단일 데이터 세트가 있습니다. 이 데이터 세트의 선 데이터에는 이 코드에서 선 색을 선택하고 스케일링하는 데 사용되는 traffic_level이라는 속성이 있습니다.
// Formatted URL to the traffic flow vector tiles.
let trafficFlowUrl = "\(map.domainPlaceholder)/traffic/flow/tile/pbf?api-version=1.0&style=relative&zoom={z}&x={x}&y={y}"

// Create a vector tile source and add it to the map.
let source = VectorTileSource(options: [
    .tiles([trafficFlowUrl]),
    .maxSourceZoom(22)
])
map.sources.add(source)

// Create a layer for traffic flow lines.
let layer = LineLayer(
    source: source,
    options: [

        // The name of the data layer within the data source to pass into this rendering layer.
        .sourceLayer("Traffic flow"),

        // Color the roads based on the traffic_level property.
        .strokeColor(
            from: NSExpression(
                forAZMInterpolating: NSExpression(forKeyPath: "traffic_level"),
                curveType: .linear,
                parameters: nil,
                stops: NSExpression(forConstantValue: [
                    0: UIColor.red,
                    0.33: UIColor.yellow,
                    0.66: UIColor.green
                ])
            )
        ),

        // Scale the width of roads based on the traffic_level property.
        .strokeWidth(
            from: NSExpression(
                forAZMInterpolating: NSExpression(forKeyPath: "traffic_level"),
                curveType: .linear,
                parameters: nil,
                stops: NSExpression(forConstantValue: [
                    0: 6,
                    1: 1
                ])
            )
        )
    ]
)

// Add the traffic flow layer below the labels to make the map clearer.
map.layers.insertLayer(layer, below: "labels")

레이어에 데이터 원본 연결
데이터는 렌더링 레이어를 사용하여 지도에 렌더링됩니다. 하나 이상의 렌더링 계층이 단일 데이터 원본을 참조할 수 있습니다. 다음 렌더링 레이어에는 데이터 원본이 필요합니다.
- 거품형 레이어 - 지도에서 점 데이터를 스케일링된 원으로 렌더링합니다.
- 기호 레이어 - 점 데이터를 아이콘 또는 텍스트로 렌더링합니다.
- 열 지도 레이어 - 점 데이터를 고밀도 열 지도로 렌더링합니다.
- 선 레이어 - 선을 렌더링하거나 다각형의 윤곽선을 렌더링합니다.
- 다각형 레이어 - 단색 또는 이미지 패턴으로 다각형 영역을 채웁니다.
다음 코드는 데이터 원본을 만들고, 맵에 추가하고, 원격 위치에서 데이터 원본으로 GeoJSON 지점 데이터를 가져온 다음, 거품형 레이어에 연결하는 방법을 보여줍니다.
// Create a data source.
let source = DataSource()

// Create a web url or a local file url
let url = URL(string: "URL_or_FilePath_to_GeoJSON_data")!
// Examples:
// let url = Bundle.main.url(forResource: "FeatureCollectionSample", withExtension: "geojson")!
// let url = URL(string: "yourdomain.com/path_to_feature_collection_sample")!

// Import the geojson data and add it to the data source.
source.importData(fromURL: url)

// Add data source to the map.
map.sources.add(source)

// Create a layer that defines how to render points in the data source and add it to the map.
let layer = BubbleLayer(source: source)
map.layers.addLayer(layer)
이러한 데이터 원본에 연결하지 않지만 렌더링을 위해 데이터를 직접 로드하는 다른 렌더링 계층이 있습니다.
- 타일 레이어 - 지도 위에 래스터 타일 레이어를 겹쳐 놓습니다.
여러 레이어가 있는 하나의 데이터 원본
여러 레이어를 단일 데이터 원본에 연결할 수 있습니다. 이 옵션이 유용할 수 있는 여러 가지 시나리오가 있습니다. 예를 들어, 사용자가 다각형을 그리는 시나리오를 생각해 보겠습니다. 사용자가 지도에 점이 추가할 때 다각형 영역을 렌더링하고 채워야 합니다. 스타일이 지정된 선을 추가하여 다각형의 윤곽을 만들면 사용자가 그릴 때 다각형의 가장자리를 더 쉽게 볼 수 있습니다. 다각형의 개별 위치를 편리하게 편집하기 위해 각 위치 위에 핀이나 표식 같은 핸들을 추가할 수 있습니다.
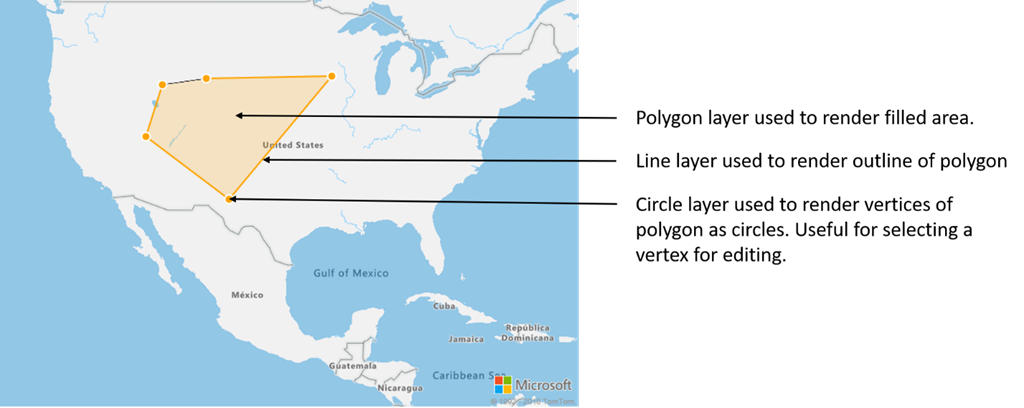
대부분의 매핑 플랫폼에서 다각형 개체, 선 개체 및 다각형의 각 위치에 대한 핀이 필요합니다. 다각형이 수정될 때 선과 핀을 수동으로 업데이트해야 하며, 이 작업은 빠르게 복잡해질 수 있습니다.
Azure Maps를 사용하면 다음 코드와 같이 데이터 원본의 단일 다각형만 있으면 됩니다.
// Create a data source and add it to the map.
let source = DataSource()
map.sources.add(source)

// Create a polygon and add it to the data source.
source.add(geometry: Polygon([
    CLLocationCoordinate2D(latitude: 33.15, longitude: -104.5),
    CLLocationCoordinate2D(latitude: 38.5, longitude: -113.5),
    CLLocationCoordinate2D(latitude: 43, longitude: -111.5),
    CLLocationCoordinate2D(latitude: 43.5, longitude: -107),
    CLLocationCoordinate2D(latitude: 43.6, longitude: -94)
]))

// Create a polygon layer to render the filled in area of the polygon.
let polygonLayer = PolygonLayer(
    source: source,
    options: [.fillColor(UIColor(red: 1, green: 165/255, blue: 0, alpha: 0.2))]
)

// Create a line layer for greater control of rendering the outline of the polygon.
let lineLayer = LineLayer(source: source, options: [
    .strokeColor(.orange),
    .strokeWidth(2)
])

// Create a bubble layer to render the vertices of the polygon as scaled circles.
let bubbleLayer = BubbleLayer(
    source: source,
    options: [
        .bubbleColor(.orange),
        .bubbleRadius(5),
        .bubbleStrokeColor(.white),
        .bubbleStrokeWidth(2)
    ]
)

// Add all layers to the map.
map.layers.addLayers([polygonLayer, lineLayer, bubbleLayer])
팁
또한 map.layers.insertLayer(_:below:) 메서드를 사용하여 기존 레이어의 ID 또는 인스턴스를 두 번째 매개 변수로 전달할 수 있습니다. 그러면 지도에 기존 레이어 아래에 새 레이어를 삽입하도록 지시됩니다. 레이어 ID를 전달하는 것 외에도 이 방법은 다음 값을 지원합니다.
"labels"- 지도 레이블 레이어 아래에 새 레이어를 삽입합니다."transit"- 지도 도로 및 교통 레이어 아래에 새 레이어를 삽입합니다.
추가 정보
맵에 추가할 더 많은 코드 예제를 보려면 다음 문서를 참조하세요.