チュートリアル: 外部テナントに対して Angular SPA へのサインインとサインアウトを追加する
このチュートリアルは、Angular シングルページ アプリケーション (SPA) を構築して、それを Microsoft Entra 管理センターを使用する認証用に準備する方法を示すシリーズの最後の部分です。 このシリーズのパート 3 では、Angular シングルページ アプリケーションに認証フローを追加し、外部テナントを使用するようにフローを構成しました。 この記事では、そのアプリケーションにサインインとサインアウトの機能を追加する方法について説明します。 最後に、アプリケーションをテストします。
このチュートリアルでは、
- サインインとサインアウトの機能をアプリに追加する。
- アプリケーションをテストする
前提条件
ユーザーのサインインとサインアウトを行う
src/app/app.component.ts を開き、ポップ (ポイント オブ プレゼンス) アップを使用してユーザーをサインインさせるように、コードを次のように置き換えます。 このコードでは、MSAL Angular ライブラリを使用してユーザーをサインインします。
  import { Component, OnInit, Inject, OnDestroy } from '@angular/core';
  import {
    MsalService,
    MsalBroadcastService,
    MSAL_GUARD_CONFIG,
    MsalGuardConfiguration,
  } from '@azure/msal-angular';
  import {
    AuthenticationResult,
    InteractionStatus,
    InteractionType,
    PopupRequest,
    RedirectRequest,
    EventMessage,
    EventType
  } from '@azure/msal-browser';
  import { Subject } from 'rxjs';
  import { filter, takeUntil } from 'rxjs/operators';

  @Component({
    selector: 'app-root',
    templateUrl: './app.component.html',
    styleUrls: ['./app.component.css'],
  })
  export class AppComponent implements OnInit, OnDestroy {
    title = 'Microsoft identity platform';
    loginDisplay = false;
    isIframe = false;

    private readonly _destroying$ = new Subject<void>();

    constructor(
      @Inject(MSAL_GUARD_CONFIG) private msalGuardConfig: MsalGuardConfiguration,
      private authService: MsalService,
      private msalBroadcastService: MsalBroadcastService,
    ) { }

    ngOnInit(): void {
      this.isIframe = window !== window.parent && !window.opener;
      this.setLoginDisplay();
      this.authService.instance.enableAccountStorageEvents(); // Optional - This will enable ACCOUNT_ADDED and ACCOUNT_REMOVED events emitted when a user logs in or out of another tab or window

      /**
       * You can subscribe to MSAL events as shown below. For more info,
       * visit: https://github.com/AzureAD/microsoft-authentication-library-for-js/blob/dev/lib/msal-angular/docs/v2-docs/events.md
       */
      this.msalBroadcastService.inProgress$
        .pipe(
          filter(
            (status: InteractionStatus) => status === InteractionStatus.None
          ),
          takeUntil(this._destroying$)
        )
        .subscribe(() => {
          this.setLoginDisplay();
          this.checkAndSetActiveAccount();
        });

      this.msalBroadcastService.msalSubject$
        .pipe(
          filter(
            (msg: EventMessage) => msg.eventType === EventType.LOGOUT_SUCCESS
          ),
          takeUntil(this._destroying$)
        )
        .subscribe((result: EventMessage) => {
          this.setLoginDisplay();
          this.checkAndSetActiveAccount();
        });

      this.msalBroadcastService.msalSubject$
        .pipe(
          filter(
            (msg: EventMessage) => msg.eventType === EventType.LOGIN_SUCCESS
          ),
          takeUntil(this._destroying$)
        )
        .subscribe((result: EventMessage) => {
          const payload = result.payload as AuthenticationResult;
          this.authService.instance.setActiveAccount(payload.account);
        });
    }

    setLoginDisplay() {
      this.loginDisplay = this.authService.instance.getAllAccounts().length > 0;
    }

    checkAndSetActiveAccount() {
      /**
       * If no active account set but there are accounts signed in, sets first account to active account
       * To use active account set here, subscribe to inProgress$ first in your component
       * Note: Basic usage demonstrated. Your app may require more complicated account selection logic
       */
      let activeAccount = this.authService.instance.getActiveAccount();

      if (!activeAccount && this.authService.instance.getAllAccounts().length > 0) {
        let accounts = this.authService.instance.getAllAccounts();
        // add your code for handling multiple accounts here
        this.authService.instance.setActiveAccount(accounts[0]);
      }
    }

    login() {
      if (this.msalGuardConfig.interactionType === InteractionType.Popup) {
        if (this.msalGuardConfig.authRequest) {
          this.authService.loginPopup({
            ...this.msalGuardConfig.authRequest,
          } as PopupRequest)
            .subscribe((response: AuthenticationResult) => {
              this.authService.instance.setActiveAccount(response.account);
            });
        } else {
          this.authService.loginPopup()
            .subscribe((response: AuthenticationResult) => {
              this.authService.instance.setActiveAccount(response.account);
            });
        }
      } else {
        if (this.msalGuardConfig.authRequest) {
          this.authService.loginRedirect({
            ...this.msalGuardConfig.authRequest,
          } as RedirectRequest);
        } else {
          this.authService.loginRedirect();
        }
      }
    }

    logout() {

      if (this.msalGuardConfig.interactionType === InteractionType.Popup) {
        this.authService.logoutPopup({
          account: this.authService.instance.getActiveAccount(),
        });
      } else {
        this.authService.logoutRedirect({
          account: this.authService.instance.getActiveAccount(),
        });
      }
    }

    // unsubscribe to events when component is destroyed
    ngOnDestroy(): void {
      this._destroying$.next(undefined);
      this._destroying$.complete();
    }
  }
アプリケーションのテスト
アプリケーション フォルダーからコマンドライン プロンプトで次のコマンドを実行し、Web サーバーを起動します。
npm install
npm start
ブラウザーで
http://localhost:4200と入力し、アプリケーションを開きます。
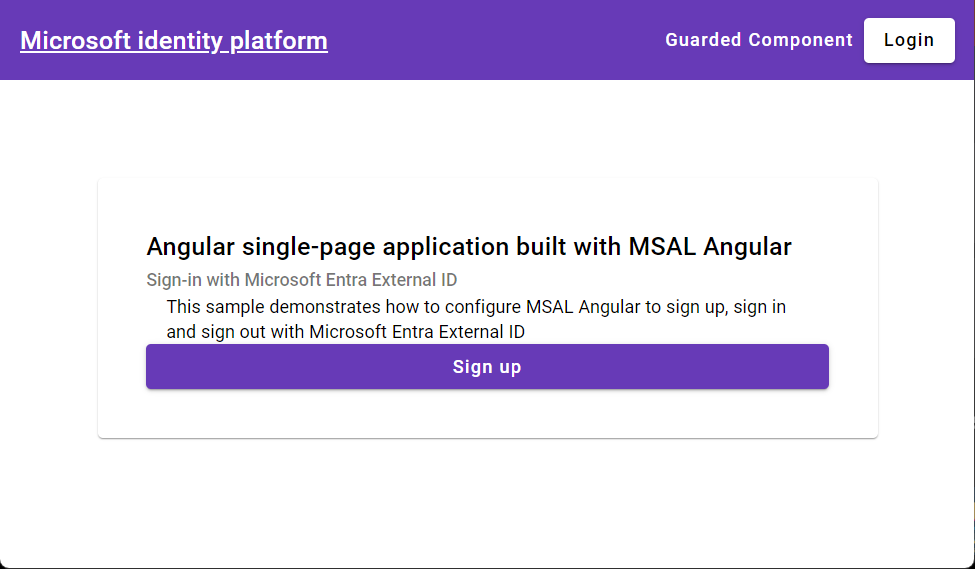
画面の右上隅にある [ログイン] ボタンを選択します。
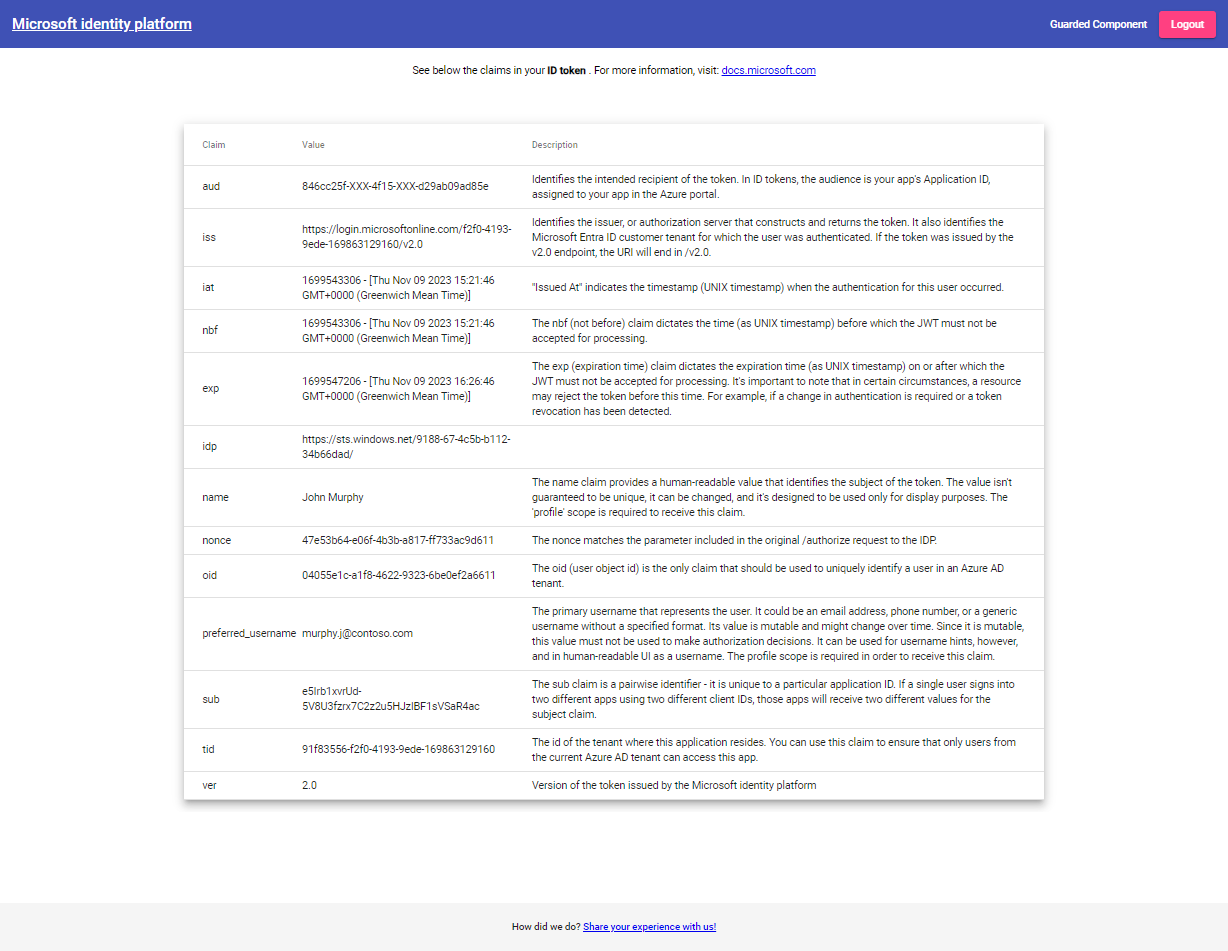
正常にサインインすると、プロファイル情報がページに表示されます。

サインアウトする場合は、画面の右上隅にある [ログアウト] ボタンを選択します。
関連項目
このチュートリアルを完了したら、次の方法について詳細を確認することをお勧めします。