Use DICOM data transformation in healthcare data solutions
The DICOM data transformation capability in healthcare data solutions lets you ingest, store, and analyze Digital Imaging and Communications in Medicine (DICOM) data from various sources. To learn more about the capability and understand how to deploy and configure it, see:
- Overview of DICOM data transformation
- DICOM metadata transformation mapping
- Deploy and configure DICOM data transformation
DICOM data transformation is an optional capability in healthcare data solutions in Microsoft Fabric.
Prerequisites
Before running the DICOM data transformation pipeline, complete the prerequisites, deployment process, and configuration steps explained in Deploy and configure DICOM data transformation.
Data ingestion options
This article provides step-by-step guidance on how to use the DICOM data transformation capability to ingest, transform, and unify the DICOM imaging dataset. The capability supports the following two ingestion options:
Option 1: End to end ingestion of DICOM files. The DICOM files, either in the native (DCM) or compressed (ZIP) formats, are ingested into the lakehouse. This option is called the Ingest option. We recommend this ingestion option for smaller data volumes when the DCM/ZIP files are in OneLake. You can also use this ingestion option to test the imaging capability using the provided sample data.
Option 2: Integration with the DICOM service. The ingestion is facilitated through native integration with the DICOM service in Azure Health Data Services. In this option, the DCM files are first transferred from the Azure Health Data Services DICOM service to Data Lake Storage Gen2. The pipeline then follows the Bring Your Own Storage (BYOS) ingestion pattern. This option is called the Azure Health Data Services (AHDS) option. We recommend this ingestion option for smaller data volumes when the DCM/ZIP files are present in other locations.
Option 3: Inventory-based ingestion. This ingestion supports ingestion of large-scale imaging data, typically exceeding 50 million DICOM files. By reading prerequisite information from a separate file in your cloud storage, the capability processes DCM files in manageable batches and prevents out-of-memory issues associated with ingestion at scale. We recommend this ingestion option for first-time data loads and scenarios involving high data volumes.
To understand the transformation mapping details, see DICOM metadata transformation mapping in healthcare data solutions.
The following sections explain the Ingest and BYOS ingestion patterns. To learn how to use inventory-based ingestion, see Ingest large-scale imaging data with inventory-based ingestion.
Option 1: End to end ingestion of DICOM files
In this option, you ingest and transform the imaging data from DICOM files into the healthcare data solutions lakehouses using the prebuilt data pipeline. The end-to-end transformation consists of the following consecutive steps:
- Ingest DICOM files into OneLake
- Organize DICOM files in OneLake
- Extract DICOM metadata into the bronze lakehouse
- Convert DICOM metadata to the FHIR (Fast Health Interoperability Resources) format
- Ingest data into the ImagingStudy delta table in the bronze lakehouse
- Flatten and transform data into the ImagingStudy delta table in the silver lakehouse
- Convert and ingest data into the Image_Occurrence table in the gold lakehouse (optional)
Tip
This ingestion option uses the 340ImagingStudies sample dataset that contains compressed ZIP files. Alternatively, you can ingest DICOM files directly in their native DCM format by placing them in the Ingest folder. Within the ZIP files, the DCM files can be structured into multiple nested subfolders. There's no limit on the number of DCM files or the number, depth, and nesting of subfolders within the ingested ZIP files. For information on file size limits, see Ingestion file size.
Step 1: Ingest DICOM files into OneLake
The Ingest folder in the bronze lakehouse represents a drop (queue) folder. You can drop the DICOM files inside this folder. The files then move to an organized folder structure within the bronze lakehouse.
Go to the
Ingest\Imaging\DICOM\DICOM-HDSfolder in the bronze lakehouse.Select ... (ellipsis) > Upload > Upload folder.
Select and upload the 340ImagingStudies imaging dataset from the SampleData folder in SampleData\Imaging\DICOM\DICOM-HDS. Alternatively, use OneLake file explorer or Azure Storage Explorer to upload the sample dataset.
Step 2: Run the imaging data pipeline
After moving the DCM/ZIP files to the Ingest folder in the bronze lakehouse, you can now run the imaging data pipeline to organize and process the data to the silver lakehouse.
In your healthcare data solutions environment, open the healthcare#_msft_imaging_with_clinical_foundation_ingestion data pipeline.
Select the Run button to begin processing the imaging data from the bronze to silver lakehouse.
This data pipeline sequentially runs five notebooks: three deployed as part of the healthcare data foundations capability, and two from the DICOM data transformation capability. To learn more about these notebooks, see DICOM data transformation: Artifacts.

Step 3: Run the silver to gold transformation notebook
Note
This transformation step is optional. Use it only if you need to further transform your DICOM data into the Observational Medical Outcomes Partnership (OMOP) common data model (CDM) format. Otherwise, you can skip this step.
Before you run this transformation, deploy and configure the OMOP transformations capability in healthcare data solutions.
After you run the imaging pipeline, your imaging data transforms up to the silver lakehouse. The silver lakehouse serves as the initial point where data from various modalities begins to converge in a structured manner. To further transform your data into the OMOP research standard for use in the Discover and build cohorts (preview) capability, run the silver to gold transformation notebook.
In your healthcare data solutions environment, open the healthcare#_msft_omop_silver_gold_transformation notebook.
This notebook uses the healthcare data solutions OMOP APIs to transform resources from the silver lakehouse into OMOP CDM delta tables in the gold lakehouse. By default, you don't need to make any changes to the notebook configuration.
Select Run all to run the notebook.
The notebook implements the OMOP tracking approach to track and process new or updated records in the ImagingStudy delta table in the silver lakehouse. It transforms data from the FHIR delta tables in the silver lakehouse (including the ImagingStudy table) into the corresponding OMOP delta tables in the gold lakehouse (including the Image_Occurrence table). For more information on this transformation, see Transformation mapping for silver to gold delta table.
For detailed OMOP mapping information, see FHIR to OMOP mapping.
Step 4: Validate the data
In real-world scenarios, data ingestion involves sources with varying quality levels. The validation engine, detailed in Data validation, intentionally triggers validations on some of the provided imaging sample data. Files that don't comply with DICOM standards move to the Failed folder and aren't processed. But, a single file failure doesn't disrupt the entire pipeline, as demonstrated by the imaging sample data. The pipeline and associated notebooks run successfully, but the Failed folder under Imaging\DICOM\DICOM-HDS\YYYY\MM\DD contains a noncompliant file. All other valid files process successfully, resulting in an overall successful pipeline status. We intentionally include this invalid file in the imaging sample data to illustrate how the imaging pipeline handles invalid files and helps you identify dataset issues.

To confirm the pipeline successfully extracted all the metadata from the raw DICOM files, open the bronze lakehouse, switch to the SQL analytics endpoint, and select New SQL query.

If the pipeline ran correctly, you must see 7739 successfully processed DICOM instances in the ImagingDicom table. To verify, run the following SQL query. For successful processing, you should see 7739 in the Results pane. This number represents the total number of DICOM instances in the sample data, comprising data from different modalities such as Computerized Tomography (CT) and Magnetic Resonance Imaging (MRI) scans.
select count(*) from ImagingDicom

To confirm the pipeline successfully hydrated the lakehouses, open the silver lakehouse, switch to the SQL analytics endpoint, and select New SQL Query. For a correct pipeline run, you see 339 successfully processed ImagingStudy resources. To verify, run the following SQL query. Initially, we begin with 340 ImagingStudy resources, but one encounters an error during processing.
select count(*) from ImagingStudy

Option 2: Integration with the DICOM service
Important
Use this transformation option only if you're using the Azure Health Data Services DICOM service and deployed the DICOM API.
This transformation approach extends the Bring Your Own Storage (BYOS) pattern with the Azure Health Data Services DICOM service. The DICOM service is a subset of DICOMweb APIs that lets you store, review, search, and delete DICOM objects. It integrates with the Azure Data Lake Storage Gen2 account linked to your Fabric workspace, so the transformation pipeline can directly access your DICOM data.
Alternatively, you can skip using the Azure DICOM API and ingest DICOM files stored in your Data Lake Storage Gen2 account (in this case, begin from step 5).
Review and complete the configuration in Deploy the DICOM API in Azure Health Data Services.
After deploying the Azure DICOM service, use the Store (STOW-RS) API to ingest DCM files. Test it by downloading a DCM file from the imaging sample data using either OneLake file explorer or Azure Storage Explorer.
Depending on your preferred language, upload the DCM files to the server using one of the following options:
Verify whether file upload was successful:
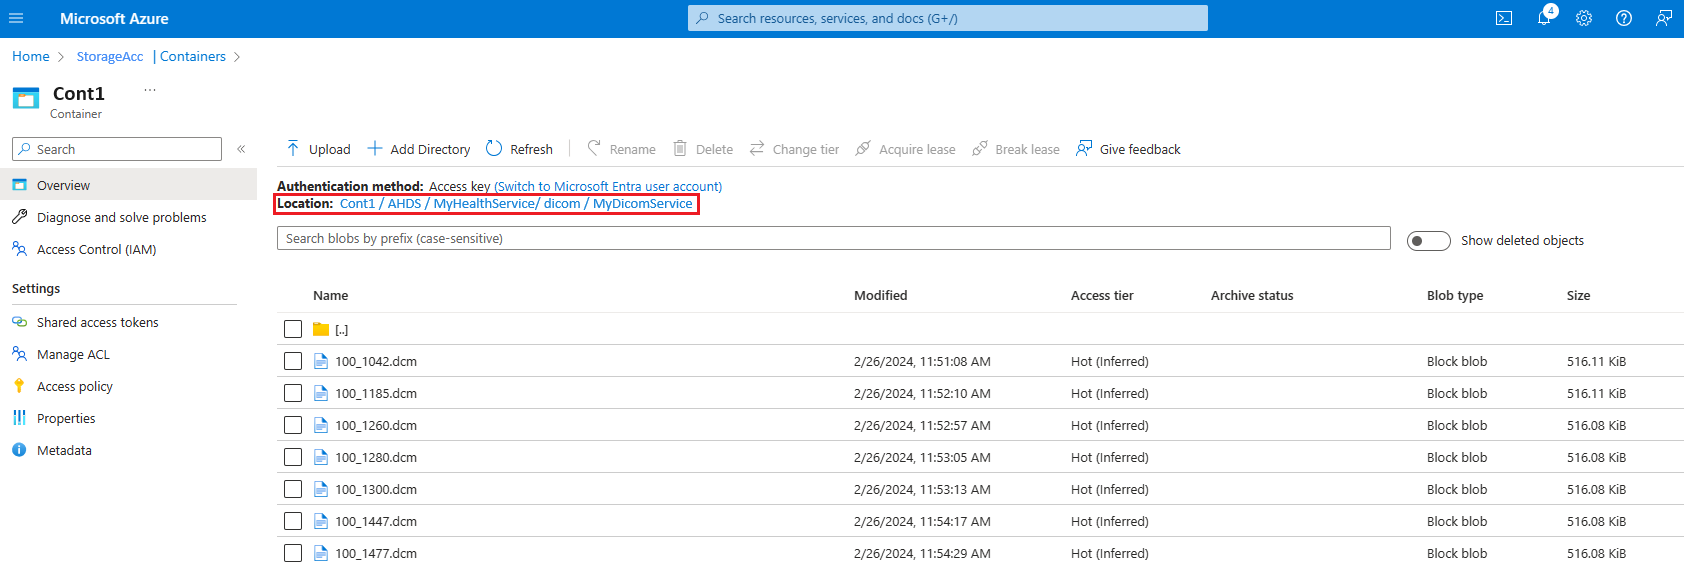
- In the Azure portal, select the storage account linked to the DICOM service.
- Go to Containers and follow the path
[ContainerName]/AHDS/[AzureHealthDataServicesWorkspaceName]/dicom/[DICOMServiceName]. - Check if you can see the DCM file uploaded here.
Note
- The file name might change when uploaded to the server. However, the file content remains unchanged.
- For information on file size limits, see Ingestion file size.
Create a shortcut in the bronze lakehouse for the DICOM file stored in the Data Lake Storage Gen2 location. Follow the steps in Create an Azure Data Lake Storage Gen2 shortcut.
- For the Azure DICOM service, make sure you use the Data Lake Storage Gen2 account created with the service.
- If you aren't using the Azure DICOM service, you can create a new Data Lake Storage Gen2 account or use an existing one. To learn more, see Create a storage account to use with Azure Data Lake Storage.
For consistency, use the following folder structure to create the shortcut:
Files\External\Imaging\DICOM\[Namespace]\[BYOSShortcutName]. TheNamespacevalue ensures logical separation of shortcuts from different source systems. For example, you can use the Data Lake Storage Gen2 name for theNamespacevalue.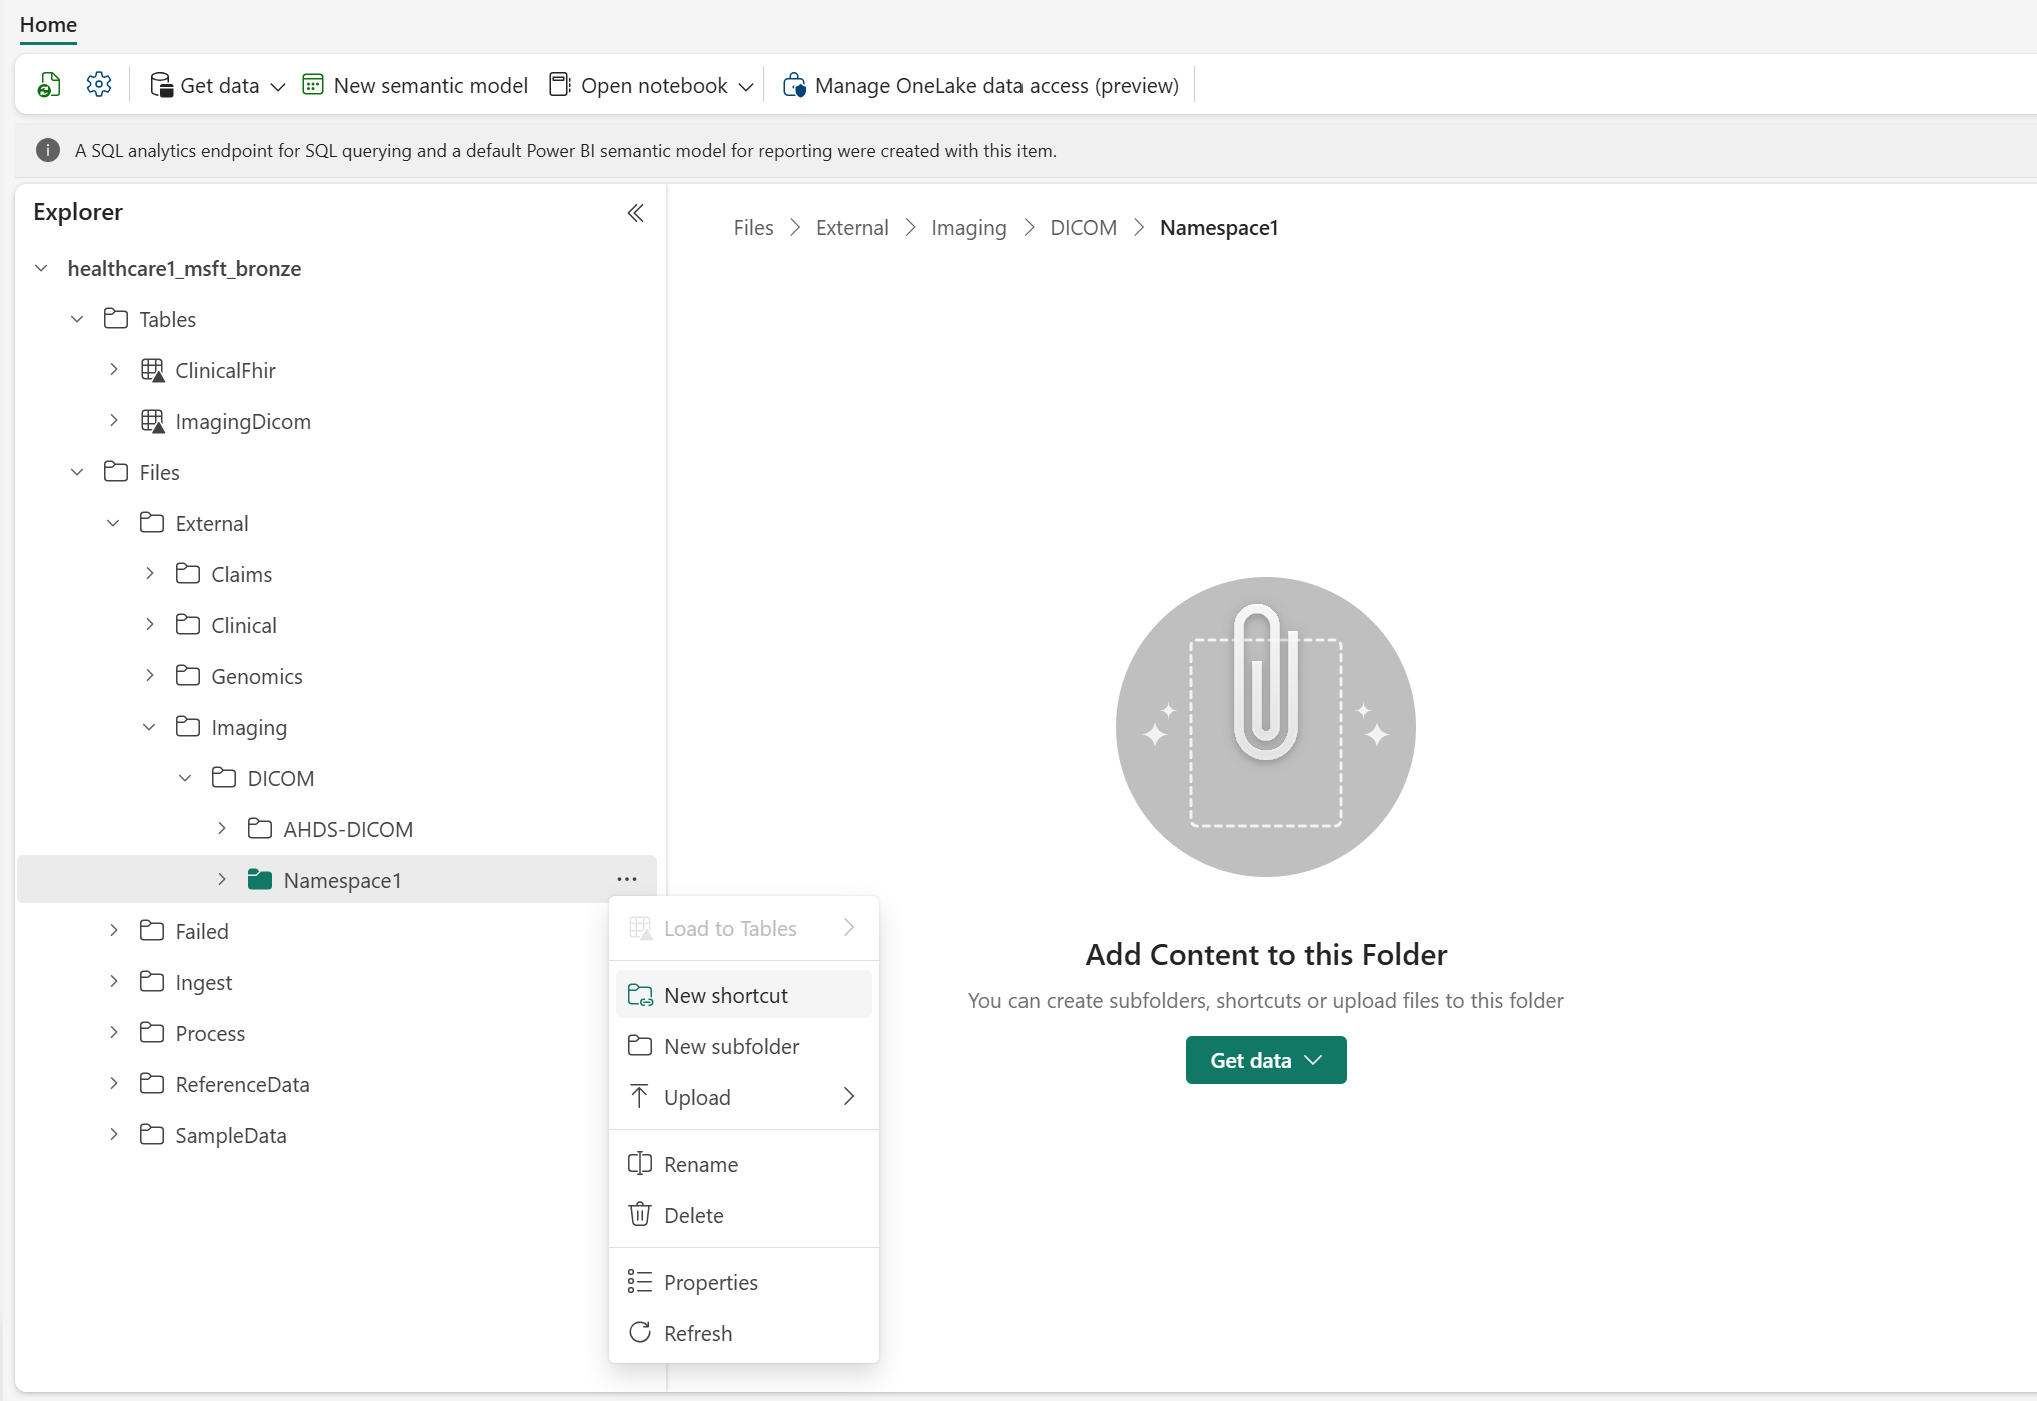
Note
OneLake shortcuts also support multiple storage systems beyond Data Lake Storage Gen2. For a full list of supported storage types, see OneLake shortcuts.
Configure the admin lakehouse to enable BYOS:
Go to the healthcare#_msft_admin lakehouse and open the deploymentParametersConfiguration.json file under
Files\system-configurations.Enable the BYOS setting in this configuration file. Use OneLake file explorer to open the deploymentParametersConfiguration.json file from the following folder path:
OneLake - Microsoft\[WorkspaceName]\healthcare#_msft_admin.Lakehouse\Files\system-configurations. Use any JSON or text editor (such as Windows Notepad) to open the file, search for theingestion_patternparameter, and set the value to 1.
The DICOM data transformation capability can now access all your DICOM files in their source Data Lake Storage Gen2 location, regardless of the folder hierarchy/structure. You don't need to manually ingest the DICOM files as done in the Ingest option. Begin execution from Step 2: Run the imaging data pipeline in the previous section to use the imaging pipeline and transform your DICOM data.


Note
To understand the integration limitations with Azure Health Data Services DICOM service, see Integration with DICOM service.