GPU paravirtualization
This article describes GPU paravirtualization in WDDM. This feature is available starting in Windows 10, version 1803 (WDDM 2.4).
About GPU virtualization
GPU virtualization is an important feature for both Windows Client and Windows Server. There are many scenarios that require effective usage of GPU resources in a virtual machine.
Server scenarios (where the host OS doesn't run user applications) include:
- Desktop virtualization
- Compute (AI, ML, etc.)
Client scenarios (where the host OS shares the GPU between VMs and user applications) include:
- Developing and testing graphics applications (where testing is run in a VM)
- Running applications in a VM for security purposes
- Running Linux in a VM with GPU acceleration
GPU paravirtualization in WDDM
Paravirtualization (PV) provides an interface to virtual machines (VMs) that are similar to their underlying hardware. In PV, you explicitly port the guest OS before installing a VM because a non-tailored guest OS can't run on top of a virtual machine monitor (VMM).
Advantages:
- Multiple VMs share the hardware resources.
- Few changes need to be made in the driver code.
The following figure depicts various components involved in WDDM's paravirtualized design.
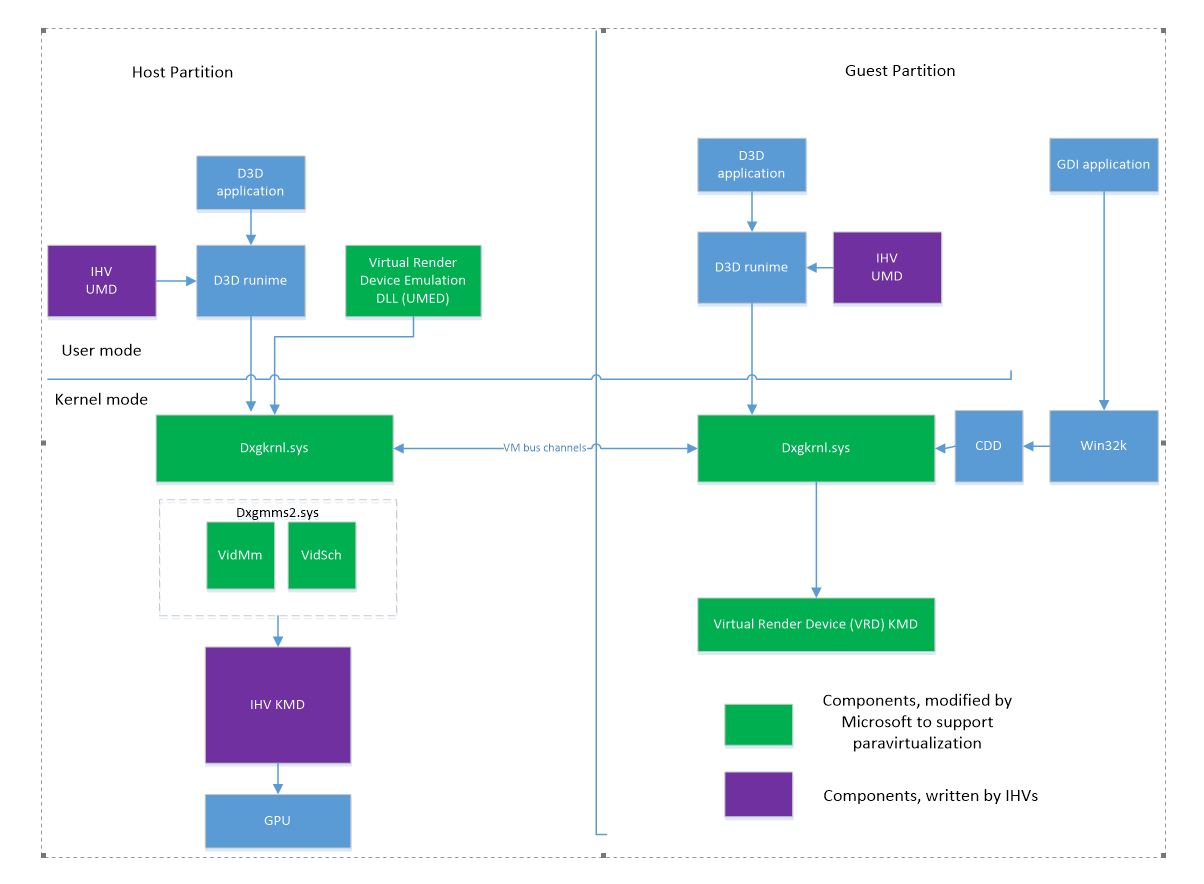
The D3D runtimes in the guest VM aren't changed. The interfaces with the user-mode runtime and with KMT kernel thunks remain the same.
The driver components don't require many changes:
The UMD in the guest VM needs to:
- Be aware that the communications with the host kernel-mode driver (KMD) happen across the VM boundary.
- Use the added Dxgkrnl services to access registry settings.
There's no KMD in the guest, only UMD. The Virtual Render Device (VRD) KMD replaces the KMD. VRD's purpose is to facilitate the loading of Dxgkrnl.
There's no video memory manager (VidMm) or scheduler (VidSch) in the guest.
Dxgkrnl in a VM gets thunk calls and marshalls them to the host partition via VM bus channels. Dxgkrnl in the guest also creates local objects for allocations, processes, devices, and other resources, which reduces traffic with the host.
Virtual render device (VRD)
When a paravirtualized GPU isn't present in a VM, the VM's Device Manager shows the "Microsoft Hyper-V Video" adapter. This display-only adapter is paired by default with the BasicRender adapter for rendering.
When you add a paravirtualized GPU to a VM, the VM's Device Manager shows two adapters:
- Microsoft Hyper-V Video Adapter or Microsoft Remote Display Adapter
- Microsoft Virtual Render Driver (The actual name is the name of the GPU adapter on the host)
By default, the VRD is paired with the Hyper-V Video adapter, so all UI rendering occurs with the VRD adapter.
If you encounter rendering issues, you can disable this pairing using the GpuVirtualizationFlags registry setting. In this case, the render-only adapter (VRD) is used when an application specifically picks it. For example, some DirectX samples allow you to change the rendering device. The Direct3D runtimes add a logical display output to the VRD when an application decides to use it.
When you add multiple virtual GPUs to the VM, there can be multiple VRD adapters in the guest. However, only one of them can be paired with the Hyper-V Video adapter. There's no way to specify which one; the OS chooses.
Containers and VMs
GPU virtualization is supported for VMs and containers. Containers are lightweight VMs, where the host OS binaries are mapped to the container VM.
For more information about containers, see Windows and containers.
Secure VMs
The following limitations exist for a secure VM:
- Driver escape calls aren't allowed, except known escapes, which are used with the DriverKnownEscape flag.
- IoMmu isolation is enabled. VM creation fails if the driver doesn't support IoMmu isolation.
When secure mode is enabled:
- DxgkDdiSetVirtualMachineData has the SecureVirtualMachine flag set.
- DxgkDdiQueryAdapterInfo has the SecureVirtualMachine flag set.
There are registry settings to force secure mode or disable IoMmu isolation during development. For more information, see Registry settings.
Remoting of the VM/container desktop
You can remote the content of a desktop in a virtual machine (VM) to the host using two methods:
- Hyper-V display adapter
- Terminal session remoting
When RDP (remote desktop) is used to connect to a VM, terminal session remoting is used.
The Hyper-V manager uses the VMConnect application to display a VM desktop. VMConnect works in two modes:
- Enhanced mode, which uses terminal session remoting.
- Basic mode, which uses the Hyper-V display adapter.
VM worker process and VM memory
When you launch a VM or container, the operating system creates the following processes on the host:
- VM worker process (vmwp.exe)
- VM memory process (vmmem.exe)
Vmwp holds various virtual device drivers, including vrdumed.dll (virtual render device user-mode emulator DLL), which is the driver for paravirtualized graphics adapters.
The vmmem process virtual address space serves as backing for the IO space of the vGPU in the guest. When the guest accesses the IO space, the resulting physical address is the entry to the second level translation, which uses the page tables of the vmmem process.
In a virtualized environment, various KMD DDI calls that typically run within the context of a user process on the host are instead executed within the context of the vmmem process when a virtual machine is running.
Dxgkrnl creates a single DXGPROCESS (and the corresponding KMD process object) for these processes, which is called the VM worker process in this article. The EPROCESS associated with the DXG VM worker process is vmmem.
VM processes
When a DXGPROCESS is created in the guest VM, Dxgkrnl creates a corresponding DXGPROCESS object on the host. This process is called the VM process in this article. The EPROCESS associated with the DXGPROCESS is vmmem.
All rendering operations from a VM or VM allocation creation are done in the context of the VM's DXGPROCESS.
For debugging purposes, Dxgkrnl notifies KMD about which process is a VM worker process or VM process in DxgkDdiCreateProcess. Using this information, the driver can link a VM process to the VM worker process. This information helps debugging in scenarios when more than one VM is running.
Driver requirements
A KMD that supports GPU paravirtualization needs to set the DXGK_VIDMMCAPS::ParavirtualizationSupported capability.
The user-mode driver (UMD) shouldn't use any process context-related data in the private driver data (pointers, handle, etc.). Instead, the KMD gets the private data in the host in a different process context.
The UMD in the guest can't share memory with the KMD in the host. It must use the functions described in Registry access from UMD to access the registry.
The current paravirtualization implementation uses the VM bus to communicate between the guest and the host. The maximum message size is 128KB. Currently, Dxgkrnl doesn't break messages to send them in chunks. Therefore, the driver needs to limit the size of private data passed with object creation. For example, when Pfnd3dddiAllocatecb is used to create many allocations, the total message size includes a header, global private data, plus the size of per allocation private data multiplied by the number of allocations. This information all needs to fit in a single message.
Running applications in fullscreen emulated mode
The Indirect Display adapter should be enabled for remoting (it's enabled by default). To disable it, perform the following steps.
- Start Edit Group Policy
- Navigate to Computer Configuration->Administrative Templates->Windows Components->Remote Desktop Services->Remote Desktop Session Host->Remote Session Environment
- Open the “Use WDDM graphics display driver for Remote Desktop Connection” item
- Select Disable and select OK
- Reboot
DXGI support for fullscreen applications in VMs is enabled by default. To disable it, use StagingTool.exe /disable 19316777.
Fullscreen applications must be running in the emulated fullscreen mode.
Enable eFSE for all DXGI applications and set the minimum WDDM version for swap effect transition to WDDM 2.0:
D3DEnableFeature.exe /enable DXGI_eFSE_Enablement_PolicyD3DEnableFeature.exe /setvariant DXGI_eFSE_Enablement_Policy 7
eFSE is enabled by default for D3D9 applications.
DriverStore in the VM
Driver binaries on the host are located in a driver store %windir%\system32\drivers\DriverStore\FileRepository<DriverDirectory>.
For paravirtualization, UMD's binaries in a VM are expected to be in %windir%\system32\drivers\HostDriverStore\FileRepository<DriverDirectory>.
The host KMD reports UMD DLL's names that have the full path to the driver store. For example, c:\windows\system32\DriverStore\FileRepository\DriverSpecificDirectory\d3dumd.dll.
When the VM asks for a UMD name, the name is translated to <VmSystemDrive>:\windows\system32\HostDriverStore\FileRepository\DriverSpecificDirectory\d3dumd.dll.
Host DriverStore for containers
For containers, Hyper-V maps the full host driver store directory in the host to <%windir%\HostDriverStore in the container.
Host DriverStore for full VMs
The driver store files are copied to the VM when the virtual GPU adapter starts in the VM. This feature is disabled in the released version of the OS.
The following registry key and possible values control the copy operation. The key doesn't exist by default.
DWORD RTL_REGISTRY_CONTROL\GraphicsDrivers\DriverStoreCopyMode
| Value | Description |
|---|---|
| 0 | Disable copying of the driver store |
| 1 | Normal operation (enable copying of the driver store files and don't overwrite existing files). |
| 2 | Enable copying of the driver store and overwrite existing files. |
Registry access from UMD
The KMD registry keys exist on the host and aren't reflected to the VM. Therefore, the UMD can't read such driver registry keys directly. The pfnQueryAdapterInfoCb2 callback is added to the D3D runtime's D3DDDI_ADAPTERCALLBACKS structure. UMD can call pfnQueryAdapterInfoCb2 with D3DDDICB_QUERYADAPTERINFO2 set as follows to read certain registry keys:
- D3DDDICB_QUERYADAPTERINFO2::QueryType set to D3DDDI_QUERYADAPTERTYPE_QUERYREGISTRY.
- pPrivateDriverData points to a buffer with a D3DDDI_QUERYREGISTRY_INFO structure in which to return the registry information. UMD fills the following members:
- D3DDDI_QUERYREGISTRY_INFO::QueryType specifies the type of registry access; for example, service key, adapter key, or driver store path.
- D3DDDI_QUERYREGISTRY_FLAGS::QueryFlags specifies the flags for the query.
- ValueName identifies the name of the value to read.
- ValueType specifies the type of the value to read.
- PrivateDriverDataSize is
sizeof(D3DDDI_QUERYREGISTRY_INFO)plus the size of the buffer for the dynamically sized output value.
UMD can also call D3DKMTQueryAdapterInfo directly. This call is useful for UMD in the guest because it's marshalled to the host and provides a way to translate certain names to the guest name space.
D3DKMTQueryAdapterInfo is called with D3DKMT_QUERYADAPTERINFO set as follows to read certain registry keys:
- Type is set to KMTQAITYPE_QUERYREGISTRY
- pPrivateDriverData points to a D3DKMT_ADAPTERREGISTRYINFO structure
- PrivateDriverDataSize is
sizeof(D3DKMT_ADAPTERREGISTRYINFO)plus the size of the buffer for the dynamically sized output value.
Example 1: Reading a value from the service key
WCHAR ValueName = L"EnableDebug";
    D3DDDI_QUERYREGISTRY_INFO Args = {};
    Args.QueryType = D3DDDI_QUERYREGISTRY_SERVICEKEY;
    Args.QueryFlags.TranslatePath = FALSE or TRUE;
    Args.ValueType = Supported registry value type;
    wcscpy_s(Args.ValueName, ARRAYSIZE(Args.ValueName), ValueName);

    D3DKMT_QUERYADAPTERINFO Args1 = {};
    Args1.hAdapter = hAdapter;
    Args1.Type = KMTQAITYPE_QUERYREGISTRY;
    Args1.pPrivateDriverData = &Args;
    Args1.PrivateDriverDataSize = sizeof(Args);
    NTSTATUS Status = D3DKMTQueryAdapterInfo(&Args1);
    if (NT_SUCCESS(Status) &&
        Args.Status == D3DDDI_QUERYREGISTRY_STATUS_SUCCESS)
    {
       if (ValueType == REG_SZ || ValueType == REG_EXPAND_SZ) {

wprintf(L"Value: \"%s\"\n", Args.OutputString);
       } else
       if (ValueType == REG_MULTI_SZ) {
          wprintf(L"Value: ");
          for (UINT i = 0; i < Args.OutputValueSize; i++) {
             if (Args.OutputString[i] == 0) {
                wprintf(L" ");
             } else {
                wprintf(L"%c", Args.OutputString[i]);
             }
          }
          wprintf(L"\n");
       } else
       if (ValueType == REG_DWORD) {
          wprintf(L"Value: %d\n", Args.OutputDword);
       } else
       if (ValueType == REG_QWORD) {
          wprintf(L"Value: 0x%I64x\n", Args.OutputQword);
       } else
       if (ValueType == REG_BINARY) {
          wprintf(L"Num bytes: %d\n", Args.OutputValueSize);

for (UINT i = 0; i < Args.OutputValueSize; i++) {
             wprintf(L"%d ", Args.OutputBinary[i]);
          }
          wprintf(L"\n");
       }
    }
Example 2: Reading the driver store path
    D3DDDI_QUERYREGISTRY_INFO Args = {};
    Args.QueryType = D3DDDI_QUERYREGISTRY_DRIVERSTOREPATH;

    D3DKMT_QUERYADAPTERINFO Args1 = {};
    Args1.hAdapter = hAdapter;
    Args1.Type = KMTQAITYPE_QUERYREGISTRY;
    Args1.pPrivateDriverData = &Args;
    Args1.PrivateDriverDataSize = sizeof(Args);
    NTSTATUS Status = D3DKMTQueryAdapterInfo(&Args1);
    if (NT_SUCCESS(Status) &&
        Args.Status == D3DDDI_QUERYREGISTRY_STATUS_SUCCESS)
    {
        Args.OutputString holds the output NULL terminated string.
        Args.OutputValueSize holds the number of characters in the string
    }
Copying files to %windir%\system32 and %windir%\syswow64 in the VM
In some cases, the driver user-mode DLLs need to be present in the %windir%\system32 and %windir%\syswow64 directories.
The OS provides a way for the driver to specify files that should be copied from the driver store in the host to %windir%\system32 or %windir%\syswow64 in the guest.
In the installation INF, the driver can define multiple values in the following subkeys in the graphics adapter registry key:
- CopyToVmOverwrite
- CopyToVmWhenNewer
- CopyToVmOverwriteWow64
- CopyToVmWhenNewerWow64
The CopyToVmOverwrite and CopyToVmWhenNewer subkeys are used to copy files to the %windir%\system32 directory.
The CopyToVmOverwriteWow64 and CopyToVmWhenNewerWow64 subkeys are used to copy files to the %windir%\syswow64 directory.
The files under CopyToVmOverwrite and CopyToVmOverwriteWow64 always overwrite the files in the destination.
The files under CopyToVmWhenNewer and CopyToVmWhenNewerWow64 overwrite the files in the destination only if the file change date is newer. The "newer" criteria compares two pieces of information:
- FileVersion
- LastWriteTime
When the destination file ends with the .dll or .exe suffix, the FileVersion is used as the most-significant comparison value where the greatest version is deemed "newer". When the destination file doesn't end with the .dll or .exe suffix or the two FileVersion are equal, then LastWriteTime is used as the least-significant comparison values where the later date/ time is deemed "newer".
Each value type under a subkey must be REG_MULTI_SZ or REG_SZ. If the value type is REG_MULTI_SZ, there should be a maximum of two strings in the value. This requirement means that each value defines a single string or a pair of strings, where the second string could be empty.
The first name in a pair is a path to a file in the driver store. The path is relative to the root of the driver store and can contain subdirectories.
The second name in a pair is the name of the file as it should appear in the %windir%\system32 or %windir%\syswow64 directory. The second name should be just the file name, not including path.
If the second name is empty, the file name is the same as in the driver store (excluding subdirectories).
This approach allows the driver to have different names in the host driver store and in the guest.
Example 1
The following example shows how to get the OS to copy <DriverStorePath>\CopyToVm\softgpu1.dll to %windir%\system32\softgpu2.dll.
INF [DDInstall] section
HKR,"softgpukmd\CopyToVmOverwrite",SoftGpuFiles,%REG_MULTI_SZ%,"CopyToVm\softgpu1.dll”, “softgpu2.dll”
The directive creates the registry key in the software (adapter) key:
"HKLM\SYSTEM\CurrentControlSet\Control\Class\{4d36e968-e325-11ce-bfc1-08002be10318}\<number>\CopyToVmOverwrite”, SoftGpuFiles = REG_MULTI_SZ, “CopyToVm\softgpu1.dll”, “softgpu2.dll"
Example 2
The following example shows how to get the OS to copy <DriverStorePath>\softgpu1.dll to %windir%\system32\softgpu.dll and <DriverStorePath>\softgpu2.dll to %windir%\system32\softgpu2.dll.
INF [DDInstall] section:
HKR,"CopyToVmOverwrite",SoftGpuFiles1,%REG_MULTI_SZ%,"softgpu1.dll”,”softgpu.dll"
HKR,"CopyToVmOverwrite",SoftGpuFiles2,%REG_SZ%, “softgpu2.dll"
The directive creates the registry key in the software (adapter) key:
“HKLM\SYSTEM\CurrentControlSet\Control\Class\{4d36e968-e325-11ce-bfc1-08002be10318}\<number>\CopyToVmOverwrite”,  SoftGpuFiles1 = REG_MULTI_SZ, “softgpu1.dll”, “softgpu.dll"

“HKLM\SYSTEM\CurrentControlSet\Control\Class\{4d36e968-e325-11ce-bfc1-08002be10318}\<number>\CopyToVmOverwrite”,  SoftGpuFiles2 = REG_SZ, “softgpu2.dll””
Example 3
The following example shows how to get the OS to copy <DriverStorePath>\Subdir1\Subdir2\softgpu2wow64.dll to %windir%\syswow64\softgpu.dll and <DriverStorePath>\softgpu.dll to %windir%\syswow64\softgpu2wow64.dll.
INF [DDInstall] section:
HKR,"CopyToVmOverwriteWow64",SoftGpuFiles,%REG_MULTI_SZ%,“Subdir1\Subdir2\softgpu2wow64.dll”,”softgpu.dll”.
The directive creates the registry key in the software (adapter) key:
“HKLM\SYSTEM\CurrentControlSet\Control\Class\{4d36e968-e325-11ce-bfc1-08002be10318}\<number>\CopyToVmOverwriteWow64”,  SoftGpuFiles = REG_MULTI_SZ, “Subdir1\Subdir2\softgpu2wow64.dll”,”softgpu.dll
Changes to DxgkDdiCreateProcess
KMD's DxgkDdiCreateProcess function needs to be updated to support VM worker processes and VM processes. The following fields are added to the DXGKARG_CREATEPROCESS structure:
- hKmdVmWorkerProcess
- ProcessNameLength
- pProcessName
The following flags are added to DXGK_CREATEPROCESSFLAGS to support VM worker processes and VM processes:
- VirtualMachineProcess
- VirtualMachineWorkerProcess
DxgkDdiSetVirtualMachineData
DxgkDdiSetVirtualMachineData is added for Dxgkrnl to pass information about a virtual machine to the KMD.
Asynchronous VM bus messages to the host
Some messages from Dxgkrnl in the guest OS to the host are asynchronous. This approach improves the performance of high-frequency Dxgkrnl API calls in the guest. The overhead of each synchronous VM bus message to the host can be high.
The async messages include:
- D3DKMTSubmitCommand
- D3DKMTSubmitCommandToHardwareQueue
- D3DKMTSignalSynchronizationObjectFromGpu
- D3DKMTWaitForSynchronizationObjectFromGpu
LDA support in GPU-PV
Linked display adapter (LDA) is supported in GPU-PV. To ensure a consistent implementation and support possible future back-porting of LDA support to older Windows releases, the KMD needs to check the LDA support in GPU-PV by calling DxgkCbIsFeatureEnabled(DXGK_FEATURE_LDA_GPUPV). The support is enabled if the function succeeds and returns Enabled. If the KMD doesn't call this callback, Dxgkrnl assumes that the KMD doesn't support LDA in GPU-PV.
If the OS supports the feature, it's up to the driver to enable LDA in user mode. If the driver enables LDA in user mode, it should do so as follows.
| Runtime | LDA state |
|---|---|
| Pre-D3D12 runtime | Enable if DXGK_FEATURE_LDA_GPUPV is supported and the guest OS is Windows 11, version 22H2 (WDDM 3.1) or later. |
| Non-DX runtimes (Windows) | Enable if DXGK_FEATURE_LDA_GPUPV is supported and the guest OS is Windows 11, version 22H2 (WDDM 3.1) or later. Instead of checking the OS version, the UMD could call D3DKMTQueryAdapterInfo(KMTQAITYPE_PHYSICALADAPTERCOUNT) and enable LDA when it returns number of physical adapters greater than 1. |
| D3D12 runtime (Windows) | Enable. See Setting the LDA state for the D3D12 runtime. |
| Linux (d3d12 and non-DX runtime) | Enable if DXGK_FEATURE_LDA_GPUPV is supported. |
Drivers compiled with an interface version less than DXGKDDI_INTERFACE_VERSION_WDDM3_0 don't check DXGK_FEATURE_LDA_GPUPV. These drivers can still enable LDA for Linux runtimes.
Setting the LDA state for the D3D12 runtime
When enabling or disabling LDA for the D3D12 runtime, the UMD needs to return the correct tier and node map information to the runtime. The code flow is as follows:
D3D12 gets the D3D12_CROSS_NODE_SHARING_TIER cap from UMD.
D3D12 gets the physical adapter count from Dxgkrnl by calling D3DKMTQueryAdapterInfo(KMTQAITYPE_PHYSICALADAPTERCOUNT).
D3D12 calls pfnQueryNodeMap(PhysicalAdapterCount, &map) to get mapping of logical node indices to physical nodes. Node in this case means physical adapter. The UMD needs to set the actual physical adapter index in the map or D3D12DDI_NODE_MAP_HIDE_NODE to disable a node.
Based on the pfnQueryNodeMap results, D3D12 computes the effective physical adapter count by not counting the hidden nodes.
If the state of the tier and the effective physical adapter count don't match, D3D12 fails device creation. Mismatch happens when:
- The tier is D3D12DDI_CROSS_NODE_SHARING_TIER_NOT_SUPPORTED and adapter count is greater than 1.
- The tier isn't D3D12DDI_CROSS_NODE_SHARING_TIER_NOT_SUPPORTED and adapter count is 1.
To disable LDA, the UMD needs to return the D3D12DDI_CROSS_NODE_SHARING_TIER_NOT_SUPPORTED tier and keep only one physical adapter enabled in the node map.
D3DKMTQueryAdapterInfo(KMTQAITYPE_PHYSICALADAPTERCOUNT)
A KMTQAITYPE_PHYSICALADAPTERCOUNT query for the physical adapter count always returns the correct physical adapter count to the guest:
- On pre-Windows 11 version 22H2 guests, it returns 1. This value is hard-coded in the guest code. It could change in the future if LDA support is ported to older OS releases.
- On Windows 11, version 22H2 and later systems, it returns:
- The actual number of physical adapters when DXGK_FEATURE_LDA_GPUPV is enabled.
- Otherwise, 1.
Paravirtualization bring up
Enable virtualization support in the BIOS (VT-d or similar). GPU-PV setup is different for VMMS virtual machines and the containers.
In PowerShell (running as Administrator), enable script execution on the server:
set-executionpolicy unrestricted
VMMS virtual machine setup
Setting up the host and the VM
The OS build in the VM can be older or newer than the OS build in the host.
Enable the Hyper-V feature in the server roles or the Hyper-V feature on the client. When enabling this feature on the server, select the option to use network adapter as the External switch.
(optional) Enable test signing (bcdedit -set TESTSIGNING ON)
Reboot.
Install a GPU driver that supports para-virtualization.
(optional) Some drivers don't set the ParavirtualizationSupported cap. In this case, add the following registry before installing the driver or disable/enable the device after the flag is set.
DWORD HKLM\System\CurrentControlSet\Control\GraphicsDrivers\GpuVirtualizationFlags = 1To check if the OS recognizes the paravirtualized GPU, execute the following PowerShell command:
Get-VMPartitionableGpu

# Example output from running the command
Name                    : \\?\PCI#VEN_10DE&DEV_1C02&SUBSYS_11C210DE&REV_A1#4&275d7527&0&0010#{064092b3-625e-43bf-9eb5-d
                          c845897dd59}\GPUPARAV
ValidPartitionCounts    : {32}
PartitionCount          : 32
TotalVRAM               : 1,000,000,000
AvailableVRAM           : 1,000,000,000
MinPartitionVRAM        : 0
MaxPartitionVRAM        : 1,000,000,000
OptimalPartitionVRAM    : 1,000,000,000
TotalEncode             : 18,446,744,073,709,551,615
AvailableEncode         : 18,446,744,073,709,551,615
MinPartitionEncode      : 0
MaxPartitionEncode      : 18,446,744,073,709,551,615

OptimalPartitionEncode  : 18446744073709551615
TotalDecode             : 1000000000
AvailableDecode         : 1000000000
MinPartitionDecode      : 0
MaxPartitionDecode      : 1000000000
OptimalPartitionDecode  : 1000000000
TotalCompute            : 1000000000
AvailableCompute        : 1000000000
MinPartitionCompute     : 0
MaxPartitionCompute     : 1000000000
OptimalPartitionCompute : 1000000000
CimSession              : CimSession: .
ComputerName            : MYCOMPUTER-TEST2
IsDeleted               : False
Run the following commands in PowerShell to create a VM with GPU. A VM named TEST is created.
$vm = “TEST“
New-VM -VMName $vm -Generation 2
Set-VM -GuestControlledCacheTypes $true -VMName $vm
Set IO space for the VM. GPU-PV uses IO space to handle CPU-visible allocations. At least 8GB of IO space is needed.
Set-VM -LowMemoryMappedIoSpace 1GB -VMName $vm
Set-VM -HighMemoryMappedIoSpace 16GB -VMName $vm
[optional] By default, the base address for the high memory IO space is set to (64GB - 512MB). On Haswell chipsets with 36-bit physical memory addressing, the end address of the IO space region needs to be below 64GB, so the start address needs to be set accordingly. The following script, named SetHighMmioBase.ps1, sets the start address to 47GB when run with the following parameters:
SetHightMmioBase.ps1 “TEST” 48128

# SetHighMmioBase.ps1

param( [string]$VmName, $BaseInMB)

function Get-WMIVM
{
    [CmdletBinding()]
    param(
        [parameter(Mandatory=$true)]
        [ValidateNotNullOrEmpty()]
        [string]$VmName = ""
        )

    gwmi -namespace root\virtualization\v2 -query "select * from Msvm_ComputerSystem where ElementName = '$VmName'"
}
function Get-WMIVmSettingData
{
    [CmdletBinding()]
    param(
        [parameter(Mandatory=$true)]
        [ValidateNotNullOrEmpty()]
        [string]$VmName = ""
        )
    $vm = Get-WMIVM $VmName

    return $vm.GetRelated ("Msvm_VirtualSystemSettingData","Msvm_SettingsDefineState",$null,$null, "SettingData", "ManagedElement", $false, $null)
}

Write-Host "Setting HighMmioGapBase to $BaseInMB for VmName $VmName"
$vssd = Get-WMIVmSettingData $VmName
$vmms = Get-WmiObject -Namespace "root\virtualization\v2" -Class Msvm_VirtualSystemManagementService
$vssd.HighMmioGapBase = $BaseInMB
$settingsText = $vssd.PSBase.GetText("CimDtd20")
$ret=$vmms.ModifySystemSettings($settingsText).ReturnValue
if ($ret -eq 0)
{
   Write-Host "Successfully set" $vssd.HighMmioGapBase
} else
{
   Write-Host "Error $ret"
}
Add a virtual GPU to the VM and disable checkpoints.
Add-VMGpuPartitionAdapter -VMName $vm
Set-VM -CheckpointType Disabled -VMName $vm
To check that the VM has a paravirtualized GPU, execute the following command:
Get-VMGpuPartitionAdapter -VMName $vm in PowerShell. The output should show the adapter.


# Example output from running the command

MinPartitionVRAM        :
MaxPartitionVRAM        :
OptimalPartitionVRAM    :
MinPartitionEncode      :
MaxPartitionEncode      :
OptimalPartitionEncode  :
MinPartitionDecode      :
MaxPartitionDecode      :
OptimalPartitionDecode  :
MinPartitionCompute     :
MaxPartitionCompute     :
OptimalPartitionCompute :
Name                    : GPU Partition Settings
Id                      : Microsoft:9ABB95E2-D12D-43C3-B840-6F4A9CFB217B\929890BC-BB33-4687-BC1A-F72A4F1B3B3F
VMId                    : 9abb95e2-d12d-43c3-b840-6f4a9cfb217b
VMName                  : TEST
VMSnapshotId            : 00000000-0000-0000-0000-000000000000
VMSnapshotName          :

CimSession              : CimSession: .
ComputerName            : MYCOMPUTER-TEST2
IsDeleted               : False
VMCheckpointId          : 00000000-0000-0000-0000-000000000000
VMCheckpointName        :
Copy the VHDX of the same client build that you use in the VM to a host directory. For example,
d:\VM\os.vhdx.Open Hyper-V manager and modify VM parameters (select VM and select Settings):
- Security - Uncheck Enable Secure Boot.
- Memory - Check Enable Dynamic Memory. Set the amount of memory to 1,024 MB or more.
- Processor - Set Number of virtual processors to 2 or 4.
- Network adapter - Select the network adapter to use with the VM from the drop out box. If network debugging is enabled, make sure to pick Microsoft Debugging NET adapter.
- SCSI controller - Hard Drive - Add - Virtual Hard Disk - Browse - Select
d:\VM\os.vhdx
The OS copies the files from the host driver store to the HostDriverStore directory in the guest when the adapter is initialized in the guest.
- Mount the VM’s VHDX. For example, to the disk f:.
- In the mounted VM, create a directory named f:\%windir%\system32\HostDriverStore\FileRepository.
- Replicate driver files from %windir%\system32\DriverStore in the host to the VM. There should be f:\%windir%\system32\HostDriverStore\FileRepository\YourDriverDirectory\* in the VM.
If the driver needs to access files from
%windir%\system32or%windir%\syswow64, manually copy the files to the VM.Enable test signing in the VM if the drivers aren't Microsoft signed. In the CMD admin window, run the following command:
bcdedit /store <VM drive>:\EFI\Microsoft\Boot\BCD -set {bootmgr} testsigning onDismount the VM's VHDX.
Start the VM.
Connect to the VM using the Hyper-V manager Connect option.
INSIDE THE VM
Check that there's a Virtual Render Device in the VM's device manager. All rendering inside the VM goes through virtual GPU.
PowerShell script to set up a VM
The following PowerShell script is an example of how to set up a VM from scratch. Modify it to suit your needs.
Param(
   [string]$VMName,
   [string]$VHDPath,
   [string]$SwitchName,
   [switch]$CreateVm,
   [switch]$InitDebug,
   [switch]$CopyRegistry,
   [switch]$CopyDriverStore,
   [switch]$CreateSwitch,
   [switch]$AddGpu,
   [switch]$All
)

if($All)
{
   $CreateVm = $True
   $CreateInitDebug = $True
   $CopyRegistry = $True
   $CopyDriverStore = $True
   $CreateSwitch = $True
   $AddGpu = $True
   $InitDebug = $True
}

   $vm = $VMName

#
# Validate parameters
#
if ($CreateSwitch -or $CreateVM)
{
    if ($SwitchName -eq "")
    {
        write "SwitchName is not set"
        exit
    }
}

if ($AddGpu -or $CreateVM)
{
    if ($VMName -eq "")
    {
        write "VMName is not set"
        exit
    }
}

if ($InitDebug -or $CreateVM -or $CopyDriverStore -or $CopyRegistry)
{
    if ($VHDPath -eq "")
    {
        write "VHDPath is not set"
        exit
    }
}

enable-windowsoptionalfeature -FeatureName Microsoft-Hyper-V-All -online

#
# Create a network switch for the VM
#
if ($CreateSwitch)
{
    New-VMSwitch $SwitchName -NetAdapterName "Ethernet (Kernel Debugger)"
}

#
# Create a VM and assign VHD to it
#
if ($CreateVm)
{
   New-VM -VMName $vm -Generation 2
   Set-VM -GuestControlledCacheTypes $true -VMName $vm


Set-VM -LowMemoryMappedIoSpace 1Gb -VMName $vm
   Set-VM -HighMemoryMappedIoSpace 32GB -VMName $vm
   Set-VMProcessor -VMname $vm -count 4
   Set-VMMemory -VMName $vm -DynamicMemoryEnabled $true -MinimumBytes 1024MB -MaximumBytes 4096MB -StartupBytes 1024MB -Buffer 20
   Add-VMHardDiskDrive -VMName $vm -Path $VHDPath
   Connect-VMNetworkAdapter -VMName $vm -Name "Network Adapter" -SwitchName $SwitchName
   Set-VMFirmware -VMName $vm -EnableSecureBoot off
   Set-VMFirmware -VMName $vm -FirstBootDevice (Get-VMHardDiskDrive -VMName $vm)
}

#
# Enable debugger and testsiging
#
if ($InitDebug)

```powershell
{
   Mount-vhd $VHDPath
   Add-PartitionAccessPath  -DiskNumber (Get-DiskImage -ImagePath $VHDPath | Get-Disk).Number -PartitionNumber 1 -AssignDriveLetter
   $efidrive = (Get-DiskImage -ImagePath $VHDPath | Get-Disk | Get-Partition -PartitionNumber 1).DriveLetter
   bcdedit /store ${efidrive}:\EFI\Microsoft\Boot\BCD -set '{bootmgr}' testsigning on
   bcdedit /store ${efidrive}:\EFI\Microsoft\Boot\BCD -set '{default}' debug on
   bcdedit /store ${efidrive}:\EFI\Microsoft\Boot\BCD /dbgsettings net port:50052 key:a.b.c.d hostip:10.131.18.133
   Dismount-VHD $VHDPath
}

#

# Now boot the VM without vGPU to verify that it's initialized correctly
# If everything is OK, turn off the VM
#
if ($CreateVm)
{
   Write-Output "Boot the VM and turn it OFF after it's initialized"
   pause
}

#
# Add virtual GPU
#
if($AddGpu)
{
   Add-VMGpuPartitionAdapter -VMName $vm
   Get-VMGpuPartitionAdapter -VMName $vm
}

#
# Copy the driver store to the VM
#
if ($CopyDriverStore)
{
   Write "Copying driver store"
   Mount-vhd $VHDPath
   $drive = (Get-DiskImage -ImagePath $VHDPath | Get-Disk | Get-Partition -PartitionNumber 3).DriveLetter
   xcopy /s $Env:windir\system32\driverstore\* ${drive}:\windows\system32\hostdriverstore\


Dismount-VHD $VHDPath
}

#
# Export driver registry settings
#
if ($CopyRegistry)
{
   Write "Copying registry"
   Mount-vhd $VHDPath
   $drive = (Get-DiskImage -ImagePath $VHDPath | Get-Disk | Get-Partition -PartitionNumber 3).DriveLetter
   reg load HKLM\VMSettings ${drive}:\Windows\System32\config\SYSTEM
   reg copy "HKLM\System\CurrentControlSet\Control\Class\{4d36e968-e325-11ce-bfc1-08002be10318}\0000" "HKLM\VmSettings\CurrentControlSet\Control\Class\{4d36e968-e325-11ce-bfc1-08002be10318}\0000" /s /f
   reg unload "HKLM\VmSettings"
   Dismount-VHD $VHDPath
}
Debugging the VM
Configure the VM debugger the same way as network debugging on a regular client machine.
If the VM doesn't start or you see a black screen:
Turn off the VM and remove the virtual GPU from it using the following commands:
$vm = “TEST“
remove-VMGpuPartitionAdapter  -VMName $vm -AdapterId “<Id from Get-VMGpuPartitionAdapter>”
For example:
remove-VMGpuPartitionAdapter -VMName $vm -AdapterId “Microsoft:9ABB95E2-D12D-43C3-B840-6F4A9CFB217B\929890BC-BB33-4687-BC1A-F72A4F1B3B3F”Start the VM. If it starts successfully, make sure the driver files are copied correctly to the HostDriverStore in the VM.
Add vGPU to the VM using the
Add-VMGpuPartitionAdaptercommand.Start the VM again.
See Troubleshooting for additional information.
Container setup
The difference between containers (also called Host Compute System (HCS) VMs) and the full VM is that the OS binaries and driver store files are mapped to the container. So, there's no need to copy the driver files to the container, unless they're needed in the windows\system32 directory.
For secure containers:
- Driver escapes are disabled.
- The driver must support IOMMU isolation to be enabled inside a secure container.
When you update the driver on the host and start or stop the host GPU, the changes are reflected in the container.
Windows Sandbox
This container type is used to try risky applications. The full desktop image is remoted to the host. The Indirect Display Driver is used for remoting. Graphics VAIL isn't used, so bringing the desktop image to the host is slow.
Virtual GPU is disabled by default in Windows Sandbox. To enable it, create a WSB configuration file (for example, config.wsb) and set the virtual GPU option. Start Sandbox by clicking the configuration file.
Configuration file example:
<Configuration>
    <VGpu>Enable</VGpu>
</Configuration>
By default, the vGPU in the container has driver escapes disabled. There's a configuration option to enable driver escapes. The following WSB file example enables both vGPU in Sandbox and driver escapes:
<Configuration>
    <VGpu>EnableVendorExtensions</VGpu>
</Configuration>
Windows Sandbox supports GPU adapter "hot plug".
Virtual Application Integrated Locally (VAIL) container
Use this container type to run Win32 applications inside a WCOS (Windows Core Operated System) based host. The image of each application in the container is remoted to the host. Graphics VAIL is enabled to remote each application swapchain. Driver escapes are enabled.
Common container requirements
Machine requirements are:
- Both Vtx and Vtd must be enabled in BIOS (or their equivalents: AMD-V, AMD-IOMMU).
- At least 8 GB of RAM.
- More than 5 GB of system disk space.
Setting up the kernel debugger for Windows Sandbox
Using CMDIAG
A Container Manager service (cmservice) controls Hyper-V isolated containers. CMDIAG.EXE is an application that's available when you install Hyper-V and Containers features. It enables kernel-mode debugging for containers, enables test signing, and more.
The Container Manager supports Serial and NET debugging.
Run cmdiag.exe Debug to see the options.
CMDIAG modifies debugger settings in the container base image. There should be only one instance of a container running when kernel debugger is enabled.
Stop the HVSICS service before changing the debugger settings.
# Example 1:

C:\Windows\system32>sc stop hvsics
SERVICE_NAME: HVSICS
        TYPE               : 30  WIN32
        STATE              : 3  STOP_PENDING
                                (STOPPABLE, NOT_PAUSABLE, IGNORES_SHUTDOWN)
        WIN32_EXIT_CODE    : 0  (0x0)
        SERVICE_EXIT_CODE  : 0  (0x0)
        CHECKPOINT         : 0x1
        WAIT_HINT          : 0xbb8

C:\Windows\system32>cmdiag debug -on -Serial  -Force
Debugging successfully enabled. Connection string: -k com:pipe,port=\\.\pipe\debugpipe,reconnect -v

# Example 2:

C:\Windows\system32>cmdiag debug -on -net -port 51000 -key a.b.c.d -hostip 10.131.18.34
Running the debugger on a different machine
When you use the serial debugger, you might want to run it on a different machine. Use kdsrv.exe to run the debugger on a different machine. For more information, see KD Connection Servers.
To disable time-outs during kernel debugging, set the following registry keys:
reg add "HKEY_LOCAL_MACHINE\SOFTWARE\Microsoft\Windows NT\CurrentVersion\Virtualization\Containers\UtilityVm" /v BridgeTransactionTimeout /t REG_DWORD /d 0xffffffff /f
reg add "HKEY_LOCAL_MACHINE\SOFTWARE\Microsoft\Windows NT\CurrentVersion\Virtualization\Containers\UtilityVm" /v BridgeServerConnectTimeout /t REG_DWORD /d 0xffffffff /f
reg add "HKLM\SOFTWARE\Microsoft\HVSI" /f /v DisableResetContainer /t REG_DWORD /d 1
reg add "HKLM\SOFTWARE\Microsoft\HVSI" /f /v AppLaunchTimeoutInSeconds /t REG_DWORD /d 0x7fffffff
reg add "HKLM\Software\Microsoft\Terminal Server Client" /f /v ConnectionHealthMonitoringSupported /t REG_DWORD /d 0

reg add "HKLM\Software\Microsoft\Terminal Server Client" /f /v DisableUDPTransport /t REG_DWORD /d 1
reg add "HKEY_CURRENT_USER\Software\Microsoft\Terminal Server Client" /f /v ConnectionHealthMonitoringSupported /t REG_DWORD /d 0
reg add "HKEY_CURRENT_USER\Software\Microsoft\Terminal Server Client" /f /v DisableUDPTransport /t REG_DWORD /d 1
Setting up the kernel debugger for VAIL container
- Connect to the host using telnet. You can obtain the IP address of the host from Network Settings in the host OS.
- Use
cmdiag.exeto configure the debugger.
Setting up the Hypervisor debugger
bcdedit /hypervisorsettings NET port:50000 key:a.b.c.d hostip:1.1.1.1
bcdedit /set {hypervisorsettings} hypervisorbusparams 0.0.0 (if needed)
bcdedit /set hypervisordebug on
reboot host
Troubleshooting
This section provides information on how to troubleshoot issues with GPU-PV.
Get-VMHostPartitionableGpu
Call Get-VMHostPartitionableGpu to see if there's a virtualized GPU. If the output is empty, there's an error somewhere (driver didn't set the virtualization cap, virtualization isn't enabled, etc.).
Get-VMHostPartitionableGpu

# Example output from running the command

Name                    : \\?\PCI#VEN_10DE&DEV_1188&SUBSYS_095B10DE&REV_A1#6&cfd27c8&0&00400008#{064092b3-625e-43bf-9eb5-dc845897dd59}\PARAV
ValidPartitionCounts    : {32, 4}
PartitionCount          : 32
TotalVRAM               : 2,000,000
AvailableVRAM           : 1,800,000
MinPartitionVRAM        : 100,000
MaxPartitionVRAM        : 1,000,000
OptimalPartitionVRAM    : 1,000,000
TotalEncode             : 20
AvailableEncode         : 20
MinPartitionEncode      : 1
MaxPartitionEncode      : 5
OptimalPartitionEncode  : 4
TotalDecode             : 40
AvailableDecode         : 30
MinPartitionDecode      : 2


MaxPartitionDecode      : 20
OptimalPartitionDecode  : 15
TotalCompute            : 100
AvailableCompute        : 100
MinPartitionCompute     : 1
MaxPartitionCompute     : 50
OptimalPartitionCompute : 30
CimSession              : CimSession: .
ComputerName            : WIN-T3H0LVHJJ59
IsDeleted               : False
Using ETW events
Dxgkrnl has Admin and Operational channels for ETW events. The events are shown in the Windows Event Viewer: Application and Services Log - Microsoft - Windows - Dxgkrnl.
Event Viewer has events from other components that participate in the creation of a VM with GPU-PV (Hyper-V-Compute, Hyper-V-Worker, Hyper-V-VID, etc.).
Using Add-VMGpuPartitionAdapter
When using Add-VMGpuPartitionAdapter, don't specify a capability (for example, decode) if it's not needed. Don't use 0 for this capability.
Using Remove-VMGpuPartitionAdapter
If a VM fails to start or has rendering issues, try to remove the virtual GPU from the VM using Remove-VMGpuPartitionAdapter.
remove-VMGpuPartitionAdapter -VMName $vm -AdapterId "Microsoft:9ABB95E2-D12D-43C3-B840-6F4A9CFB217B\929890BC-BB33-4687-BC1A-F72A4F1B3B3F"
Prevent VM start during boot
set-vm -AutomaticStartAction Nothing -VmName TEST
Event viewer events
Add events to the event viewer channel to help identify issues with vGPU startup. You can find the events in "Application and Services Logs\Microsoft\Windows\Dxgkrnl". The event channels are Admin and Operational.
Events are issued when:
- vGPU is created
- vGPU is destroyed
- The guest opens a virtual adapter
The event files are in:
- c:\Windows\System32\winevt\Logs\Microsoft-Windows-DxgKrnl-Admin.evtx
- c:\Windows\System32\winevt\Logs\Microsoft-Windows-DxgKrnl-Operational.evtx
Check if a vGPU was created and any errors.
Registry settings
GpuVirtualizationFlags
The GpuVirtualizationFlags registry key is used to set the behavior of paravirtualized GPUs. The key is located in:
DWORD HKLM\System\CurrentControlSet\Control\GraphicsDrivers\GpuVirtualizationFlags
The following bits are defined:
| Bit | Description |
|---|---|
| 0x1 | Force the ParavirtualizationSupported cap for all hardware adapters. Use this bit in the host. |
| 0x2 | Force the ParavirtualizationSupported cap for BasicRender. Use this bit in the host. |
| 0x4 | Force secure virtual machine mode, where all virtual machines will be treated as secure. In this mode, there are restrictions on the user-mode driver. For example, the driver can't use Escape calls, so they'll fail. Use this bit in the host. |
| 0x8 | Enable pairing of paravirtualized adapters with the display-only adapter. Use this bit in the guest VM. Pairing is enabled by default. |
GuestIoSpaceSizeInMb
The GuestIoSpaceSizeInMb registry key is used to set the size of the guest IO space for virtual GPUs, in megabytes. The default value is 1,000MB (1GB). The key is located at:
DWORD HKLM\System\CurrentControlSet\Control\GraphicsDrivers\Paravirtualization\GuestIoSpaceSizeInMb
The guest IO space currently implements CPU-visible allocations. A CPU-visible allocation backing store in the host is pinned in memory and mapped to the guest IO space. In the guest, the allocation user-mode virtual address is rotated to the IO space region. On some Haswell systems, the CPU has 36-bit physical addresses. Hyper-V on such systems has limited IO space size.
Disable IOMMU isolation for secure virtual machines
If a driver doesn't support IoMmu isolation, use the following registry setting during development to disable IoMmu isolation.
`DWORD HKLM\SYSTEM\CurrentControlSet\Control\GraphicsDrivers\IoMmuFlags = 8`
Limit the number of virtual functions
By default, the number of virtual functions exposed by an adapter that supports GPU paravirtualization is 32. This number means that the adapter can be added to 32 virtual machines, assuming each VM has one adapter.
You can use the following registry setting to limit the number of exposed virtual functions.
DWORD HKLM\SYSTEM\CurrentControlSet\Control\GraphicsDrivers\NumVirtualFunctions
For example, if you set NumVirtualFunctions to 1, the adapter can be added to only one GPU one time. This setting is useful when a computer has multiple GPU adapters that support GPU-PV and you want to assign each adapter to a VM. Add-VMGpuPartitionAdapter doesn't allow you to specify which adapter to add. So if two adapters are added to a VM, both could get the same GPU-PV adapter from the host.
WDDM 2.4 DDI updates
The following DDI updates are made to support GPU paravirtualization in WDDM 2.4.
Added DXGK_VIDMMCAPS cap
The ParavirtualizationSupported capability is added to the DXGK_VIDMMCAPS structure. The host KMD sets this cap if it implements all the DDIs described in this section.
Driver private data passed through DDI
The UMD uses various DDIs to exchange private information with its corresponding KMD. When the UMD runs in the guest VM, the corresponding KMD DDI call occurs in the host partition. Therefore, the UMD:
- Can't pass any pointers in the private data.
- Can't pass any handles in the private data.
- Shouldn't instruct the KMD to make global changes of the GPU state, as this change could affect other running VMs.
Added VirtualMachineProcess flag for DxgkDdiCreateProcess
The OS creates a VM worker process for each running VM. Dxgkrnl creates a corresponding DXGPROCESS and calls DxgkDdiCreateProcess with the VirtualMachineWorkerProcess flag set. There's no rendering or driver resource creation in this process context. So, the driver might skip allocating certain resources.
The OS creates a DXGPROCESS in the host for every process in a guest VM that uses a GPU. Dxgkrnl calls DxgkDdiCreateProcess with the VirtualMachineProcess flag set. Each VM DXG process belongs to the same EPROCESS as the VM worker process.
DxgkDdiQueryAdapterInfo updates
The DXGKARG_QUERYADAPTERINFO structure is updated to include the following fields for paravirtualization support:
The Flags member is added, which allows Dxgkrnl to indicate the following:
- It sets VirtualMachineData to indicate that the call comes from a VM.
- It sets SecureVirtualMachine to indicate that the VM runs in secure mode.
hKmdProcessHandle is added, which allows the driver to identify and use the correct process context on the host side when dealing with queries originating from a guest VM.
DxgkDdiEscape updates
The hKmdProcessHandle member is added to the DXGKARG_ESCAPE structure to allow the driver to identify and use the correct process context on the host side when dealing with escapes originating from a guest VM.
The VirtualMachineData flag is added to the D3DDDI_ESCAPEFLAGS structure to indicate that DxgkDdiEscape is called from a virtual machine.
Physical access to GPU allocations
Currently, the driver doesn't implement physical access to the allocations. The driver must support GpuMmu.
WDDM 2.5 DDI updates
For WDDM 2.5, the following DDI changes are also required for paravirtualization support.
Signaling guest events by the host KMD
There are scenarios that exist without virtualization when the KMD needs to signal an event created by a UMD. To handle such scenarios when paravirtualization is being used, the KMD on the host needs to signal an event created in the guest. The DxgkCbSignalEvent callback is added for this purpose. KMD can also use this callback to signal events of the host processes.
Support for UMD-provided handles in a VM
Certain driver callbacks accept a Dxgkrnl allocation or resource handle that the UMD passes, such as:
The calls on the host must be in the context of the same thread that called a DxgkDdiXxx function.
For example, assume that without virtualization, the KMD calls DxgkCbAcquireHandleData in the context of the user-mode thread that calls D3DKMTEscape, which calls DxgkDdiEscape.
When UMD runs in a virtual machine, it knows only the guest allocation handles and can't pass such handles to the KMD because KMD runs in the host. The UMD in the guest calls D3DKMTEscape and the KMD in the host receives the corresponding DxgkDdiEscape call. The KMD needs to call DxgkCbAcquireHandleData in the context of this thread.
In order to be able to translate the guest allocation/resource handle to the corresponding host handle, the D3DDDI_ESCAPEFLAGS::DriverKnownEscape driver escape flag is added.
When you call D3DKMTEscape with the DriverKnownEscape flag set:
Set D3DKMT_ESCAPE::Type to D3DKMT_ESCAPE_DRIVERPRIVATE.
Set D3DKMT_ESCAPE::pPrivateDriverData to point to a known driver escape structure, defined in the following section. Each structure starts with a D3DDDI_DRIVERESCAPETYPE value.
When virtualization isn't used, the translated handle is the same as the input handle.
The following known driver escapes are defined.
The following code snippet shows how to use the DriverKnownEscape flag.
D3DDDI_DRIVERESCAPE_TRANSLATEALLOCATIONEHANDLE Command = {};
    Command.EscapeType = D3DDDI_DRIVERESCAPETYPE_TRANSLATEALLOCATIONHANDLE;
    Command.hAllocation = hAlloc;
    D3DKMT_ESCAPE Args = {};
    Args.hAdapter = hAdapter;
    Args.Flags.DriverKnownEscape = TRUE;
    Args.Type = D3DKMT_ESCAPE_DRIVERPRIVATE;
    Args.pPrivateDriverData = &Command;
    Args.PrivateDriverDataSize = sizeof(Command);
    Status = D3DKMTEscape(&Args);
WDDM 2.6 DDI updates
Starting from WDDM 2.6 (Windows 10, version 1903), the following updates were made for paravirtualization support:
The driver can use the DXGK_ALLOCATIONINFOFLAGS::ACCESSEDPHYSICALLY flag in a virtual machine. Before WDDM 2.6, the driver couldn't use this flag in a virtual machine and allocation creation with this flag failed.
UMD can use Pfnd3dkmtUpdateallocationproperty in a virtual machine. Before WDDM 2.6, this call would fail.