View, compose and respond to email
Users can view, create, and send email faster with streamlined access that helps users compose, reply, and send emails using rich text editing and drag-and-drop attachment features and functionalities to embed images in emails.
Access and view emails
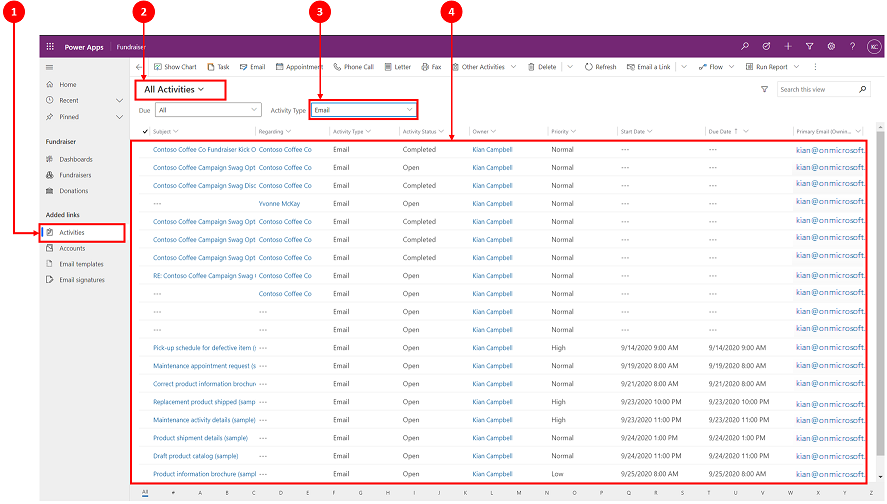 Legend
- Select Activities
- Select All Activities
- Under Activity Type select Email
- Email list appears in the screen below
Compose an email
Email capabilities, like rich-text editing and drag-and-drop or copy-and-paste images enriches customer interactions when composing email.
When enabled by your system administrator, you can access email from the top navigation bar.
Compose an email
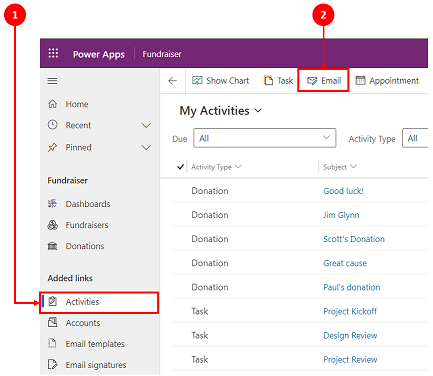
- Select Activities
- On the command bar, select Email. An email then opens in a new window where you can begin composing.
Anatomy of an email form
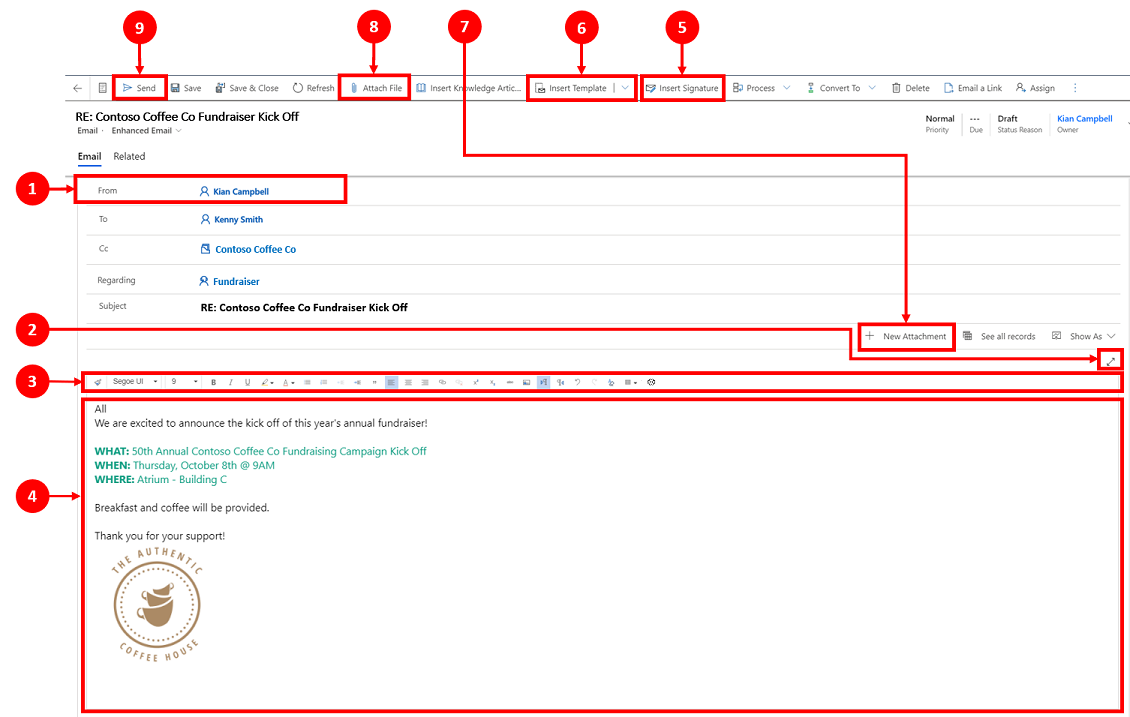
Legend
From. The name displayed in the From field is automatically populated based on the user who is currently signed in.
Expand. The Expand
 icon allows you to compose your email in a full-screen view and minimize when done.
Rich text editor. This tool bar helps you format emails. The editor is displayed as a single line that can be expanded to view the full list of editing features by default. For more information, see Use the rich text editor toolbar in email and Accessibility shortcuts for email. User Personalization. The
 icon allows you to set the default font and font size for your emails. Once set, the Font and Font Size display these values by default.
Body. The body is where you compose and/or reply to an email.
Insert Signature. Use this command to personalize your message.
Insert Template. This is used to apply an email template.
For more information, see Insert an email template.Note
The To box must contain a recipient to select a template.
New Attachment. This command is used to add a file to your email.
Attach File. This command uses the 'plus'
 icon functionality to add attachments.
Note
After you save your email, you can use Attach file and New Attachments interchangeably.
Send. Select this icon
 to Send your email when you are done.
Important
- The From and To fields are automatically populated based on the user and the account and contact of the original record.
Reply to an email
The way you can reply to an email depends on where you are in your app.
When enabled by your system administrator, the email option displays in the top navigation bar and in the activities command bar.
Note
The best performance is achieved when the HTML content size is 1 MB or less. When your HTML content size exceeds 1 MB, you might notice slower response times for loading and editing content. By default, image content is referenced from the content HTML but isn't stored as part of the HTML content, so in the default configuration, images don't negatively impact performance.
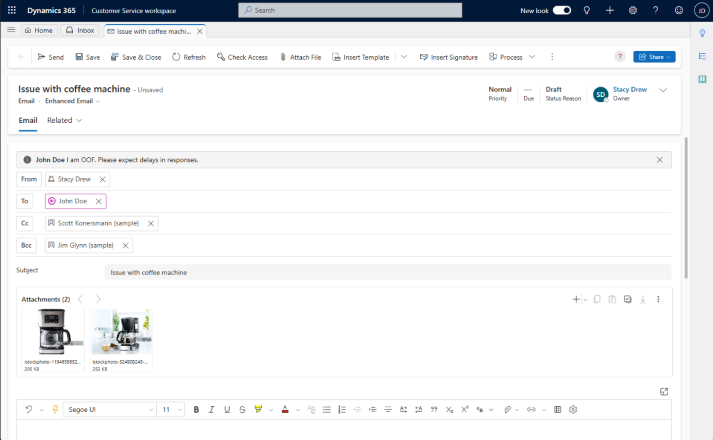
Enhanced recipient handling
Users can perform the following actions only if the administrator has added the Email Recipient control component to an email form:
Drag and drop recipient names across To, CC, and BCC fields.
View the recipient's email address along with their names.
View the recipients' presence status and out-of-office messages.
Resolve an unresolved email address faster. In the email editor, if there's an unresolved email address, the application displays a banner message and the Review option to map the email. Select the button to view and map an unresolved email address to an existing record.
Note
You can't resolve an unresolved email address for a read-only email.
Access email
When accessing email, there are a couple of options you can use.
Option 1:

- Select Email on the command bar.
Note
Email option will only appear in the drop-down list and the command bar when enabled by your system administrator.
Option 2:
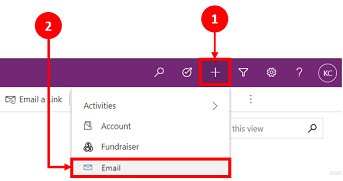
- From the navigation bar, select the plus
 icon.
icon. - Select Email from the drop-down menu.
- From the navigation bar, select the plus
Set the default font and font size
You can set the default font and font size for your email text. Perform the following steps:
- In the email editor, in the Rich text editor tool bar, select
 .
. - In User Personalization specify the Font and Font Size.
- Select Ok. The application defaults the values specified in the Font and Font Size fields of the rich text editor toolbar.
If your administrator has set default font and font size, the application displays the set values in the Font and Font Size fields of the rich text editor toolbar.
Reply to email in timeline
When replying to emails in Timeline, the command bar in the top-right corner provides you with reply options. When you select an option, your email automatically is set and opens in that state ready for you to begin your message.
You can use the following command options when working with emails in the timeline.

- Reply. Use this command to reply directly the sender of the email you received.
- Reply All. Use this command to reply to everyone on an email you received.
- Forward. Use this command to forward the email to someone else.
Download email
Select Download to download emails as a .eml file.