Deploy Financial document analysis skill for agents
Important
This is a preview feature. This information relates to a prerelease feature that may be substantially modified before it's released. Microsoft makes no warranties, expressed or implied, with respect to the information provided here.
This section provides information on installing the app from the Azure Marketplace. After the installation is complete, and the documents are ingested, you can use the Inference API to query your financial dataset.
Important
Ensure that you complete the prerequisites before proceeding with the deployment.
Sign in to this Azure portal page.
Select Create.

Select the Basics tab.
a. Select an Azure subscription ID to deploy the solution template. You must have the Owner role on this subscription.
b. Select an existing empty resource group or create a new one. We recommend creating a new resource group for the app so that, if necessary, you can delete it in a single step.
c. Select the location, that is, the relevant Azure region.

Select the Identities tab to provide details for the App registration created earlier.


Enter details of the following fields:
- Application (Client) ID: The app registration client ID that you specified. You can access this value from the Overview page.

- OpenId Configuration URL: The value of the OpenID Connect metadata document. You can access the value from the Overview page by selecting App registration > Endpoints.

The following image shows the value of the list of endpoints, including OpenID Connect metadata document.

- API Manager Publisher Email: The email address to which the notification is sent when the API Manager is ready to use.
- Select the Resources tab and specify the different field values.

Enter details of the following fields:
Resource name: Select an existing Azure OpenAI resource for the app.
Chat completion model: Select the chat completion AI model needed for the ingestion process. The currently supported chat completion models are gpt-4o and gpt-4o-mini.
Embedding model: Select the embedding AI model needed for the ingestion process. The currently supported embedding models are text-embedding-ada-002, text-embedding-3-large, and text-embedding-3-small.
Note
To ensure quality, we recommend a minimum capacity of 100K TPM each for chat completion and embedding models in case of new OpenAI resource deployments.
Storage account selector: Select the account associated with the storage container that contains the source documents, for example, the analyst reports for ingestion.
Search service configurator: Select the value of the indexer schedule, which is the time interval during which the ingestion process is triggered.
- Select Review and Create.
Post-deployment steps
Having anonymous read enabled isn't a recommended practice. We recommend turning off Allow blob anonymous access in the configuration, because the app uses Role-based access control (RBAC) to control authorization.
We recommend using a storage account with network access limited to select virtual networks and IP addresses. Follow these steps to select the specific option for the storage account:
Sign in to the Azure portal page.
Navigate to your storage account, which serves as a data source.
Under Security + Networking, select Networking.
Under Firewalls and virtual networks, for Public network access, select Enabled from selected virtual networks and IP addresses.

Scroll down to Resource instances. Ensure that the Microsoft.CognitiveServices/accounts Resource type and cog-di-XXXX instance name appear.
Under Exceptions, ensure that you do not select any checkbox unless there is a specific need to provide network access.

- Select Save to apply your changes.
During the installation process, all the required resources except Azure AI Search gain network access to Azure OpenAI. To enable Azure AI Search to connect with Azure OpenAI for embedding processing, you need to configure a private endpoint connection and then disable the Azure OpenAI public network access. This setup ensures secure communication while limiting unnecessary network access. Follow these steps to complete the configuration:
Sign in to the Azure portal page.
Navigate to the search service within the newly created resource group.
Under Settings, select Networking.
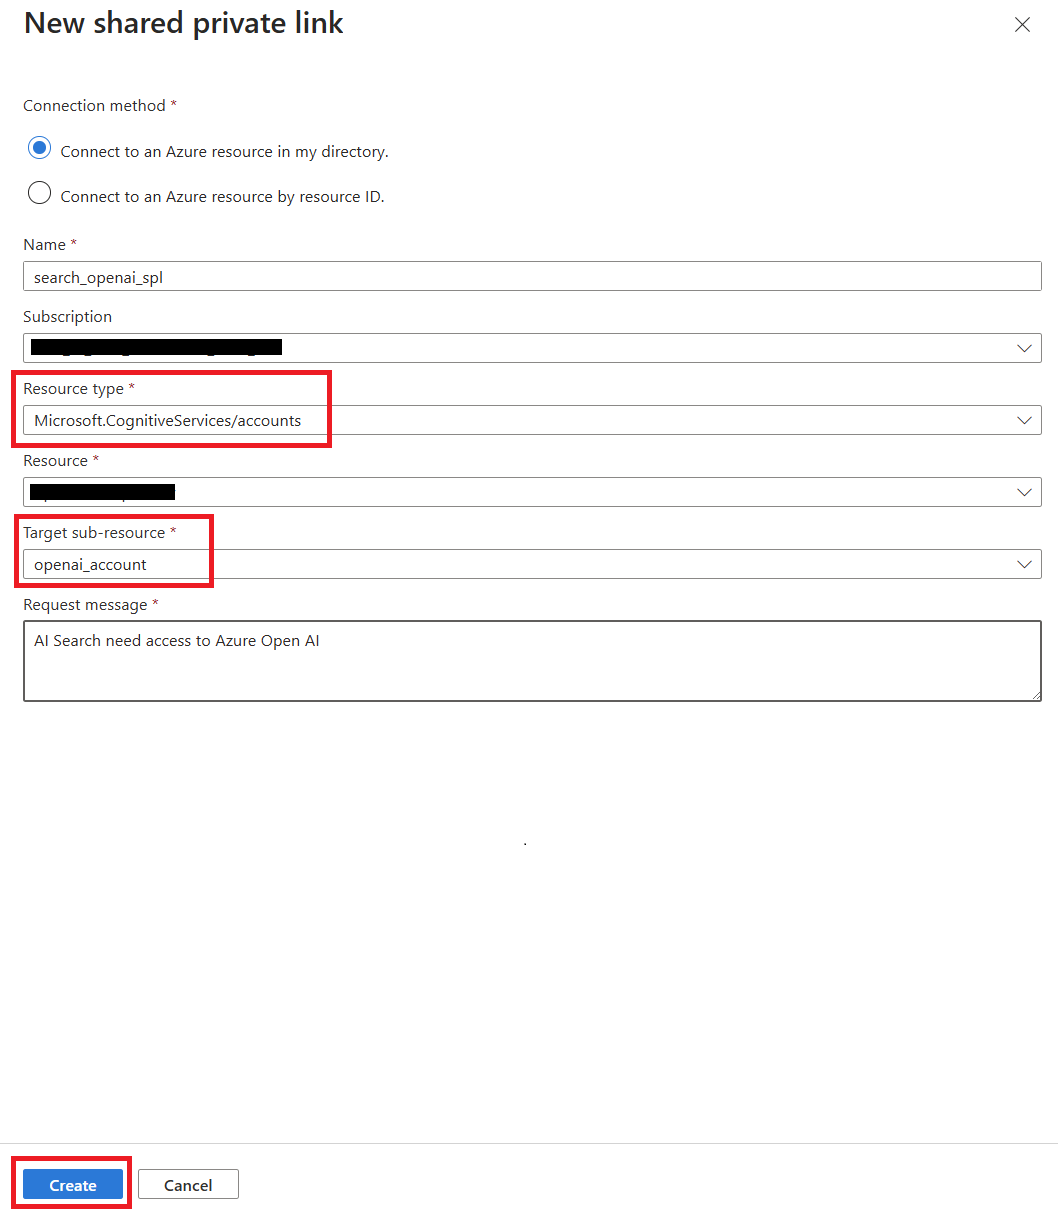
Under Shared private access, select Add shared private link.
Create a request for a private endpoint:
a. Enter a name for the private endpoint connection.
b. Select your subscription.
c. Select the Azure OpenAI resource type: Microsoft.CognitiveServices/accounts.
d. Select your Azure openAI resource.
e. Select the Azure OpenAI Target sub resource: openai_resource.
f. Enter the request message.
g. Select Create.
After creating the shared private link (the provisioning state is Succeeded), go to your Azure OpenAI resource, approve the request, and disable its network.
a. Navigate to your Azure OpenAI resource.
b. Under Resource Management, select Networking.
c. Under Private endpoint connections, you should see the created connection request. Select the connection request and then Approve.

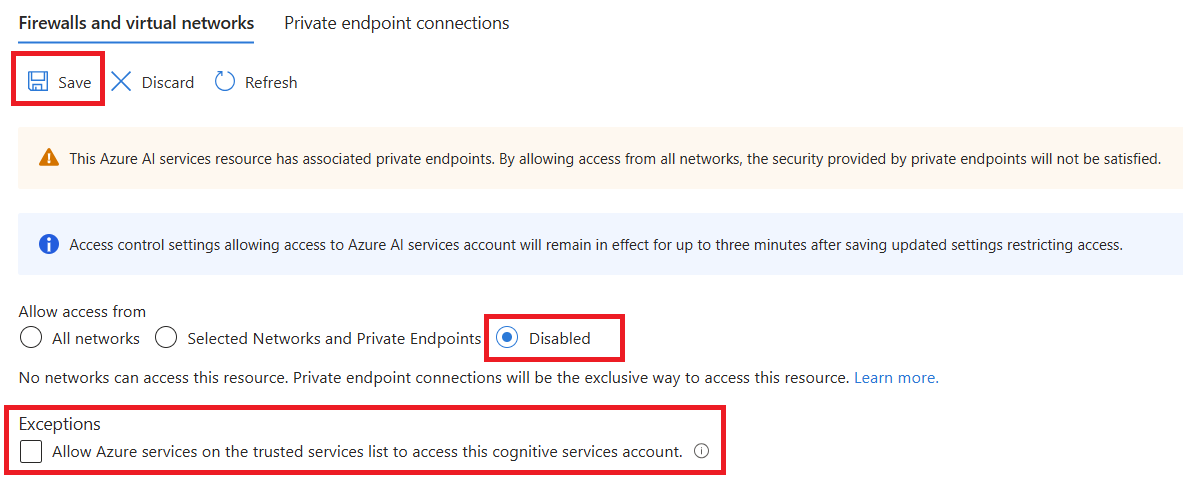
d. Under Firewalls and virtual networks in Allow access from, select Disabled.
e. Under Exceptions, ensure that the checkbox is cleared.
f. Select Save.