Configure work classification rulesets for unified routing
Applies to: Dynamics 365 Contact Center—embedded, Dynamics 365 Contact Center—standalone, and Dynamics 365 Customer Service
In unified routing, work classification lets you define rules to add detailed information to incoming work items that can be used to route and assign the work items optimally.
Typically, rules are written in the format of "if defined condition satisfies, then set the output attributes to certain values," but can also be surfaced through machine learning models. They're optional and can be used to add additional information to the incoming work items that are then used for more precise routing and assignment.
Work classification rules can be written by using the logical declarative decision list or by using machine learning models.
Important
You can create 10 rulesets per workstream, and for each ruleset, you can create up to 100 rule items.
Prerequisite
You need the CSR Manager or Omnichannel administrator role to configure the work classification rules for a workstream.
How classification rulesets work
A classification ruleset is an ordered list of multiple work classification rulesets and route-to-queue ruleset. During evaluation, the work classification rulesets are run first, followed by route-to-queue ruleset.
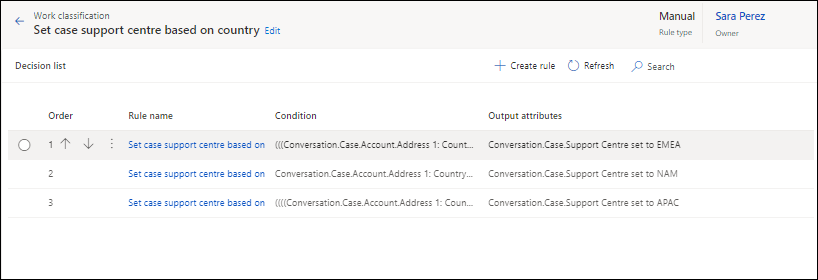
The work classification rulesets are run in the order they're listed. Within a ruleset, rule items are run in the order they're listed. When one of the rule item conditions matches, the output section of the rule item is run. The system evaluates the rules in the next ruleset if it's configured.
After all the work classification rulesets are run, the system evaluates the route-to-queue ruleset. All the rule items in the route-to-queues are run in the order they're listed. This is unlike the classification rules, where control passes to the next ruleset when one of the rule items in a ruleset condition matches.
In work classification rulesets, the values set in one of the rule items of a ruleset can be used in the next rulesets' rule items. For example: If in output section of one of the rule items of ruleset 1, priority is set to High; then any next ruleset rule item can use the priority variable and corresponding value "High" to set value for another attribute, such as, "If Priority equals High, set severity to critical".
For a rule item, you can set the output values for up to five attributes.
Create work classification rulesets
Logical classification rules are run to update work item attributes. They're written in the format of "if defined condition satisfies, then set the output attributes to certain values." You can create conditions to define rules based on multiple entity attributes. Routing rules are written as rulesets that consist of rule items.
To create a logical work classification ruleset, do the following steps:
In the Customer Service admin center app, select a workstream, and in the Routing rules area, for the Work classification (optional) option, select Create Ruleset.
On the Work classification page, select Create new, and in the Create work classification ruleset dialog, select Logical rules in Rule type, and enter a name and description. By default, the root record is selected and displayed at the top of the condition builder for ease of reference and visibility of the record for which you're creating the rule.
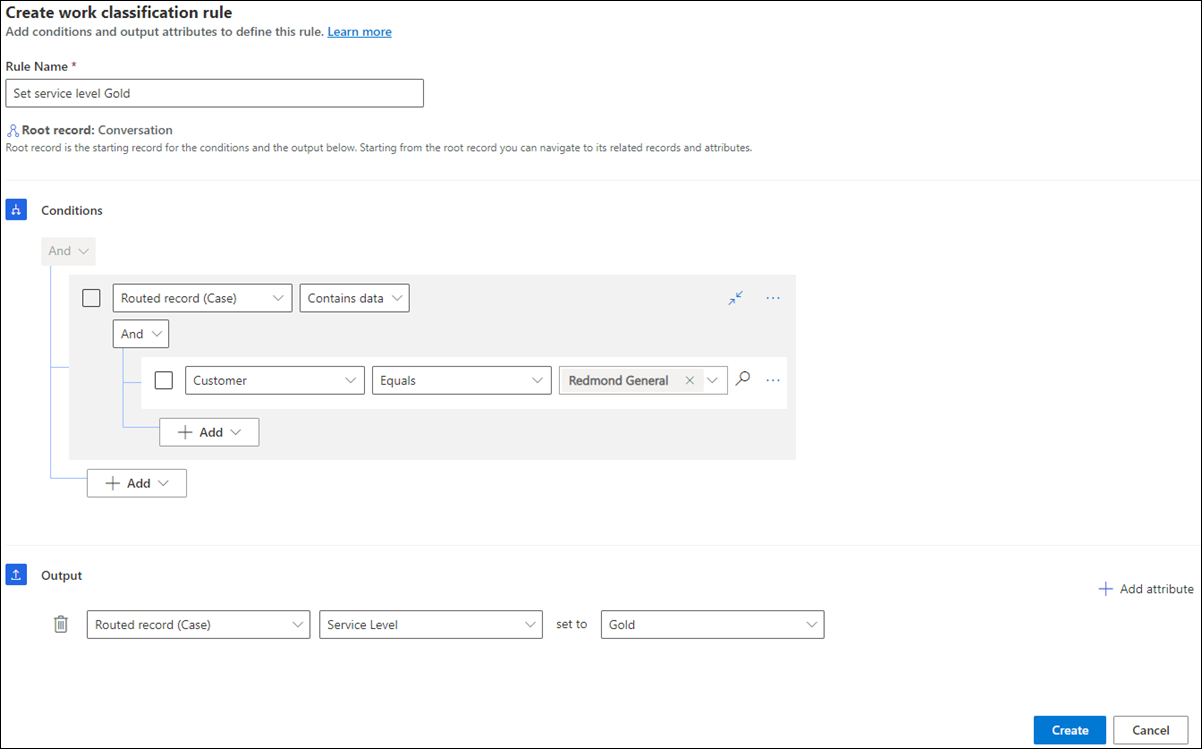
In the Decision list area, select Create Rule, and on the Create work classification rule dialog, enter a name.
In the Conditions area, define the conditions according to your business needs. If you're creating classification rules for records, then the top-level condition is automatically populated. You can define conditions for up to two levels of the related records and attributes.
In the Output area, select the attribute for which value needs to be set if the conditions are met.

Repeat steps 3 through 5 to create the demand rules.

Create logical skill classification rulesets
Skill attachment rules are a subtype of logical work classification rules and are defined to attach skills to the work item. They're written in the format of "if defined condition satisfies, then attach defined skills to the work item."
Follow these steps to create a logical skill classification ruleset:
For the selected workstream, in the Routing rules area, for the Work classification (optional) option, select Create Ruleset.
On the Work classification page, select Create new.
In the Create work classification ruleset dialog, select Logical rule in Rule type, and enter a name and description.
Select Create Rule, and on the Create work classification rule dialog, enter a name.
In the Conditions area, define the conditions as per your business needs:
- Select Add row, and select Skills from the list box.
- Select the required operator, and then select the skills for the condition.
- Repeat the steps to define any other conditions.
In the Output area, select the attribute whose value is set if the conditions are met.
If you want to set up the skill attribute, in the Conditions area, define the conditions, and select the required value in the Output area for the skill that needs to be set.
Note
- Ensure that the rating model that you choose for a skill in the work classification rule is same as the rating model that's defined for the skill attached to the customer service representative (service representative or representative). Also, ensure that you don't attach the same skill with two different rating models. For one skill, if you use different rating models in the conversation and for the service representative, or in the same conversation, assignment won't work as expected.
- When you reroute a work item, new skills are appended to the existing ones if any.
Create classification rulesets based on capacity profiles
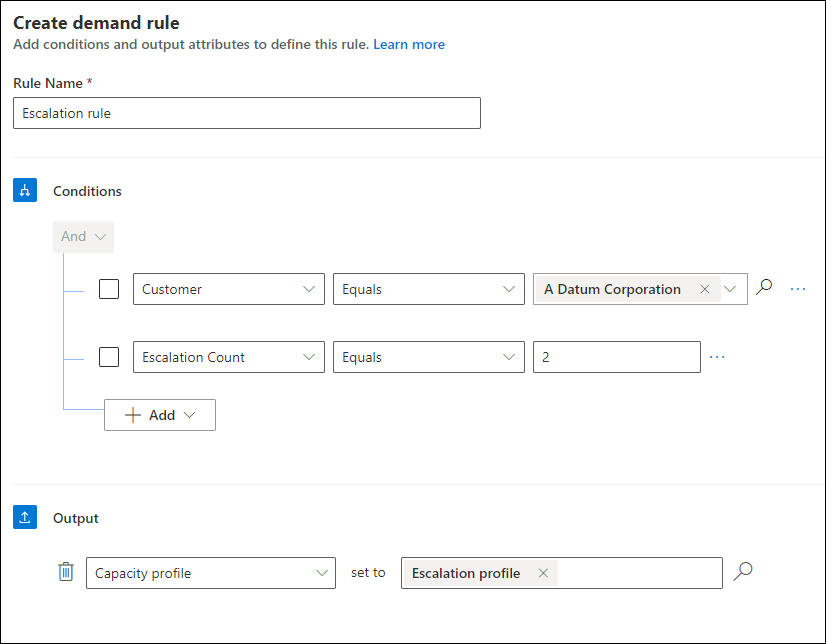
Create work classification rulesets that are based on capacity profiles to route work items to representatives based on capacity.
- Perform the steps 1 through 5 in Create logical skill classification rulesets.
- In the Output area, select Capacity profile, and choose a capacity profile whose value should be set if the conditions are met.

Create machine learning-based skill classification rulesets
Machine learning model-based rules are a subtype of work classification rules, and are rules defined to attach skills to the work item using the AI Builder text classification machine learning model created as part of the intelligent skill finder bootstrapping experience. They're written in the format of "send work item selected attributes to the published model and attach the returned tags from the model as skills on the work item."
To configure a skill classification ruleset by using the machine learning option, you must have configured the intelligent skill finder models. Learn more in Set up intelligent skill finder model.
Do the following to configure a machine learning-based ruleset:
In Customer Service admin center, select a workstream, and in the Routing rules area, for the Work classification (optional) option, select Create Ruleset or See more.
On the Work classification page, select Create new.
In the Create work classification ruleset dialog, select Rule Type as Machine learning model, and enter a name and description.
Select a model in the Select skill identification model list, and select Create.
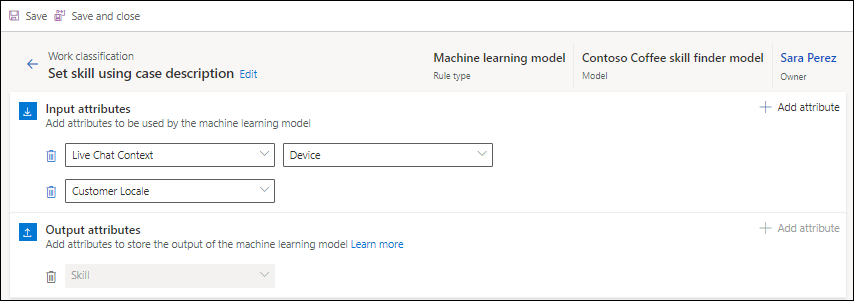
On the page that appears, in the Input attributes area, select Add attribute, and select the attributes from the Attributes or Related Entities category. For an incoming work item, these attribute values are concatenated to the machine learning model for skill prediction.
Note
Skill is the default selection for output attributes and can't be edited or deleted.

Create rulesets based on sentiment prediction model (preview)
Important
This section is pre-release documentation and is subject to change.
You can create rules that are based on the sentiment prediction model to classify work items. Learn more in Use sentiment prediction.
Create rulesets based on effort estimation model (preview)
Important
This section is pre-release documentation and is subject to change.
You can create rules that are based on the effort estimation model to classify work items. Learn more in Use effort estimation.
Options available for rulesets
After you create the rules, you can change the order in which the rules should be evaluated, search for rules, and view the condition that's been used for each rule by hovering the mouse over the condition. You can also create copies of the rules and update only the necessary information to avoid writing the conditions from scratch. You can hover the mouse over a condition to view it without having to navigate to each condition.

Related information
Create a workstream for unified routing
Set up record routing