Use effort estimation model in unified routing (preview)
Applies to: Dynamics 365 Contact Center—embedded, Dynamics 365 Contact Center—standalone, and Dynamics 365 Customer Service
You can use the effort estimation model to classify and route work items.
You can use the estimation technique to understand how much time it will take to address a work item, and based on that estimation, route it to the customer service representative (service representative or representative) who has the bandwidth to manage it.
Effort can be defined as the length of time that's necessary to either resolve a work item or amount of time spent on a work item before it is moved to the next stage as defined by the organization.
Some examples of how effort can be defined are as follows:
Estimate time for a service representative to respond to a customer response through email and assign accordingly
Estimate time for a representative analysis and assign accordingly
Estimate time for a full case resolution and assign accordingly
[This article is prerelease documentation and is subject to change.]
Important
- This is a preview feature.
- Preview features aren’t meant for production use and might have restricted functionality. These features are available before an official release so that customers can get early access and provide feedback.
Create effort estimation models
You can create the effort estimation models for any record that is enabled for unified routing. You can provide the context to the model for training by selecting the attributes. At least two attributes are mandatory, and you can specify up to 10 attributes. Attributes that indicate severity and priority are useful.
In the Customer Service admin center site map, select Routing. The Routing page appears.
Select Manage for Effort-based routing.
On the page that appears, select New.
On the New effort estimation model page, do the following:
Name: Enter a name for the model.
In Data summary, select the record, such as Issue (Case), for which you want to create the model.
In the Attributes section, select values for the Categorical description and Detailed description fields. You can add up to 10 attributes to be used to train the model.
In Actual effort calculation, select one of the following options to determine the time to address an incoming work item:
- Single duration field: Select a single work item attribute where time is captured and the time unit.
- Calculated duration: Select values to indicate the start and end times that define effort.
- SLA KPI instance: Use the SLA KPI instance to calculate the effort. This option enables users to use SLAs as the effort definition where the timestamps that are captured when a work item that meets its SLA success criteria serves as the effort definition.
Optionally, define the filter conditions to select only relevant records.
Optionally, select the date range for the records to be fetched.
Review and save the model.
Select Train AI Model. The Training tab displays the status of the training, which could take a couple of hours and depends on the conditions used. After the model is trained, the Model published successfully message appears on the page.

Optionally, use Dry run and select an input value to test the model. The following details are available:
- Effort value (minutes): The time in minutes that is estimated for the work item to be addressed.
- Confidence score: The degree of confidence in a percentage value of the effort prediction.
Performance grade
The performance grade of the model is indicated by A, B, C, D, E, or F. The letters indicate the quality of the model in the descending order. Learn more in Prediction models performance.
Create classification rules based on effort estimation model
After you train the effort estimation models, you can create classification rules based on the models and use the rules with other rules to help categorize the work items to be routed to the right representatives who will help with the issues.
Create or edit a workstream. Learn more in Create workstreams.
Go to the Work classification (optional) section to create a classification rule. Learn more in Configure work classification rulesets.
In the Create work classification ruleset dialog, select the rule type as Machine learning model, and then select type as Effort estimation.
In Select effort estimation model, select the model that you want to use for the prediction, and select Create.
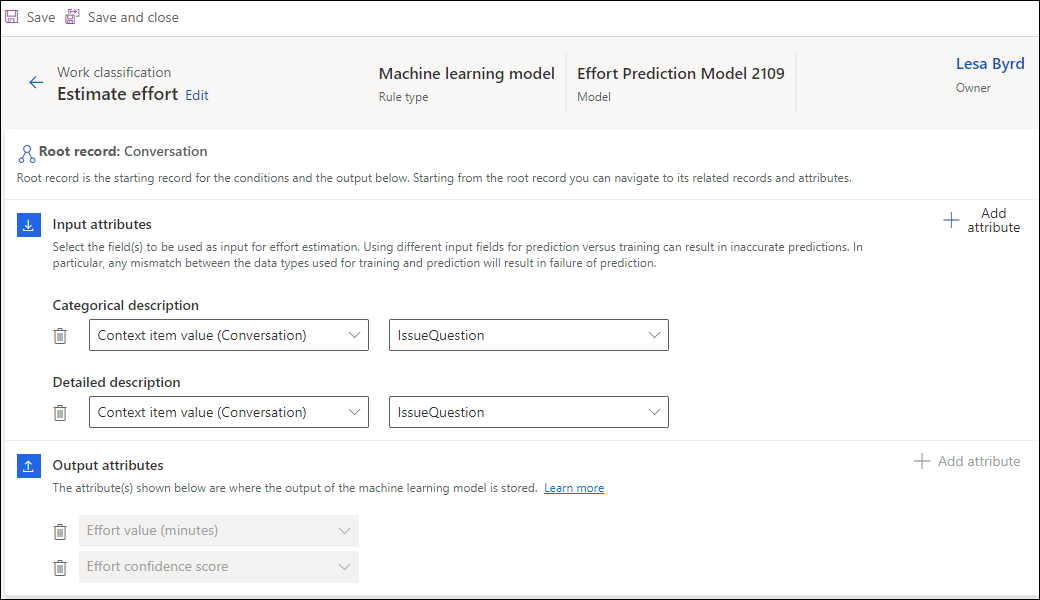
On the page that appears, select the input attributes to use for effort estimation. While you can use up to 10 attributes, the Categorical description and Detailed description fields are mandatory. By default, the output attributes are Effort value (minutes) and Effort confidence score and can't be edited.
For the messaging channels, the bot context variables should be set or a pre-conversation survey must be set up to be able to use the input attributes.

Note
You can have only one effort estimation rule per workstream.
Create route-to-queue rules
Create the route-to-queue rules based on the effort estimation.
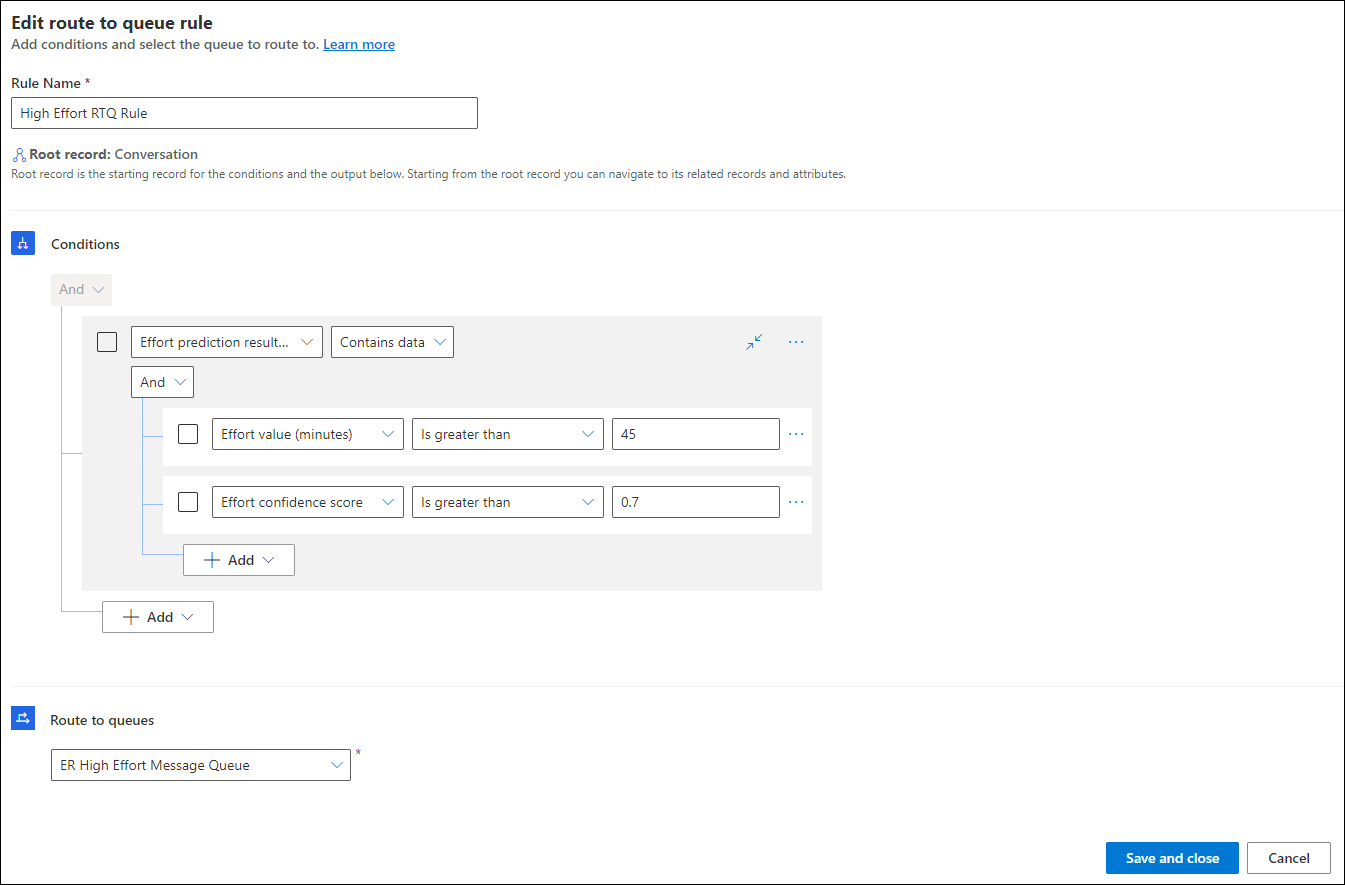
For the workstream in which you created the rule based on effort estimation, in Routing rules, select Create ruleset or See more for Route to queues to create a rule. Learn more in Configure route-to-queues rulesets and rules.
Create a rule to define conditions and select the queue to which the work items need to be assigned when the conditions are met.

Use diagnostics to analyze the efficacy of effort estimation models
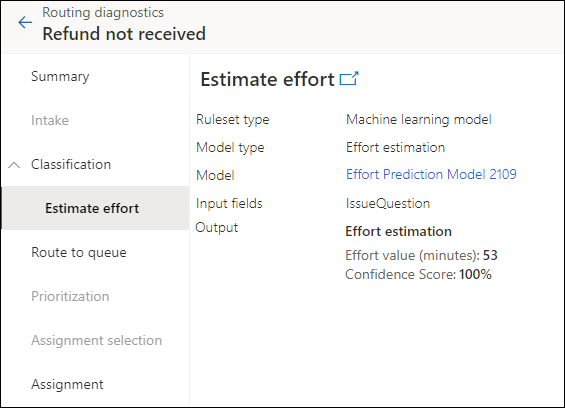
Routing diagnostics help you see how the work items have been classified and routed after you've configured the rules.
You can view how the effort estimation model was used to route a work item.

Language support for effort estimation models
Effort estimate-based routing is supported only in the following languages:
- Arabic
- Danish
- Dutch
- English
- French
- German
- Italian
- Japanese
- Spanish