What's new in .NET Aspire 9.0
📢 .NET Aspire 9.0 is the next major general availability (GA) release of .NET Aspire; it supports both:
- .NET 8.0 Long Term Support (LTS) or
- .NET 9.0 Standard Term Support (STS).
Note
You're able to use .NET Aspire 9.0 with either .NET 8 or .NET 9!
This release addresses some of the most highly requested features and pain points from the community. The best features are community-driven! To join the community on, visit us on
Discord to chat with team members and collaborate with us on

For more information on the official .NET version and .NET Aspire version support, see:
- .NET support policy: Definitions for LTS and STS.
- .NET Aspire support policy: Important unique product life cycle details.
Upgrade to .NET Aspire 9
To upgrade from earlier versions of .NET Aspire to .NET Aspire 9, follow the instructions in the official Upgrade to .NET Aspire 9 guide. The guide provides detailed instructions on how to upgrade your existing .NET Aspire solutions to .NET Aspire 9. Regardless of you're doing it manually, or using the Upgrade Assistant, the guide makes short work of the process.
Tooling improvements
.NET Aspire 9 makes it simpler to configure your environment to develop .NET Aspire applications. You no longer need a .NET workload. Instead, you install the new .NET Aspire SDK into the app host project of your .NET Aspire solutions. For more information, see .NET Aspire setup and tooling.
Templates have moved
.NET Aspire 9 is moving the contents that used to be installed via the workload into separate NuGet packages. This includes the templates for creating new .NET Aspire projects and solutions. These templates are installed using the dotnet new install command. These can be installed by running the following command:
dotnet new install Aspire.ProjectTemplates::9.0.0
Tip
If you already have the .NET Aspire workload installed, you need to pass the --force flag to overwrite the existing templates. Feel free to uninstall the .NET Aspire workload.
For more information, see .NET Aspire templates.
Dashboard UX enhancements and new interactivity features
The .NET Aspire dashboard continues to improve with each release.
Manage resource lifecycle
The most requested feature for the dashboard is to manage the life-cycles of your orchestrated named resources. Specifically, the ability to stop, start, and restart resources. This feature works for projects, containers, and executables. It enables restarting individual resources without having to restart the entire app host. For project resources, when the debugger is attached, it's reattached on restart. For more information, see .NET Aspire dashboard: Stop or Start a resource.
Mobile and responsive support
The .NET Aspire dashboard is now mobile-friendly, responsively adapting to a wide range of screen sizes and enabling on-the-go management of deployed .NET Aspire applications. Other accessibility improvements were made, including the display of settings and content overflow on mobile.
Sensitive properties, volumes, and health checks in resource details
The display of resource details contains several improvements:
Properties can be marked as sensitive, automatically masking them in the dashboard UI. This security feature helps to avoid accidentally disclosing keys or passwords when screen sharing the dashboard with other people. For example, container arguments could pass sensitive information and so are masked by default.
Configured container volumes are listed in resource details.
.NET Aspire 9 adds support for health checks. Detailed information about these checks can now be viewed in the resource details pane, showing why a resource might be marked as unhealthy or degraded. Find out more about health checks here.
Colorful console log
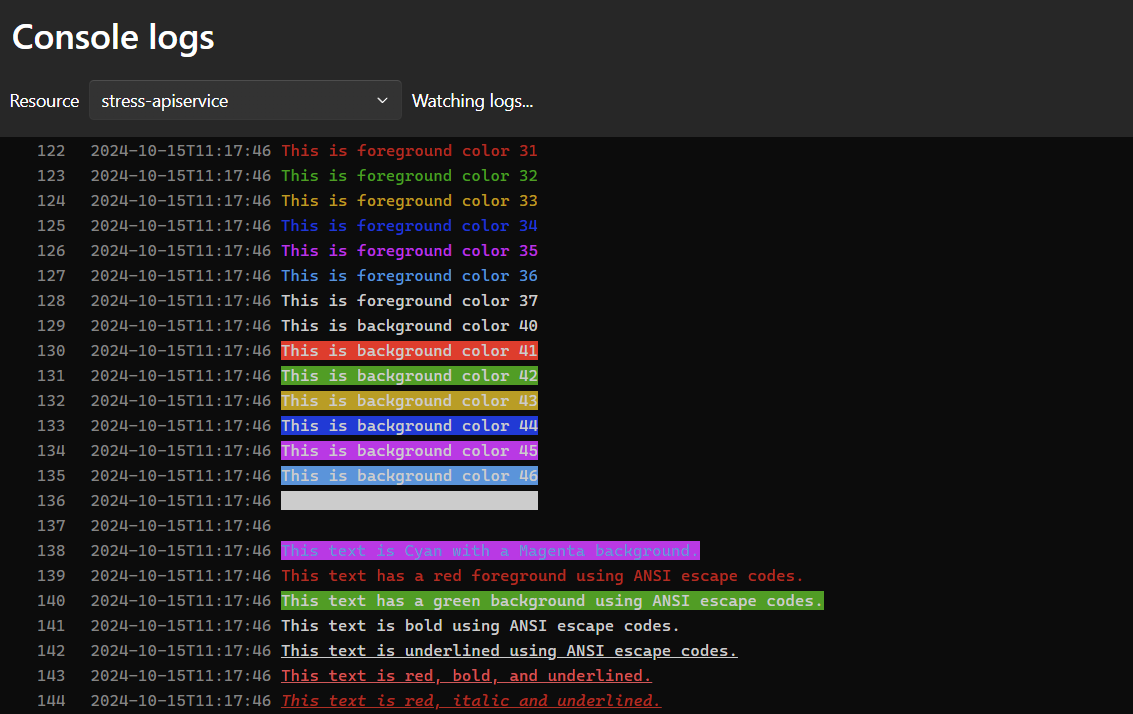
ANSI escape codes format text in terminals by controlling colors (foreground and background) and styles like bold, underline, and italics. Previously, the dashboard's console logs page could only render one ANSI escape code at a time, failing when multiple codes were combined. For example, it could display red text, but not text that was both red and bold.
A community contribution from @mangeg improved support for ANSI escape codes and removed this limitation.
Another improvement to console logs is hiding unsupported escape codes. Codes that aren't related to displaying text, such as positioning the cursor or communicating with the operating system don't make sense in this UI, and are hidden.
Telemetry user-centric additions
Telemetry remains a vital aspect of .NET Aspire. In .NET Aspire 9, many new features were introduced to the Telemetry service.
Improved telemetry filtering
Traces can be filtered with attribute values. For example, if you only want to view traces for one endpoint in your app, the http.route attribute on HTTP requests can be filtered to a specified value.
Telemetry filtering also supports autocomplete of existing values. The Add filter dialog provides a combo box for selecting from values that dashboard has available. This feature makes it much easier to filter to real data and helps avoid typos by entered a value yourself.
For more information, see .NET Aspire dashboard: Filter traces.
Combine telemetry from multiple resources
When a resource has multiple replicas, you can now filter telemetry to view data from all instances at once. Select the parent resource, labeled (application). For more information, see .NET Aspire dashboard: Combine telemetry from multiple resources.
Browser telemetry support
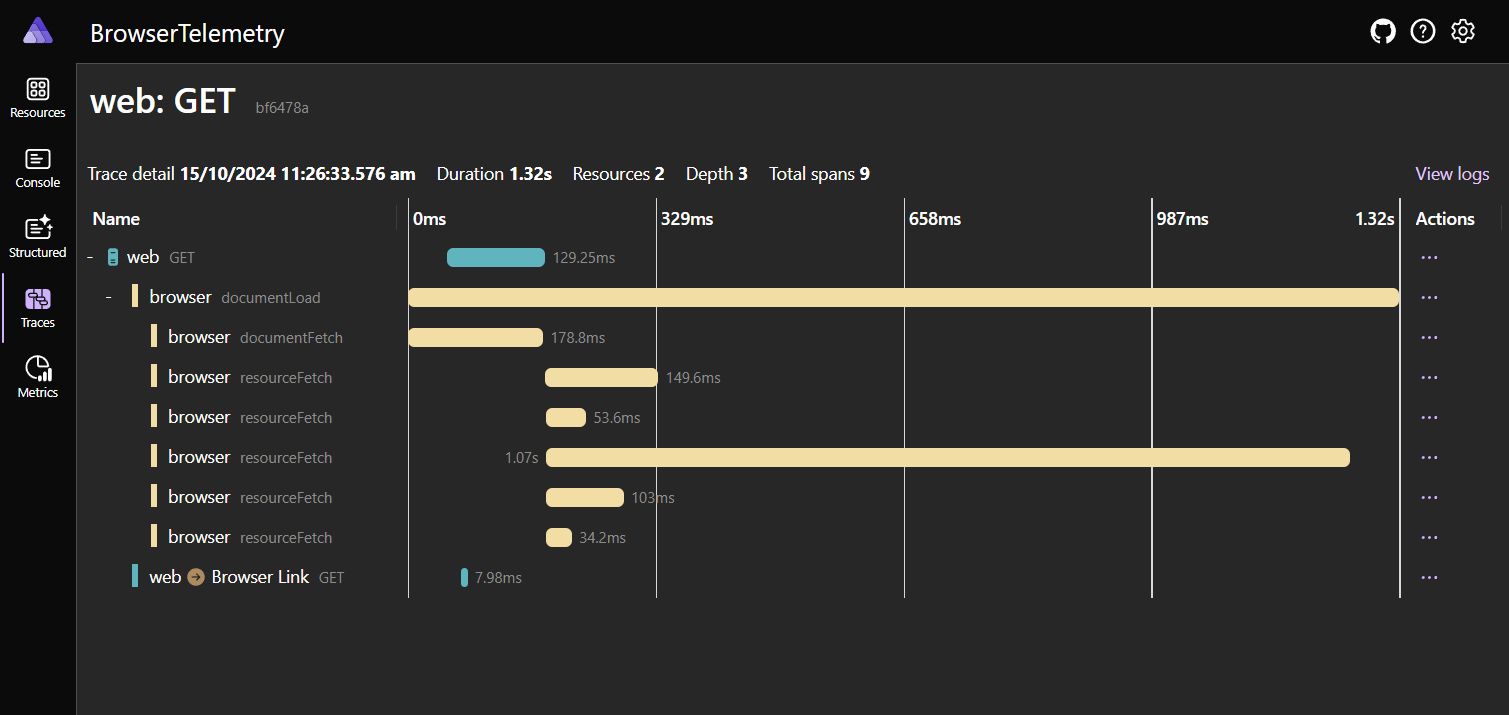
The dashboard supports OpenTelemetry Protocol (OTLP) over HTTP and cross-origin resource sharing (CORS). These features unlock the ability to send OpenTelemetry from browser apps to the .NET Aspire dashboard.
For example, a browser-based single page app (SPA) can configure the JavaScript OpenTelemetry SDK to send structured logs, traces, and metrics created in the browser to the dashboard. Browser telemetry is displayed alongside server telemetry.
For more information on configuring browser telemetry, see Enable browser telemetry documentation.
App Host (Orchestration)
The .NET Aspire app host is one of the most important features of .NET Aspire. In .NET Aspire 9, several new features were added specific to the app host.
Waiting for dependencies
If you've been following along with .NET Aspire, you already know that your app host project is where you define your app model. You create a distributed application builder, add and configure resources, and express their dependencies. Now, you can specify that a resource should wait for another resource before starting. This can help avoid connection errors during startup by only starting resources when their dependencies are "ready."
var builder = DistributedApplication.CreateBuilder(args);

var rabbit = builder.AddRabbitMQ("rabbit");

builder.AddProject<Projects.WebApplication1>("api")
       .WithReference(rabbit)
       .WaitFor(rabbit); // Don't start "api" until "rabbit" is ready...

builder.Build().Run();
When the app host starts, it waits for the rabbit resource to be ready before starting the api resource.
There are two methods exposed to wait for a resource:
- WaitFor: Wait for a resource to be ready before starting another resource.
- WaitForCompletion: Wait for a resource to complete before starting another resource.
For more information, see .NET Aspire app host: Waiting for resources.
Resource health checks
The WaitFor API uses standard .NET health checks to determine if a resource is ready. But what does "a resource being ready" mean? The best part is, that's configurable by the consumer beyond their default values.
When a resource doesn't expose any health checks (no health checks registered in the app), the app host waits for the resource to be in the Running state before starting the dependent resource.
For resources that expose HTTP endpoints, you can easily add a health check that polls a specific path for an HTTP 200 response.
var builder = DistributedApplication.CreateBuilder(args);

var catalogApi = builder.AddContainer("catalog-api", "catalog-api")
                        .WithHttpEndpoint(targetPort: 8080)
                        .WithHttpHealthCheck("/health");

builder.AddProject<Projects.WebApplication1>("store")
       .WithReference(catalogApi.GetEndpoint("http"))
       .WaitFor(catalogApi);

builder.Build().Run();
The preceding example adds a health check to the catalog-api resource. The app host waits for the health check to return a healthy status before starting the store resource. It determines that the resource is ready when the /health endpoint returns an HTTP 200 status code.
While store is waiting for catalog-api to become healthy, the resources in the dashboard appear as:
The app host's health check mechanism builds upon the IHealthChecksBuilder implementation from the Microsoft.Extensions.Diagnostics.HealthChecks namespace.
Health checks report data, which is displayed in the dashboard:
Creating a custom health check is straightforward. Start by defining the health check, then associate its name with any resources it applies to.
var builder = DistributedApplication.CreateBuilder(args);

var healthyAfter = DateTime.Now.AddSeconds(20);

builder.Services.AddHealthChecks().AddCheck(
    "delay20secs",
    () => DateTime.Now > healthyAfter
        ? HealthCheckResult.Healthy()
        : HealthCheckResult.Unhealthy()
    );

var cache = builder.AddRedis("cache")
                   .WithHealthCheck("delay20secs");

builder.AddProject<Projects.MyApp>("myapp")
       .WithReference(cache)
       .WaitFor(cache);
The preceding example adds a health check to the cache resource, which reports it as unhealthy for the first 20 seconds after the app host starts. So, the myapp resource waits for 20 seconds before starting, ensuring the cache resource is healthy.
The AddCheck and WithHealthCheck methods provide a simple mechanism to create health checks and associate them with specific resources.
Persistent containers
The app host now supports persistent containers. Persistent containers deviate from the typical container life cycle of .NET Aspire orchestrated apps. While they're created and started (when not already available) by the .NET Aspire orchestrator, they're not destroyed by .NET Aspire.
This is useful when you want to keep the container running even after the app host has stopped.
Important
To delete these containers, you must manually stop them using the container runtime.
To define an IResourceBuilder<ContainerResource> with a persistent lifetime, call the WithLifetime method and pass in ContainerLifetime.Persistent:
var builder = DistributedApplication.CreateBuilder(args);

var queue = builder.AddRabbitMQ("rabbit")
                   .WithLifetime(ContainerLifetime.Persistent);

builder.AddProject<Projects.WebApplication1>("api")
       .WithReference(queue)
       .WaitFor(queue);

builder.Build().Run();
The dashboard shows persistent containers with a pin icon:
After the app host is stopped, the container will continue to run:
The container persistence mechanism attempts to identify when you might wish to recreate the container. For example, if the environment for the container changes, then the container is restarted so that you don't need to manually stop the container if the input configuration for the resource has changed.
Resource commands
The app host supports adding custom commands to resources. This is useful when you want to add custom functionality that is not natively supported by the app host. There's likely many opportunities where exposing custom extension methods on resources will be useful. The .NET Aspire Community Toolkit might be a good place to share these extensions.
When you define a custom command, it's available in the dashboard as a user experience feature.
Important
These .NET Aspire dashboard commands are only available when running the dashboard locally. They're not available when running the dashboard in Azure Container Apps.
For more information on creating custom resource commands, see How-to: Create custom resource commands in .NET Aspire.
Container networking
The app host now adds all containers to a common network named default-aspire-network. This is useful when you want to communicate between containers without going through the host network. This also makes it easier to migrate from docker compose to the app host, as containers can communicate with each other using the container name.
Eventing model
The eventing model allows developers to hook into the lifecycle of the application and resources. This is useful for running custom code at specific points in the application lifecycle. There are various ways to subscribe to events, including global events and per-resource events.
Global events:
- BeforeStartEvent: An event that is triggered before the application starts. This is the last place that changes to the app model are observed. This runs in both "Run" and "Publish" modes. This is a blocking event, meaning that the application doesn't start until all handlers have completed.
- AfterResourcesCreatedEvent: An event that is triggered after the resources are created. This runs in Run mode only.
- AfterEndpointsAllocatedEvent: An event that is triggered after the endpoints are allocated for all resources. This runs in Run mode only.
The global events are analogous to the app host life cycle events. For more information, see App host life cycles.
Per-resource events:
- BeforeResourceStartedEvent: An event that is triggered before a single resource starts. This runs in Run mode only. This is a blocking event, meaning that the resource doesn't start until all handlers complete.
- ConnectionStringAvailableEvent: An event that is triggered when a connection string is available for a resource. This runs in Run mode only.
- ResourceReadyEvent: An event that is triggered when a resource is ready to be used. This runs in Run mode only.
For more information, see Eventing in .NET Aspire.
Integrations
.NET Aspire continues to add integrations that make it easy to get started with your favorite services and tools. For more information, see .NET Aspire integrations overview.
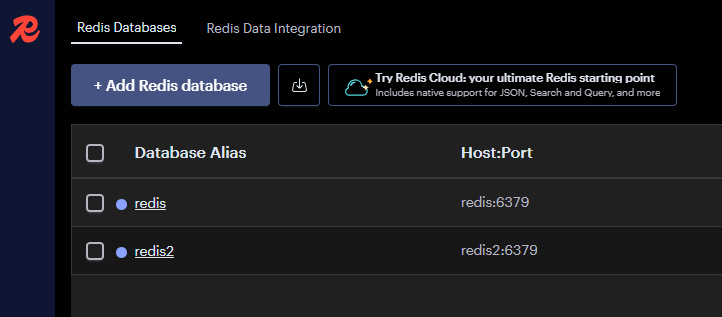
Redis Insight
Support for Redis Insights is available on a Redis resource:
var builder = DistributedApplication.CreateBuilder(args);

builder.AddRedis("redis")
       .WithRedisInsight(); // Starts a Redis Insight container image
                            // that is pre-configured to work with the
                            // Redis instance.
The WithRedisInsight extension method can be applied to multiple Redis resources and they'll each be visible on the Redis Insight dashboard.
For more information, see Add Redis resource with Redis Insights.
OpenAI (Preview)
Starting with .NET Aspire 9, an additional OpenAI integration is available which allows to use the latest official OpenAI dotnet library directly. The client integration registers the OpenAIClient as a singleton service in the service collection. The client can be used to interact with the OpenAI REST API.
Moreover, the already available .NET Aspire Azure OpenAI integration was improved to provide a flexible way to configure an OpenAIClient for either an Azure AI OpenAI service or a dedicated OpenAI REST API one with the new AddOpenAIClientFromConfiguration(IHostApplicationBuilder, String) builder method. The following example detects if the connection string is for an Azure AI OpenAI service and registers the most appropriate OpenAIClient instance automatically.
builder.AddOpenAIClientFromConfiguration("openai");
For instance, if the openai connection looked like Endpoint=https://{account}.azure.com;Key={key}; it would guess it can register an Azure AI OpenAI client because of the domain name. Otherwise a common OpenAIClient would be used.
Read Azure-agnostic client resolution for more details.
MongoDB
Added support for specifying the MongoDB username and password when using the AddMongoDB(IDistributedApplicationBuilder, String, Nullable<Int32>, IResourceBuilder<ParameterResource>, IResourceBuilder<ParameterResource>) extension method. If not specified, a random username and password is generated but can be manually specified using parameter resources.
var builder = DistributedApplication.CreateBuilder(args);

var username = builder.AddParameter("mongousername");
var password = builder.AddParameter("mongopassword", secret: true);

var db = builder.AddMongo("db", username, password);
Important Azure improvements
The following sections describe Azure improvements added in .NET Aspire 9. For a complete listing of all the breaking changes, see Breaking changes in .NET Aspire 9.
Azure resource customization
In .NET Aspire 8, customizing Azure resources were marked experimental because the underlying Azure.Provisioning libraries were new and gathering feedback before they could be marked stable. In .NET Aspire 9 these APIs were updated and removes the experimental attribute.
Azure Resource naming breaking change
As part of the update to the Azure.Provisioning libraries, the default naming scheme for Azure resources was updated with better support for various naming policies. However, this update resulted in a change to how resources are named. The new naming policy might result in the existing Azure resources being abandoned and new Azure resources being created, after updating your .NET Aspire application from 8 to 9. To keep using the same naming policies from .NET Aspire 8, you can add the following code to your AppHost Program.cs:
var builder = DistributedApplication.CreateBuilder(args);

builder.Services.Configure<AzureProvisioningOptions>(options =>
{
    options.ProvisioningBuildOptions.InfrastructureResolvers.Insert(0, new AspireV8ResourceNamePropertyResolver());
});
Azure SQL, PostgreSQL, and Redis Update
Azure SQL, PostgreSQL, and Redis resources are different than other Azure resources because there are local container resources for these technologies. In .NET Aspire 8, in order to create these Azure resources you needed to start with a local container resource and then either "As" or "PublishAs" it to an Azure resource. This design introduced problems and didn't fit with other APIs.
For example, you might have this code in .NET Aspire 8:
var builder = DistributedApplication.CreateBuilder(args);

var sql = builder.AddSqlServer("sql")
                 .PublishAsAzureSqlDatabase();

var pgsql = builder.AddPostgres("pgsql")
                   .PublishAsAzurePostgresFlexibleServer();

var cache = builder.AddRedis("cache")
                   .PublishAsAzureSqlDatabase();
In .NET Aspire 9 these APIs were marked as obsolete and a new API pattern implemented:
var builder = DistributedApplication.CreateBuilder(args);

var sql = builder.AddAzureSqlServer("sql")
                 .RunAsContainer();

var pgsql = builder.AddAzurePostgresFlexibleServer("pgsql")
                   .RunAsContainer();

var cache = builder.AddAzureRedis("cache")
                   .RunAsContainer();
Microsoft Entra ID by default
In order to make .NET Aspire applications more secure, Azure Database for PostgreSQL and Azure Cache for Redis resources were updated to use Microsoft Entra ID by default. This requires changes to applications that need to connect to these resources. See the following for updating applications to use Microsoft Entra ID to connect to these resources:
The following examples demonstrate how to configure your application to connect to the Azure resources using Microsoft Entra ID:
If you need to use password or access key authentication (not recommended), you can opt-in with the following code:
var builder = DistributedApplication.CreateBuilder(args);

var pgsql = builder.AddAzurePostgresFlexibleServer("pgsql")
                   .WithPasswordAuthentication();

var cache = builder.AddAzureRedis("cache")
                   .WithAccessKeyAuthentication();
Support for Azure Functions (Preview)
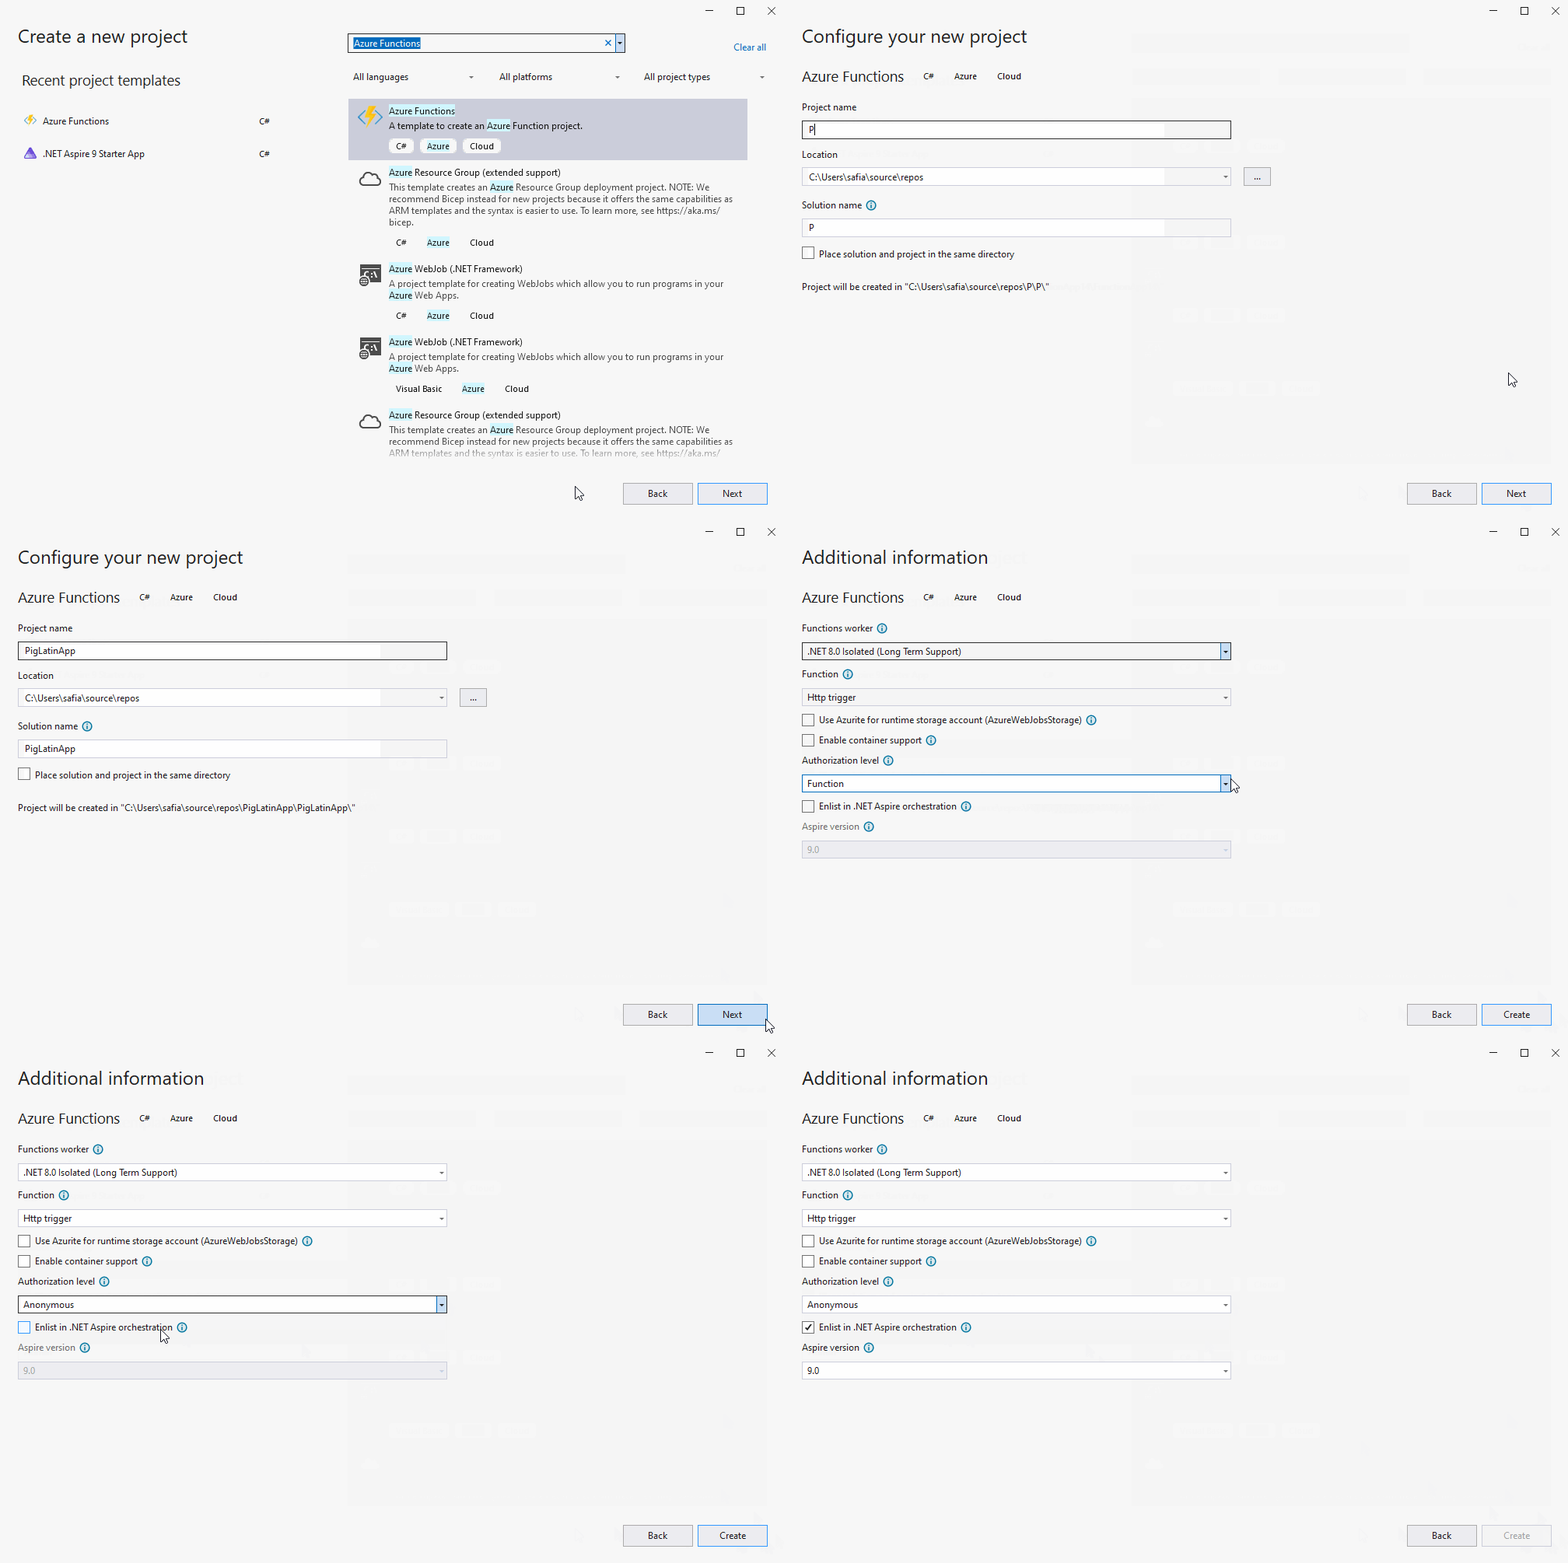
Support for Azure Functions is one of the most widely requested features on the .NET Aspire issue tracker and we're excited to introduce preview support for it in this release. To demonstrate this support, let's use .NET Aspire to create and deploy a webhook.
To get started, create a new Azure Functions project using the Visual Studio New Project dialog. When prompted, select the Enlist in Aspire orchestration checkbox when creating the project.
In the app host project, observe that there's a PackageReference to the new 📦 Aspire.Hosting.Azure.Functions NuGet package:
<ItemGroup>
    <PackageReference Include="Aspire.Hosting.AppHost" Version="9.0.0" />
    <PackageReference Include="Aspire.Hosting.Azure.Functions" Version="9.0.0" />
</ItemGroup>
This package provides an AddAzureFunctionsProject<TProject>(IDistributedApplicationBuilder, String) API that can be invoked in the app host to configure Azure Functions projects within an .NET Aspire host:
var builder = DistributedApplication.CreateBuilder(args);

builder.AddAzureFunctionsProject<Projects.PigLatinApp>("piglatinapp");

builder.Build().Run();
In this example, the webhook is responsible for translating an input string into Pig Latin. Update the contents of our trigger with the following code:
using Microsoft.AspNetCore.Http;
using Microsoft.AspNetCore.Mvc;
using Microsoft.Azure.Functions.Worker;
using Microsoft.Extensions.Logging;
using System.Text;
using FromBodyAttribute = Microsoft.Azure.Functions.Worker.Http.FromBodyAttribute;

namespace PigLatinApp;

public class Function1(ILogger<Function1> logger)
{
    public record InputText(string Value);
    public record PigLatinText(string Value);

    [Function("Function1")]
    public IActionResult Run(
        [HttpTrigger(AuthorizationLevel.Anonymous, "post")] HttpRequest req,
        [FromBody] InputText inputText)
    {
        logger.LogInformation("C# HTTP trigger function processed a request.");

        var result = TranslateToPigLatin(inputText.Value);

        return new OkObjectResult(new PigLatinText(result));
    }

    private static string TranslateToPigLatin(string input)
    {
        if (string.IsNullOrEmpty(input))
        {
            return input;
        }

        var words = input.Split(' ');
        StringBuilder pigLatin = new();

        foreach (string word in words)
        {
            if (IsVowel(word[0]))
            {
                pigLatin.Append(word + "yay ");
            }
            else
            {
                int vowelIndex = FindFirstVowelIndex(word);
                if (vowelIndex is -1)
                {
                    pigLatin.Append(word + "ay ");
                }
                else
                {
                    pigLatin.Append(
                        word.Substring(vowelIndex) + word.Substring(0, vowelIndex) + "ay ");
                }
            }
        }

        return pigLatin.ToString().Trim();
    }

    private static int FindFirstVowelIndex(string word)
    {
        for (var i = 0; i < word.Length; i++)
        {
            if (IsVowel(word[i]))
            {
                return i;
            }
        }
        return -1;
    }

    private static bool IsVowel(char c) =>
        char.ToLower(c) is 'a' or 'e' or 'i' or 'o' or 'u';
}
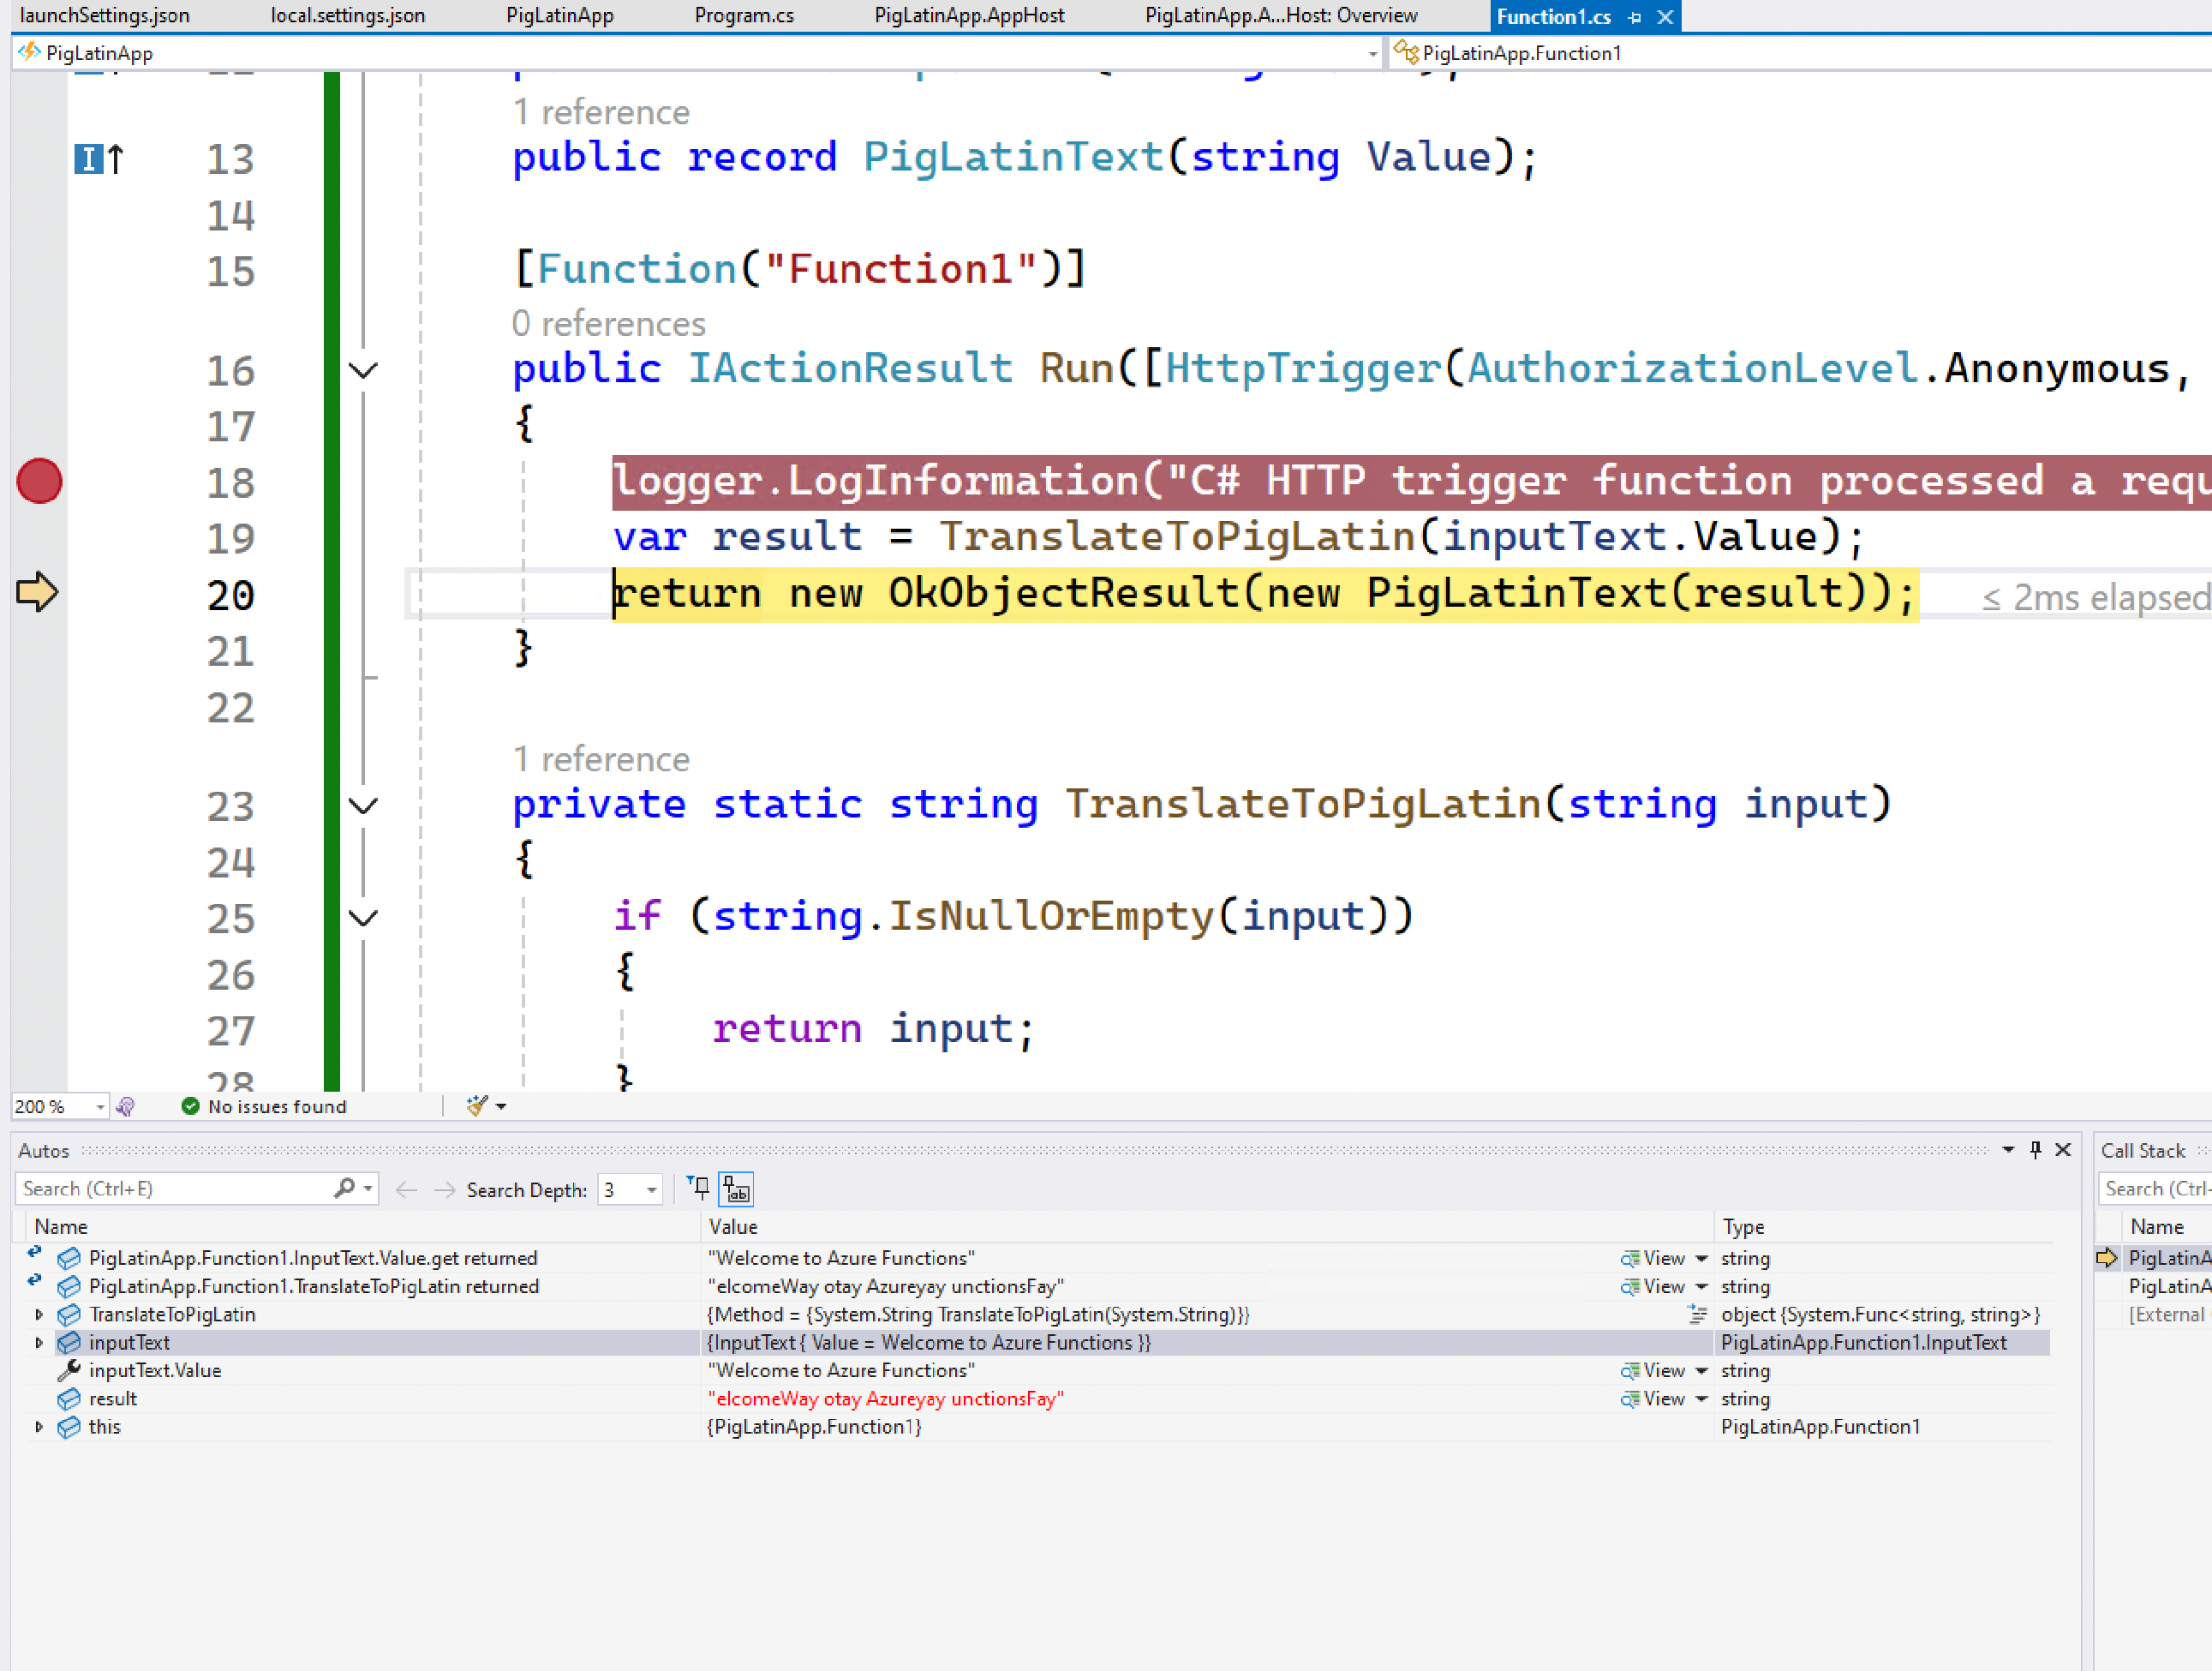
Set a breakpoint on the first logger.LogInformation line of the Run method and press F5 to start the Functions host. Once the .NET Aspire dashboard launches, you observe the following:
.NET Aspire has:
- Configured an emulated Azure Storage resource to be used for bookkeeping by the host.
- Launched the Functions host locally with the target as the Functions project registered.
- Wired the port defined in launchSettings.json of the functions project for listening.
Use your favorite HTTP client of choice to send a request to the trigger and observe the inputs bound from the request body in the debugger.
curl --request POST \
  --url http://localhost:7282/api/Function1 \
  --header 'Content-Type: application/json' \
  --data '{
  "value": "Welcome to Azure Functions"
}'
Now you're ready to deploy our application to Azure Container Apps (ACA). Deployment currently depends on preview builds of Azure Functions Worker and Worker SDK packages. If necessary, upgrade the versions referenced in the Functions project:
<ItemGroup>
    <PackageReference Include="Microsoft.Azure.Functions.Worker" Version="2.0.0-preview2" />
    <PackageReference Include="Microsoft.Azure.Functions.Worker.Sdk" Version="2.0.0-preview2" />
</ItemGroup>
You also need to expose a public endpoint for our Azure Functions project so that requests can be sent to our HTTP trigger:
builder.AddAzureFunctionsProject<Projects.PigLatinApp>("piglatinapp")
       .WithExternalHttpEndpoints();
To deploy the application with the azd CLI, you need get the latest version first. To install the latest version, you see a warning if your version is out of date. Follow the instructions to update to the latest version.
After it's installed, navigate to the folder containing the app host project and run azd init:
$ azd init

Initializing an app to run on Azure (azd init)

? How do you want to initialize your app? Use code in the current directory

  (✓) Done: Scanning app code in current directory

Detected services:

  .NET (Aspire)
  Detected in: ./PigLatinApp/PigLatinApp.AppHost/PigLatinApp.AppHost.csproj

azd will generate the files necessary to host your app on Azure using Azure Container Apps.

? Select an option Confirm and continue initializing my app
? Enter a new environment name: azfunc-piglatin

Generating files to run your app on Azure:

  (✓) Done: Generating ./azure.yaml
  (✓) Done: Generating ./next-steps.md

SUCCESS: Your app is ready for the cloud!
Then, deploy the application by running azd up:
$ azd up
? Select an Azure Subscription to use: 130. [redacted]
? Select an Azure location to use: 50. (US) West US 2 (westus2)

Packaging services (azd package)


Provisioning Azure resources (azd provision)
Provisioning Azure resources can take some time.

Subscription: [redacted]
Location: West US 2

  You can view detailed progress in the Azure Portal:
  [redacted]

  (✓) Done: Resource group: rg-azfunc-piglatin (967ms)
  (✓) Done: Container Registry: [redacted] (13.316s)
  (✓) Done: Log Analytics workspace: [redacted] (16.467s)
  (✓) Done: Container Apps Environment: [redacted] (1m35.531s)
  (✓) Done: Storage account: [redacted] (21.37s)

Deploying services (azd deploy)

  (✓) Done: Deploying service piglatinapp
  - Endpoint: {{endpoint-url}}

  Aspire Dashboard: {{dashboard-url}}
Finally, test your deployed Functions application using your favorite HTTP client:
curl --request POST \
  --url {{endpoint-url}}/api/Function1 \
  --header 'Content-Type: application/json' \
  --data '{
  "value": "Welcome to Azure Functions"
}'
Support for Azure Functions in .NET Aspire is still in preview with support for a limited set of triggers including:
- HTTP triggers
- Azure Storage Queue triggers
- Azure Storage Blob triggers
- Azure Service Bus triggers
- Azure Event Hubs triggers
For more information, see the official .NET Aspire Azure Functions integration (Preview).
Customization of Azure Container Apps
One of the most requested features is the ability to customize the Azure Container Apps that the app host creates without touching Bicep. This is possible by using the PublishAsAzureContainerApp<T>(IResourceBuilder<T>, Action<AzureResourceInfrastructure,ContainerApp>) and PublishAsAzureContainerApp<T>(IResourceBuilder<T>, Action<AzureResourceInfrastructure,ContainerApp>) APIs in the Aspire.Hosting.Azure.AppContainers namespace. These methods customizes the Azure Container App definition that the app host creates.
Add the package reference to your project file:
<ItemGroup>
  <PackageReference Include="Aspire.Hosting.Azure.AppContainers"
                    Version="9.0.0" />
</ItemGroup>
The following example demonstrates how to scale an Azure Container App to zero (0) replicas:
var builder = DistributedApplication.CreateBuilder(args);

var db = builder.AddAzurePostgresFlexibleServer("pg")
                .RunAsContainer()
                .AddDatabase("db");

// Type is for evaluation purposes only and is subject to change or removal in future updates. Suppress this diagnostic to proceed.
#pragma warning disable AZPROVISION001

builder.AddProject<Projects.WebApplication1>("api")
       .WithReference(db)
       .PublishAsAzureContainerApp((module, containerApp) =>
       {
           // Scale to 0
           containerApp.Template.Value!.Scale.Value!.MinReplicas = 0;
       });

#pragma warning restore AZPROVISION001

builder.Build().Run();
The preceding code example defers generation of the Azure Container App definition to the app host. This allows you to customize the Azure Container App definition without needing to run azd infra synth and unsafely modifying the generated bicep files.
See also
.NET Aspire
