Azure OpenAI On Your Data
Use this article to learn about Azure OpenAI On Your Data, which makes it easier for developers to connect, ingest and ground their enterprise data to create personalized copilots (preview) rapidly. It enhances user comprehension, expedites task completion, improves operational efficiency, and aids decision-making.
What is Azure OpenAI On Your Data
Azure OpenAI On Your Data enables you to run advanced AI models such as GPT-35-Turbo and GPT-4 on your own enterprise data without needing to train or fine-tune models. You can chat on top of and analyze your data with greater accuracy. You can specify sources to support the responses based on the latest information available in your designated data sources. You can access Azure OpenAI On Your Data using a REST API, via the SDK or the web-based interface in the Azure OpenAI Studio. You can also create a web app that connects to your data to enable an enhanced chat solution or deploy it directly as a copilot in the Copilot Studio (preview).
Developing with Azure OpenAI On Your Data
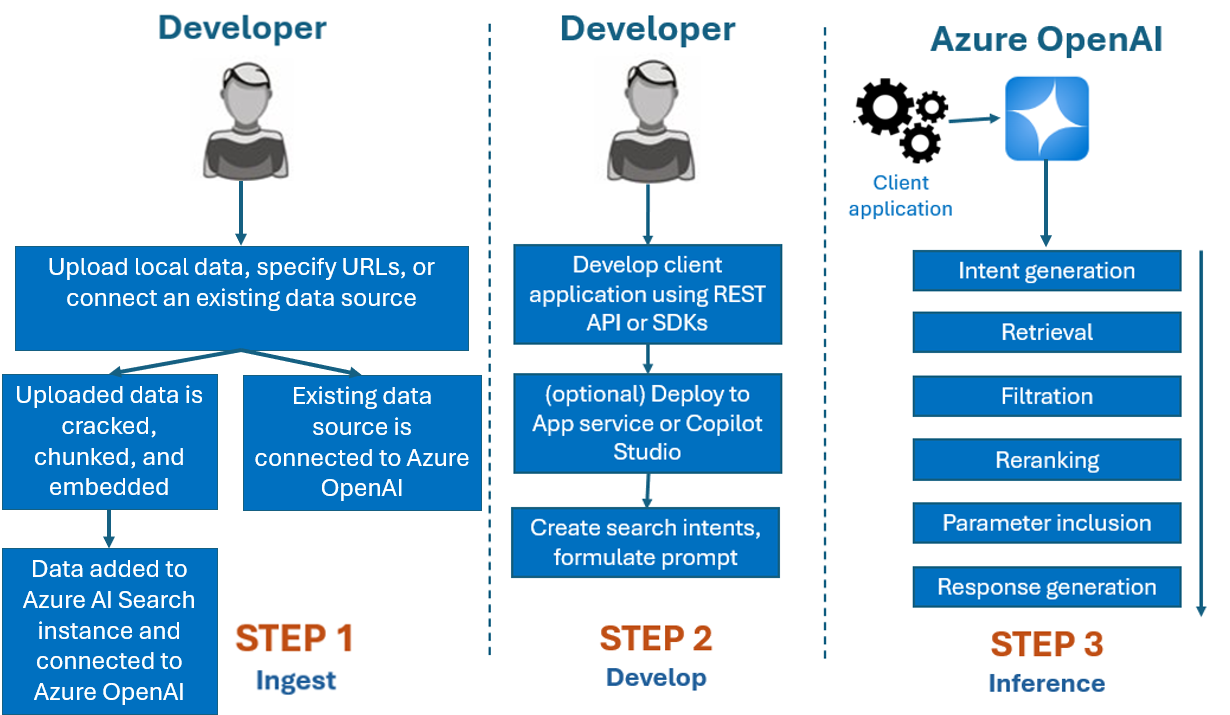
Typically, the development process you'd use with Azure OpenAI On Your Data is:
Ingest: Upload files using either Azure OpenAI Studio or the ingestion API. This enables your data to be cracked, chunked and embedded into an Azure AI Search instance that can be used by Azure OpenAI models. If you have an existing supported data source, you can also connect it directly.
Develop: After trying Azure OpenAI On Your Data, begin developing your application using the available REST API and SDKs, which are available in several languages. It will create prompts and search intents to pass to the Azure OpenAI service.
Inference: After your application is deployed in your preferred environment, it will send prompts to Azure OpenAI, which will perform several steps before returning a response:
Intent generation: The service will determine the intent of the user's prompt to determine a proper response.
Retrieval: The service retrieves relevant chunks of available data from the connected data source by querying it. For example by using a semantic or vector search. Parameters such as strictness and number of documents to retrieve are utilized to influence the retrieval.
Filtration and reranking: Search results from the retrieval step are improved by ranking and filtering data to refine relevance.
Response generation: The resulting data is submitted along with other information like the system message to the Large Language Model (LLM) and the response is sent back to the application.
To get started, connect your data source using Azure OpenAI Studio and start asking questions and chatting on your data.
Azure Role-based access controls (Azure RBAC) for adding data sources
To use Azure OpenAI On Your Data fully, you need to set one or more Azure RBAC roles. See Azure OpenAI On Your Data configuration for more information.
Data formats and file types
Azure OpenAI On Your Data supports the following file types:
.txt.md.html.docx.pptx.pdf
There's an upload limit, and there are some caveats about document structure and how it might affect the quality of responses from the model:
If you're converting data from an unsupported format into a supported format, optimize the quality of the model response by ensuring the conversion:
- Doesn't lead to significant data loss.
- Doesn't add unexpected noise to your data.
If your files have special formatting, such as tables and columns, or bullet points, prepare your data with the data preparation script available on GitHub.
For documents and datasets with long text, you should use the available data preparation script. The script chunks data so that the model's responses are more accurate. This script also supports scanned PDF files and images.
Supported data sources
You need to connect to a data source to upload your data. When you want to use your data to chat with an Azure OpenAI model, your data is chunked in a search index so that relevant data can be found based on user queries.
The Integrated Vector Database in vCore-based Azure Cosmos DB for MongoDB natively supports integration with Azure OpenAI On Your Data.
For some data sources such as uploading files from your local machine (preview) or data contained in a blob storage account (preview), Azure AI Search is used. When you choose the following data sources, your data is ingested into an Azure AI Search index.
| Data ingested through Azure AI Search | Description |
|---|---|
| Azure AI Search | Use an existing Azure AI Search index with Azure OpenAI On Your Data. |
| Upload files (preview) | Upload files from your local machine to be stored in an Azure Blob Storage database, and ingested into Azure AI Search. |
| URL/Web address (preview) | Web content from the URLs is stored in Azure Blob Storage. |
| Azure Blob Storage (preview) | Upload files from Azure Blob Storage to be ingested into an Azure AI Search index. |

- Azure AI Search
- Vector Database in Azure Cosmos DB for MongoDB
- Azure Blob Storage (preview)
- Upload files (preview)
- URL/Web address (preview)
- Elasticsearch (preview)
- MongoDB Atlas (preview)
You might want to consider using an Azure AI Search index when you either want to:
- Customize the index creation process.
- Reuse an index created before by ingesting data from other data sources.
Note
- To use an existing index, it must have at least one searchable field.
- Set the CORS Allow Origin Type option to
alland the Allowed origins option to*.
Search types
Azure OpenAI On Your Data provides the following search types you can use when you add your data source.
Vector search using Ada embedding models, available in selected regions
To enable vector search, you need an existing embedding model deployed in your Azure OpenAI resource. Select your embedding deployment when connecting your data, then select one of the vector search types under Data management. If you're using Azure AI Search as a data source, make sure you have a vector column in the index.
If you're using your own index, you can customize the field mapping when you add your data source to define the fields that will get mapped when answering questions. To customize field mapping, select Use custom field mapping on the Data Source page when adding your data source.
Important
- Semantic search is subject to additional pricing. You need to choose Basic or higher SKU to enable semantic search or vector search. See pricing tier difference and service limits for more information.
- To help improve the quality of the information retrieval and model response, we recommend enabling semantic search for the following data source languages: English, French, Spanish, Portuguese, Italian, Germany, Chinese(Zh), Japanese, Korean, Russian, and Arabic.
| Search option | Retrieval type | Additional pricing? | Benefits |
|---|---|---|---|
| keyword | Keyword search | No additional pricing. | Performs fast and flexible query parsing and matching over searchable fields, using terms or phrases in any supported language, with or without operators. |
| semantic | Semantic search | Additional pricing for semantic search usage. | Improves the precision and relevance of search results by using a reranker (with AI models) to understand the semantic meaning of query terms and documents returned by the initial search ranker |
| vector | Vector search | Additional pricing on your Azure OpenAI account from calling the embedding model. | Enables you to find documents that are similar to a given query input based on the vector embeddings of the content. |
| hybrid (vector + keyword) | A hybrid of vector search and keyword search | Additional pricing on your Azure OpenAI account from calling the embedding model. | Performs similarity search over vector fields using vector embeddings, while also supporting flexible query parsing and full text search over alphanumeric fields using term queries. |
| hybrid (vector + keyword) + semantic | A hybrid of vector search, semantic search, and keyword search. | Additional pricing on your Azure OpenAI account from calling the embedding model, and additional pricing for semantic search usage. | Uses vector embeddings, language understanding, and flexible query parsing to create rich search experiences and generative AI apps that can handle complex and diverse information retrieval scenarios. |
Intelligent search
Azure OpenAI On Your Data has intelligent search enabled for your data. Semantic search is enabled by default if you have both semantic search and keyword search. If you have embedding models, intelligent search defaults to hybrid + semantic search.
Document-level access control
Note
Document-level access control is supported when you select Azure AI Search as your data source.
Azure OpenAI On Your Data lets you restrict the documents that can be used in responses for different users with Azure AI Search security filters. When you enable document level access, the search results returned from Azure AI Search and used to generate a response are trimmed based on user Microsoft Entra group membership. You can only enable document-level access on existing Azure AI Search indexes. See Azure OpenAI On Your Data network and access configuration for more information.
Index field mapping
If you're using your own index, you'll be prompted in the Azure OpenAI Studio to define which fields you want to map for answering questions when you add your data source. You can provide multiple fields for Content data, and should include all fields that have text pertaining to your use case.

In this example, the fields mapped to Content data and Title provide information to the model to answer questions. Title is also used to title citation text. The field mapped to File name generates the citation names in the response.
Mapping these fields correctly helps ensure the model has better response and citation quality. You can additionally configure it in the API using the fieldsMapping parameter.
Search filter (API)
If you want to implement additional value-based criteria for query execution, you can set up a search filter using the filter parameter in the REST API.
How data is ingested into Azure AI search
As of September 2024, the ingestion APIs switched to integrated vectorization. This update does not alter the existing API contracts. Integrated vectorization, a new offering of Azure AI Search, utilizes prebuilt skills for chunking and embedding the input data. The Azure OpenAI On Your Data ingestion service no longer employs custom skills. Following the migration to integrated vectorization, the ingestion process has undergone some modifications and as a result only the following assets are created:
{job-id}-index{job-id}-indexer, if an hourly or daily schedule is specified, otherwise, the indexer is cleaned-up at the end of the ingestion process.{job-id}-datasource
The chunks container is no longer available, as this functionality is now inherently managed by Azure AI Search.
Data connection
You need to select how you want to authenticate the connection from Azure OpenAI, Azure AI Search, and Azure blob storage. You can choose a System assigned managed identity or an API key. By selecting API key as the authentication type, the system will automatically populate the API key for you to connect with your Azure AI Search, Azure OpenAI, and Azure Blob Storage resources. By selecting System assigned managed identity, the authentication will be based on the role assignment you have. System assigned managed identity is selected by default for security.

Once you select the next button, it will automatically validate your setup to use the selected authentication method. If you encounter an error, see the role assignments article to update your setup.
Once you have fixed the setup, select next again to validate and proceed. API users can also configure authentication with assigned managed identity and API keys.


Deploy to a copilot (preview), Teams app (preview), or web app
After you connect Azure OpenAI to your data, you can deploy it using the Deploy to button in Azure OpenAI Studio.

This gives you multiple options for deploying your solution.
You can deploy to a copilot in Copilot Studio (preview) directly from Azure OpenAI Studio, enabling you to bring conversational experiences to various channels such as: Microsoft Teams, websites, Dynamics 365, and other Azure Bot Service channels. The tenant used in the Azure OpenAI service and Copilot Studio (preview) should be the same. For more information, see Use a connection to Azure OpenAI On Your Data.
Note
Deploying to a copilot in Copilot Studio (preview) is only available in US regions.
Configure access and networking for Azure OpenAI On Your Data
You can use Azure OpenAI On Your Data and protect data and resources with Microsoft Entra ID role-based access control, virtual networks, and private endpoints. You can also restrict the documents that can be used in responses for different users with Azure AI Search security filters. See Azure OpenAI On Your Data access and network configuration.
Best practices
Use the following sections to learn how to improve the quality of responses given by the model.
Ingestion parameter
When your data is ingested into to Azure AI Search, You can modify the following additional settings in either the studio or ingestion API.
Chunk size (preview)
Azure OpenAI On Your Data processes your documents by splitting them into chunks before ingesting them. The chunk size is the maximum size in terms of the number of tokens of any chunk in the search index. Chunk size and the number of retrieved documents together control how much information (tokens) is included in the prompt sent to the model. In general, the chunk size multiplied by the number of retrieved documents is the total number of tokens sent to the model.
Setting chunk size for your use case
The default chunk size is 1,024 tokens. However, given the uniqueness of your data, you might find a different chunk size (such as 256, 512, or 1,536 tokens) more effective.
Adjusting the chunk size can enhance your chatbot's performance. While finding the optimal chunk size requires some trial and error, start by considering the nature of your dataset. A smaller chunk size is generally better for datasets with direct facts and less context, while a larger chunk size might be beneficial for more contextual information, though it could affect retrieval performance.
A small chunk size like 256 produces more granular chunks. This size also means the model will utilize fewer tokens to generate its output (unless the number of retrieved documents is very high), potentially costing less. Smaller chunks also mean the model doesn't have to process and interpret long sections of text, reducing noise and distraction. This granularity and focus however pose a potential problem. Important information might not be among the top retrieved chunks, especially if the number of retrieved documents is set to a low value like 3.
Tip
Keep in mind that altering the chunk size requires your documents to be re-ingested, so it's useful to first adjust runtime parameters like strictness and the number of retrieved documents. Consider changing the chunk size if you're still not getting the desired results:
- If you are encountering a high number of responses such as "I don't know" for questions with answers that should be in your documents, consider reducing the chunk size to 256 or 512 to improve granularity.
- If the chatbot is providing some correct details but missing others, which becomes apparent in the citations, increasing the chunk size to 1,536 might help capture more contextual information.
Runtime parameters
You can modify the following additional settings in the Data parameters section in Azure OpenAI Studio and the API. You don't need to reingest your data when you update these parameters.
| Parameter name | Description |
|---|---|
| Limit responses to your data | This flag configures the chatbot's approach to handling queries unrelated to the data source or when search documents are insufficient for a complete answer. When this setting is disabled, the model supplements its responses with its own knowledge in addition to your documents. When this setting is enabled, the model attempts to only rely on your documents for responses. This is the inScope parameter in the API, and set to true by default. |
| Retrieved documents | This parameter is an integer that can be set to 3, 5, 10, or 20, and controls the number of document chunks provided to the large language model for formulating the final response. By default, this is set to 5. The search process can be noisy and sometimes, due to chunking, relevant information might be spread across multiple chunks in the search index. Selecting a top-K number, like 5, ensures that the model can extract relevant information, despite the inherent limitations of search and chunking. However, increasing the number too high can potentially distract the model. Additionally, the maximum number of documents that can be effectively used depends on the version of the model, as each has a different context size and capacity for handling documents. If you find that responses are missing important context, try increasing this parameter. This is the topNDocuments parameter in the API, and is 5 by default. |
| Strictness | Determines the system's aggressiveness in filtering search documents based on their similarity scores. The system queries Azure Search or other document stores, then decides which documents to provide to large language models like ChatGPT. Filtering out irrelevant documents can significantly enhance the performance of the end-to-end chatbot. Some documents are excluded from the top-K results if they have low similarity scores before forwarding them to the model. This is controlled by an integer value ranging from 1 to 5. Setting this value to 1 means that the system will minimally filter documents based on search similarity to the user query. Conversely, a setting of 5 indicates that the system will aggressively filter out documents, applying a very high similarity threshold. If you find that the chatbot omits relevant information, lower the filter's strictness (set the value closer to 1) to include more documents. Conversely, if irrelevant documents distract the responses, increase the threshold (set the value closer to 5). This is the strictness parameter in the API, and set to 3 by default. |
Uncited references
It's possible for the model to return "TYPE":"UNCITED_REFERENCE" instead of "TYPE":CONTENT in the API for documents that are retrieved from the data source, but not included in the citation. This can be useful for debugging, and you can control this behavior by modifying the strictness and retrieved documents runtime parameters described above.
System message
You can define a system message to steer the model's reply when using Azure OpenAI On Your Data. This message allows you to customize your replies on top of the retrieval augmented generation (RAG) pattern that Azure OpenAI On Your Data uses. The system message is used in addition to an internal base prompt to provide the experience. To support this, we truncate the system message after a specific number of tokens to ensure the model can answer questions using your data. If you are defining extra behavior on top of the default experience, ensure that your system prompt is detailed and explains the exact expected customization.
Once you select add your dataset, you can use the System message section in the Azure OpenAI Studio, or the role_information parameter in the API.

Potential usage patterns
Define a role
You can define a role that you want your assistant. For example, if you are building a support bot, you can add "You are an expert incident support assistant that helps users solve new issues."
Define the type of data being retrieved
You can also add the nature of data you are providing to assistant.
- Define the topic or scope of your dataset, like "financial report," "academic paper," or "incident report." For example, for technical support you might add "You answer queries using information from similar incidents in the retrieved documents."
- If your data has certain characteristics, you can add these details to the system message. For example, if your documents are in Japanese, you can add "You retrieve Japanese documents and you should read them carefully in Japanese and answer in Japanese."
- If your documents include structured data like tables from a financial report, you can also add this fact into the system prompt. For example, if your data has tables, you might add "You are given data in form of tables pertaining to financial results and you should read the table line by line to perform calculations to answer user questions."
Define the output style
You can also change the model's output by defining a system message. For example, if you want to ensure that the assistant answers are in French, you can add a prompt like "You are an AI assistant that helps users who understand French find information. The user questions can be in English or French. Please read the retrieved documents carefully and answer them in French. Please translate the knowledge from documents to French to ensure all answers are in French."
Reaffirm critical behavior
Azure OpenAI On Your Data works by sending instructions to a large language model in the form of prompts to answer user queries using your data. If there is a certain behavior that is critical to the application, you can repeat the behavior in system message to increase its accuracy. For example, to guide the model to only answer from documents, you can add "Please answer using retrieved documents only, and without using your knowledge. Please generate citations to retrieved documents for every claim in your answer. If the user question cannot be answered using retrieved documents, please explain the reasoning behind why documents are relevant to user queries. In any case, don't answer using your own knowledge."
Prompt Engineering tricks
There are many tricks in prompt engineering that you can try to improve the output. One example is chain-of-thought prompting where you can add "Let’s think step by step about information in retrieved documents to answer user queries. Extract relevant knowledge to user queries from documents step by step and form an answer bottom up from the extracted information from relevant documents."
Note
The system message is used to modify how GPT assistant responds to a user question based on retrieved documentation. It doesn't affect the retrieval process. If you'd like to provide instructions for the retrieval process, it is better to include them in the questions. The system message is only guidance. The model might not adhere to every instruction specified because it has been primed with certain behaviors such as objectivity, and avoiding controversial statements. Unexpected behavior might occur if the system message contradicts with these behaviors.
Maximum response
Set a limit on the number of tokens per model response. The upper limit for Azure OpenAI On Your Data is 1500. This is equivalent to setting the max_tokens parameter in the API.
Limit responses to your data
This option encourages the model to respond using your data only, and is selected by default. If you unselect this option, the model might more readily apply its internal knowledge to respond. Determine the correct selection based on your use case and scenario.
Interacting with the model
Use the following practices for best results when chatting with the model.
Conversation history
- Before starting a new conversation (or asking a question that isn't related to the previous ones), clear the chat history.
- Getting different responses for the same question between the first conversational turn and subsequent turns can be expected because the conversation history changes the current state of the model. If you receive incorrect answers, report it as a quality bug.
Model response
If you aren't satisfied with the model response for a specific question, try either making the question more specific or more generic to see how the model responds, and reframe your question accordingly.
Chain-of-thought prompting has been shown to be effective in getting the model to produce desired outputs for complex questions/tasks.
Question length
Avoid asking long questions and break them down into multiple questions if possible. The GPT models have limits on the number of tokens they can accept. Token limits are counted toward: the user question, the system message, the retrieved search documents (chunks), internal prompts, the conversation history (if any), and the response. If the question exceeds the token limit, it will be truncated.
Multi-lingual support
Currently, keyword search and semantic search in Azure OpenAI On Your Data supports queries are in the same language as the data in the index. For example, if your data is in Japanese, then input queries also need to be in Japanese. For cross-lingual document retrieval, we recommend building the index with Vector search enabled.
To help improve the quality of the information retrieval and model response, we recommend enabling semantic search for the following languages: English, French, Spanish, Portuguese, Italian, Germany, Chinese(Zh), Japanese, Korean, Russian, Arabic
We recommend using a system message to inform the model that your data is in another language. For example:
*"*You are an AI assistant designed to help users extract information from retrieved Japanese documents. Please scrutinize the Japanese documents carefully before formulating a response. The user's query will be in Japanese, and you must response also in Japanese."
If you have documents in multiple languages, we recommend building a new index for each language and connecting them separately to Azure OpenAI.
Streaming data
You can send a streaming request using the stream parameter, allowing data to be sent and received incrementally, without waiting for the entire API response. This can improve performance and user experience, especially for large or dynamic data.
{
    "stream": true,
    "dataSources": [
        {
            "type": "AzureCognitiveSearch",
            "parameters": {
                "endpoint": "'$AZURE_AI_SEARCH_ENDPOINT'",
                "key": "'$AZURE_AI_SEARCH_API_KEY'",
                "indexName": "'$AZURE_AI_SEARCH_INDEX'"
            }
        }
    ],
    "messages": [
        {
            "role": "user",
            "content": "What are the differences between Azure Machine Learning and Azure AI services?"
        }
    ]
}
Conversation history for better results
When you chat with a model, providing a history of the chat will help the model return higher quality results. You don't need to include the context property of the assistant messages in your API requests for better response quality. See the API reference documentation for examples.
Function Calling
Some Azure OpenAI models allow you to define tools and tool_choice parameters to enable function calling. You can set up function calling through REST API /chat/completions. If both tools and data sources are in the request, the following policy is applied.
- If
tool_choiceisnone, the tools are ignored, and only the data sources are used to generate the answer. - Otherwise, if
tool_choiceis not specified, or specified asautoor an object, the data sources are ignored, and the response will contain the selected functions name and the arguments, if any. Even if the model decides no function is selected, the data sources are still ignored.
If the policy above doesn't meet your need, please consider other options, for example: prompt flow or Assistants API.
Token usage estimation for Azure OpenAI On Your Data
Azure OpenAI On Your Data Retrieval Augmented Generation (RAG) is a service that leverages both a search service (such as Azure AI Search) and generation (Azure OpenAI models) to let users get answers for their questions based on provided data.
As part of this RAG pipeline, there are three steps at a high-level:
Reformulate the user query into a list of search intents. This is done by making a call to the model with a prompt that includes instructions, the user question, and conversation history. Let's call this an intent prompt.
For each intent, multiple document chunks are retrieved from the search service. After filtering out irrelevant chunks based on the user-specified threshold of strictness and reranking/aggregating the chunks based on internal logic, the user-specified number of document chunks are chosen.
These document chunks, along with the user question, conversation history, role information, and instructions are sent to the model to generate the final model response. Let's call this the generation prompt.
In total, there are two calls made to the model:
For processing the intent: The token estimate for the intent prompt includes those for the user question, conversation history, and the instructions sent to the model for intent generation.
For generating the response: The token estimate for the generation prompt includes those for the user question, conversation history, the retrieved list of document chunks, role information, and the instructions sent to it for generation.
The model generated output tokens (both intents and response) need to be taken into account for total token estimation. Summing up all the four columns below gives the average total tokens used for generating a response.
| Model | Generation prompt token count | Intent prompt token count | Response token count | Intent token count |
|---|---|---|---|---|
| gpt-35-turbo-16k | 4297 | 1366 | 111 | 25 |
| gpt-4-0613 | 3997 | 1385 | 118 | 18 |
| gpt-4-1106-preview | 4538 | 811 | 119 | 27 |
| gpt-35-turbo-1106 | 4854 | 1372 | 110 | 26 |
The above numbers are based on testing on a data set with:
- 191 conversations
- 250 questions
- 10 average tokens per question
- 4 conversational turns per conversation on average
And the following parameters.
| Setting | Value |
|---|---|
| Number of retrieved documents | 5 |
| Strictness | 3 |
| Chunk size | 1024 |
| Limit responses to ingested data? | True |
These estimates will vary based on the values set for the above parameters. For example, if the number of retrieved documents is set to 10 and strictness is set to 1, the token count will go up. If returned responses aren't limited to the ingested data, there are fewer instructions given to the model and the number of tokens will go down.
The estimates also depend on the nature of the documents and questions being asked. For example, if the questions are open-ended, the responses are likely to be longer. Similarly, a longer system message would contribute to a longer prompt that consumes more tokens, and if the conversation history is long, the prompt will be longer.
| Model | Max tokens for system message |
|---|---|
| GPT-35-0301 | 400 |
| GPT-35-0613-16K | 1000 |
| GPT-4-0613-8K | 400 |
| GPT-4-0613-32K | 2000 |
| GPT-35-turbo-0125 | 2000 |
| GPT-4-turbo-0409 | 4000 |
| GPT-4o | 4000 |
| GPT-4o-mini | 4000 |
The table above shows the maximum number of tokens that can be used for the system message. To see the maximum tokens for the model response, see the models article. Additionally, the following also consume tokens:
The meta prompt: if you limit responses from the model to the grounding data content (
inScope=Truein the API), the maximum number of tokens higher. Otherwise (for example ifinScope=False) the maximum is lower. This number is variable depending on the token length of the user question and conversation history. This estimate includes the base prompt and the query rewriting prompts for retrieval.User question and history: Variable but capped at 2,000 tokens.
Retrieved documents (chunks): The number of tokens used by the retrieved document chunks depends on multiple factors. The upper bound for this is the number of retrieved document chunks multiplied by the chunk size. It will, however, be truncated based on the tokens available tokens for the specific model being used after counting the rest of fields.
20% of the available tokens are reserved for the model response. The remaining 80% of available tokens include the meta prompt, the user question and conversation history, and the system message. The remaining token budget is used by the retrieved document chunks.
In order to compute the number of tokens consumed by your input (such as your question, the system message/role information), use the following code sample.
import tiktoken

class TokenEstimator(object):

    GPT2_TOKENIZER = tiktoken.get_encoding("gpt2")

    def estimate_tokens(self, text: str) -> int:
        return len(self.GPT2_TOKENIZER.encode(text))

token_output = TokenEstimator.estimate_tokens(input_text)
Troubleshooting
To troubleshoot failed operations, always look out for errors or warnings specified either in the API response or Azure OpenAI Studio. Here are some of the common errors and warnings:
Failed ingestion jobs
Quota Limitations Issues
An index with the name X in service Y couldn't be created. Index quota has been exceeded for this service. You must either delete unused indexes first, add a delay between index creation requests, or upgrade the service for higher limits.
Standard indexer quota of X has been exceeded for this service. You currently have X standard indexers. You must either delete unused indexers first, change the indexer 'executionMode', or upgrade the service for higher limits.
Resolution:
Upgrade to a higher pricing tier or delete unused assets.
Preprocessing Timeout Issues
Couldn't execute skill because the Web API request failed
Couldn't execute skill because Web API skill response is invalid
Resolution:
Break down the input documents into smaller documents and try again.
Permissions Issues
This request isn't authorized to perform this operation
Resolution:
This means the storage account isn't accessible with the given credentials. In this case, please review the storage account credentials passed to the API and ensure the storage account isn't hidden behind a private endpoint (if a private endpoint isn't configured for this resource).
503 errors when sending queries with Azure AI Search
Each user message can translate to multiple search queries, all of which get sent to the search resource in parallel. This can produce throttling behavior when the number of search replicas and partitions is low. The maximum number of queries per second that a single partition and single replica can support might not be sufficient. In this case, consider increasing your replicas and partitions, or adding sleep/retry logic in your application. See the Azure AI Search documentation for more information.
Regional availability and model support
| Region | gpt-35-turbo-16k (0613) |
gpt-35-turbo (1106) |
gpt-4-32k (0613) |
gpt-4 (1106-preview) |
gpt-4 (0125-preview) |
gpt-4 (0613) |
gpt-4o** |
gpt-4 (turbo-2024-04-09) |
|---|---|---|---|---|---|---|---|---|
| Australia East | ✅ | ✅ | ✅ | ✅ | ✅ | |||
| Canada East | ✅ | ✅ | ✅ | ✅ | ✅ | |||
| East US | ✅ | ✅ | ✅ | |||||
| East US 2 | ✅ | ✅ | ✅ | ✅ | ||||
| France Central | ✅ | ✅ | ✅ | ✅ | ✅ | |||
| Japan East | ✅ | |||||||
| North Central US | ✅ | ✅ | ✅ | |||||
| Norway East | ✅ | ✅ | ||||||
| South Central US | ✅ | ✅ | ||||||
| South India | ✅ | ✅ | ||||||
| Sweden Central | ✅ | ✅ | ✅ | ✅ | ✅ | ✅ | ||
| Switzerland North | ✅ | ✅ | ✅ | |||||
| UK South | ✅ | ✅ | ✅ | ✅ | ||||
| West US | ✅ | ✅ | ✅ |
**This is a text-only implementation
If your Azure OpenAI resource is in another region, you won't be able to use Azure OpenAI On Your Data.