Manage expiration of Azure Blob storage in Azure Content Delivery Network
Important
Azure CDN Standard from Microsoft (classic) will be retired on September 30, 2027. To avoid any service disruption, it's important that you migrate your Azure CDN Standard from Microsoft (classic) profiles to Azure Front Door Standard or Premium tier by September 30, 2027. For more information, see Azure CDN Standard from Microsoft (classic) retirement.
Azure CDN from Edgio was retired on January 15, 2025. For more information, see Azure CDN from Edgio retirement FAQ.
Warning
Microsoft recommends that you use the most secure authentication flow available. The authentication flow described in this procedure requires a very high degree of trust in the application, and carries risks that are not present in other flows. You should only use this flow when other more secure flows, such as managed identities, aren't viable.
The Blob storage service in Azure Storage is one of several Azure-based origins integrated with Azure Content Delivery Network. Any publicly accessible blob content can be cached in Azure Content Delivery Network until its time to live (TTL) elapses. The TTL gets determined by the Cache-Control header in the HTTP response from the origin server. This article describes several ways that you can set the Cache-Control header on a blob in Azure Storage.
You can also control cache settings from the Azure portal by setting content delivery network caching rules. If you create a caching rule and set its caching behavior to Override or Bypass cache, the origin-provided caching settings discussed in this article are ignored. For information about general caching concepts, see How caching works.
Tip
You can choose to set no TTL on a blob. In this case, Azure Content Delivery Network automatically applies a default TTL of seven days, unless you have set up caching rules in the Azure portal. This default TTL applies only to general web delivery optimizations. For large file optimizations, the default TTL is one day, and for media streaming optimizations, the default TTL is one year.
For more information about how Azure Content Delivery Network works to speed up access to blobs and other files, see Overview of the Azure Content Delivery Network.
For more information about Azure Blob storage, see Introduction to Blob storage.
Setting Cache-Control headers by using content delivery network caching rules
The preferred method for setting a blob's Cache-Control header is to use caching rules in the Azure portal. For more information about content delivery network caching rules, see Control Azure Content Delivery Network caching behavior with caching rules.
To navigate to the CDN caching rules page:
In the Azure portal, select a content delivery network profile, then select the endpoint for the blob.
In the left pane under Settings, select Caching rules.
The Caching rules page appears.
To set a Blob storage service's Cache-Control headers by using global caching rules:
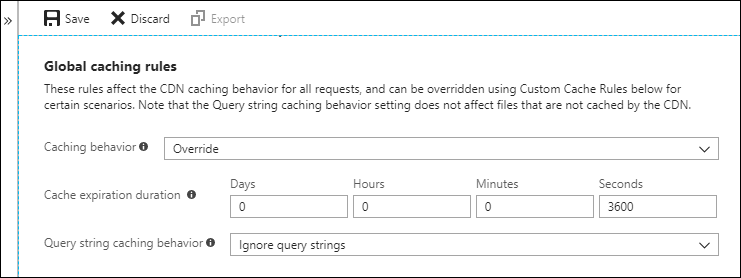
Under Global caching rules, set Query string caching behavior to Ignore query strings and set Caching behavior to Override.
For Cache expiration duration, enter 3600 in the Seconds box or 1 in the Hours box.

This global caching rule sets a cache duration of one hour and affects all requests to the endpoint. It overrides any
Cache-ControlorExpiresHTTP headers that get sent by the origin server specified by the endpoint.Select Save.
To set a blob file's Cache-Control headers by using custom caching rules:
Under Custom caching rules, create two match conditions:
A. For the first match condition, set Match condition to Path and enter
/blobcontainer1/*for Match value. Set Caching behavior to Override and enter 4 in the Hours box.B. For the second match condition, set Match condition to Path and enter
/blobcontainer1/blob1.txtfor Match value. Set Caching behavior to Override and enter 2 in the Hours box.
The first custom caching rule sets a cache duration of four hours for any blob files in the
/blobcontainer1folder on the origin server specified by your endpoint. The second rule overrides the first rule for theblob1.txtblob file only and sets a cache duration of two hours for it.Select Save.
Setting Cache-Control headers by using Azure PowerShell
Note
We recommend that you use the Azure Az PowerShell module to interact with Azure. To get started, see Install Azure PowerShell. To learn how to migrate to the Az PowerShell module, see Migrate Azure PowerShell from AzureRM to Az.
Azure PowerShell is one of the quickest and most powerful ways to administer your Azure services. Use the Get-AzStorageBlob cmdlet to get a reference to the blob, then set the .ICloudBlob.Properties.CacheControl property.
For example:
# Create a storage context
$context = New-AzStorageContext -StorageAccountName "<storage account name>" -StorageAccountKey "<storage account key>"

# Get a reference to the blob
$blob = Get-AzStorageBlob -Context $context -Container "<container name>" -Blob "<blob name>"

# Set the CacheControl property to expire in 1 hour (3600 seconds)
$blob.ICloudBlob.Properties.CacheControl = "max-age=3600"

# Send the update to the cloud
$blob.ICloudBlob.SetProperties()
Tip
You can also use PowerShell to manage your content delivery network profiles and endpoints.
Setting Cache-Control headers by using .NET
To specify a blob's Cache-Control header by using .NET code, use the Azure Storage Client Library for .NET to set the BlobHttpHeaders.CacheControl property.
For example:
    class Program
    {
        const string containerName = "<container name>";
        const string blobName = "<blob name>";
        const string connectionString = "<storage connection string>";
        static void Main()
        {
            // Retrieve storage account information from connection string
            BlobContainerClient container = new BlobContainerClient(connectionString, containerName);

            // Create a blob client for interacting with the blob service.
            BlobClient blob = container.GetBlobClient(blobName);

            // Set the CacheControl property to expire in 1 hour (3600 seconds)
            blob.SetHttpHeaders(new BlobHttpHeaders {CacheControl = "max-age=3600" });
        }
    }
Tip
There are more .NET code samples available in Azure Blob Storage Samples for .NET.
Setting Cache-Control headers by using other methods
Azure Storage Explorer
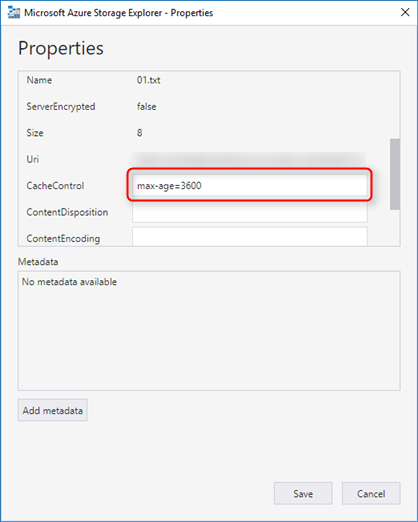
With Azure Storage Explorer, you can view and edit your blob storage resources, including properties such as the CacheControl property.
To update the CacheControl property of a blob with Azure Storage Explorer:
- Select a blob, then select Properties from the context menu.
- Scroll down to the CacheControl property.
- Enter a value, then select Save.

The Azure CLI
You can manage Azure blob resources from the command line via the Azure CLI. To set the cache-control header when you upload a blob with the Azure CLI, set the cacheControl property by using the -p switch. The following example shows how to set the TTL to one hour (3600 seconds):
azure storage blob upload -c <connectionstring> -p cacheControl="max-age=3600" .\<blob name> <container name> <blob name>
Azure Storage services REST API
You can use the Azure Storage services REST API to explicitly set the x-ms-blob-cache-control property by using the following operations on a request:
Testing the Cache-Control header
You can easily verify the TTL settings of your blobs. With your browser's developer tools, test that your blob includes the Cache-Control response header. You can also use a tool such as Wget or Fiddler to examine the response headers.