Create workstreams in Omnichannel Administration
Important
- Support for the Omnichannel Administration app ended on April 30, 2022, and the app was removed in July 2023. We recommend that you use the Customer Service admin center app to configure the latest features, such as unified routing and voice channel. For more information about the deprecation announcement, see Omnichannel Administration app is deprecated.
- Additionally, workstreams that you create in the Omnichannel Administration app can't be modified in the Customer Service admin center app. You'll need to migrate the existing workstreams and then manage them in the Customer Service admin center app. More information: Migrate workstreams created in Omnichannel Administration
Introduction
A workstream is a collection of routing rules. Routing settings define how conversations should be routed to queues. Work distribution settings define how conversations should be allocated to agents within a queue. You can create the workstreams in the Omnichannel admin center, Customer Service Hub, and Omnichannel Administration apps.
A workstream can belong to multiple channels of the same type, like multiple chat channels. In this case, all the conversations from these channels inherit the routing and work distribution settings of the workstream they belong to.
If you want to create workstreams to configure unified routing, see Create workstreams in Omnichannel admin center.
Perform the following steps:
In the Omnichannel Administration site map, go to Work Distribution Management > Work Streams.
The Active Work Streams view is displayed.

On the command bar, select New to create a work stream.
In the Work Distribution tab of the new work stream, follow these steps:
In the General information section, specify the following information:
Name: Enter a name for the workstream.
Channel: Channel is defined as a medium through which a customer reaches out for support. For example, a customer can contact an agent through chat.
Select a channel from the dropdown list:
- Live chat
- SMS
- Entity Records
- Microsoft Teams
- LINE
- Custom
Capacity: Specify the units of capacity that are required to process a single conversation for the workstream in the text box. For information on how to determine capacity units, see Capacity.
Auto-close after inactivity: Enter the unit of time after which a conversation is moved from Waiting to Closed state because of inactivity.
Select Save. The workstream is saved.
In the Work distribution settings section, perform the following steps:
- Select whether the Work distribution mode should be Push or Pick for agents to take up a conversation.
- In Allowed Presences, select a base presence, such as Available and Busy, from the dropdown. You can select all options also. Agents will be allocated work items if the agent presence is set to one of the statuses specified here. If you have enabled missed notifications, do not select Away as an allowed presence. For information, see Configure and manage custom presence.
- If you have selected Push in Work distribution mode, set the toggle to Yes for Enable selecting from push-based work streams. The agents can assign work items to themselves irrespective of constraints, such as capacity and presence.
- If you want an ongoing conversation to be assigned to the same agent when the conversation status changes from waiting to active, make sure the Enable Agent Affinity is set to yes. By default, the toggle is enabled for SMS and social channels.
Note
The Enable Agent Affinity option is available only when the work distribution mode is push. More information: Agent affinity
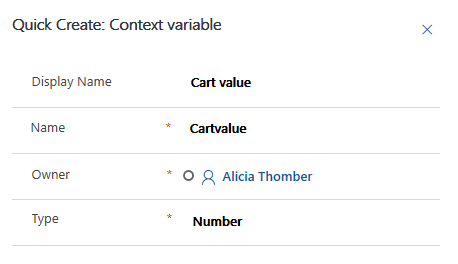
View and create context variables in the Context variables tab. Context variables enrich conversations with pre-chat data, channel data, and custom context data. These attributes can then be used to define routing rules to route conversations to different queues.
Select New to create a context variable in the Quick Create window.
Enter Display Name for the new variable. The Name field is populated accordingly.
Select the Type of variable from the drop-down list. You can choose from Text or Number.

Define routing rule items in the Routing rule items tab. Routing rule items are configured for each work stream, so that conversations can be routed to the correct queues. To learn how to configure a routing rule, see Create and manage routing rules in Omnichannel.
Select Save. The workstream is saved.
Associate workstreams with channel artifacts
You can associate work streams with channel artifacts so that the conversations can be assigned to agents seamlessly. For example, for a live chat widget, a default workstream is already associated in the Work stream field. You can select the search icon to associate another workstream. Select New to create a new workstream from within the live chat widget.
See also
Manage users in Omnichannel for Customer Service
Create workstream for entity record routing in Omnichannel Administration
Work with queues
Automatically identify customers using pre-chat responses