Hinzufügen eines Suchdiensts zu einem Netzwerksicherheitsperimeter
Wichtig
Die Unterstützung zur Azure KI-Suche für den Netzwerksicherheitsperimeter befindet sich in der öffentlichen Vorschau unter ergänzenden Nutzungsbedingungen. Sie ist in Regionen verfügbar, in denen das Feature bereitstellt wurde. Diese Vorschauversion wird ohne Vereinbarung zum Servicelevel bereitgestellt und ist nicht für Produktionsworkloads vorgesehen. Manche Features werden möglicherweise nicht unterstützt oder sind nur eingeschränkt verwendbar.
Überprüfen Sie den Abschnitt zu Einschränkungen und Überlegungen, bevor Sie beginnen.
In diesem Artikel wird erläutert, wie Sie einen Dienst mit Azure KI-Suche mit einem Netzwerksicherheitsperimeter verbinden, um den Netzwerkzugriff auf Ihren Suchdienst zu steuern. Die Verbindung mit einem Netzwerksicherheitsperimeter bietet folgende Möglichkeiten:
- Sie können den gesamten Zugriff auf Ihren Suchdienst im Kontext anderer Azure-Ressourcen im selben Perimeter steuern.
- Sie können die gesamte Datenexfiltrationen von einem Suchdienst in andere Dienste außerhalb des Perimeters blockieren.
- Sie können den Zugriff auf Ihren Suchdienst mithilfe von Funktionen für den ein- und ausgehenden Zugriff des Netzwerksicherheitsperimeters zulassen.
Sie können einen Suchdienst einem Netzwerksicherheitsperimeter im Azure-Portal hinzufügen, wie in diesem Artikel beschrieben. Alternativ können Sie die REST-API von Azure Virtual Network Manager verwenden, um einen Suchdienst einzubinden, und die REST-APIs für die Suchverwaltung, um die Konfigurationseinstellungen anzuzeigen und zu synchronisieren.
Einschränkungen und Aspekte
Für Suchdienste innerhalb eines Netzwerksicherheitsperimeters müssen die Indexer eine systemseitig oder benutzerseitig zugewiesene verwaltete Identität verwenden und über eine Rollenzuweisung verfügen, die Lesezugriff auf die Datenquellen ermöglicht.
Derzeit werden als Datenquellen für Indexer nur Azure Blob Storage, Azure Cosmos DB for NoSQL und Azure SQL-Datenbank unterstützt.
Derzeit sind Indexer-Verbindungen innerhalb des Umkreises mit Azure PaaS für den Datenabruf der primäre Anwendungsfall. Für ausgehende, skillgesteuerte API-Aufrufe an Azure KI-Dienste, Azure OpenAI oder den Azure KI Foundry-Modellkatalog oder für eingehende Anrufe aus dem Azure KI Foundry für Szenarien mit "Chat mit Ihren Daten" müssen Sie eingehende und ausgehende Regeln konfigurieren, um die Anforderungen über den Umkreis zu ermöglichen. Wenn Sie private Verbindungen für strukturberücksichtigendes Chunking und Vektorisierung benötigen, sollten Sie ein privates Netzwerk und einen freigegebenen privaten Link erstellen.
Voraussetzungen
Ein vorhandener Netzwerksicherheitsperimeter. Sie können einen erstellen und Ihrem Suchdienst zuordnen.
Azure KI-Suche mit einer beliebigen abrechenbaren Ebene in jeder Region.
Zuweisen eines Suchdiensts zu einem Netzwerksicherheitsperimeter
Azure-Netzwerksicherheitsperimeter ermöglichen Administratorteams das Definieren einer logischen Grenze für die Netzwerkisolation für PaaS-Ressourcen (z. B. Azure Storage und Azure SQL-Datenbank), die außerhalb der virtuellen Netzwerke bereitgestellt werden. Sie schränken die Kommunikation mit Ressourcen innerhalb des Perimeters ein und ermöglichen nicht öffentlichen Datenverkehr außerhalb des Perimeters über Regeln für ein- und ausgehenden Zugriff.
Sie können Azure KI-Suche einem Netzwerksicherheitsperimiter hinzufügen, sodass alle Indizierungs- und Abfrageanforderungen innerhalb der Sicherheitsgrenze ausgeführt werden.
Suchen Sie im Azure-Portal den Netzwerksicherheitsperimeterdienst für Ihr Abonnement.
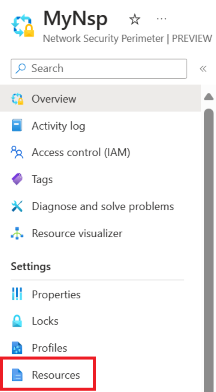
Wählen Sie im Menü auf der linken Seite Ressourcen aus.
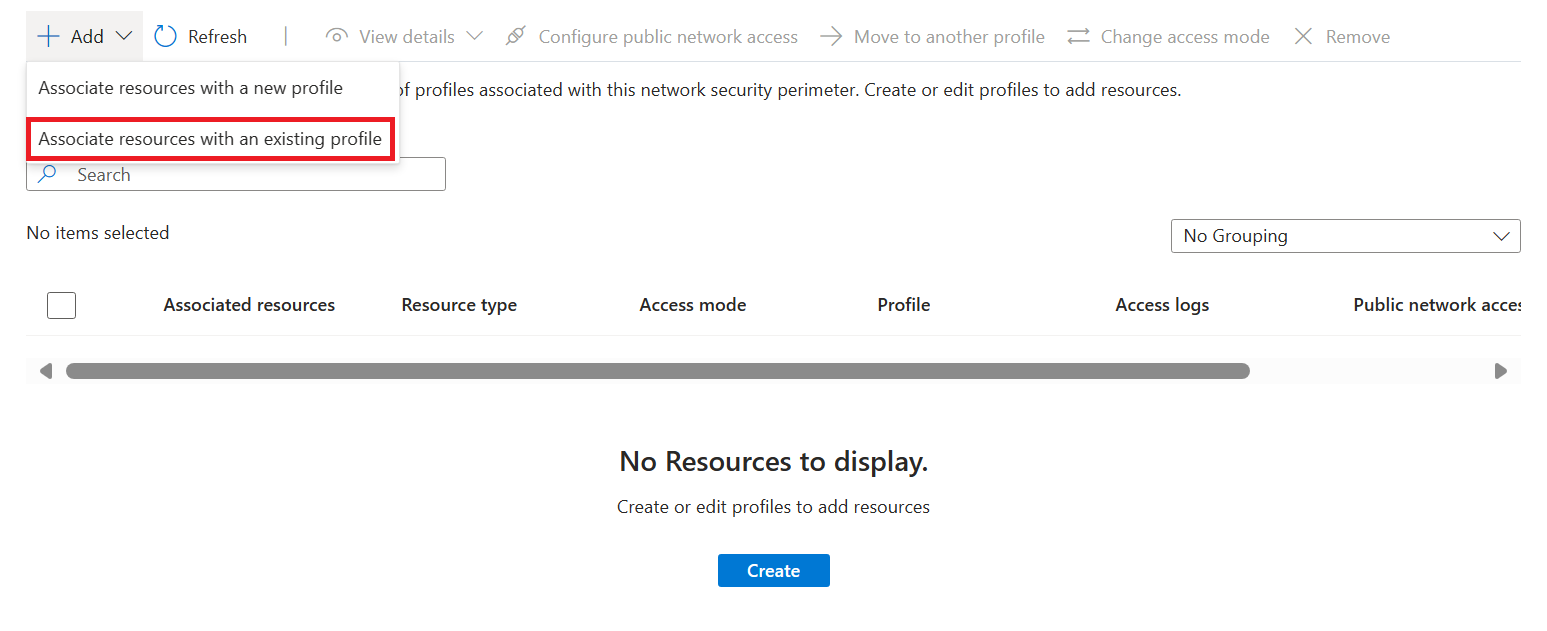
Wählen Sie Hinzufügen>Ressourcen einem vorhandenen Profil zuordnen aus.
Wählen Sie unter Profil das Profil aus, das Sie beim Erstellen des Netzwerksicherheitsperimeters erstellt haben.
Wählen Sie Zuordnen und dann den von Ihnen erstellten Suchdienst aus.
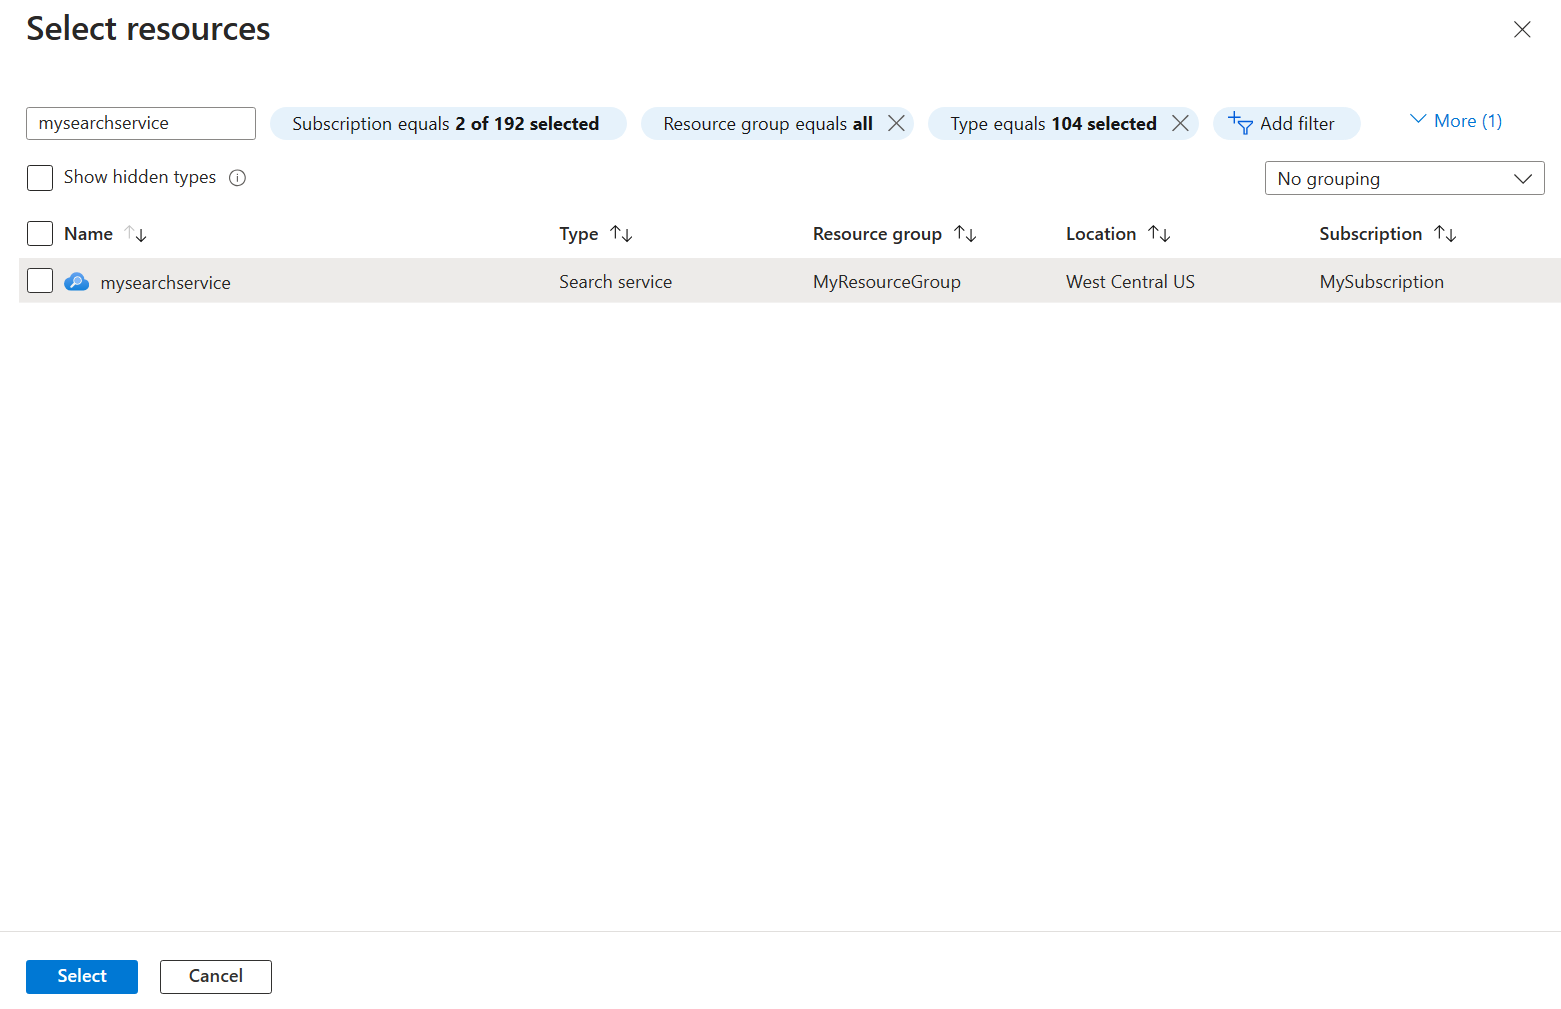
Wählen Sie im Abschnitt links unten auf dem Bildschirm Zuordnen aus, um die Zuordnung zu erstellen.
Zugriffsmodi im Netzwerksicherheitsperimeter
Netzwerksicherheitsperimeter unterstützen zwei verschiedene Zugriffsmodi für zugeordnete Ressourcen:
| Mode | Beschreibung |
|---|---|
| Lernmodus | Dies ist der Standardzugriffsmodus. Im Lernmodus protokolliert der Netzwerksicherheitsperimeter den gesamten Datenverkehr zum Suchdienst, der verweigert werden würde, wenn der Perimeter im erzwungenen Modus ausgeführt wird. Dadurch kann das Netzwerkadministratorteam die vorhandenen Zugriffsmuster des Suchdiensts analysieren, bevor es die Erzwingung von Zugriffsregeln implementiert. |
| Erzwungener Modus | Im erzwungenen Modus protokolliert und blockiert der Netzwerksicherheitsperimeter den gesamte Datenverkehr, der nicht explizit durch Zugriffsregeln erlaubt ist. |
Netzwerkeinstellungen für Netzwerksicherheitsperimeter und Suchdienst
Die publicNetworkAccess-Einstellung legt die Suchdienstzuordnung mit einem Netzwerksicherheitsperimeter fest.
Im Lernmodus steuert die
publicNetworkAccess-Einstellung den öffentlichen Zugriff auf die Ressource.Im erzwungenen Modus wird die
publicNetworkAccess-Einstellung durch die Regeln des Netzwerksicherheitsperimeters außer Kraft gesetzt. Wenn z. B. ein Suchdienst mit derpublicNetworkAccess-Einstellung mit dem Wertenabledeinem Netzwerksicherheitsperimeter im erzwungenen Modus zugeordnet ist, wird der Zugriff auf den Suchdienst weiterhin durch die Zugriffsregeln für den Netzwerksicherheitsperimeter gesteuert.
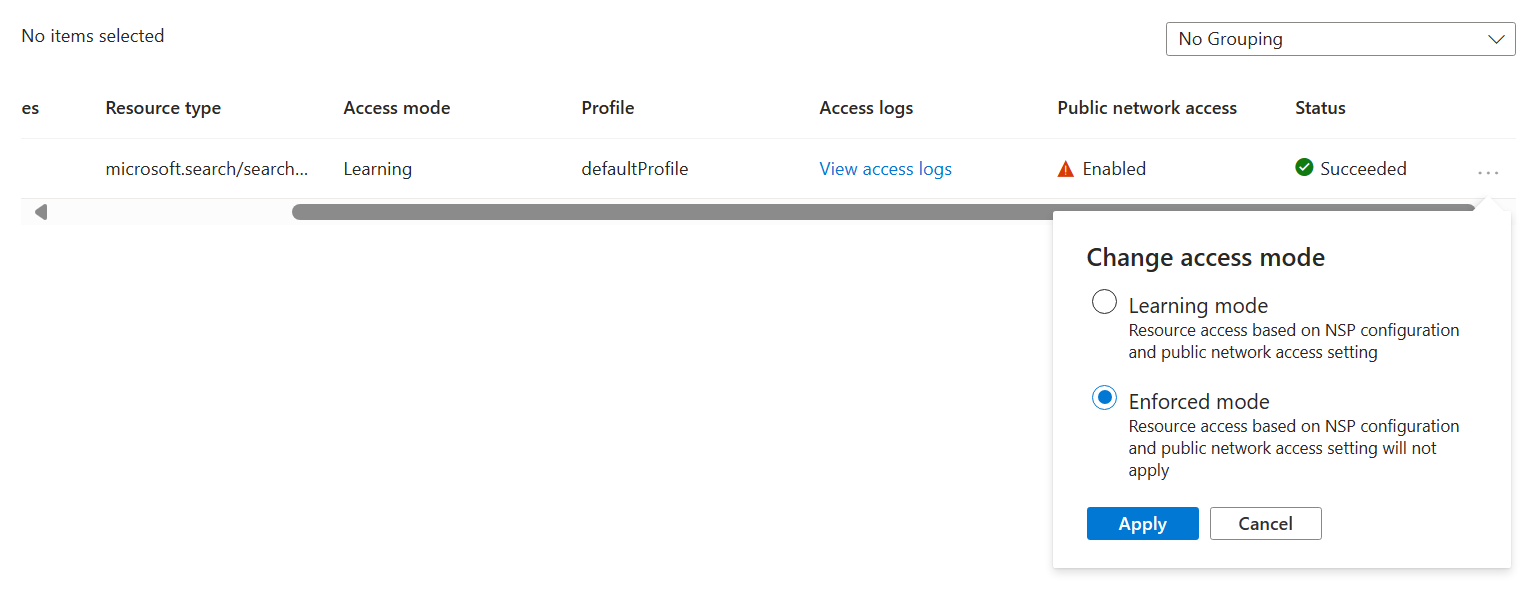
Ändern des Zugriffsmodus für Netzwerksicherheitsperimeter
Navigieren Sie im Azure-Portal zu Ihrer Netzwerksicherheitsperimeterressource.
Wählen Sie im Menü auf der linken Seite Ressourcen aus.

Suchen Sie Ihren Suchdienst in der Tabelle.
Wählen Sie die drei Punkte ganz rechts in der Zeile des Suchdiensts aus. Wählen Sie im Popupmenü die Option Zugriffsmodus ändern aus.
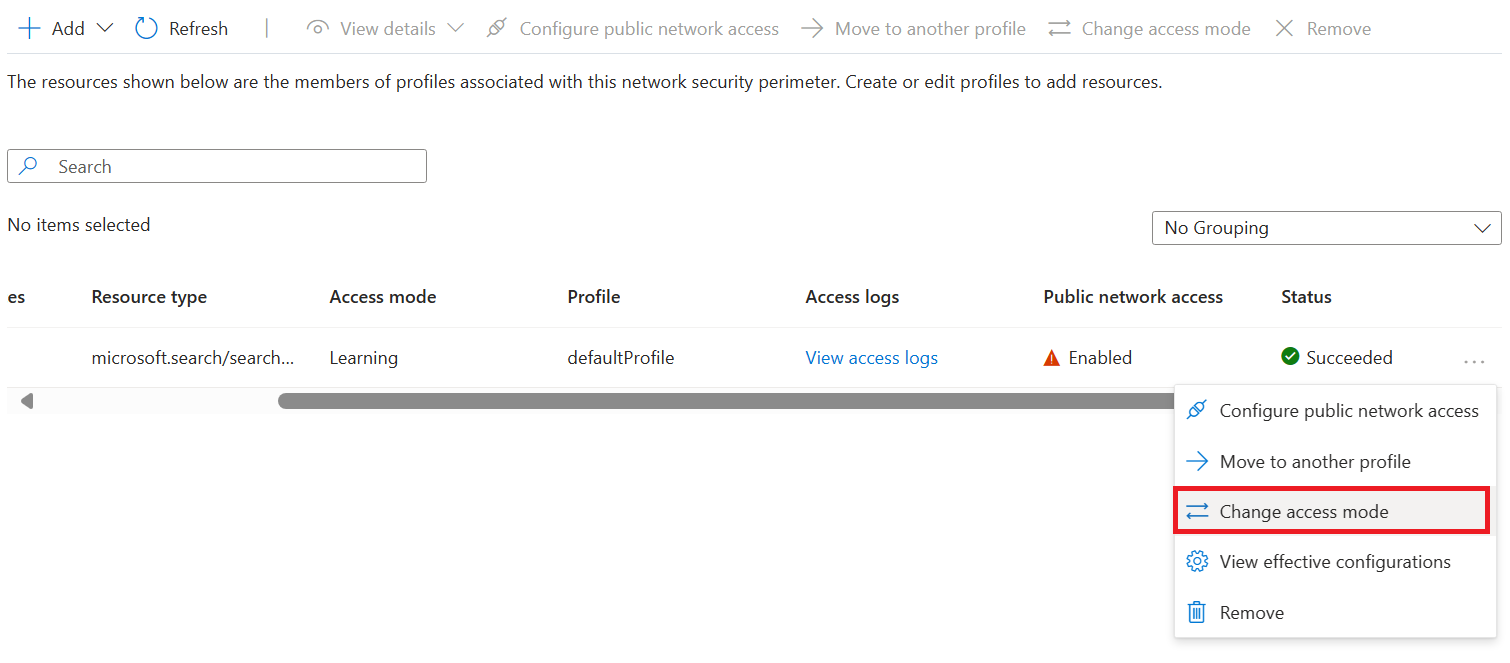
Wählen Sie den gewünschten Zugriffsmodus und dann Übernehmen aus.
Aktivieren der Protokollierung des Netzwerkzugriffs
Navigieren Sie im Azure-Portal zu Ihrer Netzwerksicherheitsperimeterressource.
Wählen Sie im Menü auf der linken Seite die Option Diagnoseeinstellungen aus.
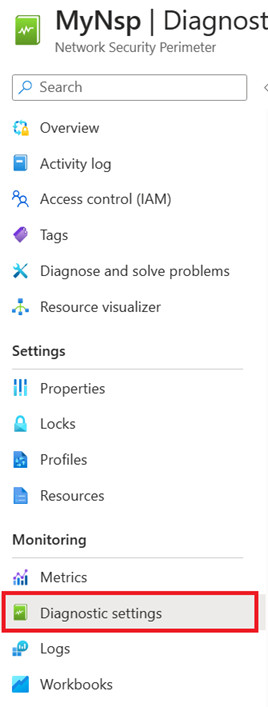
Klicken Sie auf Diagnoseeinstellung hinzufügen.
Geben Sie unter Name der Diagnoseeinstellung einen beliebigen Namen ein (z. B. „Diagnose“).
Wählen Sie unter Protokolle die Option allLogs aus. Mit allLogs wird sichergestellt, dass alle ein- und ausgehenden Netzwerkzugriffe auf Ressourcen in Ihrem Netzwerksicherheitsperimeter protokolliert werden.
Wählen Sie unter Zieldetails die Option In Speicherkonto archivieren oder An Log Analytics-Arbeitsbereich senden aus. Das Speicherkonto muss sich in derselben Region wie der Netzwerksicherheitsperimeter befinden. Sie können ein vorhandenes Speicherkonto auswählen oder ein neues erstellen. Ein Log Analytics-Arbeitsbereich kann sich auch in einer anderen Region als der des Netzwerksicherheitsperimeters befinden. Sie können auch eines der anderen entsprechenden Ziele auswählen.
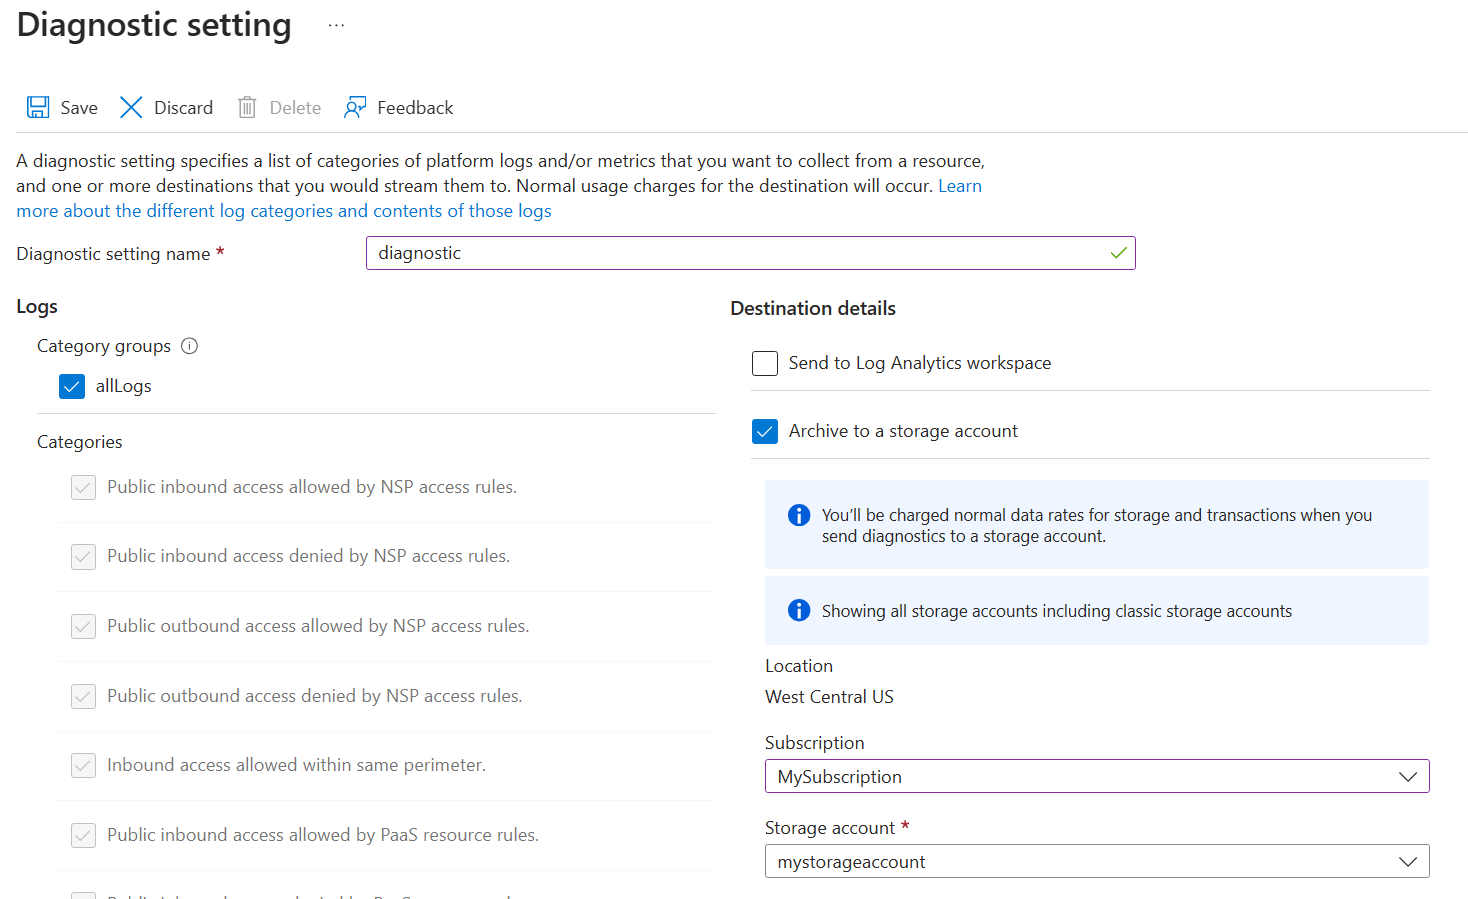
Wählen Sie Speichern aus, um die Diagnoseeinstellung zu erstellen und die Protokollierung des Netzwerkzugriffs zu starten.
Lesen von Netzwerkzugriffsprotokollen
Log Analytics-Arbeitsbereich
Die Tabelle network-security-perimeterAccessLogs enthält alle Protokolle für jede Protokollkategorie (z. B. network-security-perimeterPublicInboundResourceRulesAllowed). Jedes Protokoll enthält einen Datensatz für einen Netzwerkzugriff auf den Netzwerksicherheitsperimeter aus der jeweiligen Protokollkategorie.
Im Folgenden finden Sie ein Beispiel für das Protokollformat von network-security-perimeterPublicInboundResourceRulesAllowed:
| Spaltenname | Bedeutung | Beispielwert |
|---|---|---|
| ResultDescription | Name des Netzwerkzugriffsvorgangs | POST /indexes/my-index/docs/search |
| Profil | Der zugeordnete Netzwerksicherheitsperimeter des Suchdiensts | defaultProfile |
| ServiceResourceId | Ressourcen-ID des Suchdiensts | search-service-resource-id |
| Ausgelöste Regel | JSON-Beschreibung der mit dem Protokoll abgeglichenen Regel | { "accessRule": "IP firewall" } |
| SourceIPAddress | Quell-IP-Adresse des eingehenden Netzwerkzugriffs (sofern zutreffend) | 1.1.1.1 |
| AccessRuleVersion | Version der Zugriffsregeln für den Netzwerksicherheitsperimeter, die zum Erzwingen der Netzwerkzugriffsregeln angewendet wurden | 0 |
Speicherkonto
Das Speicherkonto enthält Container für jede Protokollkategorie (z. B. insights-logs-network-security-perimeterpublicinboundperimeterrulesallowed). Die Ordnerstruktur innerhalb des Containers entspricht der Ressourcen-ID des Netzwerksicherheitsperimeters und der Zeit, zu der die Protokolle erfasst wurden. Jede Zeile in der JSON-Protokolldatei enthält einen Datensatz für Netzwerkzugriff im Netzwerkperimeter aus der jeweiligen Protokollkategorie.
Zum Protokollieren der Kategorie für Eingangsregeln für zulässigen Perimeterzugriff wird z. B. das folgende Format verwendet:
"properties": {
    "ServiceResourceId": "/subscriptions/00000000-0000-0000-0000-000000000000/resourceGroups/network-security-perimeter/providers/Microsoft.Search/searchServices/network-security-perimeter-search",
    "Profile": "defaultProfile",
    "MatchedRule": {
        "AccessRule": "myaccessrule"
    },
    "Source": {
        "IpAddress": "255.255.255.255",
    }
}
Hinzufügen einer Zugriffsregel für Ihren Suchdienst
Ein Netzwerksicherheitsperimeterprofil gibt Regeln an, die den Zugriff im Perimeter zulassen oder verweigern.
Innerhalb des Perimeters haben alle Ressourcen gegenseitigen Zugriff auf Netzwerkebene. Sie müssen trotzdem eine Authentifizierung und Autorisierung einrichten, aber auf Netzwerkebene werden Verbindungsanforderungen innerhalb des Perimeters akzeptiert.
Für Ressourcen außerhalb des Netzwerksicherheitsperimeters müssen Sie Regeln für ein- und ausgehenden Zugriff angeben. Eingangsregeln geben an, welche eingehenden Verbindungen zulässig sind, und Ausgangsregeln legen fest, welche ausgehenden Anforderungen erlaubt sind.
Ein Suchdienst akzeptiert eingehende Anforderungen von Apps wie dem Azure AI Foundry-Portal, dem prompt flow von Azure Machine Learning und allen Apps, die Indizierungs- oder Abfrageanforderungen senden. Ein Suchdienst sendet ausgehende Anforderungen während der indexerbasierten Indizierung und bei Skillsetausführungen. In diesem Abschnitt wird erläutert, wie Sie Regeln für ein- und ausgehenden Zugriff für Szenarien mit Azure KI-Suche einrichten.
Hinweis
Jeder Dienst, der einem Netzwerksicherheitsperimeter zugeordnet ist, ermöglicht implizit ein- und ausgehenden Zugriff auf alle anderen Dienste, die demselben Netzwerksicherheitsperimeter zugeordnet sind, wenn dieser Zugriff mithilfe verwalteter Identitäten und Rollenzuweisungen authentifiziert wird. Zugriffsregeln müssen nur erstellt werden, wenn Zugriff außerhalb des Netzwerksicherheitsperimeters zugelassen werden soll, oder um den Zugriff mithilfe von API-Schlüsseln zu authentifizieren.
Hinzufügen einer Regel für eingehenden Zugriff
Regeln für eingehenden Zugreifen lassen Verbindungen aus dem Internet und von Ressourcen außerhalb des Perimeters mit Ressourcen innerhalb des Perimeters zu.
Der Netzwerksicherheitsperimeter unterstützt zwei Typen von Regeln für eingehenden Zugriff:
IP-Adressbereiche. IP-Adressen oder -bereiche müssen im CIDR-Format (Classless Inter-Domain Routing) angegeben werden. Ein Beispiel für die CIDR-Notation ist „192.0.2.0/24“, womit die IP-Adressen im Bereich zwischen 192.0.2.0 und 192.0.2.255 dargestellt werden. Dieser Regeltyp lässt eingehende Anforderungen von einer beliebigen IP-Adresse innerhalb des Bereichs zu.
Abonnements. Dieser Regeltyp lässt eingehenden Zugriff zu, der mit einer beliebigen verwalteten Identität aus dem Abonnement authentifiziert wurde.
So fügen Sie eine Regel für eingehenden Zugriff über das Azure-Portal hinzu:
Navigieren Sie im Azure-Portal zu Ihrer Netzwerksicherheitsperimeterressource.
Wählen Sie im linken Menü Profile aus.
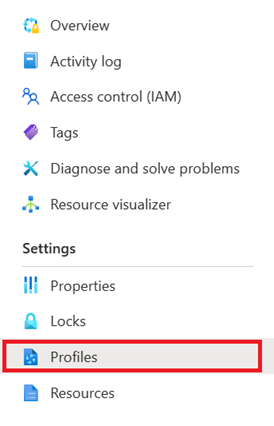
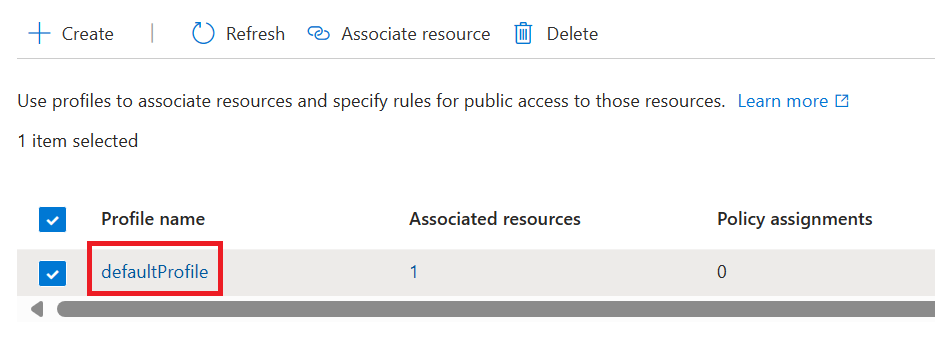
Wählen Sie das Profil aus, das Sie für Ihren Netzwerksicherheitsperimeter verwenden.
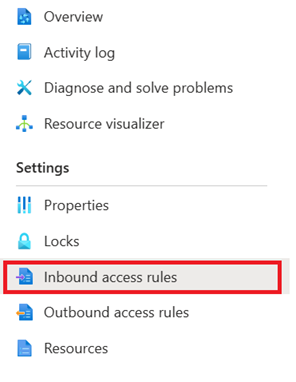
Wählen Sie im linken Menü Regel für eingehenden Zugriff aus.
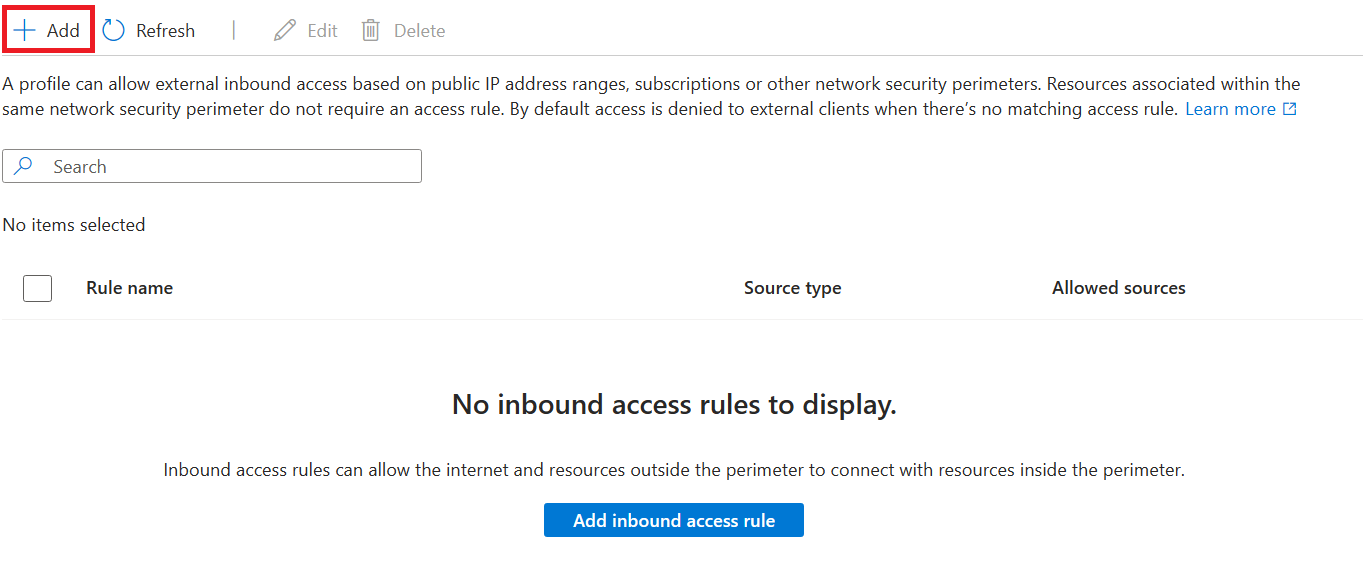
Wählen Sie Hinzufügen.
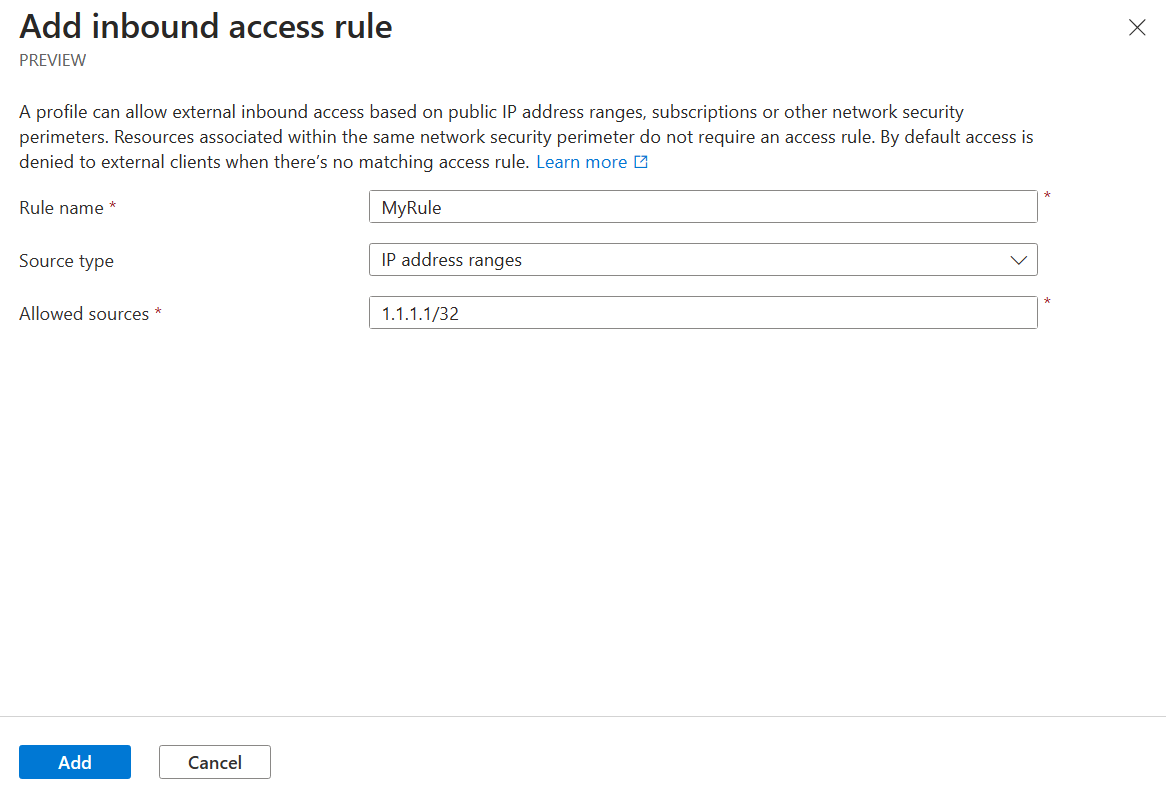
Geben Sie folgende Werte ein bzw. wählen diese aus:
Einstellung Wert Regelname Der Name für die Regel für eingehenden Zugriff (z. B. „MyInboundAccessRule“). Quelltyp Gültige Werte sind IP-Adressbereiche oder Abonnements. Zulässige Quellen Wenn Sie IP-Adressbereiche ausgewählt haben, geben Sie den IP-Adressbereich, aus dem Sie den eingehenden Zugriff zulassen möchten, im CIDR-Format ein. Azure IP-Adressbereiche finden Sie unter diesem Link. Wenn Sie Abonnements ausgewählt haben, verwenden Sie das Abonnement, aus dem Sie eingehenden Zugriff zulassen möchten. Wählen Sie Hinzufügen aus, um die Regel für eingehenden Zugriff zu erstellen.
Hinzufügen einer Regel für ausgehenden Zugriff
Ein Suchdienst führt während der indexerbasierten Indizierung und bei Skillsetausführungen ausgehende Aufrufe durch. Wenn sich Ihre Indexerdatenquellen, Azure KI Services oder benutzerdefinierte Skilllogik außerhalb des Netzwerksicherheitsperimeters befinden, sollten Sie eine Regel für ausgehenden Zugriff erstellen, die Ihrem Suchdienst das Herstellen einer Verbindung erlaubt.
Denken Sie daran, dass Azure KI-Suche während der Public Preview nur innerhalb des Sicherheitsperimeters eine Verbindung mit Azure Storage oder Azure Cosmos DB herstellen kann. Wenn Ihre Indexer andere Datenquellen verwenden, benötigen Sie eine Regel für ausgehenden Zugriff erstellen, die diese Verbindung unterstützt.
Der Netzwerksicherheitsperimeter unterstützt Regeln für ausgehenden Zugriff basierend auf dem vollqualifizierten Domänennamen (Fully Qualified Domain Name, FQDN) des Ziels. Sie können z. B. ausgehenden Zugriff von jedem Dienst, der Ihrem Netzwerksicherheitsperimeter zugeordnet ist, an einen FQDN wie mystorageaccount.blob.core.windows.net zulassen.
So fügen Sie eine Regel für ausgehenden Zugriff über das Azure-Portal hinzu:
Navigieren Sie im Azure-Portal zu Ihrer Netzwerksicherheitsperimeterressource.
Wählen Sie im linken Menü Profile aus.

Wählen Sie das Profil aus, das Sie für Ihren Netzwerksicherheitsperimeter verwenden.

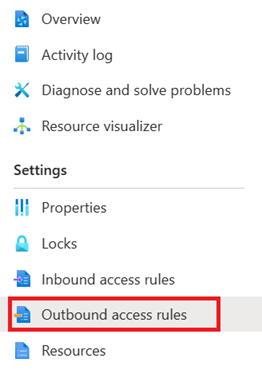
Wählen Sie im linken Menü Regel für ausgehenden Zugriff aus.
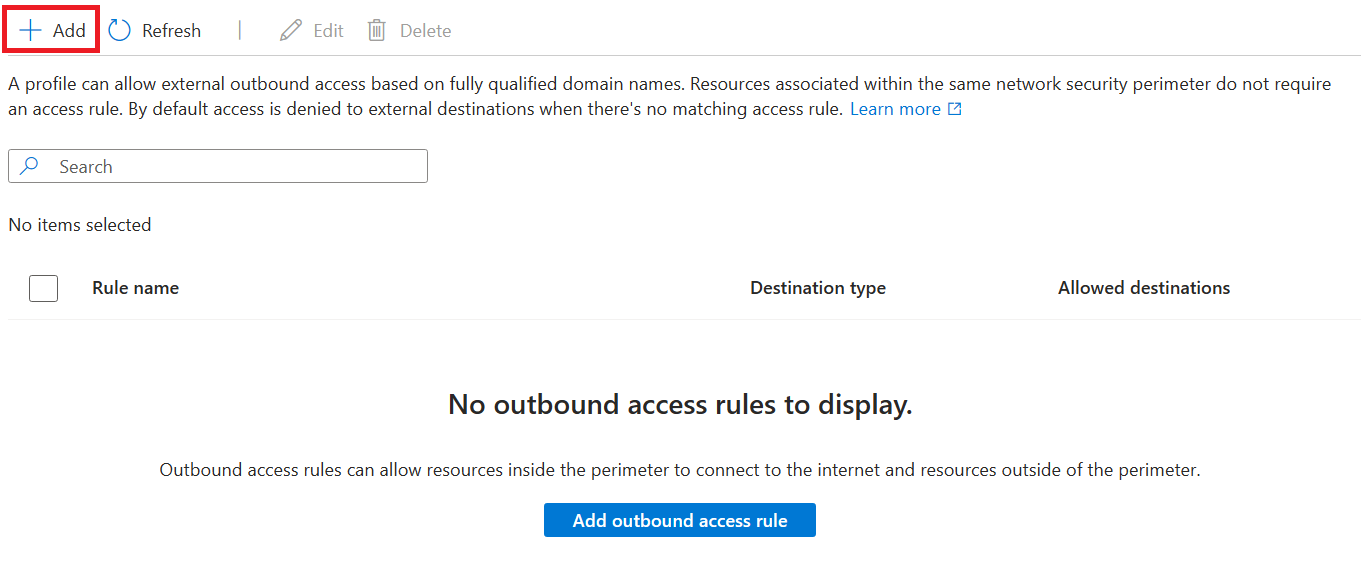
Wählen Sie Hinzufügen.
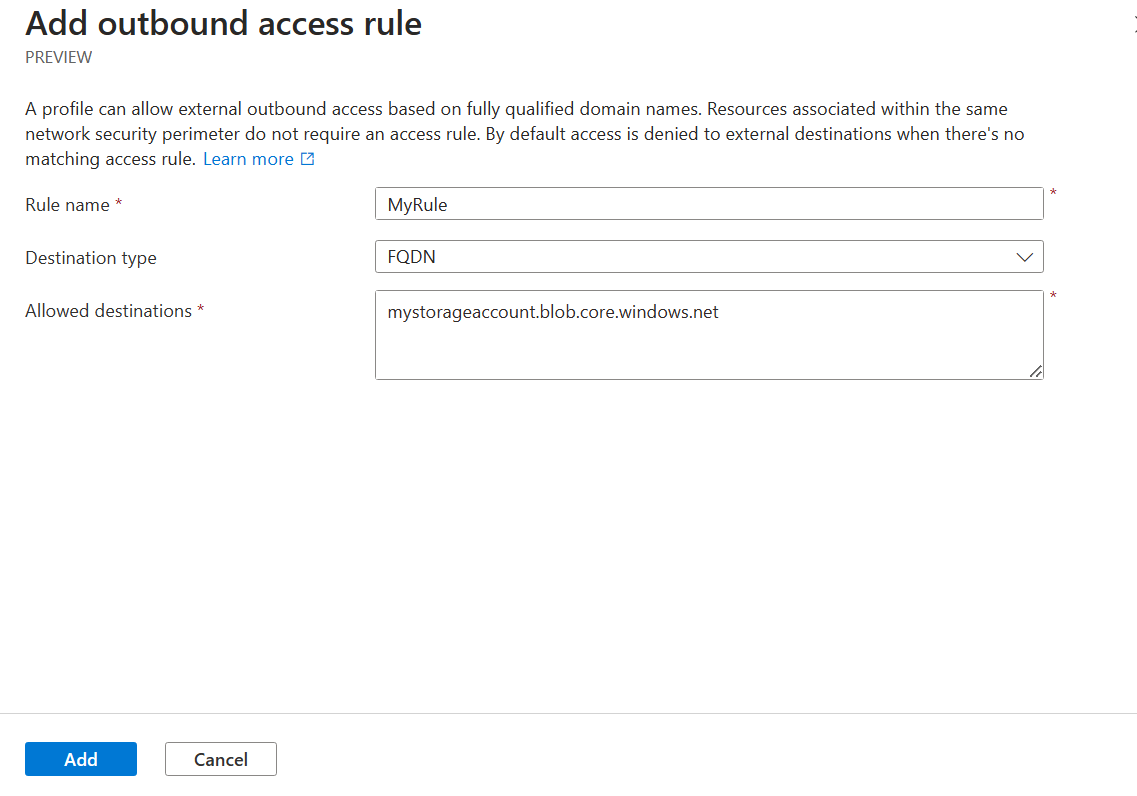
Geben Sie folgende Werte ein bzw. wählen diese aus:
Einstellung Wert Regelname Der Name der Regel für ausgehenden Zugriff (z. B. „MyOutboundAccessRule“) Zieltyp Behalten Sie den FQDN bei. Zulässige Ziele Geben Sie eine durch Trennzeichen getrennte Liste von FQDNs ein, an die Sie ausgehenden Zugriff zulassen möchten. Wählen Sie Hinzufügen aus, um die Regel für ausgehenden Zugriff zu erstellen.
Testen der Verbindung über den Netzwerksicherheitsperimeter
Um Ihre Verbindung über den Netzwerksicherheitsperimeter zu testen, benötigen Sie Zugriff auf einen Webbrowser auf einem lokalen Computer mit Internetverbindung oder auf einer Azure-VM.
Ändern Sie die Zuordnung des Netzwerksicherheitsperimeters in den erzwungenen Modus, um die Anforderungen des Netzwerksicherheitsperimeters für den Netzwerkzugriff auf Ihren Suchdienst zu erzwingen.
Entscheiden Sie, ob Sie einen lokalen Computer oder eine Azure-VM verwenden möchten.
- Wenn Sie einen lokalen Computer verwenden, müssen Sie Ihre öffentliche IP-Adresse kennen.
- Wenn Sie eine Azure-VM verwenden, können Sie entweder Private Link verwenden oder die IP-Adresse über das Azure-Portal überprüfen.
Mithilfe der IP-Adresse können Sie eine Regel für eingehenden Zugriff für diese IP-Adresse erstellen, um Zugriff darüber zuzulassen. Sie können diesen Schritt überspringen, wenn Sie Private Link verwenden.
Versuchen Sie zum Schluss, im Azure-Portal zum Suchdienst zu navigieren. Wenn Sie die Indizes erfolgreich anzeigen können, wurde der Netzwerksicherheitsperimeter ordnungsgemäß konfiguriert.
Anzeigen und Verwalten der Konfiguration des Netzwerksicherheitsperimeters
Sie können die Konfigurations-REST-APIs für Netzwerksicherheitsperimeter verwenden, um Perimeterkonfigurationen zu überprüfen und abzustimmen.
Achten Sie darauf, dafür die Vorschau-API-Version 2024-06-01-preview zu verwenden.
Erfahren Sie, wie Sie die Verwaltungs-REST-APIs aufrufen.