如何建立幾何群組
本主題描述如何建立幾何群組。
若要建立幾何群組,請呼叫 ID2D1Factory::CreateGeometryGroup 方法,並指定幾何陣列和填滿模式。
當您將幾何結合成幾何群組時,請確定幾何具有類似的方向。 如果您不確定幾何的方向,請分別呼叫 ID2D1Geometry::Outline,然後將產生的幾何插入幾何群組中。
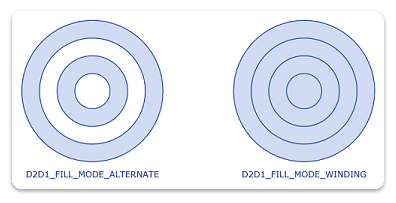
下列程式代碼範例示範建立四個同心圓:第一個圓圈的半徑為 25、第二個 50、第三個 75 和第四個 100。 程式碼還顯示了幾何體陣列的實例化,以及兩次CreateGeometryGroup的呼叫。
HRESULT DemoApp::CreateGeometryResources()
{
    HRESULT hr;

    const D2D1_ELLIPSE ellipse1 = D2D1::Ellipse(
        D2D1::Point2F(105.0f, 105.0f),
        25.0f,
        25.0f
        );

    hr = m_pD2DFactory->CreateEllipseGeometry(
        ellipse1,
        &m_pEllipseGeometry1
        );

    if (SUCCEEDED(hr))
    {
        const D2D1_ELLIPSE ellipse2 = D2D1::Ellipse(
            D2D1::Point2F(105.0f, 105.0f),
            50.0f,
            50.0f
            );

        hr = m_pD2DFactory->CreateEllipseGeometry(
            ellipse2,
            &m_pEllipseGeometry2
            );
    }

    if (SUCCEEDED(hr))
    {

        const D2D1_ELLIPSE ellipse3 = D2D1::Ellipse(
            D2D1::Point2F(105.0f, 105.0f),
            75.0f,
            75.0f
            );

        hr = m_pD2DFactory->CreateEllipseGeometry(
            ellipse3,
            &m_pEllipseGeometry3
            );
    }

    if (SUCCEEDED(hr))
    {
        const D2D1_ELLIPSE ellipse4 = D2D1::Ellipse(
            D2D1::Point2F(105.0f, 105.0f),
            100.0f,
            100.0f
            );

        hr = m_pD2DFactory->CreateEllipseGeometry(
            ellipse4,
            &m_pEllipseGeometry4
            );
    }

    if (SUCCEEDED(hr))
    {
        ID2D1Geometry *ppGeometries[] =
        {
            m_pEllipseGeometry1,
            m_pEllipseGeometry2,
            m_pEllipseGeometry3,
            m_pEllipseGeometry4
        };

        hr = m_pD2DFactory->CreateGeometryGroup(
            D2D1_FILL_MODE_ALTERNATE,
            ppGeometries,
            ARRAYSIZE(ppGeometries),
            &m_pGeoGroup_AlternateFill
            );

        if (SUCCEEDED(hr))
        {
            hr = m_pD2DFactory->CreateGeometryGroup(
                D2D1_FILL_MODE_WINDING,
                ppGeometries,
                ARRAYSIZE(ppGeometries),
                &m_pGeoGroup_WindingFill
                );
        }

    }
    return hr;
}
幾何群組的繪製和填滿
若要繪製和填滿幾何群組,請使用 ID2D1RenderTarget::FillGeometry 和 ID2D1RenderTarget::D rawGeometry 方法。 下列程式代碼範例示範如何繪製和填滿幾何群組。
HRESULT DemoApp::OnRender()
{
    HRESULT hr = CreateDeviceResources();

    if (SUCCEEDED(hr))
    {
        static const WCHAR sc_fillModeAlternateText[] = L"D2D1_FILL_MODE_ALTERNATE";
        static const WCHAR sc_fillModeWindingText[] = L"D2D1_FILL_MODE_WINDING";

        m_pRenderTarget->BeginDraw();

        m_pRenderTarget->SetTransform(D2D1::Matrix3x2F::Identity());

        m_pRenderTarget->Clear(D2D1::ColorF(D2D1::ColorF::White));

        D2D1_SIZE_F rtSize = m_pRenderTarget->GetSize();
        m_pRenderTarget->FillRectangle(
            D2D1::RectF(0.0f, 0.0f, rtSize.width, rtSize.height),
            m_pGridPatternBitmapBrush
            );

        // Centers the text in a layout rectangle.
        hr = m_pTextFormat->SetTextAlignment(DWRITE_TEXT_ALIGNMENT_CENTER);

        if (SUCCEEDED(hr))
        {
            // Fill the geometry group with D2D1_FILL_MODE_ALTERNATE and
            // then draw the geometries in the group.
            m_pRenderTarget->FillGeometry(m_pGeoGroup_AlternateFill, m_pFillBrush);
            m_pRenderTarget->DrawGeometry(m_pGeoGroup_AlternateFill, m_pStrokeBrush, 1.0f);

            m_pRenderTarget->DrawText(
                sc_fillModeAlternateText,
                ARRAYSIZE(sc_fillModeAlternateText) - 1,
                m_pTextFormat,
                D2D1::RectF(5, 215, 205, 240),
                m_pStrokeBrush,
                D2D1_DRAW_TEXT_OPTIONS_NONE,
                DWRITE_MEASURING_MODE_NATURAL
                );

            m_pRenderTarget->SetTransform(D2D1::Matrix3x2F::Translation(300, 0));

            // Fill the geometry group with D2D1_FILL_MODE_WINDING and
            // then draw the geometries in the group.
            m_pRenderTarget->FillGeometry(m_pGeoGroup_WindingFill, m_pFillBrush);
            m_pRenderTarget->DrawGeometry(m_pGeoGroup_WindingFill, m_pStrokeBrush, 1.0f);

            m_pRenderTarget->DrawText(
                sc_fillModeWindingText,
                ARRAYSIZE(sc_fillModeWindingText) - 1,
                m_pTextFormat,
                D2D1::RectF(5, 215, 205, 240),
                m_pStrokeBrush,
                D2D1_DRAW_TEXT_OPTIONS_NONE,
                DWRITE_MEASURING_MODE_NATURAL
                );

            hr = m_pRenderTarget->EndDraw();

            if (hr == D2DERR_RECREATE_TARGET)
            {
                hr = S_OK;
                DiscardDeviceResources();
            }
        }
    }
    return hr;
}
此程式代碼會產生下圖所示的輸出。
