清單檢視和網格檢視
大多數應用程式操作和顯示資料集,例如:影像的圖庫或一組電子郵件。 XAML UI 架構提供 ListView 和 GridView 控制項,讓您可以輕鬆地在應用程式中顯示和操作資料。
注意
ListView 和 GridView 都是衍生自 ListViewBase 類別,因此它們具有相同功能,但會以不同方式顯示資料。 在本文中,除非另有說明,否則有關清單檢視的討論同時適用於 ListView 和 GridView 控制項。 我們可能會參考像是 ListView 或 ListViewItem 等類別,但對於對應的方格對等項目 (GridView 或 GridViewItem),可使用 Grid 來取代 List 首碼。
當您使用集合時,ListView 和 GridView 控制項提供許多好處。 兩者都很容易實作,且提供基本 UI、互動性和捲動功能,而且可輕易自訂。 兩者都可以繫結至現有的動態資料來源,或者是 XAML 本身或程式碼後置中提供的硬式編碼資料。
這兩個控制項可以靈活地在各種案例中使用,但整體而言,它們最適合所有項目都具有相同基本結構和外觀以及相同互動行為的集合。 也就是說,當按一下時,它們都應該執行相同的動作 (例如:開啟連結或瀏覽)。
比較 ListView 和 GridView。
ListView
ListView 控制項會顯示垂直堆疊在單一資料行中的資料。 ListView 較適用於以文字為焦點的項目,以及應從上往下讀取 (例如:依字母順序排列) 的集合。 ListView 的一些常見使用案例包括訊息清單和搜尋結果清單。 如果您需要以多個資料行或類似資料表的格式顯示集合,則不應該使用 ListView。 相反地,請考慮使用 DataGrid 控制項。
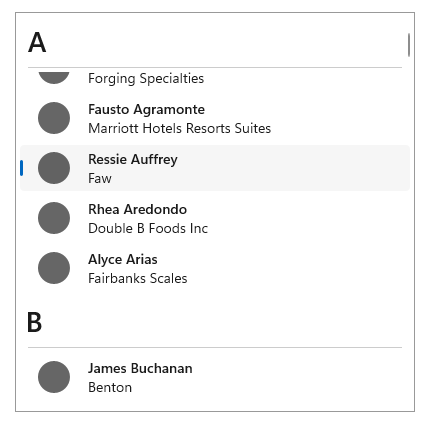
GridView
GridView 控制項以資料列和資料行的形式呈現可垂直捲動的項目集合。 資料會水平堆疊,直到它填滿資料行,然後繼續進行資料行中的下一個資料列。 GridView 較適用於以影像為焦點的集合,或者其項目可並列讀取或未依特定順序排序的集合。 GridView 的常見使用案例為相片或產品資源庫。
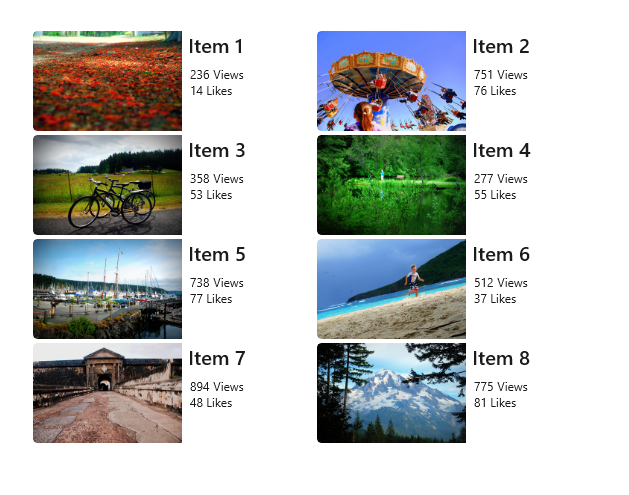
您應使用哪個集合控制項? 與 ItemsRepeater 的比較
請務必先了解這些類型的控制項之間的差異,再決定要使用的控件類型。
ListView 和 GridView \(英文\)
功能豐富的 ListView 和 GridView 控制項現成可用。 它們不一定需要自訂,但可以輕鬆地自訂。 每個都有它自己的內建 UI 和 UX,目的是按原狀顯示幾乎任何類型的集合。
ItemsRepeater
ItemsRepeater 控制項也可用來顯示集合,但其設計宗旨是要做為建置組塊,用以建立符合個人特定 UI 需求的自訂控制項。 它沒有與 ListView 和 GridView 相同的內建特性和功能,因此您必須實作任何必要的功能或互動。 如果您有無法使用 ListView 或 GridView 來建立的高度自訂 UI,或者您的資料來源要求每個項目有不同的行為,則使用 ItemsRepeater。
若要深入了解 ItemsRepeater,請閱讀其指引和 API 文件。
UWP 和 WinUI 2
重要
本文中的資訊和範例針對使用 Windows App SDK 和 WinUI 3 的應用程式進行了最佳化,但通常適用於使用 WinUI 2 的 UWP 應用程式。 如需平台特定資訊和範例,請參閱 UWP API 參考。
本節包含您在 UWP 或 WinUI 2 應用程式中使用控制項所需的資訊。
這些控制項的 API 位在 Windows.UI.Xaml.Controls 命名空間中。
- UWP API:ListView 類別、GridView 類別、ItemsSource 屬性、Items 屬性
- 開啟 WinUI 2 資源庫應用程式,並查看 ListView 或 GridView 運作情形。 WinUI 2 程式庫應用程式包含大部分 WinUI 2 控制項、特性和功能的互動式範例。 從 Microsoft Store 取得應用程式,或在 Github 上取得原始程式碼。
建議使用最新的 WinUI 2 來取得所有控制項的最新樣式和範本。
建立清單檢視或網格檢視
- Important APIs: ListView 類別、GridView 類別、ItemsSource 屬性、Items 屬性
WinUI 3 資源庫應用程式包含大多數 WinUI 3 控制項和功能的互動式範例。 從 Microsoft Store 取得應用程式,或在 GitHub 上取得原始程式碼
ListView 和 GridView 皆屬於 ItemsControl 類型,因此可包含任何類型的項目集合。 ListView 或 GridView 控制項的 Items 集合中必須要有項目,才能在畫面上顯示任何內容。 若要填入檢視,您可以請將項目直接新增至集合,或將 ItemsSource 屬性設定為資料來源。
警告
您可以使用 Items 或 ItemsSource 屬性來填入清單,但無法同時使用這兩者。 如果設定 ItemsSource 屬性並在 XAML 中新增項目,則會忽略新增的項目。 如果設定 ItemsSource 屬性並在程式碼中將項目新增至 Items 集合中,則會擲回例外狀況。
為了簡化起見,本文中的許多範例都會直接填入 Items 集合。 不過,更常見的是清單中的項目來自動態來源,例如:線上資料庫中的書籍清單。 您可以使用 ItemsSource 屬性來達到此目的。
將項目新增至 ListView 或 GridView 控制項
您可以使用 XAML 或使用程式碼將項目新增至 ListView 或 GridView Items 集合,以產生相同的結果。 如果您只有少量不會變更且很容易定義的項目,或是如果您在執行階段於程式碼中產生項目,則通常會透過 XAML 新增項目。
方法 1:將項目新增至 Items 集合
選項 1:透過 XAML 新增項目
<!-- No corresponding C# code is needed for this example. -->

<ListView x:Name="Fruits">
<x:String>Apricot</x:String>
<x:String>Banana</x:String>
<x:String>Cherry</x:String>
<x:String>Orange</x:String>
<x:String>Strawberry</x:String>
</ListView>
選項 2:透過程式碼新增項目
<StackPanel Name="FruitsPanel"></StackPanel>// Create a new ListView and add content. ListView Fruits = new ListView(); Fruits.Items.Add("Apricot"); Fruits.Items.Add("Banana"); Fruits.Items.Add("Cherry"); Fruits.Items.Add("Orange"); Fruits.Items.Add("Strawberry"); // Add the ListView to a parent container in the visual tree (which you created in the corresponding XAML file). FruitsPanel.Children.Add(Fruits);
這兩個選項都會產生相同的清單檢視,如下所示:
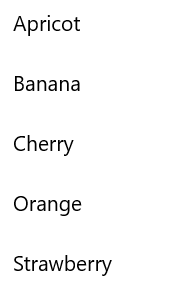
方法 2:透過設定 ItemsSource 屬性新增項目
您會使用 ListView 或 GridView 顯示來自資料庫或網際網路等來源的資料。 若要從資料來源填入 ListView 或 GridView 控制項,您應將其 ItemsSource 屬性設定為資料項目的集合。 如果 ListView 或 GridView 將會存放自訂類別物件,此方法會有更好的效用,如下列範例所示。
選項 1:在程式碼中設定 ItemsSource
在這裡,ListView ItemsSource 屬性會在程式碼中直接設定為集合的執行個體。
<StackPanel x:Name="ContactPanel"></StackPanel>// Class definition should be provided within the namespace being used, outside of any other classes. this.InitializeComponent(); // Instead of adding hard coded items to an ObservableCollection as shown here, //the data could be pulled asynchronously from a database or the internet. ObservableCollection<Contact> Contacts = new ObservableCollection<Contact>(); // You create Contact objects by providing a first name, last name, and company for the Contact constructor. // They are then added to the ObservableCollection Contacts. Contacts.Add(new Contact("John", "Doe", "Contoso, LTD.")); Contacts.Add(new Contact("Jane", "Doe", "Fabrikam, Inc.")); Contacts.Add(new Contact("Santa", "Claus", "Alpine Ski House")); // Create a new ListView (or GridView) for the UI, and add content by setting ItemsSource ListView ContactsLV = new ListView(); ContactsLV.ItemsSource = Contacts; // Add the ListView to a parent container in the visual tree (which you created in the corresponding XAML file) ContactPanel.Children.Add(ContactsLV);選項 2:在 XAML 中設定 ItemsSource
您也可以將 ItemsSource 屬性繫結至 XAML 中的集合。 在此,ItemsSource 會繫結至名為 Contacts 的公用屬性,此屬性可公開頁面的私用資料集合,名為 _contacts。
<ListView x:Name="ContactsLV" ItemsSource="{x:Bind Contacts}"/>// Provide a class definition within the namespace being used, outside of any other classes. // These two declarations belong outside the main page class. private ObservableCollection<Contact> _contacts = new ObservableCollection<Contact>(); public ObservableCollection<Contact> Contacts { get { return this._contacts; } } // Define this method within your main page class. protected override void OnNavigatedTo(NavigationEventArgs e) { base.OnNavigatedTo(e); // Instead of hard coded items, the data could be pulled // asynchronously from a database or the internet. Contacts.Add(new Contact("John", "Doe", "Contoso, LTD.")); Contacts.Add(new Contact("Jane", "Doe", "Fabrikam, Inc.")); Contacts.Add(new Contact("Santa", "Claus", "Alpine Ski House")); }
這兩個選項都會產生相同的清單檢視,如下列螢幕擷取畫面所示。 (清單檢視會顯示每個項目的字串表示,因為沒有為此練習定義的資料範本。)
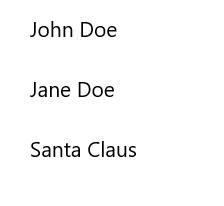
重要
在沒有定義資料範本的情況下,自訂類別物件將只會以其字串值形式出現在清單檢視中 (如果它們具有已定義的 ToString() 方法)。
下一節將更詳細說明如何在 ListView 或 GridView 範本中正確呈現簡單和自訂類別項目。
如需資料繫結的詳細資訊,請參閱資料繫結概觀。
注意
如果您需要在清單檢視中顯示分組資料,就必須繫結至 CollectionViewSource 類別。 CollectionViewSource 可做為 XAML 中集合類別的 Proxy,並啟用群組支援。 如需詳細資訊,請參閱 CollectionViewSource。
使用資料範本自訂外觀
透過在 ListView 或 GridView 控制項中使用資料範本,您可以定義項目和資料的視覺化方式。 根據預設,資料項目會在清單檢視中,以字串形式顯示所繫結的資料物件。 您可以將 DisplayMemberPath 設定為該屬性,以顯示資料項目之特定屬性的字串表示法。
但是,您通常會想要以更多樣化的表示方式顯示資料。 若要指定項目在清單檢視或網格檢視中的顯示方式,您可以建立 DataTemplate 類別。 在 DataTemplate 中的 XAML 會定義用來顯示個別項目之控制項的配置和外觀。 配置中的控制項可以繫結至資料物件的屬性,或以內嵌方式定義靜態內容。
重要
當您在 DataTemplate中使用 x:Bind markup extension 時,必須在資料範本上指定資料類型(x:DataType)。
簡單的 ListView 資料範本
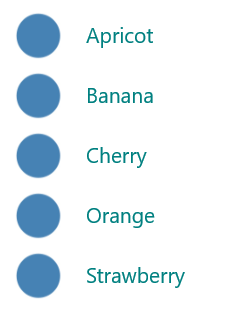
在此範例中,資料項目是一個簡單字串。 若要將影像新增至字串左側,並以藍綠色顯示字串,可以在 ListView 定義中以內嵌方式定義 DataTemplate。 這與您先前使用方法 1 的選項 1 所建立的 ListView 控制項相同。
<!--No corresponding code is needed for this example.-->
<ListView x:Name="FruitsList">
                <ListView.ItemTemplate>
                    <DataTemplate x:DataType="x:String">
                        <Grid>
                            <Grid.ColumnDefinitions>
                                <ColumnDefinition Width="47"/>
                                <ColumnDefinition/>
                            </Grid.ColumnDefinitions>
                            <Image Source="Assets/placeholder.png" Width="32" Height="32"
                                HorizontalAlignment="Left" VerticalAlignment="Center"/>
                            <TextBlock Text="{x:Bind}" Foreground="Teal" FontSize="14"
                                Grid.Column="1" VerticalAlignment="Center"/>
                        </Grid>
                    </DataTemplate>
                </ListView.ItemTemplate>
                <x:String>Apricot</x:String>
                <x:String>Banana</x:String>
                <x:String>Cherry</x:String>
                <x:String>Orange</x:String>
                <x:String>Strawberry</x:String>
            </ListView>
以下是套用簡單 ListView 資料範本時,資料項目的顯示方式:
自訂類別物件的 ListView 資料範本
在以下範例中,資料項目是一個 Contact 物件。 若要將連絡人影像新增至連絡人名稱和公司左側,可以在 ListView 定義中以內嵌方式定義 DataTemplate。 如前所述,此 ListView 資料範本是在方法 2 的選項 2 中建立的。
<ListView x:Name="ContactsLV" ItemsSource="{x:Bind Contacts}">
    <ListView.ItemTemplate>
        <DataTemplate x:DataType="local:Contact">
            <Grid>
                <Grid.RowDefinitions>
                    <RowDefinition Height="*"/>
                    <RowDefinition Height="*"/>
                </Grid.RowDefinitions>
                <Grid.ColumnDefinitions>
                    <ColumnDefinition Width="Auto"/>
                    <ColumnDefinition Width="*"/>
                </Grid.ColumnDefinitions>
                <Image Grid.Column="0" Grid.RowSpan="2" Source="Assets/grey-placeholder.png" Width="32"
                    Height="32" HorizontalAlignment="Center" VerticalAlignment="Center"></Image>
                <TextBlock Grid.Column="1" Text="{x:Bind Name}" Margin="12,6,0,0"
                    Style="{ThemeResource BaseTextBlockStyle}"/>
                <TextBlock  Grid.Column="1" Grid.Row="1" Text="{x:Bind Company}" Margin="12,0,0,6"
                    Style="{ThemeResource BodyTextBlockStyle}"/>
            </Grid>
        </DataTemplate>
    </ListView.ItemTemplate>
</ListView>
以下是將 ListView 資料範本套用至自訂類別物件時,資料項目的顯示方式:

資料範本是您定義 ListView 外觀的主要方式。 如果您的清單含有大量項目,這些範本可能也會對效能產生顯著的影響。
您可以在 ListView 或 GridView 定義中以內嵌方式定義您的資料範本,如先前程式碼所示,或個別定義於 [資源] 區段中。 如果在 ListView 或 GridView 定義之外定義它,則必須為資料範本指定 x:Key 屬性,並使用該索引鍵將其指派給 ListView 或 GridView 的 ItemTemplate 屬性。
如需詳細資訊,以及如何使用資料範本和項目容器來在清單或方格中定義項目外觀的範例,請參閱項目容器與範本。
變更項目的配置
當您將項目新增至 ListView 或 GridView 時,控制項會在項目容器中將每個項目自動換行,接著配置所有項目容器。 這些項目容器的配置方式取決於控制項的 ItemsPanel 屬性。
預設情況下,ListView 會使用 ItemsStackPanel,它會產生垂直清單:

GridView 會使用 ItemsWrapGrid,其會以水平方向新增項目,然後以垂直方向進行換行和捲動:

您可以藉由調整項目面板上的屬性來修改項目的版面配置,也可以將預設面板替換為另一個面板。
注意
如果更改 ItemsPanel,請勿停用虛擬化。 ItemsStackPanel 和 ItemsWrapGrid 都支援虛擬化,因此這些類別可以安全使用。 如果您使用任何其他面板,則可能會停用虛擬化並降低清單檢視的效能。 如需詳細資訊,請參閱效能底下的清單檢視文章。
這個範例示範如何藉由變更 ItemsStackPanel 的 Orientation 屬性,讓 ListView 控制項能夠在水平清單中列出其項目容器。
因為清單檢視預設為垂直捲動,所以您也需要調整清單檢視內部 ScrollViewer 的一些屬性,使其水平捲動。
- 將 ScrollViewer.HorizontalScrollMode 變更為 Enabled 或 Auto。
- 將 ScrollViewer.HorizontalScrollBarVisibility 變更為 Auto。
- 將 ScrollViewer.VerticalScrollMode 變更為 Disabled。
- 將 ScrollViewer.VerticalScrollBarVisibility 變更為 Hidden。
重要
以下範例顯示的清單檢視寬度不受限制,因此不會顯示水平捲軸。 如果執行此程式碼,您可以為 ListView 設定 Width="180" 以顯示捲軸。
<ListView Height="60"
          ScrollViewer.HorizontalScrollMode="Enabled"
          ScrollViewer.HorizontalScrollBarVisibility="Auto"
          ScrollViewer.VerticalScrollMode="Disabled"
          ScrollViewer.VerticalScrollBarVisibility="Hidden">
    <ListView.ItemsPanel>
        <ItemsPanelTemplate>
            <ItemsStackPanel Orientation="Horizontal"/>
        </ItemsPanelTemplate>
    </ListView.ItemsPanel>
    <x:String>Apricot</x:String>
    <x:String>Banana</x:String>
    <x:String>Cherry</x:String>
    <x:String>Orange</x:String>
    <x:String>Strawberry</x:String>
</ListView>
以下是清單的顯示方式:

在下一個範例中,ListView 使用 ItemsWrapGrid 在垂直換行清單中配置項目,而不是使用 ItemsStackPanel。
重要
必須限制清單檢視的高度,才能強制控制項在容器中換行。
<ListView Height="100"
          ScrollViewer.HorizontalScrollMode="Enabled"
          ScrollViewer.HorizontalScrollBarVisibility="Auto"
          ScrollViewer.VerticalScrollMode="Disabled"
          ScrollViewer.VerticalScrollBarVisibility="Hidden">
    <ListView.ItemsPanel>
        <ItemsPanelTemplate>
            <ItemsWrapGrid/>
        </ItemsPanelTemplate>
    </ListView.ItemsPanel>
    <x:String>Apricot</x:String>
    <x:String>Banana</x:String>
    <x:String>Cherry</x:String>
    <x:String>Orange</x:String>
    <x:String>Strawberry</x:String>
</ListView>
以下是清單的顯示方式:

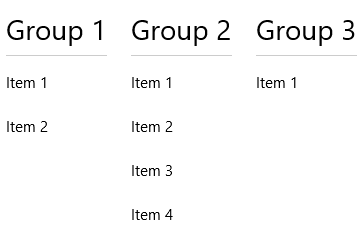
如果您在清單檢視中顯示群組資料,則 ItemsPanel 會決定項目群組的配置方式,而不是個別項目的配置方式。例如:如果您使用先前顯示的水平 ItemsStackPanel 來顯示群組資料,則群組會水平排列,但每個群組中的項目仍會垂直堆疊,如下所示:
 .
.
項目選取與互動
您可以選擇多種方式讓使用者與清單檢視互動。 預設情況下,使用者可以選取單一項目。 您可以變更 SelectionMode 屬性以啟用複選或停用選取。 您可以設定 IsItemClickEnabled 屬性,讓使用者按一下項目 (例如:按鈕) 來叫用動作,而不是選取項目。
注意
注意ListView 和 GridView 都會針對其 SelectionMode 屬性使用 ListViewSelectionMode 列舉。 IsItemClickEnabled 預設會設定為 False,因此您只需要將它設定為啟用按一下模式即可。
下表顯示使用者可以與清單檢視互動的方式,以及如何回應互動。
| 若要啟用此互動: | 使用下列設定: | 處理這個事件: | 使用此屬性來取得選取的項目: |
|---|---|---|---|
| 無互動 | SelectionMode="None" IsItemClickEnabled="False" |
N/A | N/A |
| 單一選取項目 | SelectionMode="Single" IsItemClickEnabled="False" |
SelectionChanged \(英文\) | SelectedItem SelectedIndex |
| 多重選取 | SelectionMode="Multiple" IsItemClickEnabled="False" |
SelectionChanged \(英文\) | SelectedItems \(英文\) |
| 擴充選取範圍 | SelectionMode="Extended" IsItemClickEnabled="False" |
SelectionChanged \(英文\) | SelectedItems \(英文\) |
| 按一下 | SelectionMode="None" IsItemClickEnabled="True" |
ItemClick \(英文\) | N/A |
注意
您可以在同時將 SelectionMode 設定為 Single、Multiple 或 Extended 的情況下,啟用 IsItemClickEnabled 來引發 ItemClick 事件。 如果這樣做,則會先引發 ItemClick 事件,然後引發 SelectionChanged 事件。 在某些情況下 (例如,如果您移至 ItemClick 事件處理常式中的另一個頁面),則不會引發 SelectionChanged 事件並且不會選擇該項目。
可以在 XAML 或程式碼中設定這些屬性,如下所示:
<ListView x:Name="myListView" SelectionMode="Multiple"/>

<GridView x:Name="myGridView" SelectionMode="None" IsItemClickEnabled="True"/>
myListView.SelectionMode = ListViewSelectionMode.Multiple;

myGridView.SelectionMode = ListViewSelectionMode.None;
myGridView.IsItemClickEnabled = true;
唯讀
您可以將 SelectionMode 屬性設定為 ListViewSelectionMode.None 以停用項目選取。 這會讓控制項處於唯讀模式,使其用於顯示資料,但不會用於與其互動。 也就是說,項目選取已停用,但控制項本身未停用。
單一選取項目
此表描述當 SelectionMode 設定為 Single 時的鍵盤、滑鼠和觸控互動。
| 輔助按鍵 | 互動 |
|---|---|
| 無 | |
| Ctrl |
當 SelectionMode 設定為 Single 時,您可以從 SelectedItem 屬性取得選取的資料項目。 您可以使用 SelectedIndex 屬性,取得所選項目集合中的索引。 如果未選取任何項目,SelectedItem 為 null,且 SelectedIndex 為 -1。
如果嘗試將不在 Items 集合中的項目設定為 SelectedItem,則會忽略此作業,且 SelectedItem 為 null。 不過,如果您嘗試將 SelectedIndex 設定為超出清單中項目範圍的索引,則會出現 System.ArgumentException 例外狀況。
多重選取
此表描述當 SelectionMode 設定為 Multiple 時的鍵盤、滑鼠和觸控互動。
| 輔助按鍵 | 互動 |
|---|---|
| 無 | |
| Shift 鍵 |
擴充選取範圍
此表描述當 SelectionMode 設定為 Extended 時的鍵盤、滑鼠和觸控互動。
| 輔助按鍵 | 互動 |
|---|---|
| 無 | |
| Ctrl | |
| Shift 鍵 |
當 SelectionMode 設定為 Multiple 或 Extended 時,您可以從 SelectedItems 屬性取得選取的資料項目。
SelectedIndex、SelectedItem 和 SelectedItems 屬性是同步的。 例如,如果您將 SelectedIndex 設定為 -1,SelectedItem 會設定為 null 且 SelectedItems 是空的。 如果您將 SelectedItem 設定為 null,SelectedIndex 會設定為 -1,SelectedItems 是空的。
在複選模式中,SelectedItem 包含第一個選取的項目,Selectedindex 包含第一個選取的項目索引。
回應選取項目變更
若要回應清單檢視中的選取項目變更,請處理 SelectionChanged 事件。 在事件處理常式程式碼中,您可以從 SelectionChangedEventArgs.AddedItems 屬性取得所選的項目清單。 您可以從 SelectionChangedEventArgs.RemovedItems 屬性取得已取消選取的任何項目。 AddedItems 和 RemovedItems 集合最多包含一個項目,除非使用者透過按住 Shift 鍵來選取一系列項目。
下列範例顯示如何處理 SelectionChanged 事件並存取各種 Item 集合:
<StackPanel HorizontalAlignment="Right">
    <ListView x:Name="listView1" SelectionMode="Multiple"
              SelectionChanged="ListView1_SelectionChanged">
        <x:String>Apricot</x:String>
        <x:String>Banana</x:String>
        <x:String>Cherry</x:String>
        <x:String>Orange</x:String>
        <x:String>Strawberry</x:String>
    </ListView>
    <TextBlock x:Name="selectedItem"/>
    <TextBlock x:Name="selectedIndex"/>
    <TextBlock x:Name="selectedItemCount"/>
    <TextBlock x:Name="addedItems"/>
    <TextBlock x:Name="removedItems"/>
</StackPanel>
private void ListView1_SelectionChanged(object sender, SelectionChangedEventArgs e)
{
    if (listView1.SelectedItem != null)
    {
        selectedItem.Text =
            "Selected item: " + listView1.SelectedItem.ToString();
    }
    else
    {
        selectedItem.Text =
            "Selected item: null";
    }
    selectedIndex.Text =
        "Selected index: " + listView1.SelectedIndex.ToString();
    selectedItemCount.Text =
        "Items selected: " + listView1.SelectedItems.Count.ToString();
    addedItems.Text =
        "Added: " + e.AddedItems.Count.ToString();
    removedItems.Text =
        "Removed: " + e.RemovedItems.Count.ToString();
}
按一下模式
您可以變更清單檢視,讓使用者按一下按鈕和其他項目,而不是選取它們。 例如,如果您的應用程式在使用者按一下清單或網格中的項目時開啟新頁面,這會很有用。
若要啟用此行為:
- 將 SelectionMode 設定為 None。
- 將 IsItemClickEnabled 設定為 True。
- 處理 ItemClick 事件,以在使用者按一下項目時執行某些動作。
以下是具有可點選項目的清單檢視。 ItemClick 事件處理常式中的程式碼會在應用程式中開啟新的頁面。
<ListView SelectionMode="None"
          IsItemClickEnabled="True"
          ItemClick="ListView1_ItemClick">
    <x:String>Page 1</x:String>
    <x:String>Page 2</x:String>
    <x:String>Page 3</x:String>
    <x:String>Page 4</x:String>
    <x:String>Page 5</x:String>
</ListView>
private void ListView1_ItemClick(object sender, ItemClickEventArgs e)
{
    switch (e.ClickedItem.ToString())
    {
        case "Page 1":
            this.Frame.Navigate(typeof(Page1));
            break;

        case "Page 2":
            this.Frame.Navigate(typeof(Page2));
            break;

        case "Page 3":
            this.Frame.Navigate(typeof(Page3));
            break;

        case "Page 4":
            this.Frame.Navigate(typeof(Page4));
            break;

        case "Page 5":
            this.Frame.Navigate(typeof(Page5));
            break;

        default:
            break;
    }
}
以程式設計方式選取一系列專案
有時候,您可能需要以程式設計方式操作 ListView 項目選取。 例如,您可能會顯示 [全選] 按鈕,讓使用者選取清單中的所有項目。 在這種情況下,從 SelectedItems 集合中逐一新增和刪除項目通常效率不高。 每個項目變更都會造成 SelectionChanged 事件,而且當您直接使用項目,而不是使用索引值時,項目會取消虛擬化。
使用 SelectAll、SelectRange 和 DeselectRange 方法來修改選取範圍比使用 SelectedItems 屬性更有效率。 這些方法會使用項目索引的範圍來選取 (或取消選取) 項目。 虛擬化的專案會保持虛擬化,因為只會使用索引。 不論其原始選取狀態為何,都會選取 (或取消選取) 指定範圍中的所有項目。 每次呼叫這些方法時,SelectionChanged 事件只會發生一次。
重要
只有在 SelectionMode 屬性設為 Multiple 或 Extended 時,才能呼叫這些方法。 如果在 SelectionMode 為 Single 或 None 時呼叫 SelectRange,則會發生例外狀況。
當您使用索引範圍選取項目時,請使用 SelectedRanges 屬性來取得清單中所有選取的範圍。
如果 ItemsSource 屬性實作 IItemsRangeInfo,且您使用這些方法來修改選取項目,系統將不會在 SelectionChangedEventArgs 中設定 AddedItems 和 RemovedItems 屬性。 設定這些屬性需要取消虛擬化項目物件。 請改用 SelectedRanges 屬性來取得項目。
您可以呼叫 SelectAll 方法,以選取集合中的所有項目。 不過,沒有對應的方法來取消選取所有項目。 您可以呼叫 DeselectRange 並傳遞 FirstIndex 值為 0 和 Length 值等於集合中項目數目的 ItemIndexRange 來取消所有項目。 這會連同選取所有項目的選項一起顯示在下列範例中。
<StackPanel Width="160">
    <Button Content="Select all" Click="SelectAllButton_Click"/>
    <Button Content="Deselect all" Click="DeselectAllButton_Click"/>
    <ListView x:Name="listView1" SelectionMode="Multiple">
        <x:String>Apricot</x:String>
        <x:String>Banana</x:String>
        <x:String>Cherry</x:String>
        <x:String>Orange</x:String>
        <x:String>Strawberry</x:String>
    </ListView>
</StackPanel>
private void SelectAllButton_Click(object sender, RoutedEventArgs e)
{
    if (listView1.SelectionMode == ListViewSelectionMode.Multiple ||
        listView1.SelectionMode == ListViewSelectionMode.Extended)
    {
        listView1.SelectAll();
    }
}

private void DeselectAllButton_Click(object sender, RoutedEventArgs e)
{
    if (listView1.SelectionMode == ListViewSelectionMode.Multiple ||
        listView1.SelectionMode == ListViewSelectionMode.Extended)
    {
        listView1.DeselectRange(new ItemIndexRange(0, (uint)listView1.Items.Count));
    }
}
如需如何變更選取項目外觀的詳細資訊,請參閱項目容器與範本。
拖放
ListView 和 GridView 控制項支援在其自己的控制項內以及在其自身與其他 ListView 和 GridView 控制項之間拖放項目。 如需實作拖放功能的詳細資訊,請參閱拖放。
取得範例程式碼
- XAML ListView 和 GridView 範例:示範 ListView 和 GridView 控制項。
- XAML 拖放範例:示範搭配 ListView 控制項的拖放。
- WinUI 資源庫範例 - 以互動式格式查看所有 XAML 控制項。
