Xamarin.Forms Grid
Grid是將子系組織成數據列和數據行的版面配置,其大小可以是成正比或絕對大小。 根據預設,一個 Grid 包含一個資料列和一個資料行。 此外, Grid 可以做為包含其他子版面配置的父版面配置。
配置 Grid 不應與數據表混淆,而且不適合呈現表格式數據。 不同於 HTML 資料表,是 Grid 用來配置內容。 若要顯示表格式數據,請考慮使用 ListView、 CollectionView 或 TableView。
類別 Grid 會定義下列屬性:
Column型int別為 ,這是附加屬性,表示父Grid代 內檢視的數據行對齊方式。 這個屬性的預設值為 0。 驗證回呼可確保當屬性設定時,其值大於或等於0。ColumnDefinitions型ColumnDefinitionCollection別為 的物件清單ColumnDefinition,可定義方格數據行的寬度。ColumnSpacing型double別為 的 ,表示方格數據行之間的距離。 此屬性的預設值為6個裝置獨立單位。ColumnSpan型int別為 的 ,這是附加屬性,表示檢視在父Grid代 內跨越的數據行總數。 這個屬性的預設值為 1。 驗證回呼可確保當屬性設定時,其值大於或等於 1。Row型int別為 的 ,這是附加屬性,表示父Grid代 內檢視的數據列對齊方式。 這個屬性的預設值為 0。 驗證回呼可確保當屬性設定時,其值大於或等於0。RowDefinitions型RowDefinitionCollection別為 的物件清單RowDefintion,可定義網格線列的高度。RowSpacing型double別為 的 ,表示方格數據列之間的距離。 此屬性的預設值為6個裝置獨立單位。RowSpan型int別為 的 ,這是附加屬性,表示檢視在父Grid代 內跨越的數據列總數。 這個屬性的預設值為 1。 驗證回呼可確保當屬性設定時,其值大於或等於 1。
這些屬性是由 BindableProperty 物件所支援,這表示屬性可以是數據系結和樣式的目標。
類別 Grid 衍生自 Layout<T> 類別,該類別會 Children 定義 型 IList<T>別 的屬性。 屬性 Children 是 ContentProperty 類別的 Layout<T> ,因此不需要從 XAML 明確設定。
提示
若要取得最佳的版面配置效能,請遵循優化版面配置效能的指導方針。
資料列和資料行
根據預設,包含 Grid 一個資料列和一個數據列:
<ContentPage xmlns="http://xamarin.com/schemas/2014/forms"
             xmlns:x="http://schemas.microsoft.com/winfx/2009/xaml"
             x:Class="GridTutorial.MainPage">
    <Grid Margin="20,35,20,20">
        <Label Text="By default, a Grid contains one row and one column." />
    </Grid>
</ContentPage>
在此範例中, Grid 包含自動放置在單一位置的單一子 Label 系:
的配置行為Grid可以分別使用 RowDefinitions 和 ColumnDefinitions 屬性來定義,這些是 和 ColumnDefinition 物件的集合RowDefinition。 這些集合會定義的數據Grid列和數據行特性,而且應該包含 中Grid每個數據列的一個 RowDefinition 物件,以及 中每個數據行的Grid一個 ColumnDefinition 物件。
類別 RowDefinition 會 Height 定義 型別 的屬性、型 GridLength別 ,而 ColumnDefinition 類別會 Width 定義 型 GridLength別 的屬性。 結構會 GridLength 根據 GridUnitType 列舉指定數據列高度或數據行寬度,其中包含三個成員:
Absolute– 資料列高度或欄寬是裝置獨立單位的值(XAML 中的數位)。Auto– 資料列高度或欄寬會根據儲存格內容自動調整(Auto以 XAML 為單位)。Star– 剩餘的數據列高度或數據行寬度會按比例配置(數字後面接著*XAML)。
Grid具有 Height 屬性的數據Auto列,會以與垂直 StackLayout相同的方式限制該數據列中檢視的高度。 同樣地,具有 Width 屬性的數據 Auto 行的運作方式非常類似水準 StackLayout。
警告
請嘗試確保盡可能少的數據列和數據行設定為 Auto 大小。 每個自動調整大小的資料列或資料行都會導致版面配置引擎執行額外的版面配置計算。 可能的話,請改用固定大小的資料列和資料行。 或者,設定數據列和數據行以佔用具有列舉值的比例空間 GridUnitType.Star 量。
下列 XAML 示範如何使用三個 Grid 資料列和兩個資料列建立 :
<ContentPage xmlns="http://xamarin.com/schemas/2014/forms"
             xmlns:x="http://schemas.microsoft.com/winfx/2009/xaml"
             x:Class="GridDemos.Views.BasicGridPage"
             Title="Basic Grid demo">
   <Grid>
        <Grid.RowDefinitions>
            <RowDefinition Height="2*" />
            <RowDefinition Height="*" />
            <RowDefinition Height="100" />
        </Grid.RowDefinitions>
        <Grid.ColumnDefinitions>
            <ColumnDefinition Width="*" />
            <ColumnDefinition Width="*" />
        </Grid.ColumnDefinitions>
        ...
    </Grid>
</ContentPage>
在此範例中, Grid 具有頁面高度的整體高度。 Grid知道第三列的高度是100個裝置獨立單位。 它會從自己的高度減去該高度,並根據星號之前的數位,按比例配置第一個和第二個數據列之間的剩餘高度。 在此範例中,第一個數據列的高度是第二個數據列的高度是第二個數據列的高度兩倍。
這兩 ColumnDefinition 個物件都會將 設定 Width 為 *,這與 相同 1*,這表示螢幕的寬度在兩個數據行底下相等。
重要
屬性的 RowDefinition.Height 預設值為 *。 同樣地,屬性的 ColumnDefinition.Width 預設值為 *。 因此,在可接受這些預設值的情況下,不需要設定這些屬性。
子檢視可以放在具有 Grid.Column 和 Grid.Row 附加屬性的特定Grid儲存格中。 此外,若要讓子檢視跨越多個數據列和數據行,請使用 Grid.RowSpan 和 Grid.ColumnSpan 附加屬性。
下列 XAML 會顯示相同的 Grid 定義,也會將子檢視放置在特定 Grid 儲存格中:
<ContentPage xmlns="http://xamarin.com/schemas/2014/forms"
             xmlns:x="http://schemas.microsoft.com/winfx/2009/xaml"
             x:Class="GridDemos.Views.BasicGridPage"
             Title="Basic Grid demo">
   <Grid>
        <Grid.RowDefinitions>
            <RowDefinition Height="2*" />
            <RowDefinition />
            <RowDefinition Height="100" />
        </Grid.RowDefinitions>
        <Grid.ColumnDefinitions>
            <ColumnDefinition />
            <ColumnDefinition />
        </Grid.ColumnDefinitions>
        <BoxView Color="Green" />
        <Label Text="Row 0, Column 0"
               HorizontalOptions="Center"
               VerticalOptions="Center" />
        <BoxView Grid.Column="1"
                 Color="Blue" />
        <Label Grid.Column="1"
               Text="Row 0, Column 1"
               HorizontalOptions="Center"
               VerticalOptions="Center" />
        <BoxView Grid.Row="1"
                 Color="Teal" />
        <Label Grid.Row="1"
               Text="Row 1, Column 0"
               HorizontalOptions="Center"
               VerticalOptions="Center" />
        <BoxView Grid.Row="1"
                 Grid.Column="1"
                 Color="Purple" />
        <Label Grid.Row="1"
               Grid.Column="1"
               Text="Row1, Column 1"
               HorizontalOptions="Center"
               VerticalOptions="Center" />
        <BoxView Grid.Row="2"
                 Grid.ColumnSpan="2"
                 Color="Red" />
        <Label Grid.Row="2"
               Grid.ColumnSpan="2"
               Text="Row 2, Columns 0 and 1"
               HorizontalOptions="Center"
               VerticalOptions="Center" />
    </Grid>
</ContentPage>
注意
Grid.Row和 Grid.Column 屬性都是從 0 編製索引,因此Grid.Row="2"參考第二個數據行時Grid.Column="1"會參考第三個數據列。 此外,這兩個屬性都有預設值0,因此不需要在佔用 的第一個數據列或第一欄的 Grid子檢視上設定。
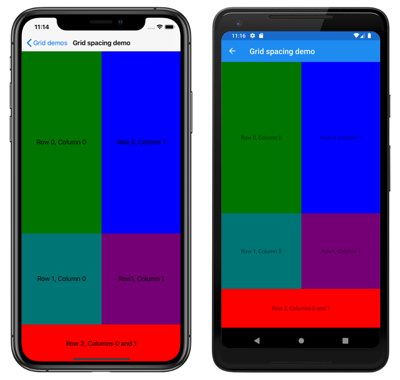
在此範例中,這三 Grid 個數據列都由 BoxView 和 Label 檢視所佔用。 第三個數據列是100個裝置獨立單位高,前兩個數據列佔用剩餘的空間(第一個數據列是第二個數據列的兩倍)。 兩個數據行的寬度相等,並除 Grid 以半。 BoxView第三個數據列中的 跨越這兩個數據行。
此外,中的 Grid 子檢視可以共用單元格。 子系出現在 XAML 中的順序是子系放在 Grid中的順序。 在上一個範例中, Label 物件只會顯示,因為它們會轉譯在物件之上 BoxView 。 Label如果對象呈現在物件頂端,BoxView則不會顯示這些物件。
對等的 C# 程式碼為:
public class BasicGridPageCS : ContentPage
{
    public BasicGridPageCS()
    {
        Grid grid = new Grid
        {
            RowDefinitions =
            {
                new RowDefinition { Height = new GridLength(2, GridUnitType.Star) },
                new RowDefinition(),
                new RowDefinition { Height = new GridLength(100) }
            },
            ColumnDefinitions =
            {
                new ColumnDefinition(),
                new ColumnDefinition()
            }
        };

        // Row 0
        // The BoxView and Label are in row 0 and column 0, and so only needs to be added to the
        // Grid.Children collection to get default row and column settings.
        grid.Children.Add(new BoxView
        {
            Color = Color.Green
        });
        grid.Children.Add(new Label
        {
            Text = "Row 0, Column 0",
            HorizontalOptions = LayoutOptions.Center,
            VerticalOptions = LayoutOptions.Center
        });

        // This BoxView and Label are in row 0 and column 1, which are specified as arguments
        // to the Add method.
        grid.Children.Add(new BoxView
        {
            Color = Color.Blue
        }, 1, 0);
        grid.Children.Add(new Label
        {
            Text = "Row 0, Column 1",
            HorizontalOptions = LayoutOptions.Center,
            VerticalOptions = LayoutOptions.Center
        }, 1, 0);

        // Row 1
        // This BoxView and Label are in row 1 and column 0, which are specified as arguments
        // to the Add method overload.
        grid.Children.Add(new BoxView
        {
            Color = Color.Teal
        }, 0, 1, 1, 2);
        grid.Children.Add(new Label
        {
            Text = "Row 1, Column 0",
            HorizontalOptions = LayoutOptions.Center,
            VerticalOptions = LayoutOptions.Center
        }, 0, 1, 1, 2); // These arguments indicate that that the child element goes in the column starting at 0 but ending before 1.
                        // They also indicate that the child element goes in the row starting at 1 but ending before 2.

        grid.Children.Add(new BoxView
        {
            Color = Color.Purple
        }, 1, 2, 1, 2);
        grid.Children.Add(new Label
        {
            Text = "Row1, Column 1",
            HorizontalOptions = LayoutOptions.Center,
            VerticalOptions = LayoutOptions.Center
        }, 1, 2, 1, 2);

        // Row 2
        // Alternatively, the BoxView and Label can be positioned in cells with the Grid.SetRow
        // and Grid.SetColumn methods.
        BoxView boxView = new BoxView { Color = Color.Red };
        Grid.SetRow(boxView, 2);
        Grid.SetColumnSpan(boxView, 2);
        Label label = new Label
        {
            Text = "Row 2, Column 0 and 1",
            HorizontalOptions = LayoutOptions.Center,
            VerticalOptions = LayoutOptions.Center
        };
        Grid.SetRow(label, 2);
        Grid.SetColumnSpan(label, 2);

        grid.Children.Add(boxView);
        grid.Children.Add(label);

        Title = "Basic Grid demo";
        Content = grid;
    }
}
在程式代碼中,若要指定物件的高度 RowDefinition ,以及對象的寬度 ColumnDefinition ,您通常會使用 結構的值 GridLength ,通常與 GridUnitType 列舉結合。
上述範例程式代碼也會顯示數種不同的方法,將子系新增至 Grid,並指定其所在的單元格。 使用Add指定左、右、上、上和下自變數的多載時,而左自變數和頂端自變數一律會參考 內的Grid單元格,而右自變數和底部自變數則會出現參照位於 外部的Grid單元格。 這是因為 右 自變數必須一律大於 左 自變數,而 底部 自變數必須一律大於 top 自變數。 下列假設為 2x2 Grid的範例會顯示使用這兩個多載的 Add 對等程式代碼:
// left, top
grid.Children.Add(topLeft, 0, 0);           // first column, first row
grid.Children.Add(topRight, 1, 0);          // second column, first tow
grid.Children.Add(bottomLeft, 0, 1);        // first column, second row
grid.Children.Add(bottomRight, 1, 1);       // second column, second row

// left, right, top, bottom
grid.Children.Add(topLeft, 0, 1, 0, 1);     // first column, first row
grid.Children.Add(topRight, 1, 2, 0, 1);    // second column, first tow
grid.Children.Add(bottomLeft, 0, 1, 1, 2);  // first column, second row
grid.Children.Add(bottomRight, 1, 2, 1, 2); // second column, second row
注意
此外,您可以使用 和 方法將子檢視加入 至 Grid AddHorizontal ,以將子系加入至單一數據列或單一數據行 。 GridAddVertical 接著 Grid 會在進行這些呼叫時以數據列或數據行展開,並自動將子系放置在正確的單元格中。
簡化數據列和數據行定義
在 XAML 中,可以使用簡化的 Grid 語法來指定的數據列和數據行特性,以避免必須為每個數據列和數據行定義 RowDefinition 和 ColumnDefinition 物件。 相反地,RowDefinitions和 ColumnDefinitions 屬性可以設定為包含逗號分隔GridUnitType值的字串,從中建立和 ColumnDefinition 物件內Xamarin.FormsRowDefinition建的類型轉換器:
<Grid RowDefinitions="1*, Auto, 25, 14, 20"
      ColumnDefinitions="*, 2*, Auto, 300">
    ...
</Grid>
在此範例中,有 Grid 五個數據列和四個數據行。 第三個、第四個和第五個數據列會設定為絕對高度,而第二個數據列會自動重設大小至其內容。 然後,剩餘的高度會配置給第一個數據列。
第四欄會設定為絕對寬度,第三欄會自動重設大小至其內容。 剩餘的寬度會根據星號之前的數位,按比例配置第一欄和第二欄。 在此範例中,第二欄的寬度是第一個數據行的兩倍(因為 * 與 1*相同)。
數據列和數據行之間的空間
根據預設, Grid 數據列會以 6 個與裝置無關的空間單位分隔。 同樣地, Grid 數據行會以6個裝置獨立空間單位分隔。 您可以藉由分別設定 RowSpacing 和 ColumnSpacing 屬性來變更這些預設值:
<ContentPage xmlns="http://xamarin.com/schemas/2014/forms"
             xmlns:x="http://schemas.microsoft.com/winfx/2009/xaml"
             x:Class="GridDemos.Views.GridSpacingPage"
             Title="Grid spacing demo">
    <Grid RowSpacing="0"
          ColumnSpacing="0">
        ..
    </Grid>
</ContentPage>
這個範例會 Grid 建立在其資料列和資料列之間沒有間距的 :
提示
RowSpacing和 ColumnSpacing 屬性可以設定為負值,讓儲存格內容重疊。
對等的 C# 程式碼為:
public GridSpacingPageCS()
{
    Grid grid = new Grid
    {
        RowSpacing = 0,
        ColumnSpacing = 0,
        // ...
    };
    // ...

    Content = grid;
}
對齊方式
中的 Grid 子檢視可以依 HorizontalOptions 和 VerticalOptions 屬性放置在其儲存格內。 這些屬性可以設定為結構中的 LayoutOptions 下列欄位:
重要
結構 AndExpands 中的 LayoutOptions 欄位僅適用於 StackLayout 物件。
下列 XAML 會 Grid 建立具有九個相同大小儲存格的 ,並在每個儲存格中放置 Label 具有不同對齊方式的 :
<ContentPage xmlns="http://xamarin.com/schemas/2014/forms"
             xmlns:x="http://schemas.microsoft.com/winfx/2009/xaml"
             x:Class="GridDemos.Views.GridAlignmentPage"
             Title="Grid alignment demo">
    <Grid RowSpacing="0"
          ColumnSpacing="0">
        <Grid.RowDefinitions>
            <RowDefinition />
            <RowDefinition />
            <RowDefinition />
        </Grid.RowDefinitions>
        <Grid.ColumnDefinitions>
            <ColumnDefinition />
            <ColumnDefinition />
            <ColumnDefinition />
        </Grid.ColumnDefinitions>

        <BoxView Color="AliceBlue" />
        <Label Text="Upper left"
               HorizontalOptions="Start"
               VerticalOptions="Start" />
        <BoxView Grid.Column="1"
                 Color="LightSkyBlue" />
        <Label Grid.Column="1"
               Text="Upper center"
               HorizontalOptions="Center"
               VerticalOptions="Start"/>
        <BoxView Grid.Column="2"
                 Color="CadetBlue" />
        <Label Grid.Column="2"
               Text="Upper right"
               HorizontalOptions="End"
               VerticalOptions="Start" />
        <BoxView Grid.Row="1"
                 Color="CornflowerBlue" />
        <Label Grid.Row="1"
               Text="Center left"
               HorizontalOptions="Start"
               VerticalOptions="Center" />
        <BoxView Grid.Row="1"
                 Grid.Column="1"
                 Color="DodgerBlue" />
        <Label Grid.Row="1"
               Grid.Column="1"
               Text="Center center"
               HorizontalOptions="Center"
               VerticalOptions="Center" />
        <BoxView Grid.Row="1"
                 Grid.Column="2"
                 Color="DarkSlateBlue" />
        <Label Grid.Row="1"
               Grid.Column="2"
               Text="Center right"
               HorizontalOptions="End"
               VerticalOptions="Center" />
        <BoxView Grid.Row="2"
                 Color="SteelBlue" />
        <Label Grid.Row="2"
               Text="Lower left"
               HorizontalOptions="Start"
               VerticalOptions="End" />
        <BoxView Grid.Row="2"
                 Grid.Column="1"
                 Color="LightBlue" />
        <Label Grid.Row="2"
               Grid.Column="1"
               Text="Lower center"
               HorizontalOptions="Center"
               VerticalOptions="End" />
        <BoxView Grid.Row="2"
                 Grid.Column="2"
                 Color="BlueViolet" />
        <Label Grid.Row="2"
               Grid.Column="2"
               Text="Lower right"
               HorizontalOptions="End"
               VerticalOptions="End" />
    </Grid>
</ContentPage>
在此範例中, Label 每個數據列中的物件全都垂直對齊,但使用不同的水準對齊方式。 或者,這可以視為 Label 每個數據行中的物件水準對齊相同,但使用不同的垂直對齊方式:
對等的 C# 程式碼為:
public class GridAlignmentPageCS : ContentPage
{
    public GridAlignmentPageCS()
    {
        Grid grid = new Grid
        {
            RowSpacing = 0,
            ColumnSpacing = 0,
            RowDefinitions =
            {
                new RowDefinition(),
                new RowDefinition(),
                new RowDefinition()
            },
            ColumnDefinitions =
            {
                new ColumnDefinition(),
                new ColumnDefinition(),
                new ColumnDefinition()
            }
        };

        // Row 0
        grid.Children.Add(new BoxView
        {
            Color = Color.AliceBlue
        });
        grid.Children.Add(new Label
        {
            Text = "Upper left",
            HorizontalOptions = LayoutOptions.Start,
            VerticalOptions = LayoutOptions.Start
        });

        grid.Children.Add(new BoxView
        {
            Color = Color.LightSkyBlue
        }, 1, 0);
        grid.Children.Add(new Label
        {
            Text = "Upper center",
            HorizontalOptions = LayoutOptions.Center,
            VerticalOptions = LayoutOptions.Start
        }, 1, 0);

        grid.Children.Add(new BoxView
        {
            Color = Color.CadetBlue
        }, 2, 0);
        grid.Children.Add(new Label
        {
            Text = "Upper right",
            HorizontalOptions = LayoutOptions.End,
            VerticalOptions = LayoutOptions.Start
        }, 2, 0);

        // Row 1
        grid.Children.Add(new BoxView
        {
            Color = Color.CornflowerBlue
        }, 0, 1);
        grid.Children.Add(new Label
        {
            Text = "Center left",
            HorizontalOptions = LayoutOptions.Start,
            VerticalOptions = LayoutOptions.Center
        }, 0, 1);

        grid.Children.Add(new BoxView
        {
            Color = Color.DodgerBlue
        }, 1, 1);
        grid.Children.Add(new Label
        {
            Text = "Center center",
            HorizontalOptions = LayoutOptions.Center,
            VerticalOptions = LayoutOptions.Center
        }, 1, 1);

        grid.Children.Add(new BoxView
        {
            Color = Color.DarkSlateBlue
        }, 2, 1);
        grid.Children.Add(new Label
        {
            Text = "Center right",
            HorizontalOptions = LayoutOptions.End,
            VerticalOptions = LayoutOptions.Center
        }, 2, 1);

        // Row 2
        grid.Children.Add(new BoxView
        {
            Color = Color.SteelBlue
        }, 0, 2);
        grid.Children.Add(new Label
        {
            Text = "Lower left",
            HorizontalOptions = LayoutOptions.Start,
            VerticalOptions = LayoutOptions.End
        }, 0, 2);

        grid.Children.Add(new BoxView
        {
            Color = Color.LightBlue
        }, 1, 2);
        grid.Children.Add(new Label
        {
            Text = "Lower center",
            HorizontalOptions = LayoutOptions.Center,
            VerticalOptions = LayoutOptions.End
        }, 1, 2);

        grid.Children.Add(new BoxView
        {
            Color = Color.BlueViolet
        }, 2, 2);
        grid.Children.Add(new Label
        {
            Text = "Lower right",
            HorizontalOptions = LayoutOptions.End,
            VerticalOptions = LayoutOptions.End
        }, 2, 2);

        Title = "Grid alignment demo";
        Content = grid;
    }
}
巢狀網格線物件
Grid可用來做為包含巢狀子Grid物件的父版面配置,或其他子版面配置。 巢狀Grid物件時,Grid.Row、 Grid.ColumnGrid.RowSpan、 和 Grid.ColumnSpan 附加屬性一律會參考其父Grid系內檢視的位置。
下列 XAML 顯示巢狀 Grid 物件的範例:
<ContentPage xmlns="http://xamarin.com/schemas/2014/forms"
             xmlns:x="http://schemas.microsoft.com/winfx/2009/xaml"
             xmlns:converters="clr-namespace:GridDemos.Converters"
             x:Class="GridDemos.Views.ColorSlidersGridPage"
             Title="Nested Grids demo">

    <ContentPage.Resources>
        <converters:DoubleToIntConverter x:Key="doubleToInt" />

        <Style TargetType="Label">
            <Setter Property="HorizontalTextAlignment"
                    Value="Center" />
        </Style>
    </ContentPage.Resources>

    <Grid>
        <Grid.RowDefinitions>
            <RowDefinition />
            <RowDefinition Height="Auto" />
        </Grid.RowDefinitions>

        <BoxView x:Name="boxView"
                 Color="Black" />
        <Grid Grid.Row="1"
              Margin="20">
            <Grid.RowDefinitions>
                <RowDefinition />
                <RowDefinition />
                <RowDefinition />
                <RowDefinition />
                <RowDefinition />
                <RowDefinition />
            </Grid.RowDefinitions>
            <Slider x:Name="redSlider"
                    ValueChanged="OnSliderValueChanged" />
            <Label Grid.Row="1"
                   Text="{Binding Source={x:Reference redSlider},
                                  Path=Value,
                                  Converter={StaticResource doubleToInt},
                                  ConverterParameter=255,
                                  StringFormat='Red = {0}'}" />
            <Slider x:Name="greenSlider"
                    Grid.Row="2"
                    ValueChanged="OnSliderValueChanged" />
            <Label Grid.Row="3"
                   Text="{Binding Source={x:Reference greenSlider},
                                  Path=Value,
                                  Converter={StaticResource doubleToInt},
                                  ConverterParameter=255,
                                  StringFormat='Green = {0}'}" />
            <Slider x:Name="blueSlider"
                    Grid.Row="4"
                    ValueChanged="OnSliderValueChanged" />
            <Label Grid.Row="5"
                   Text="{Binding Source={x:Reference blueSlider},
                                  Path=Value,
                                  Converter={StaticResource doubleToInt},
                                  ConverterParameter=255,
                                  StringFormat='Blue = {0}'}" />
        </Grid>
    </Grid>
</ContentPage>
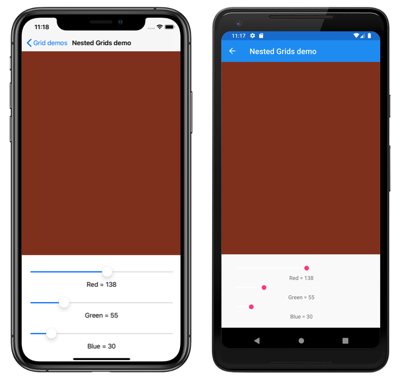
在此範例中,根 Grid 配置在其第一個數據列中包含 BoxView ,以及其第二個數據列中的子 Grid 系。 子 Grid 系包含 Slider 對象,這些物件會操作 所 BoxView顯示的色彩,以及 Label 顯示每個 Slider物件的值:
對等的 C# 程式碼為:
public class ColorSlidersGridPageCS : ContentPage
{
    BoxView boxView;
    Slider redSlider;
    Slider greenSlider;
    Slider blueSlider;

    public ColorSlidersGridPageCS()
    {
        // Create an implicit style for the Labels
        Style labelStyle = new Style(typeof(Label))
        {
            Setters =
            {
                new Setter { Property = Label.HorizontalTextAlignmentProperty, Value = TextAlignment.Center }
            }
        };
        Resources.Add(labelStyle);

        // Root page layout
        Grid rootGrid = new Grid
        {
            RowDefinitions =
            {
                new RowDefinition(),
                new RowDefinition()
            }
        };

        boxView = new BoxView { Color = Color.Black };
        rootGrid.Children.Add(boxView);

        // Child page layout
        Grid childGrid = new Grid
        {
            Margin = new Thickness(20),
            RowDefinitions =
            {
                new RowDefinition(),
                new RowDefinition(),
                new RowDefinition(),
                new RowDefinition(),
                new RowDefinition(),
                new RowDefinition()
            }
        };

        DoubleToIntConverter doubleToInt = new DoubleToIntConverter();

        redSlider = new Slider();
        redSlider.ValueChanged += OnSliderValueChanged;
        childGrid.Children.Add(redSlider);

        Label redLabel = new Label();
        redLabel.SetBinding(Label.TextProperty, new Binding("Value", converter: doubleToInt, converterParameter: "255", stringFormat: "Red = {0}", source: redSlider));
        Grid.SetRow(redLabel, 1);
        childGrid.Children.Add(redLabel);

        greenSlider = new Slider();
        greenSlider.ValueChanged += OnSliderValueChanged;
        Grid.SetRow(greenSlider, 2);
        childGrid.Children.Add(greenSlider);

        Label greenLabel = new Label();
        greenLabel.SetBinding(Label.TextProperty, new Binding("Value", converter: doubleToInt, converterParameter: "255", stringFormat: "Green = {0}", source: greenSlider));
        Grid.SetRow(greenLabel, 3);
        childGrid.Children.Add(greenLabel);

        blueSlider = new Slider();
        blueSlider.ValueChanged += OnSliderValueChanged;
        Grid.SetRow(blueSlider, 4);
        childGrid.Children.Add(blueSlider);

        Label blueLabel = new Label();
        blueLabel.SetBinding(Label.TextProperty, new Binding("Value", converter: doubleToInt, converterParameter: "255", stringFormat: "Blue = {0}", source: blueSlider));
        Grid.SetRow(blueLabel, 5);
        childGrid.Children.Add(blueLabel);

        // Place the child Grid in the root Grid
        rootGrid.Children.Add(childGrid, 0, 1);

        Title = "Nested Grids demo";
        Content = rootGrid;
    }

    void OnSliderValueChanged(object sender, ValueChangedEventArgs e)
    {
        boxView.Color = new Color(redSlider.Value, greenSlider.Value, blueSlider.Value);
    }
}


