SkiaSharp 中的路徑效果
探索各種路徑效果,允許路徑用於撫摸和填滿
路徑效果是類別的SKPathEffect實例,這個實例是由 類別所定義的八個靜態建立方法之一所建立。 然後,對象 SKPathEffect 會設定為 PathEffect 物件的 屬性 SKPaint ,以取得各種有趣的效果,例如,使用小型復寫路徑來建立線條:
路徑效果可讓您:
- 使用點和虛線划入線條
- 使用任何填滿路徑划入線條
- 以線線填滿區域
- 使用磚路徑填滿區域
- 使尖角四捨五入
- 將隨機「抖動」新增至線條和曲線
此外,您可以結合兩個或多個路徑效果。
本文也示範如何使用 GetFillPath 的 方法 SKPaint ,藉由套用 SKPaint的屬性,包括 StrokeWidth 和 PathEffect,將一個路徑轉換成另一個路徑。 這會產生一些有趣的技術,例如取得另一個路徑的外框路徑。 GetFillPath 也有助於與路徑效果有關。
點和虛線
在 Dots 和 Dashes 一文中說明方法的使用PathEffect.CreateDash方式。 方法的第一個自變數是包含兩個或多個值的偶數陣列,在虛線長度與虛線之間的間距長度之間交替:
public static SKPathEffect CreateDash (Single[] intervals, Single phase)
這些值 與筆劃寬度不 相關。 例如,如果筆劃寬度為 10,而且您想要由正方形虛線和方形間距組成的線條,請將 intervals 陣列設定為 { 10, 10 }。 自 phase 變數會指出線條開始的虛線圖樣內的位置。 在此範例中,如果您希望線條以方形間距開頭,請將 設定 phase 為 10。
虛線的結尾會受到 StrokeCap 的屬性 SKPaint影響。 對於寬筆劃寬度,將此屬性設定為 SKStrokeCap.Round 將虛線的結尾四捨五入是很常見的。 在此情況下,陣列中的intervals值不包含捨入所產生的額外長度。 這個事實表示圓點需要指定零的寬度。 若為 10 的筆劃寬度,若要建立一條具有圓形點和相同直徑點之間間距的線條,請使用 intervals { 0, 20 } 的數位。
[動畫虛線文字] 頁面類似於整合文字和圖形一文中所述的 [大綱文字] 頁面,方法是將 對象的 屬性SKPaint設定Style為 SKPaintStyle.Stroke,以顯示外框文字字元。 此外, 動畫虛線文字 會使用 SKPathEffect.CreateDash 來提供這個外框虛線的外觀,而且程式也會以動畫 phase 顯示 方法的 SKPathEffect.CreateDash 自變數,讓點似乎在文字字元周圍移動。 以下是橫向模式的頁面:
類別 AnimatedDottedTextPage 的開頭是定義一些常數,也會覆寫 OnAppearing 動畫的 和 OnDisappearing 方法:
public class AnimatedDottedTextPage : ContentPage
{
    const string text = "DOTTED";
    const float strokeWidth = 10;
    static readonly float[] dashArray = { 0, 2 * strokeWidth };

    SKCanvasView canvasView;
    bool pageIsActive;

    public AnimatedDottedTextPage()
    {
        Title = "Animated Dotted Text";

        canvasView = new SKCanvasView();
        canvasView.PaintSurface += OnCanvasViewPaintSurface;
        Content = canvasView;
    }

    protected override void OnAppearing()
    {
        base.OnAppearing();
        pageIsActive = true;

        Device.StartTimer(TimeSpan.FromSeconds(1f / 60), () =>
        {
            canvasView.InvalidateSurface();
            return pageIsActive;
        });
    }

    protected override void OnDisappearing()
    {
        base.OnDisappearing();
        pageIsActive = false;
    }
    ...
}
處理程式 PaintSurface 會從建立 SKPaint 對象來顯示文字開始。 TextSize屬性會根據螢幕寬度進行調整:
public class AnimatedDottedTextPage : ContentPage
{
    ...
    void OnCanvasViewPaintSurface(object sender, SKPaintSurfaceEventArgs args)
    {
        SKImageInfo info = args.Info;
        SKSurface surface = args.Surface;
        SKCanvas canvas = surface.Canvas;

        canvas.Clear();

        // Create an SKPaint object to display the text
        using (SKPaint textPaint = new SKPaint
            {
                Style = SKPaintStyle.Stroke,
                StrokeWidth = strokeWidth,
                StrokeCap = SKStrokeCap.Round,
                Color = SKColors.Blue,
            })
        {
            // Adjust TextSize property so text is 95% of screen width
            float textWidth = textPaint.MeasureText(text);
            textPaint.TextSize *= 0.95f * info.Width / textWidth;

            // Find the text bounds
            SKRect textBounds = new SKRect();
            textPaint.MeasureText(text, ref textBounds);

            // Calculate offsets to center the text on the screen
            float xText = info.Width / 2 - textBounds.MidX;
            float yText = info.Height / 2 - textBounds.MidY;

            // Animate the phase; t is 0 to 1 every second
            TimeSpan timeSpan = new TimeSpan(DateTime.Now.Ticks);
            float t = (float)(timeSpan.TotalSeconds % 1 / 1);
            float phase = -t * 2 * strokeWidth;

            // Create dotted line effect based on dash array and phase
            using (SKPathEffect dashEffect = SKPathEffect.CreateDash(dashArray, phase))
            {
                // Set it to the paint object
                textPaint.PathEffect = dashEffect;

                // And draw the text
                canvas.DrawText(text, xText, yText, textPaint);
            }
        }
    }
}
在方法的結尾, SKPathEffect.CreateDash 會使用 dashArray 定義為欄位的,以及動畫 phase 值來呼叫 方法。 實例 SKPathEffect 會設定為 PathEffect 對象的 屬性 SKPaint ,以顯示文字。
或者,您可以先將 物件設定 SKPathEffect 為 SKPaint 物件,再測量文字並將其置中於頁面上。 不過,在此情況下,動畫點和虛線會導致轉譯文字的大小有一些變化,而文字通常會振動一點。 (試試看!
您也會注意到,當動畫點繞著文字字元圓圈時,每個封閉曲線中都有一個特定點,其中點似乎會彈出和不存在。 這是定義字元大綱開始和結束的路徑。 如果路徑長度不是虛線圖樣長度的整數倍數(在此案例中為 20 像素),則只有該模式的一部分可以符合路徑結尾。
您可以調整虛線圖樣長度以符合路徑的長度,但需要判斷路徑長度,這是路徑資訊和列舉一文所涵蓋的技術。
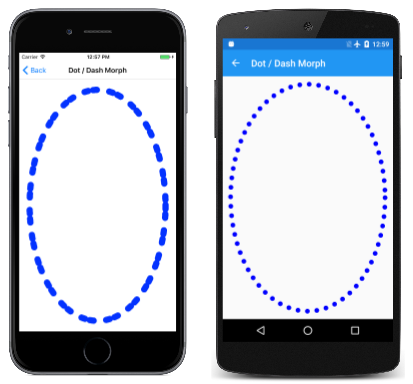
Dot / Dash Morph 程式會以動畫顯示虛線圖樣本身,讓虛線似乎分成一個點,以再次形成虛線:
類別 DotDashMorphPage 會 OnAppearing 覆寫 和 OnDisappearing 方法,就像上一個程式所做的一樣,但 類別會將 SKPaint 對象定義為欄位:
public class DotDashMorphPage : ContentPage
{
    const float strokeWidth = 30;
    static readonly float[] dashArray = new float[4];

    SKCanvasView canvasView;
    bool pageIsActive = false;

    SKPaint ellipsePaint = new SKPaint
    {
        Style = SKPaintStyle.Stroke,
        StrokeWidth = strokeWidth,
        StrokeCap = SKStrokeCap.Round,
        Color = SKColors.Blue
    };
    ...
    void OnCanvasViewPaintSurface(object sender, SKPaintSurfaceEventArgs args)
    {
        SKImageInfo info = args.Info;
        SKSurface surface = args.Surface;
        SKCanvas canvas = surface.Canvas;

        canvas.Clear();

        // Create elliptical path
        using (SKPath ellipsePath = new SKPath())
        {
            ellipsePath.AddOval(new SKRect(50, 50, info.Width - 50, info.Height - 50));

            // Create animated path effect
            TimeSpan timeSpan = new TimeSpan(DateTime.Now.Ticks);
            float t = (float)(timeSpan.TotalSeconds % 3 / 3);
            float phase = 0;

            if (t < 0.25f)  // 1, 0, 1, 2 --> 0, 2, 0, 2
            {
                float tsub = 4 * t;
                dashArray[0] = strokeWidth * (1 - tsub);
                dashArray[1] = strokeWidth * 2 * tsub;
                dashArray[2] = strokeWidth * (1 - tsub);
                dashArray[3] = strokeWidth * 2;
            }
            else if (t < 0.5f)  // 0, 2, 0, 2 --> 1, 2, 1, 0
            {
                float tsub = 4 * (t - 0.25f);
                dashArray[0] = strokeWidth * tsub;
                dashArray[1] = strokeWidth * 2;
                dashArray[2] = strokeWidth * tsub;
                dashArray[3] = strokeWidth * 2 * (1 - tsub);
                phase = strokeWidth * tsub;
            }
            else if (t < 0.75f) // 1, 2, 1, 0 --> 0, 2, 0, 2
            {
                float tsub = 4 * (t - 0.5f);
                dashArray[0] = strokeWidth * (1 - tsub);
                dashArray[1] = strokeWidth * 2;
                dashArray[2] = strokeWidth * (1 - tsub);
                dashArray[3] = strokeWidth * 2 * tsub;
                phase = strokeWidth * (1 - tsub);
            }
            else               // 0, 2, 0, 2 --> 1, 0, 1, 2
            {
                float tsub = 4 * (t - 0.75f);
                dashArray[0] = strokeWidth * tsub;
                dashArray[1] = strokeWidth * 2 * (1 - tsub);
                dashArray[2] = strokeWidth * tsub;
                dashArray[3] = strokeWidth * 2;
            }

            using (SKPathEffect pathEffect = SKPathEffect.CreateDash(dashArray, phase))
            {
                ellipsePaint.PathEffect = pathEffect;
                canvas.DrawPath(ellipsePath, ellipsePaint);
            }
        }
    }
}
處理程式PaintSurface會根據頁面的大小建立橢圓路徑,並執行設定和 phase 變數的程式代碼dashArray長區段。 當動畫變數 t 的範圍從 0 到 1 時,區塊會將 if 該時間分成四個季度,在這些季度中, tsub 也會從 0 到 1 不等。 最後,程式會 SKPathEffect 建立 ,並將它設定為 SKPaint 用於繪製的物件。
從路徑到路徑
的 方法SKPaint會GetFillPath根據物件中的SKPaint設定,將一個路徑轉換成另一個路徑。 若要檢視運作方式,請使用下列程式代碼取代 canvas.DrawPath 上一個程式中的呼叫:
SKPath newPath = new SKPath();
bool fill = ellipsePaint.GetFillPath(ellipsePath, newPath);
SKPaint newPaint = new SKPaint
{
    Style = fill ? SKPaintStyle.Fill : SKPaintStyle.Stroke
};
canvas.DrawPath(newPath, newPaint);
在這個新的程式代碼中,呼叫會將 GetFillPathellipsePath (這隻是橢圓形) newPath轉換成 ,然後以 newPaint顯示 。 物件 newPaint 是使用所有預設屬性設定所建立, Style 但屬性是根據的 GetFillPath布爾值傳回值所設定。
視覺效果相同,但色彩除外,該色彩是在 中 ellipsePaint 設定,但不是 newPaint。 而不是 中 ellipsePath定義的簡單橢圓形, newPath 包含許多路徑輪廓,可定義一連串的點和虛線。 這是將各種屬性ellipsePaint套用至 ellipsePath ,StrokeWidthStrokeCap並將PathEffect結果路徑newPath放入 的結果。 方法 GetFillPath 會傳回 Boolean 值,指出是否要填入目的地路徑;在此範例中,傳回值是 true 用來填入路徑。
請嘗試將 中的newPaint設定變更Style為 SKPaintStyle.Stroke ,您會看到以一圖元寬度線條概述的個別路徑輪廓。
使用路徑串動
方法 SKPathEffect.Create1DPath 在概念上類似 SKPathEffect.CreateDash ,不同之處在於您指定路徑,而不是虛線和間距的模式。 此路徑會復寫多次以筆劃線條或曲線。
語法為:
public static SKPathEffect Create1DPath (SKPath path, Single advance,
                                         Single phase, SKPath1DPathEffectStyle style)
一般而言,您傳遞 Create1DPath 的路徑會很小,並以點 (0, 0) 為中心。 參數 advance 會指出路徑中心之間的距離,因為路徑是在行上複寫。 您通常會將此自變數設定為路徑的近似寬度。 自 phase 變數在這裡扮演的角色與方法中 CreateDash 的作用相同。
SKPath1DPathEffectStyle有三個成員:
TranslateRotateMorph
成員 Translate 會使路徑保持與沿著線條或曲線複寫相同的方向。 針對 Rotate,路徑會根據曲線的正切值旋轉。 路徑具有水平線的正常方向。 Morph 與 類似 Rotate ,不同之處在於路徑本身也會彎曲以符合所繪製線條的曲度。
[ 1D 路徑效果] 頁面示範這三個選項。 OneDimensionalPathEffectPage.xaml 檔案會定義一個選擇器,其中包含三個專案,對應至列舉的三個成員:
<?xml version="1.0" encoding="utf-8" ?>
<ContentPage xmlns="http://xamarin.com/schemas/2014/forms"
             xmlns:x="http://schemas.microsoft.com/winfx/2009/xaml"
             xmlns:skia="clr-namespace:SkiaSharp.Views.Forms;assembly=SkiaSharp.Views.Forms"
             x:Class="SkiaSharpFormsDemos.Curves.OneDimensionalPathEffectPage"
             Title="1D Path Effect">
    <Grid>
        <Grid.RowDefinitions>
            <RowDefinition Height="Auto" />
            <RowDefinition Height="*" />
        </Grid.RowDefinitions>

        <Picker x:Name="effectStylePicker"
                Title="Effect Style"
                Grid.Row="0"
                SelectedIndexChanged="OnPickerSelectedIndexChanged">
            <Picker.ItemsSource>
                <x:Array Type="{x:Type x:String}">
                    <x:String>Translate</x:String>
                    <x:String>Rotate</x:String>
                    <x:String>Morph</x:String>
                </x:Array>
            </Picker.ItemsSource>
            <Picker.SelectedIndex>
                0
            </Picker.SelectedIndex>
        </Picker>

        <skia:SKCanvasView x:Name="canvasView"
                           PaintSurface="OnCanvasViewPaintSurface"
                           Grid.Row="1" />
    </Grid>
</ContentPage>
OneDimensionalPathEffectPage.xaml.cs程式代碼後置檔案會將三SKPathEffect個物件定義為欄位。 這些都是使用 建立SKPathEffect.Create1DPathSKPath的物件來建立SKPath.ParseSvgPathData的。 第一個是簡單的方塊,第二個是菱形,第三個是矩形。 這些是用來示範三種效果樣式:
public partial class OneDimensionalPathEffectPage : ContentPage
{
    SKPathEffect translatePathEffect =
        SKPathEffect.Create1DPath(SKPath.ParseSvgPathData("M -10 -10 L 10 -10, 10 10, -10 10 Z"),
                                  24, 0, SKPath1DPathEffectStyle.Translate);

    SKPathEffect rotatePathEffect =
        SKPathEffect.Create1DPath(SKPath.ParseSvgPathData("M -10 0 L 0 -10, 10 0, 0 10 Z"),
                                  20, 0, SKPath1DPathEffectStyle.Rotate);

    SKPathEffect morphPathEffect =
        SKPathEffect.Create1DPath(SKPath.ParseSvgPathData("M -25 -10 L 25 -10, 25 10, -25 10 Z"),
                                  55, 0, SKPath1DPathEffectStyle.Morph);

    SKPaint pathPaint = new SKPaint
    {
        Color = SKColors.Blue
    };

    public OneDimensionalPathEffectPage()
    {
        InitializeComponent();
    }

    void OnPickerSelectedIndexChanged(object sender, EventArgs args)
    {
        if (canvasView != null)
        {
            canvasView.InvalidateSurface();
        }
    }

    void OnCanvasViewPaintSurface(object sender, SKPaintSurfaceEventArgs args)
    {
        SKImageInfo info = args.Info;
        SKSurface surface = args.Surface;
        SKCanvas canvas = surface.Canvas;

        canvas.Clear();

        using (SKPath path = new SKPath())
        {
            path.MoveTo(new SKPoint(0, 0));
            path.CubicTo(new SKPoint(2 * info.Width, info.Height),
                         new SKPoint(-info.Width, info.Height),
                         new SKPoint(info.Width, 0));

            switch ((string)effectStylePicker.SelectedItem))
            {
                case "Translate":
                    pathPaint.PathEffect = translatePathEffect;
                    break;

                case "Rotate":
                    pathPaint.PathEffect = rotatePathEffect;
                    break;

                case "Morph":
                    pathPaint.PathEffect = morphPathEffect;
                    break;
            }

            canvas.DrawPath(path, pathPaint);
        }
    }
}
處理程式 PaintSurface 會建立迴圈本身的 Bézier 曲線,並存取選擇器來判斷 PathEffect 應該用來繪製它。 從左至右顯示三個選項 : Translate、 Rotate和 Morph :
方法中指定的 SKPathEffect.Create1DPath 路徑一律會填滿。 如果SKPaint對象的屬性PathEffect設定為 1D 路徑效果,則方法中指定的DrawPath路徑一律會筆劃。 請注意, pathPaint 對象沒有 Style 設定,這通常預設為 Fill,但不論路徑為何。
此範例中使用的 Translate 方塊是 20 像素平方,而 advance 自變數會設定為 24。 當線條大致為水準或垂直時,此差異會導致方塊之間的間距,但是當線條對角線為對角線時,方塊會重疊一點,因為方塊的對角線為 28.3 圖元。
此範例中的 Rotate 菱形也是 20 像素寬。 advance設定為 20,讓點繼續觸控,因為鑽石會隨著線條的曲度旋轉。
此範例中的 Morph 矩形圖形寬 50 像素 advance ,其設定為 55,可在矩形之間做一個小間距,因為它們在 Bézier 曲線周圍彎曲。
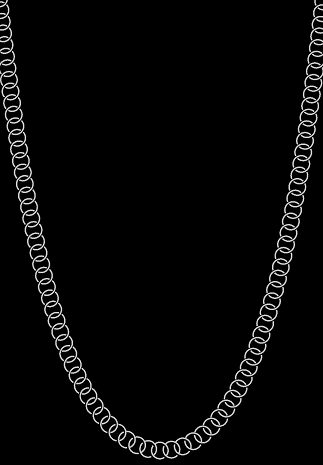
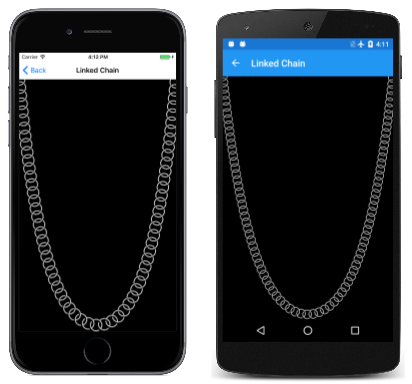
如果自 advance 變數小於路徑的大小,則復寫的路徑可以重疊。 這可能會導致一些有趣的效果。 [ 鏈接鏈 結] 頁面會顯示一系列重疊的圓形,這些圓形似乎與鏈結類似,其會以貓角線的獨特形狀停止回應:
看起來非常接近,您會看到這些實際上不是圓圈。 鏈結中的每個連結都是兩個弧線,大小和位置,因此它們似乎與相鄰鏈接連接。
一條鏈結或一條統一重量分配的纜線以貓頭的形式掛斷。 一個拱門,以反轉的貓頭的形式建置,受益於拱門重量的壓力相等分配。 貓頭號有一個看似簡單的數學描述:
y = a · cosh(x / a)
cosh是雙曲餘弦函數。 若為 x 等於 0,cosh為零,而 y 等於 a。 這就是禁區的中心。 和餘弦函數一樣,cosh 據說是偶數,這表示 cosh(–x) 等於 cosh(x),而值會增加增加正數或負自變數。 這些值描述形成貓邊的曲線。
尋找 適當的值,以符合手機頁面維度的貓號不是直接計算。 如果 w 和 h 是矩形的寬度和高度,則 的最佳值符合下列方程式:
cosh(w / 2 / a) = 1 + h / a
類別中的 LinkedChainPage 下列方法會藉由將等號左邊和右邊的兩個運算式當做 left 和 right來納入該相等。 若為小型值,left大於 right;若為 的大型值,left則小於 right。 循環while會在的最佳值上縮小:
float FindOptimumA(float width, float height)
{
    Func<float, float> left = (float a) => (float)Math.Cosh(width / 2 / a);
    Func<float, float> right = (float a) => 1 + height / a;

    float gtA = 1;         // starting value for left > right
    float ltA = 10000;     // starting value for left < right

    while (Math.Abs(gtA - ltA) > 0.1f)
    {
        float avgA = (gtA + ltA) / 2;

        if (left(avgA) < right(avgA))
        {
            ltA = avgA;
        }
        else
        {
            gtA = avgA;
        }
    }

    return (gtA + ltA) / 2;
}
SKPath連結的物件會建立於 類別的建構函式中,而結果SKPathEffect對象接著會設定為PathEffect儲存為欄位之SKPaint物件的 屬性:
public class LinkedChainPage : ContentPage
{
    const float linkRadius = 30;
    const float linkThickness = 5;

    Func<float, float, float> catenary = (float a, float x) => (float)(a * Math.Cosh(x / a));

    SKPaint linksPaint = new SKPaint
    {
        Color = SKColors.Silver
    };

    public LinkedChainPage()
    {
        Title = "Linked Chain";

        SKCanvasView canvasView = new SKCanvasView();
        canvasView.PaintSurface += OnCanvasViewPaintSurface;
        Content = canvasView;

        // Create the path for the individual links
        SKRect outer = new SKRect(-linkRadius, -linkRadius, linkRadius, linkRadius);
        SKRect inner = outer;
        inner.Inflate(-linkThickness, -linkThickness);

        using (SKPath linkPath = new SKPath())
        {
            linkPath.AddArc(outer, 55, 160);
            linkPath.ArcTo(inner, 215, -160, false);
            linkPath.Close();

            linkPath.AddArc(outer, 235, 160);
            linkPath.ArcTo(inner, 395, -160, false);
            linkPath.Close();

            // Set that path as the 1D path effect for linksPaint
            linksPaint.PathEffect =
                SKPathEffect.Create1DPath(linkPath, 1.3f * linkRadius, 0,
                                          SKPath1DPathEffectStyle.Rotate);
        }
    }
    ...
}
處理程式的主要作業 PaintSurface 是建立貓本身的路徑。 在判斷最佳 a 並將它儲存在 optA 變數之後,也需要計算視窗頂端的位移。 然後,它可以累積一個 SKPoint 值集合,將它變成路徑,並使用先前建立 SKPaint 的物件繪製路徑:
public class LinkedChainPage : ContentPage
{
    ...
    void OnCanvasViewPaintSurface(object sender, SKPaintSurfaceEventArgs args)
    {
        SKImageInfo info = args.Info;
        SKSurface surface = args.Surface;
        SKCanvas canvas = surface.Canvas;

        canvas.Clear(SKColors.Black);

        // Width and height of catenary
        int width = info.Width;
        float height = info.Height - linkRadius;

        // Find the optimum 'a' for this width and height
        float optA = FindOptimumA(width, height);

        // Calculate the vertical offset for that value of 'a'
        float yOffset = catenary(optA, -width / 2);

        // Create a path for the catenary
        SKPoint[] points = new SKPoint[width];

        for (int x = 0; x < width; x++)
        {
            points[x] = new SKPoint(x, yOffset - catenary(optA, x - width / 2));
        }

        using (SKPath path = new SKPath())
        {
            path.AddPoly(points, false);

            // And render that path with the linksPaint object
            canvas.DrawPath(path, linksPaint);
        }
    }
    ...
}
此程式會定義 中 Create1DPath 用來在中心具有其 (0, 0) 點的路徑。 這似乎是合理的,因為路徑的 (0, 0) 點與它裝飾的線條或曲線對齊。 不過,您可以針對某些特殊效果使用非置中 (0, 0) 點。
[ 輸送帶 ] 頁面會建立一條路徑,其路徑與長方形輸送帶,其上下彎曲,大小為視窗尺寸。 該路徑會以簡單SKPaint物件 20 像素寬和彩色灰色來筆劃,然後以另一個SKPaintSKPathEffect對象來筆劃,該對象參考一個小貯體的路徑:
桶路徑的 (0, 0) 點是控點,所以當 phase 自變數是動畫時,水桶似乎圍繞輸送帶旋轉,也許在底部挖水,並將其傾倒在頂部。
類別會ConveyorBeltPage使用 和 OnDisappearing 方法的OnAppearing覆寫來實作動畫。 貯體的路徑定義於頁面的建構函式中:
public class ConveyorBeltPage : ContentPage
{
    SKCanvasView canvasView;
    bool pageIsActive = false;

    SKPaint conveyerPaint = new SKPaint
    {
        Style = SKPaintStyle.Stroke,
        StrokeWidth = 20,
        Color = SKColors.DarkGray
    };

    SKPath bucketPath = new SKPath();

    SKPaint bucketsPaint = new SKPaint
    {
        Color = SKColors.BurlyWood,
    };

    public ConveyorBeltPage()
    {
        Title = "Conveyor Belt";

        canvasView = new SKCanvasView();
        canvasView.PaintSurface += OnCanvasViewPaintSurface;
        Content = canvasView;

        // Create the path for the bucket starting with the handle
        bucketPath.AddRect(new SKRect(-5, -3, 25, 3));

        // Sides
        bucketPath.AddRoundedRect(new SKRect(25, -19, 27, 18), 10, 10,
                                  SKPathDirection.CounterClockwise);
        bucketPath.AddRoundedRect(new SKRect(63, -19, 65, 18), 10, 10,
                                  SKPathDirection.CounterClockwise);

        // Five slats
        for (int i = 0; i < 5; i++)
        {
            bucketPath.MoveTo(25, -19 + 8 * i);
            bucketPath.LineTo(25, -13 + 8 * i);
            bucketPath.ArcTo(50, 50, 0, SKPathArcSize.Small,
                             SKPathDirection.CounterClockwise, 65, -13 + 8 * i);
            bucketPath.LineTo(65, -19 + 8 * i);
            bucketPath.ArcTo(50, 50, 0, SKPathArcSize.Small,
                             SKPathDirection.Clockwise, 25, -19 + 8 * i);
            bucketPath.Close();
        }

        // Arc to suggest the hidden side
        bucketPath.MoveTo(25, -17);
        bucketPath.ArcTo(50, 50, 0, SKPathArcSize.Small,
                         SKPathDirection.Clockwise, 65, -17);
        bucketPath.LineTo(65, -19);
        bucketPath.ArcTo(50, 50, 0, SKPathArcSize.Small,
                         SKPathDirection.CounterClockwise, 25, -19);
        bucketPath.Close();

        // Make it a little bigger and correct the orientation
        bucketPath.Transform(SKMatrix.MakeScale(-2, 2));
        bucketPath.Transform(SKMatrix.MakeRotationDegrees(90));
    }
    ...
貯體建立程式代碼會完成兩個轉換,讓貯體變大一點,並側轉。 套用這些轉換比調整先前程序代碼中的所有座標更容易。
處理程式 PaintSurface 從定義輸送帶本身的路徑開始。 這隻是一對線條和一對半圓形,以 20 像素寬的深灰色線條繪製:
public class ConveyorBeltPage : ContentPage
{
    ...
    void OnCanvasViewPaintSurface(object sender, SKPaintSurfaceEventArgs args)
    {
        SKImageInfo info = args.Info;
        SKSurface surface = args.Surface;
        SKCanvas canvas = surface.Canvas;

        canvas.Clear();

        float width = info.Width / 3;
        float verticalMargin = width / 2 + 150;

        using (SKPath conveyerPath = new SKPath())
        {
            // Straight verticals capped by semicircles on top and bottom
            conveyerPath.MoveTo(width, verticalMargin);
            conveyerPath.ArcTo(width / 2, width / 2, 0, SKPathArcSize.Large,
                               SKPathDirection.Clockwise, 2 * width, verticalMargin);
            conveyerPath.LineTo(2 * width, info.Height - verticalMargin);
            conveyerPath.ArcTo(width / 2, width / 2, 0, SKPathArcSize.Large,
                               SKPathDirection.Clockwise, width, info.Height - verticalMargin);
            conveyerPath.Close();

            // Draw the conveyor belt itself
            canvas.DrawPath(conveyerPath, conveyerPaint);

            // Calculate spacing based on length of conveyer path
            float length = 2 * (info.Height - 2 * verticalMargin) +
                           2 * ((float)Math.PI * width / 2);

            // Value will be somewhere around 200
            float spacing = length / (float)Math.Round(length / 200);

            // Now animate the phase; t is 0 to 1 every 2 seconds
            TimeSpan timeSpan = new TimeSpan(DateTime.Now.Ticks);
            float t = (float)(timeSpan.TotalSeconds % 2 / 2);
            float phase = -t * spacing;

            // Create the buckets PathEffect
            using (SKPathEffect bucketsPathEffect =
                        SKPathEffect.Create1DPath(bucketPath, spacing, phase,
                                                  SKPath1DPathEffectStyle.Rotate))
            {
                // Set it to the Paint object and draw the path again
                bucketsPaint.PathEffect = bucketsPathEffect;
                canvas.DrawPath(conveyerPath, bucketsPaint);
            }
        }
    }
}
繪製輸送帶的邏輯無法在橫向模式中運作。
貯體應該在輸送帶上相隔約 200 像素。 不過,輸送帶可能不是長度為 200 像素的倍數,這表示當 phase 的 SKPathEffect.Create1DPath 自變數為動畫時,貯體會彈出並不存在。
基於這個理由,程式會先計算名為 length 的值,也就是輸送帶的長度。 因為輸送帶是由直線和半圓組成,因此這是一個簡單的計算。 接下來,值區數目會除 length 以 200 來計算。 這會四捨五入為最接近的整數,然後該數位會分割成 length。 結果是值區整數的間距。 自 phase 變數只是其中的一小部分。
再次從路徑到路徑
在輸送帶的處理程式底部DrawSurface,將canvas.DrawPath呼叫批注化,並將它取代為下列程序代碼:
SKPath newPath = new SKPath();
bool fill = bucketsPaint.GetFillPath(conveyerPath, newPath);
SKPaint newPaint = new SKPaint
{
    Style = fill ? SKPaintStyle.Fill : SKPaintStyle.Stroke
};
canvas.DrawPath(newPath, newPaint);
如同先前的 GetFillPath範例,您會看到結果與色彩不同。 執行 GetFillPath之後, newPath 物件會包含貯體路徑的多個復本,每個復本都位於動畫在呼叫時放置它們的相同位置。
孵化區域
方法SKPathEffect.Create2DLines會以平行線條填滿區域,通常稱為影線。 方法具有下列語法:
public static SKPathEffect Create2DLine (Single width, SKMatrix matrix)
自 width 變數會指定線線的筆劃寬度。 參數 matrix 是縮放和選擇性旋轉的組合。 縮放比例表示 Skia 用來空間線的圖元增量。 行之間的分隔是縮放因數減去 width 自變數。 如果縮放比例小於或等於 width 值,則影線之間不會有空格,而且區域看起來會填滿。 針對水平和垂直縮放指定相同的值。
根據預設,線線為水平線。 matrix如果參數包含旋轉,則線線會順時針旋轉。
[ 影線填滿 ] 頁面示範此路徑效果。 類別 HatchFillPage 會將三個路徑效果定義為字段,第一個用於寬度為 3 像素的水準影線,縮放比例表示它們相隔 6 圖元。 因此,線條之間的分隔是三個圖元。 第二個路徑效果適用於寬度為 6 像素的垂直影線,寬度為 24 像素(因此分隔為 18 像素),而第三個則是對角線 12 像素寬 36 圖元。
public class HatchFillPage : ContentPage
{
    SKPaint fillPaint = new SKPaint();

    SKPathEffect horzLinesPath = SKPathEffect.Create2DLine(3, SKMatrix.MakeScale(6, 6));

    SKPathEffect vertLinesPath = SKPathEffect.Create2DLine(6,
        Multiply(SKMatrix.MakeRotationDegrees(90), SKMatrix.MakeScale(24, 24)));

    SKPathEffect diagLinesPath = SKPathEffect.Create2DLine(12,
        Multiply(SKMatrix.MakeScale(36, 36), SKMatrix.MakeRotationDegrees(45)));

    SKPaint strokePaint = new SKPaint
    {
        Style = SKPaintStyle.Stroke,
        StrokeWidth = 3,
        Color = SKColors.Black
    };
    ...
    static SKMatrix Multiply(SKMatrix first, SKMatrix second)
    {
        SKMatrix target = SKMatrix.MakeIdentity();
        SKMatrix.Concat(ref target, first, second);
        return target;
    }
}
請注意矩陣 Multiply 方法。 由於水準和垂直縮放係數相同,因此縮放和旋轉矩陣相乘的順序並不重要。
處理程式 PaintSurface 會使用這三種路徑效果搭配三種不同的色彩, fillPaint 以填滿四捨五入的矩形,以符合頁面大小。 Style會忽略 上fillPaint設定的屬性;當 物件包含從 SKPathEffect.Create2DLine建立的路徑效果時SKPaint,不論下列項目為何,區域都會填滿:
public class HatchFillPage : ContentPage
{
    ...
    void OnCanvasViewPaintSurface(object sender, SKPaintSurfaceEventArgs args)
    {
        SKImageInfo info = args.Info;
        SKSurface surface = args.Surface;
        SKCanvas canvas = surface.Canvas;

        canvas.Clear();

        using (SKPath roundRectPath = new SKPath())
        {
            // Create a path
            roundRectPath.AddRoundedRect(
                new SKRect(50, 50, info.Width - 50, info.Height - 50), 100, 100);

            // Horizontal hatch marks
            fillPaint.PathEffect = horzLinesPath;
            fillPaint.Color = SKColors.Red;
            canvas.DrawPath(roundRectPath, fillPaint);

            // Vertical hatch marks
            fillPaint.PathEffect = vertLinesPath;
            fillPaint.Color = SKColors.Blue;
            canvas.DrawPath(roundRectPath, fillPaint);

            // Diagonal hatch marks -- use clipping
            fillPaint.PathEffect = diagLinesPath;
            fillPaint.Color = SKColors.Green;

            canvas.Save();
            canvas.ClipPath(roundRectPath);
            canvas.DrawRect(new SKRect(0, 0, info.Width, info.Height), fillPaint);
            canvas.Restore();

            // Outline the path
            canvas.DrawPath(roundRectPath, strokePaint);
        }
    }
    ...
}
如果您仔細查看結果,您會看到紅色和藍色影線不會精確地限制在圓角矩形。 (這顯然是基礎 Skia 程式代碼的特性。如果這不盡如人意,則會針對綠色的對角線顯示替代方法:圓角矩形會當做裁剪路徑使用,而且整個頁面上繪製影線。
處理程式會 PaintSurface 以直接筆觸四捨五入矩形的呼叫結束,因此您可以看到紅色和藍色影線的差異:
Android 畫面看起來並不像這樣:螢幕快照的縮放比例導致細紅線和細空格合併成看似較寬的紅色線條和較寬的空間。
填滿路徑
SKPathEffect.Create2DPath可讓您以水準和垂直方式複寫的路徑填滿區域,實際上會將區域並排在一起:
public static SKPathEffect Create2DPath (SKMatrix matrix, SKPath path)
縮放 SKMatrix 比例表示複寫路徑的水準和垂直間距。 但是您無法使用此 matrix 自變數來旋轉路徑;如果您想要旋轉路徑,請使用 Transform 所 SKPath定義的 方法來旋轉路徑本身。
複寫的路徑通常會與螢幕的左邊緣和上邊緣對齊,而不是填滿的區域。 您可以藉由提供介於0與縮放比例之間的轉譯因數來指定左側和上側的水準和垂直位移,以覆寫此行為。
[ 路徑磚填滿 ] 頁面示範此路徑效果。 用來將區域並排的路徑定義為 類別中的 PathTileFillPage 欄位。 水平和垂直座標的範圍從 –40 到 40,這表示此路徑是 80 像素平方:
public class PathTileFillPage : ContentPage
{
    SKPath tilePath = SKPath.ParseSvgPathData(
        "M -20 -20 L 2 -20, 2 -40, 18 -40, 18 -20, 40 -20, " +
        "40 -12, 20 -12, 20 12, 40 12, 40 40, 22 40, 22 20, " +
        "-2 20, -2 40, -20 40, -20 8, -40 8, -40 -8, -20 -8 Z");
    ...
    void OnCanvasViewPaintSurface(object sender, SKPaintSurfaceEventArgs args)
    {
        SKImageInfo info = args.Info;
        SKSurface surface = args.Surface;
        SKCanvas canvas = surface.Canvas;

        canvas.Clear();

        using (SKPaint paint = new SKPaint())
        {
            paint.Color = SKColors.Red;

            using (SKPathEffect pathEffect =
                   SKPathEffect.Create2DPath(SKMatrix.MakeScale(64, 64), tilePath))
            {
                paint.PathEffect = pathEffect;

                canvas.DrawRoundRect(
                    new SKRect(50, 50, info.Width - 50, info.Height - 50),
                    100, 100, paint);
            }
        }
    }
}
在處理程式中 PaintSurface ,呼叫會將 SKPathEffect.Create2DPath 水準和垂直間距設定為64,使80像素的方形磚重疊。 幸運的是,路徑類似於一個拼圖片,與相鄰的磚網格良好:
原始螢幕快照中的縮放比例會導致某些扭曲,特別是在Android畫面上。
請注意,這些磚一律會顯示完整且永遠不會被截斷。 在前兩個螢幕快照中,甚至看不出填滿的區域是圓角矩形。 如果您想要將這些磚截斷至特定區域,請使用裁剪路徑。
請嘗試將 Style 對象的 屬性 SKPaint 設定為 Stroke,您會看到個別磚外框,而不是填滿。
您也可以使用並排位圖填滿區域,如SkiaSharp位陣陣圖並排一文所示。
圓角圓角
在三種方式繪製Arc文章中所呈現的圓角式Heptagon程式使用正切弧來彎曲七面圖的點。 [ 另一個四捨五入的 Heptagon ] 頁面會顯示使用從 SKPathEffect.CreateCorner 方法建立之路徑效果的簡單方法:
public static SKPathEffect CreateCorner (Single radius)
雖然單一自變數命名 radius為 ,但您必須將它設定為所需圓角半徑的一半。 (這是基礎 Skia 程式代碼的特性。
以下是 PaintSurface 類別中的 AnotherRoundedHeptagonPage 處理程式:
void OnCanvasViewPaintSurface(object sender, SKPaintSurfaceEventArgs args)
{
    SKImageInfo info = args.Info;
    SKSurface surface = args.Surface;
    SKCanvas canvas = surface.Canvas;

    canvas.Clear();

    int numVertices = 7;
    float radius = 0.45f * Math.Min(info.Width, info.Height);
    SKPoint[] vertices = new SKPoint[numVertices];
    double vertexAngle = -0.5f * Math.PI;       // straight up

    // Coordinates of the vertices of the polygon
    for (int vertex = 0; vertex < numVertices; vertex++)
    {
        vertices[vertex] = new SKPoint(radius * (float)Math.Cos(vertexAngle),
                                       radius * (float)Math.Sin(vertexAngle));
        vertexAngle += 2 * Math.PI / numVertices;
    }

    float cornerRadius = 100;

    // Create the path
    using (SKPath path = new SKPath())
    {
        path.AddPoly(vertices, true);

        // Render the path in the center of the screen
        using (SKPaint paint = new SKPaint())
        {
            paint.Style = SKPaintStyle.Stroke;
            paint.Color = SKColors.Blue;
            paint.StrokeWidth = 10;

            // Set argument to half the desired corner radius!
            paint.PathEffect = SKPathEffect.CreateCorner(cornerRadius / 2);

            canvas.Translate(info.Width / 2, info.Height / 2);
            canvas.DrawPath(path, paint);

            // Uncomment DrawCircle call to verify corner radius
            float offset = cornerRadius / (float)Math.Sin(Math.PI * (numVertices - 2) / numVertices / 2);
            paint.Color = SKColors.Green;
            // canvas.DrawCircle(vertices[0].X, vertices[0].Y + offset, cornerRadius, paint);
        }
    }
}
您可以使用這個效果,根據對象的屬性SKPaint來撫摸或填滿Style。 這裡正在執行:
您會看到這個四捨五入的 Heptagon 與先前的程式相同。 如果您需要更令人信服的是角半徑確實為 100,而不是呼叫中指定的 SKPathEffect.CreateCorner 50,您可以在程式中取消批注最終語句,並查看角上迭加的 100 半徑圓圈。
隨機抖動
有時計算機圖形的完美直線不是您想要的,而且需要一點隨機性。 在此情況下,您會想要嘗試 SKPathEffect.CreateDiscrete 方法:
public static SKPathEffect CreateDiscrete (Single segLength, Single deviation, UInt32 seedAssist)
您可以將此路徑效果用於撫摸或填滿。 線條會分隔成連接的區段,其近似長度是由 segLength 指定,並以不同的方向延伸。 原始行的偏差範圍是由 deviation指定。
最後一個自變數是一種種子,用來產生用於效果的虛擬隨機序列。 抖動效應對不同的種子看起來會有點不同。 自變數的預設值為零,這表示當您執行程式時,效果會相同。 如果您想要在螢幕重新繪製時發生不同的抖動,您可以將種子設定為 Millisecond 值的 屬性 DataTime.Now (例如)。
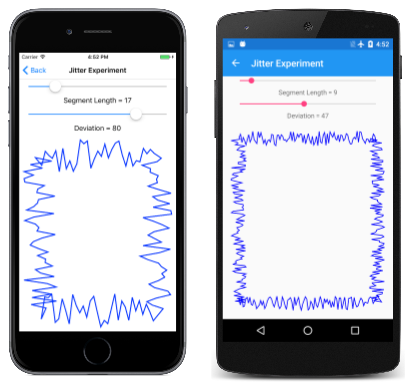
[ 抖動實驗 ] 頁面可讓您在繪製矩形時試驗不同的值:
程序很簡單。 JitterExperimentPage.xaml 檔案會具現化兩Slider個元素和 :SKCanvasView
<ContentPage xmlns="http://xamarin.com/schemas/2014/forms"
             xmlns:x="http://schemas.microsoft.com/winfx/2009/xaml"
             xmlns:skia="clr-namespace:SkiaSharp.Views.Forms;assembly=SkiaSharp.Views.Forms"
             x:Class="SkiaSharpFormsDemos.Curves.JitterExperimentPage"
             Title="Jitter Experiment">
    <Grid>
        <Grid.RowDefinitions>
            <RowDefinition Height="Auto" />
            <RowDefinition Height="Auto" />
            <RowDefinition Height="Auto" />
            <RowDefinition Height="Auto" />
            <RowDefinition Height="*" />
        </Grid.RowDefinitions>

        <Grid.Resources>
            <ResourceDictionary>
                <Style TargetType="Label">
                    <Setter Property="HorizontalTextAlignment" Value="Center" />
                </Style>

                <Style TargetType="Slider">
                    <Setter Property="Margin" Value="20, 0" />
                    <Setter Property="Minimum" Value="0" />
                    <Setter Property="Maximum" Value="100" />
                </Style>
            </ResourceDictionary>
        </Grid.Resources>

        <Slider x:Name="segLengthSlider"
                Grid.Row="0"
                ValueChanged="sliderValueChanged" />

        <Label Text="{Binding Source={x:Reference segLengthSlider},
                              Path=Value,
                              StringFormat='Segment Length = {0:F0}'}"
               Grid.Row="1" />

        <Slider x:Name="deviationSlider"
                Grid.Row="2"
                ValueChanged="sliderValueChanged" />

        <Label Text="{Binding Source={x:Reference deviationSlider},
                              Path=Value,
                              StringFormat='Deviation = {0:F0}'}"
               Grid.Row="3" />

        <skia:SKCanvasView x:Name="canvasView"
                           Grid.Row="4"
                           PaintSurface="OnCanvasViewPaintSurface" />
    </Grid>
</ContentPage>
PaintSurface每當Slider值變更時,就會呼叫JitterExperimentPage.xaml.cs程序代碼後置檔案中的處理程式。 它會使用兩Slider個值來呼叫 SKPathEffect.CreateDiscrete ,並使用該值來繪製矩形:
void OnCanvasViewPaintSurface(object sender, SKPaintSurfaceEventArgs args)
{
    SKImageInfo info = args.Info;
    SKSurface surface = args.Surface;
    SKCanvas canvas = surface.Canvas;

    canvas.Clear();

    float segLength = (float)segLengthSlider.Value;
    float deviation = (float)deviationSlider.Value;

    using (SKPaint paint = new SKPaint())
    {
        paint.Style = SKPaintStyle.Stroke;
        paint.StrokeWidth = 5;
        paint.Color = SKColors.Blue;

        using (SKPathEffect pathEffect = SKPathEffect.CreateDiscrete(segLength, deviation))
        {
            paint.PathEffect = pathEffect;

            SKRect rect = new SKRect(100, 100, info.Width - 100, info.Height - 100);
            canvas.DrawRect(rect, paint);
        }
    }
}
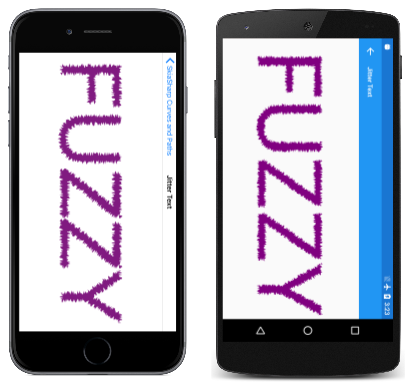
您也可以使用此效果來填滿,在此情況下,填滿區域的外框受限於這些隨機偏差。 [ 抖動文字 ] 頁面示範如何使用這個路徑效果來顯示文字。 類別處理程式JitterTextPage中的PaintSurface大部分程式代碼都致力於重設大小和置中文字:
void OnCanvasViewPaintSurface(object sender, SKPaintSurfaceEventArgs args)
{
    SKImageInfo info = args.Info;
    SKSurface surface = args.Surface;
    SKCanvas canvas = surface.Canvas;

    canvas.Clear();

    string text = "FUZZY";

    using (SKPaint textPaint = new SKPaint())
    {
        textPaint.Color = SKColors.Purple;
        textPaint.PathEffect = SKPathEffect.CreateDiscrete(3f, 10f);

        // Adjust TextSize property so text is 95% of screen width
        float textWidth = textPaint.MeasureText(text);
        textPaint.TextSize *= 0.95f * info.Width / textWidth;

        // Find the text bounds
        SKRect textBounds = new SKRect();
        textPaint.MeasureText(text, ref textBounds);

        // Calculate offsets to center the text on the screen
        float xText = info.Width / 2 - textBounds.MidX;
        float yText = info.Height / 2 - textBounds.MidY;

        canvas.DrawText(text, xText, yText, textPaint);
    }
}
在這裡,它會以橫向模式執行:
路徑大綱
您已經看到 兩個小範例,GetFillPathSKPaint其中的方法有兩個版本:
public Boolean GetFillPath (SKPath src, SKPath dst, Single resScale = 1)

public Boolean GetFillPath (SKPath src, SKPath dst, SKRect cullRect, Single resScale = 1)
只需要前兩個自變數。 方法會存取 自變數所參考 src 的路徑、根據物件中的 SKPaint 筆劃屬性修改路徑數據(包括 PathEffect 屬性),然後將結果 dst 寫入路徑。 參數 resScale 可減少精確度以建立較小的目的路徑,而且 cullRect 自變數可以消除矩形外部的輪廓。
這個方法的基本用法根本不牽涉到路徑效果:如果SKPaint對象的屬性設定為 SKPaintStyle.Stroke,而且沒有其PathEffectStyle設定,則GetFillPath建立路徑,表示來源路徑的外框,就好像已由油漆屬性筆劃一樣。
例如,如果 src 路徑是半徑 500 的簡單圓圈,而 SKPaint 物件指定筆劃寬度為 100,則 dst 路徑會變成兩個同心圓,一個半徑為 450,另一個半徑為 550。 因為填入此dst路徑與建立src路徑相同,因此會呼叫 GetFillPath 方法。 但您也可以划入 dst 路徑,以查看路徑外框。
[ 點選以概述路徑 ] 示範這一點。 和 SKCanvasViewTapGestureRecognizer 會在 TapToOutlineThePathPage.xaml 檔案中具現化。 TapToOutlineThePathPage.xaml.cs程式代碼後置檔案會將三SKPaint個物件定義為字段,兩個用於以筆劃寬度為 100 和 20 的拖曳,第三個用於填滿:
public partial class TapToOutlineThePathPage : ContentPage
{
    bool outlineThePath = false;

    SKPaint redThickStroke = new SKPaint
    {
        Style = SKPaintStyle.Stroke,
        Color = SKColors.Red,
        StrokeWidth = 100
    };

    SKPaint redThinStroke = new SKPaint
    {
        Style = SKPaintStyle.Stroke,
        Color = SKColors.Red,
        StrokeWidth = 20
    };

    SKPaint blueFill = new SKPaint
    {
        Style = SKPaintStyle.Fill,
        Color = SKColors.Blue
    };

    public TapToOutlineThePathPage()
    {
        InitializeComponent();
    }

    void OnCanvasViewTapped(object sender, EventArgs args)
    {
        outlineThePath ^= true;
        (sender as SKCanvasView).InvalidateSurface();
    }
    ...
}
如果尚未點選螢幕,處理程式會 PaintSurface 使用 blueFill 和 redThickStroke 繪製 對象來轉譯迴圈路徑:
public partial class TapToOutlineThePathPage : ContentPage
{
    ...
    void OnCanvasViewPaintSurface(object sender, SKPaintSurfaceEventArgs args)
    {
        SKImageInfo info = args.Info;
        SKSurface surface = args.Surface;
        SKCanvas canvas = surface.Canvas;

        canvas.Clear();

        using (SKPath circlePath = new SKPath())
        {
            circlePath.AddCircle(info.Width / 2, info.Height / 2,
                                 Math.Min(info.Width / 2, info.Height / 2) -
                                 redThickStroke.StrokeWidth);

            if (!outlineThePath)
            {
                canvas.DrawPath(circlePath, blueFill);
                canvas.DrawPath(circlePath, redThickStroke);
            }
            else
            {
                using (SKPath outlinePath = new SKPath())
                {
                    redThickStroke.GetFillPath(circlePath, outlinePath);

                    canvas.DrawPath(outlinePath, blueFill);
                    canvas.DrawPath(outlinePath, redThinStroke);
                }
            }
        }
    }
}
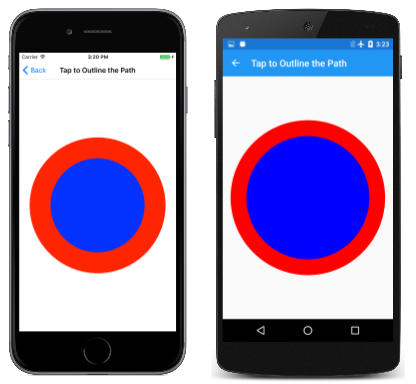
圓形會填滿並筆劃,如您所預期所示:
當您點選畫面時,outlineThePath會設定為 true,而PaintSurface處理程式會建立新的 SKPath 物件,並在繪製物件上redThickStroke呼叫 GetFillPath 時使用該物件做為目的地路徑。 然後,該目的地路徑會填入並筆劃, redThinStroke併產生下列結果:
兩個紅色圓圈清楚地表示原始圓形路徑已轉換成兩個圓形輪廓。
這個方法對於開發方法 SKPathEffect.Create1DPath 使用的路徑非常有用。 這些方法中指定的路徑一律會在復寫路徑時填入。 如果您不想要填滿整個路徑,則必須仔細定義大綱。
例如,在鏈結範例中,連結是以四個弧線的數位定義,每個弧線都是以兩個弧度為基礎,以概述要填滿的路徑區域。 可以取代 類別中的 LinkedChainPage 程序代碼,以稍微不同的方式執行。
首先,您會想要重新定義 linkRadius 常數:
const float linkRadius = 27.5f;
const float linkThickness = 5;
linkPath現在只是以該單一半徑為基礎的兩個弧線,具有所需的開始角度和掃掠角度:
using (SKPath linkPath = new SKPath())
{
    SKRect rect = new SKRect(-linkRadius, -linkRadius, linkRadius, linkRadius);
    linkPath.AddArc(rect, 55, 160);
    linkPath.AddArc(rect, 235, 160);

    using (SKPaint strokePaint = new SKPaint())
    {
        strokePaint.Style = SKPaintStyle.Stroke;
        strokePaint.StrokeWidth = linkThickness;

        using (SKPath outlinePath = new SKPath())
        {
            strokePaint.GetFillPath(linkPath, outlinePath);

            // Set that path as the 1D path effect for linksPaint
            linksPaint.PathEffect =
                SKPathEffect.Create1DPath(outlinePath, 1.3f * linkRadius, 0,
                                          SKPath1DPathEffectStyle.Rotate);

        }

    }
}
然後,物件 outlinePath 會是 大綱的 linkPath 收件者,其筆劃時會使用 中指定的 strokePaint屬性。
另一個使用這項技術的範例會針對方法中使用的路徑,下一個範例。
結合路徑效果
的兩個最終靜態建立方法 SKPathEffect 為 SKPathEffect.CreateSum 和 SKPathEffect.CreateCompose:
public static SKPathEffect CreateSum (SKPathEffect first, SKPathEffect second)

public static SKPathEffect CreateCompose (SKPathEffect outer, SKPathEffect inner)
這兩種方法會結合兩個路徑效果來建立復合路徑效果。 方法 CreateSum 會建立一個路徑效果,類似於個別套用的兩個路徑效果,同時 CreateCompose 套用一個路徑效果 , inner然後將 套用 outer 至該效果。
您已經瞭解 方法如何GetFillPath根據SKPaint屬性將一個路徑轉換成另一個路徑(包括PathEffect),因此物件在 或 CreateCompose 方法中指定的兩個路徑效果中CreateSum,執行SKPaint該作業的方式不應該太神秘。SKPaint
其中一個明顯的用法 CreateSum 是定義 SKPaint 物件,以一個路徑效果填滿路徑,並以另一個路徑效果來筆劃路徑。 這會在 Frame 範例中的 Cats 中示範,這會在具有扇貝邊緣的框架內顯示貓數位:
類別 CatsInFramePage 的開頭是定義數個字段。 您可以從 SVG 路徑資料一文辨識 類別的第一個字段PathDataCatPage。 第二個路徑是以框架扇貝圖案的線條和弧線為基礎:
public class CatsInFramePage : ContentPage
{
    // From PathDataCatPage.cs
    SKPath catPath = SKPath.ParseSvgPathData(
        "M 160 140 L 150 50 220 103" +              // Left ear
        "M 320 140 L 330 50 260 103" +              // Right ear
        "M 215 230 L 40 200" +                      // Left whiskers
        "M 215 240 L 40 240" +
        "M 215 250 L 40 280" +
        "M 265 230 L 440 200" +                     // Right whiskers
        "M 265 240 L 440 240" +
        "M 265 250 L 440 280" +
        "M 240 100" +                               // Head
        "A 100 100 0 0 1 240 300" +
        "A 100 100 0 0 1 240 100 Z" +
        "M 180 170" +                               // Left eye
        "A 40 40 0 0 1 220 170" +
        "A 40 40 0 0 1 180 170 Z" +
        "M 300 170" +                               // Right eye
        "A 40 40 0 0 1 260 170" +
        "A 40 40 0 0 1 300 170 Z");

    SKPaint catStroke = new SKPaint
    {
        Style = SKPaintStyle.Stroke,
        StrokeWidth = 5
    };

    SKPath scallopPath =
        SKPath.ParseSvgPathData("M 0 0 L 50 0 A 60 60 0 0 1 -50 0 Z");

    SKPaint framePaint = new SKPaint
    {
        Color = SKColors.Black
    };
    ...
}
如果物件屬性設定Stroke為 ,就可以在 方法中使用 SKPathEffect.Create2DPath 。StyleSKPaintcatPath 不過,如果 catPath 直接在這個程式中使用 ,那麼貓的整個頭就會填滿,而且鬍鬚甚至看不到。 (試試看!您必須取得該路徑的大綱,並在方法中使用 SKPathEffect.Create2DPath 該大綱。
建構函式會執行此作業。 它會先套用兩個轉換, catPath 以將 (0, 0) 點移至中心,並縮小大小。 GetFillPath 會取得 中 outlinedCatPath輪廓的所有外框,而且該對象用於 SKPathEffect.Create2DPath 呼叫中。 值中的 SKMatrix 縮放因數稍微大於貓的水準和垂直大小,以在磚之間提供一點緩衝區,而轉譯因數在有些經驗上衍生,讓框架左上角可以看到完整的貓:
public class CatsInFramePage : ContentPage
{
    ...
    public CatsInFramePage()
    {
        Title = "Cats in Frame";

        SKCanvasView canvasView = new SKCanvasView();
        canvasView.PaintSurface += OnCanvasViewPaintSurface;
        Content = canvasView;

        // Move (0, 0) point to center of cat path
        catPath.Transform(SKMatrix.MakeTranslation(-240, -175));

        // Now catPath is 400 by 250
        // Scale it down to 160 by 100
        catPath.Transform(SKMatrix.MakeScale(0.40f, 0.40f));

        // Get the outlines of the contours of the cat path
        SKPath outlinedCatPath = new SKPath();
        catStroke.GetFillPath(catPath, outlinedCatPath);

        // Create a 2D path effect from those outlines
        SKPathEffect fillEffect = SKPathEffect.Create2DPath(
            new SKMatrix { ScaleX = 170, ScaleY = 110,
                           TransX = 75, TransY = 80,
                           Persp2 = 1 },
            outlinedCatPath);

        // Create a 1D path effect from the scallop path
        SKPathEffect strokeEffect =
            SKPathEffect.Create1DPath(scallopPath, 75, 0, SKPath1DPathEffectStyle.Rotate);

        // Set the sum the effects to frame paint
        framePaint.PathEffect = SKPathEffect.CreateSum(fillEffect, strokeEffect);
    }
    ...
}
建構函式接著會呼叫 SKPathEffect.Create1DPath 扇貝框架。 請注意,路徑的寬度為100像素,但進階為75像素,讓複寫的路徑在框架周圍重疊。 建構函式的最後一個語句會呼叫 SKPathEffect.CreateSum ,以結合兩個路徑效果,並將結果設定為 SKPaint 物件。
這一切工作都讓 PaintSurface 處理程序相當簡單。 它只需要定義矩形,並使用 來繪製它 framePaint:
public class CatsInFramePage : ContentPage
{
    ...
    void OnCanvasViewPaintSurface(object sender, SKPaintSurfaceEventArgs args)
    {
        SKImageInfo info = args.Info;
        SKSurface surface = args.Surface;
        SKCanvas canvas = surface.Canvas;

        canvas.Clear();

        SKRect rect = new SKRect(50, 50, info.Width - 50, info.Height - 50);
        canvas.ClipRect(rect);
        canvas.DrawRect(rect, framePaint);
    }
}
路徑效果背後的演算法一律會導致顯示用於繪製或填滿的完整路徑,這可能會導致某些視覺效果出現在矩形外。 ClipRect呼叫之前的DrawRect呼叫可讓視覺效果更簡潔。 (試試看而不裁剪!
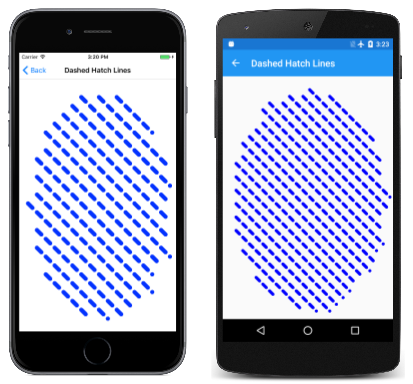
常用來 SKPathEffect.CreateCompose 將一些抖動新增至另一個路徑效果。 您當然可以自行實驗,但以下範例稍有不同:
虛線線會填滿橢圓形,並填入虛線。 類別中的 DashedHatchLinesPage 大部分工作都會在欄位定義中正確執行。 這些欄位會定義虛線效果和影線效果。 這些定義會定義為 static ,因為它們接著會在定義中的SKPaint呼叫中SKPathEffect.CreateCompose參考:
public class DashedHatchLinesPage : ContentPage
{
    static SKPathEffect dashEffect =
        SKPathEffect.CreateDash(new float[] { 30, 30 }, 0);

    static SKPathEffect hatchEffect = SKPathEffect.Create2DLine(20,
        Multiply(SKMatrix.MakeScale(60, 60),
                 SKMatrix.MakeRotationDegrees(45)));

    SKPaint paint = new SKPaint()
    {
        PathEffect = SKPathEffect.CreateCompose(dashEffect, hatchEffect),
        StrokeCap = SKStrokeCap.Round,
        Color = SKColors.Blue
    };
    ...
    static SKMatrix Multiply(SKMatrix first, SKMatrix second)
    {
        SKMatrix target = SKMatrix.MakeIdentity();
        SKMatrix.Concat(ref target, first, second);
        return target;
    }
}
處理程式 PaintSurface 只需要包含標準額外負荷,以及對 DrawOval的一個呼叫:
public class DashedHatchLinesPage : ContentPage
{
    ...
    void OnCanvasViewPaintSurface(object sender, SKPaintSurfaceEventArgs args)
    {
        SKImageInfo info = args.Info;
        SKSurface surface = args.Surface;
        SKCanvas canvas = surface.Canvas;

        canvas.Clear();

        canvas.DrawOval(info.Width / 2, info.Height / 2,
                        0.45f * info.Width, 0.45f * info.Height,
                        paint);
    }
    ...
}
如您所發現,影線不會精確限制於區域內部,在此範例中,它們一律會以整條虛線從左邊開始:
既然您已看到路徑效果,範圍從簡單的點和虛線到奇怪的組合,請使用您的想像力,並查看您可以創造的內容。
![[動畫虛線文字] 頁面的三重螢幕快照](effects-images/animateddottedtext-small.png)
![[1D 路徑效果] 頁面的三重螢幕快照](effects-images/1dpatheffect-small.png)
![[輸送帶] 頁面的三個螢幕快照](effects-images/conveyorbelt-small.png)
![[影線填滿] 頁面的三重螢幕快照](effects-images/hatchfill-small.png)
![[路徑磚填滿] 頁面的三個螢幕快照](effects-images/pathtilefill-small.png)

![大綱點選至 [路徑] 頁面的三重螢幕快照](effects-images/taptooutlinethepathoutlined-small.png)
![[框架中的貓] 頁面的三重螢幕快照](effects-images/catsinframe-small.png)
