部署 Apache Superset™
重要
AKS 上的 Azure HDInsight 於 2025 年 1 月 31 日淘汰。 透過此公告 深入瞭解。
您必須將工作負載移轉至 Microsoft Fabric 或對等 Azure 產品,以避免突然終止工作負載。
重要
這項功能目前為預覽狀態。 Microsoft Azure 預覽版的補充使用規定 包含適用於 Beta 版、預覽版或尚未正式發行之 Azure 功能的更合法條款。 如需此特定預覽的相關訊息,請參閱 AKS 上的 Azure HDInsight 預覽資訊。 如需問題或功能建議,請提交請求至 AskHDInsight 並附上詳細資訊,然後追蹤我們以取得 Azure HDInsight 社群 的更多更新。
視覺效果對於有效地探索、呈現及共用數據至關重要。 Apache Superset 可讓您在彈性 Web UI 中透過您的資料執行查詢、可視化及建置儀錶板。
本文說明如何在 Azure 中部署 Apache Superset UI 實例,並在 AKS 上使用 HDInsight 將其連線到 Trino 叢集,以查詢數據並建立儀錶板。
本文所涵蓋步驟的摘要:
- 必要條件。
- 為 Apache Superset建立 Kubernetes 叢集。
- 部署 Apache Superset。
先決條件
如果使用 Windows,請在 WSL2 上使用 Ubuntu,在 Windows 內的 bash shell Linux 環境中執行這些步驟。 否則,您必須修改命令以在 Windows 中運作。
建立 Trino 叢集並指派受控識別
如果您尚未這麼做,請在 AKS 上建立具有 HDInsight 的Trino 叢集。
若要讓 Apache Superset 呼叫 Trino,它必須具有受控識別 (MSI)。 建立或挑選現有的 使用者指派的受控識別。
修改您的 Trino 叢集組態,以允許在步驟 2 中建立的受控識別執行查詢。 瞭解如何管理存取。
安裝本機工具
設定 Azure CLI。
一個。 安裝 Azure CLI。
b. 登入 Azure CLI:
az login。c. 安裝 Azure CLI 預覽延伸模組。
# Install the aks-preview extension
az extension add --name aks-preview

# Update the extension to make sure you've the latest version installed
az extension update --name aks-preview
安裝 Kubernetes。
安裝 Helm。
建立 Apache Superset 的 kubernetes 叢集
此步驟會建立 Azure Kubernetes Service (AKS) 叢集,您可以在其中安裝 Apache Superset。 您必須系結與叢集相關聯的受控識別,才能讓 Superset 使用該身分識別向 Trino 叢集進行驗證。
在 Bash 中為您的 Superset 安裝建立下列變數。
# ----- Parameters ------

# The subscription ID where you want to install Superset
SUBSCRIPTION=
# Superset cluster name (visible only to you)
CLUSTER_NAME=trinosuperset
# Resource group containing the Azure Kubernetes service
RESOURCE_GROUP_NAME=trinosuperset
# The region to deploy Superset (ideally same region as Trino): to list regions: az account list-locations REGION=westus3
# The resource path of your managed identity. To get this resource path:
#   1. Go to the Azure Portal and find your user assigned managed identity
#   2. Select JSON View on the top right
#   3. Copy the Resource ID value.
MANAGED_IDENTITY_RESOURCE=
選取您要安裝 Superset 的訂用帳戶。
az account set --subscription $SUBSCRIPTION在您的目前訂用帳戶上啟用Pod身分識別功能。
az feature register --name EnablePodIdentityPreview --namespace Microsoft.ContainerService
az provider register -n Microsoft.ContainerService
建立 AKS 叢集以部署超集。
# Create resource group
az group create --location $REGION --name $RESOURCE_GROUP_NAME

# Create AKS cluster
az \
aks create \
-g $RESOURCE_GROUP_NAME \
-n $CLUSTER_NAME \
--node-vm-size Standard_DS2_v2 \
--node-count 3 \
--enable-managed-identity \
--assign-identity $MANAGED_IDENTITY_RESOURCE \
--assign-kubelet-identity $MANAGED_IDENTITY_RESOURCE

# Set the context of your new Kubernetes cluster
az aks get-credentials --resource-group $RESOURCE_GROUP_NAME --name $CLUSTER_NAME
部署 Apache Superset
若要讓 Superset 安全地與 Trino 叢集通訊,最簡單的方式是設定 Superset 以使用 Azure 受控識別。 此步驟表示您的叢集會使用您指派的身分識別,而不需要手動部署或更替機密。
您必須為 Superset Helm 部署建立 values.yaml 檔案。 請參閱 的範例代碼。
選擇性:使用 Microsoft Azure Postgres,而不是使用部署在 Kubernetes 叢集中的 Postgres。
建立「適用於 PostgreSQL 的 Azure 資料庫」實例,以方便維護、允許備份,並提供更佳的可靠性。
postgresql:
  enabled: false

supersetNode:
  connections:
    db_host: '{{SERVER_NAME}}.postgres.database.azure.com'
    db_port: '5432'
    db_user: '{{POSTGRES_USER}}'
    db_pass: '{{POSTGRES_PASSWORD}}'
    db_name: 'postgres' # default db name for Azure Postgres
視需要新增 values.yaml 的其他區段。 Superset 文件 建議變更預設密碼。
使用 Helm 部署 Superset。
# Verify you have the context of the right Kubernetes cluster
kubectl cluster-info
# Add the Superset repository
helm repo add superset https://apache.github.io/superset
# Deploy
helm repo update
helm upgrade --install --values values.yaml superset superset/superset
連接至 Superset 並創建連線。
注意
您應該為每個您想要使用的 Trino 目錄建立個別的連線。
使用埠轉送進行連線到 Superset。
kubectl port-forward service/superset 8088:8088 --namespace default開啟網頁瀏覽器並移至 http://localhost:8088/. 如果您未變更系統管理員密碼,請使用使用者名稱登入:admin、password:admin。
從右側的加號 『+』 選單中選取 [連接資料庫]。
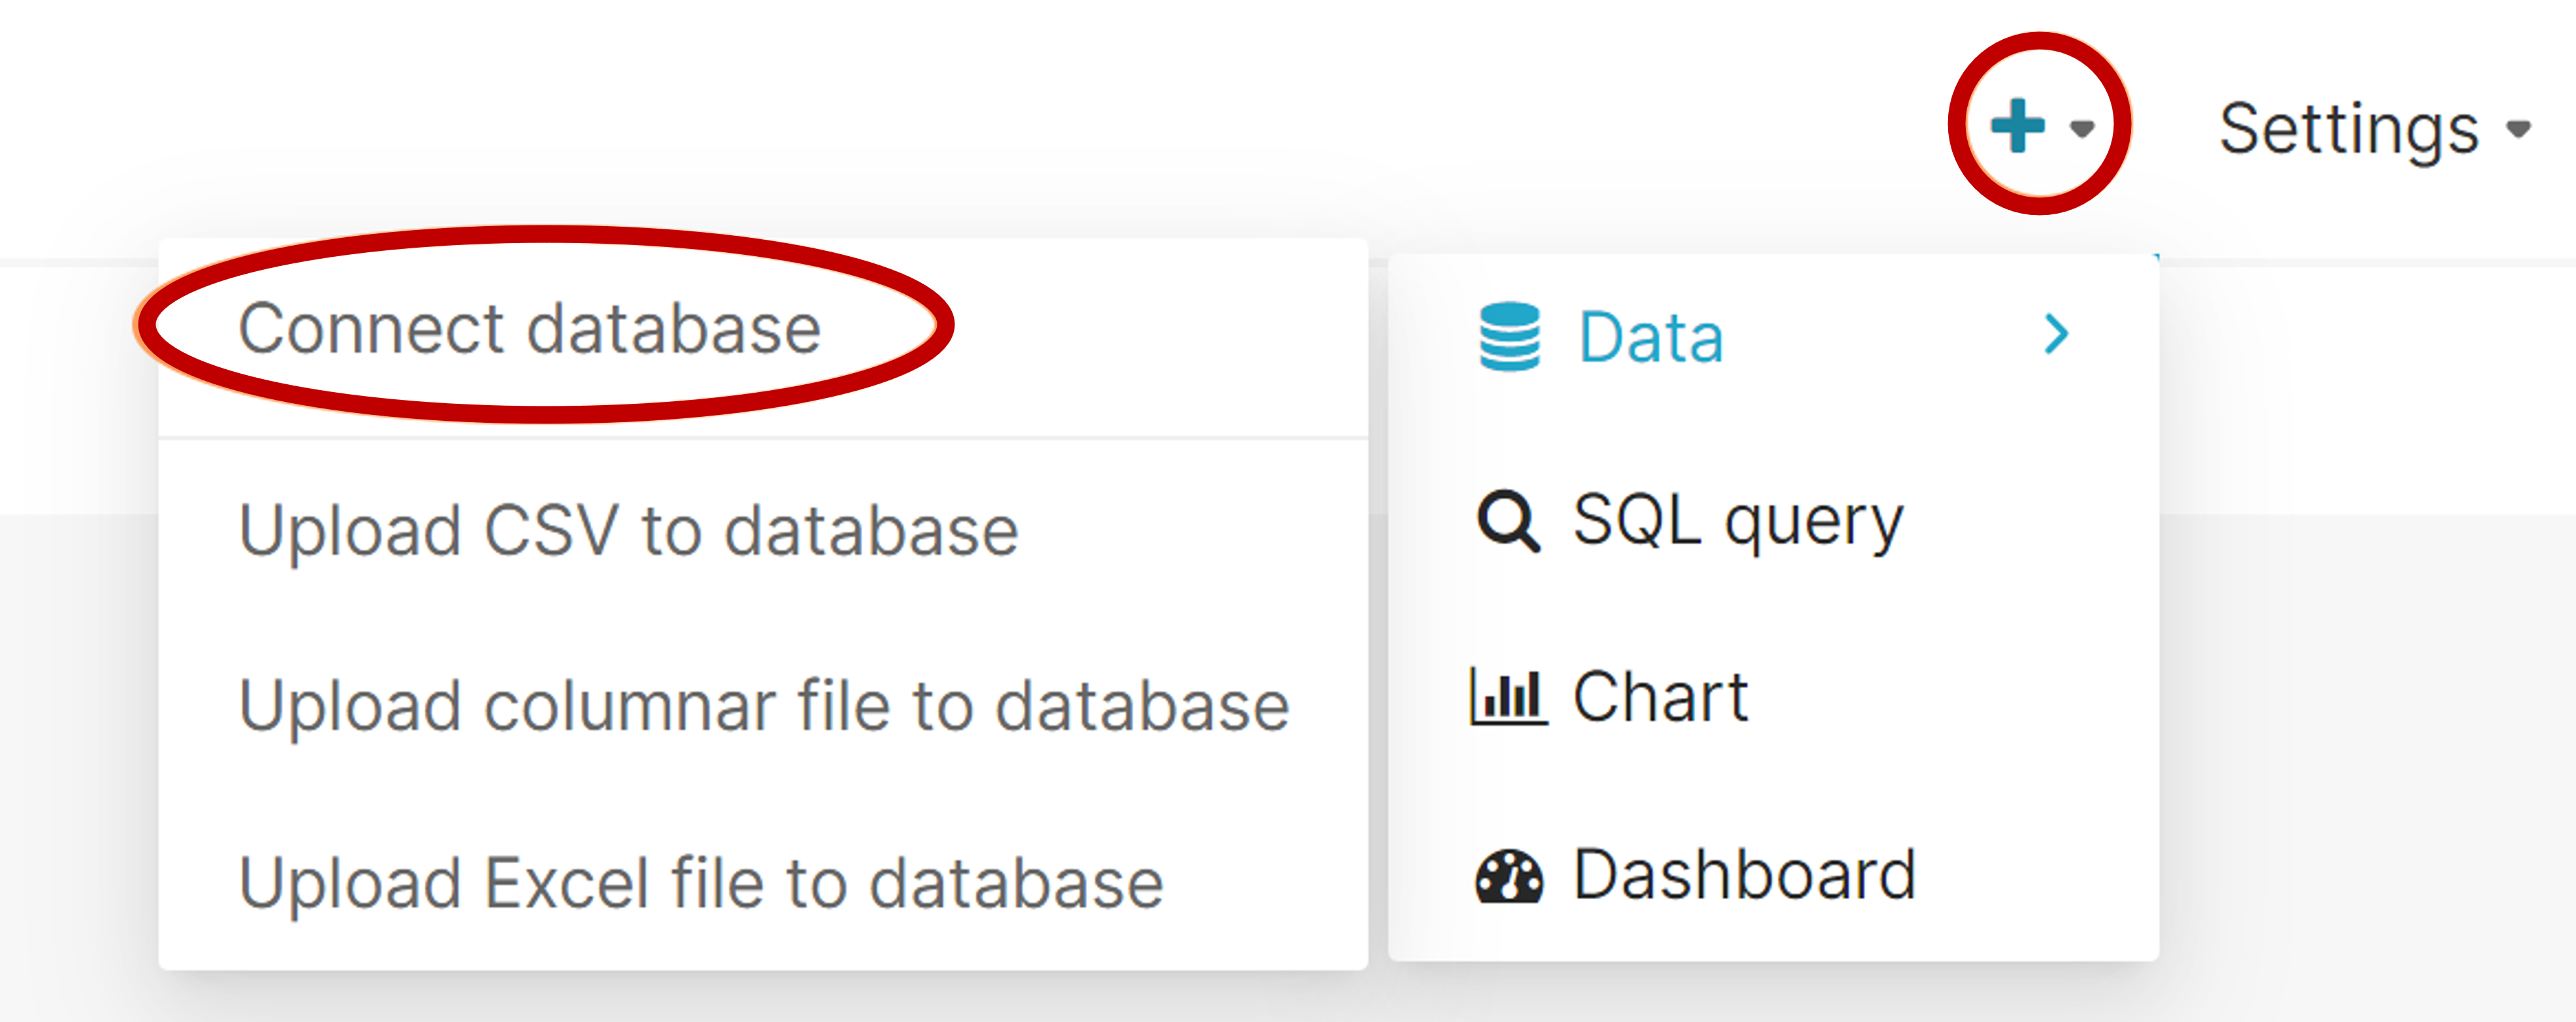
選取 [Trino]。
輸入 Trino 叢集的 SQL Alchemy URI。
您必須變更此連接字串的三個部份:
財產 例 描述 使用者 trino@ @ 符號之前的名稱是用來連線至 Trino 的用戶名稱。 主機名稱 mytrinocluster.0000000000000000000000000000
.eastus.hdinsightaks.netTrino 叢集的主機名。
您可以從 Azure 入口網站中叢集的 [概觀] 頁面取得此資訊。目錄 /tpch 斜線之後,是預設目錄名稱。
您必須將此目錄變更為具有您想要可視化之資料的目錄。trino://$USER@$TRINO_CLUSTER_HOST_NAME.hdinsightaks.net:443/$DEFAULT_CATALOG範例:
trino://trino@mytrinocluster.00000000000000000000000000.westus3.hdinsightaks.net:443/tpch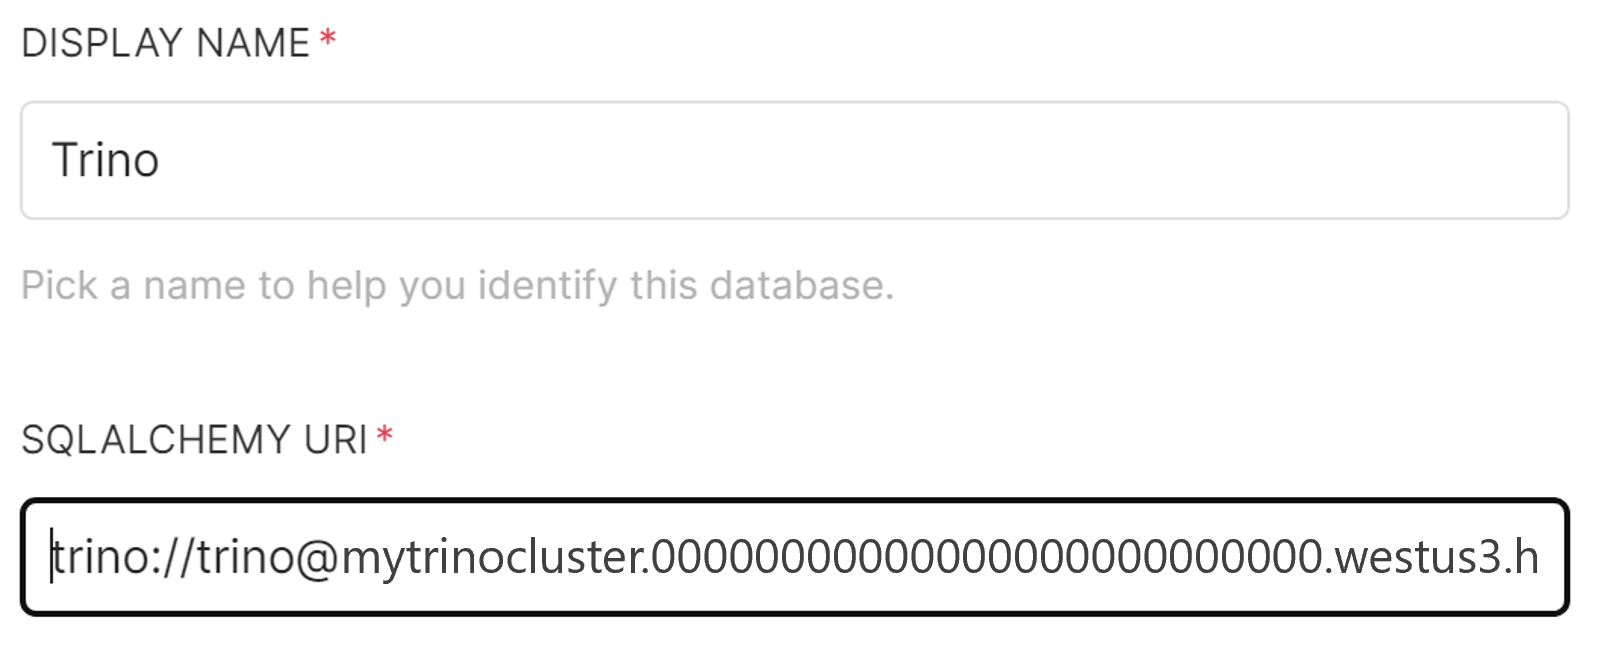
選取 [進階] 索引標籤,然後在 [其他安全性] 中輸入下列設定。以受控識別的 GUID 用戶端識別碼取代 client_id 值(您可以在 Azure 入口網站的受控識別資源概觀頁面中找到此值)。
 {
   "auth_method": "azure_msi",
   "auth_params":
   {
     "scope": "https://clusteraccess.hdinsightaks.net/.default",
     "client_id": "xxxxxxxx-xxxx-xxxx-xxxx-xxxxxxxxxxxx"
   }
 }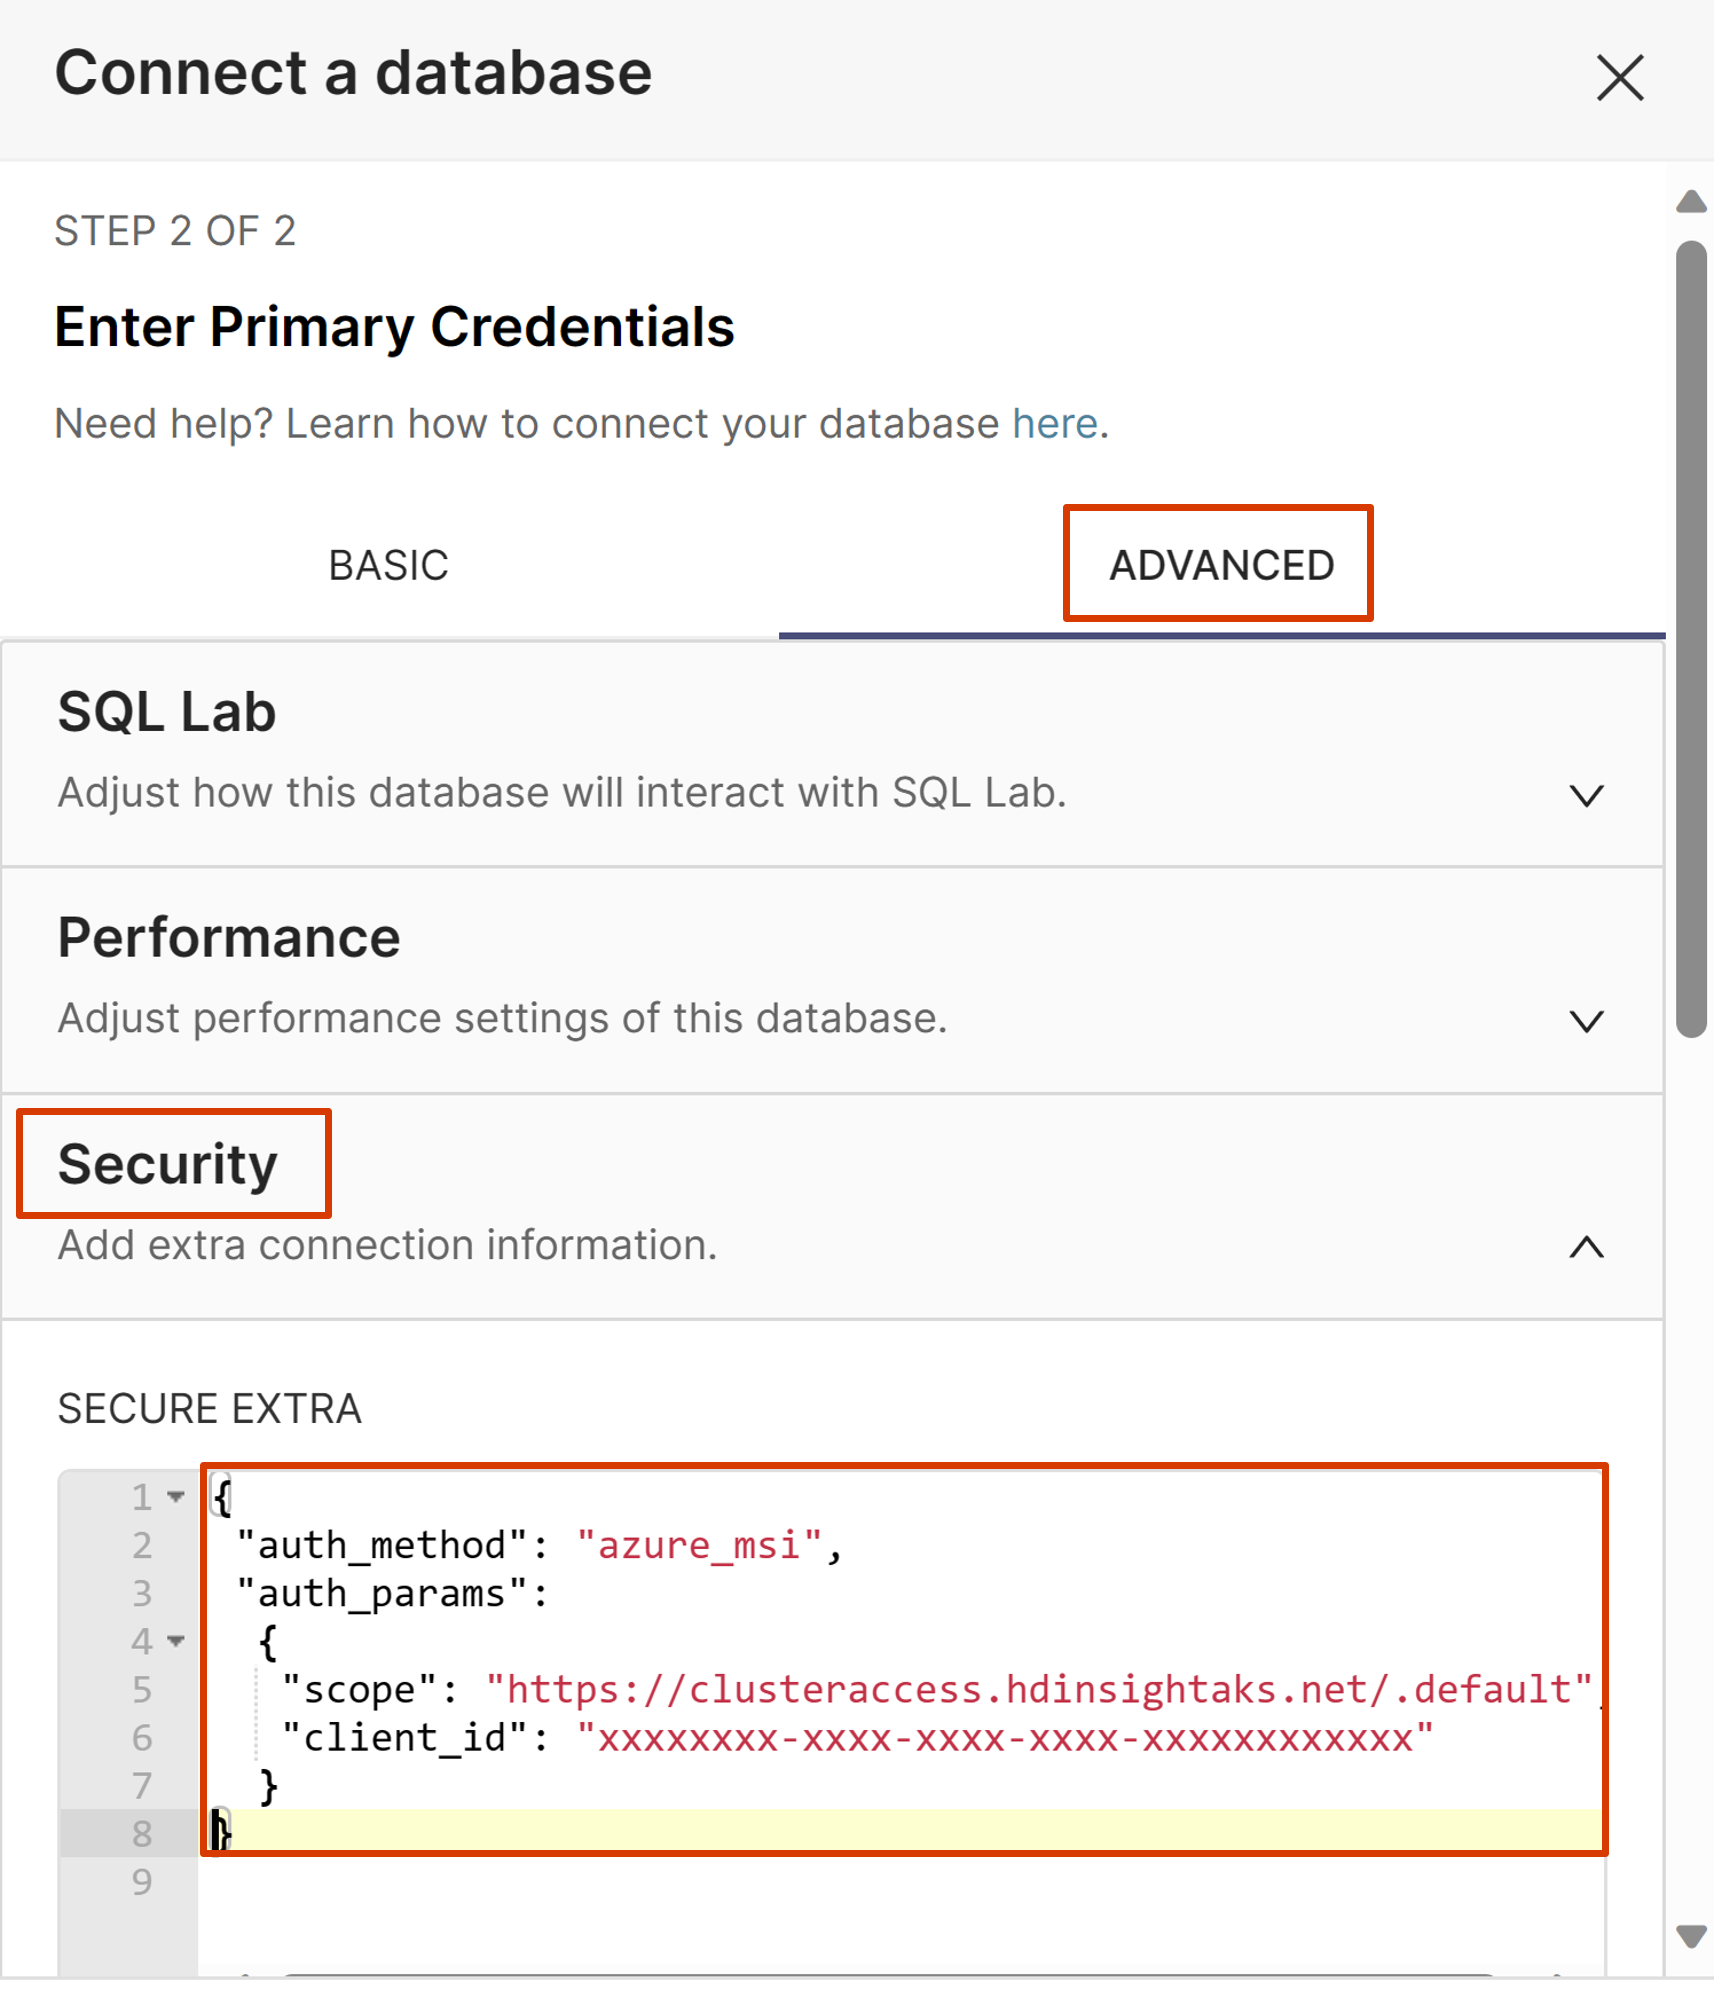
選取 [連接]。
現在,您已準備好建立數據集和圖表。
故障排除
確認您的 Trino 叢集已配置為允許 Superset 叢集的使用者指派的受控身份識別進行連線。 您可以查看 Trino 叢集的資源 JSON 來確認此值(authorizationProfile/userIds)。 請確定您使用身分識別的物件識別碼,而不是用戶端識別碼。
請確定連線設定中沒有任何錯誤。
- 請確保已填寫「附加安全」部分,
- 您的URL正確。
- 使用
tpch目錄來測試 ,以確認您的連線在使用您自己的目錄之前是否正常運作。
後續步驟
若要將 Superset 公開至因特網,請使用 Microsoft Entra ID 允許使用者登入,您需要完成下列一般步驟。 這些步驟需要有中級或更高級別的 Kubernetes 經驗。