WebView2 部署 Visual Studio 安裝程式
這個範例 WV2DeploymentVSInstallerSample 示範如何使用 Visual Studio 安裝程式來部署 WebView2 應用程式。
- 範例名稱: WV2DeploymentVSInstallerSample
- 存放庫目錄: WV2DeploymentVSInstallerSample
- 方案檔:存放庫中未提供。 您可以在下列步驟中建立方案檔。
為了示範如何使用您的應用程式部署 Evergreen WebView2 運行時間,本文說明如何使用適用於 Visual Studio 的 Microsoft Visual Studio 安裝程式 Project 延伸模組。 您可以建立 Setup Project 類型的專案,以建立 Win32 範例應用程式 的安裝程式, (WebView2APISample) 。 您建立的該安裝程式會鏈結安裝 Evergreen WebView2 運行時間。
您會先從存放庫編輯project.xml檔案,然後在 Visual Studio 中,使用 Microsoft Visual Studio 安裝程式 Projects 擴充功能的安裝專案專案範本來建立新專案。
此範例示範數種不同的部署方法:
- 使用鏈接下載 Evergreen WebView2 運行時間啟動載入器。
- 使用您的應用程式封裝 Evergreen WebView2 運行時間啟動載入器。
- 使用您的應用程式封裝 Evergreen WebView2 執行時間獨立安裝程式。
如需這些不同方法的相關信息,請參閱散發您的應用程式和 WebView2 運行時間中的部署 Evergreen WebView2 運行時間。
步驟 1 - 建置並執行 WebView2APISample
若要熟悉此範例散發的應用程式,並確定您的環境已針對一般 Win32 WebView2 應用程式開發進行設定,請先建置並執行 Win32 範例應用程式 (WebView2APISample) ,再使用此部署範例。
- 執行 Win32 範例應用程式 中的步驟 (WebView2APISample) ,然後繼續下方。
必要條件:如上一頁所述,需要 Microsoft Visual Studio,包括 C++ 支援。 此 WV2DeploymentVSInstallerSample 範例不支援 Microsoft Visual Studio Code。
上述頁面可協助您複製或下載 WebView2Samples 存放庫,如果尚未完成,請安裝具有 C++ 支援的 Visual Studio。
步驟 2 - 安裝 Visual Studio 安裝程式 專案
如果尚未完成,請安裝 Visual Studio 安裝程式 專案:
- 安裝 Microsoft Visual Studio 安裝程式 Projects for Visual Studio 2019。 遵循該頁面上的步驟,然後返回此頁面並繼續執行下列步驟。
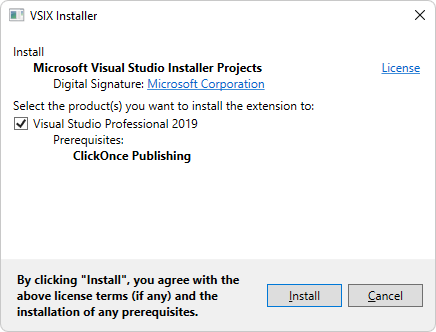
如果出現 [正在等候下列程序關閉 ] 對話框,請關閉 Visual Studio。
步驟 3 - 編輯 product.xml 以設定如何散發 WebView2 運行時間
開啟 Visual Studio。 在開啟畫面中,您可以按下右下方的 [ 不使用程式代碼繼續 ] 連結。
開啟存放庫本地複本中的下列個別檔案:
<repo-location>\WebView2Samples\SampleApps\WV2DeploymentVSInstallerSample\product.xml檔案在 GitHub 存放庫中的位置: SampleApps/WV2DeploymentVSInstallerSample/product.xml
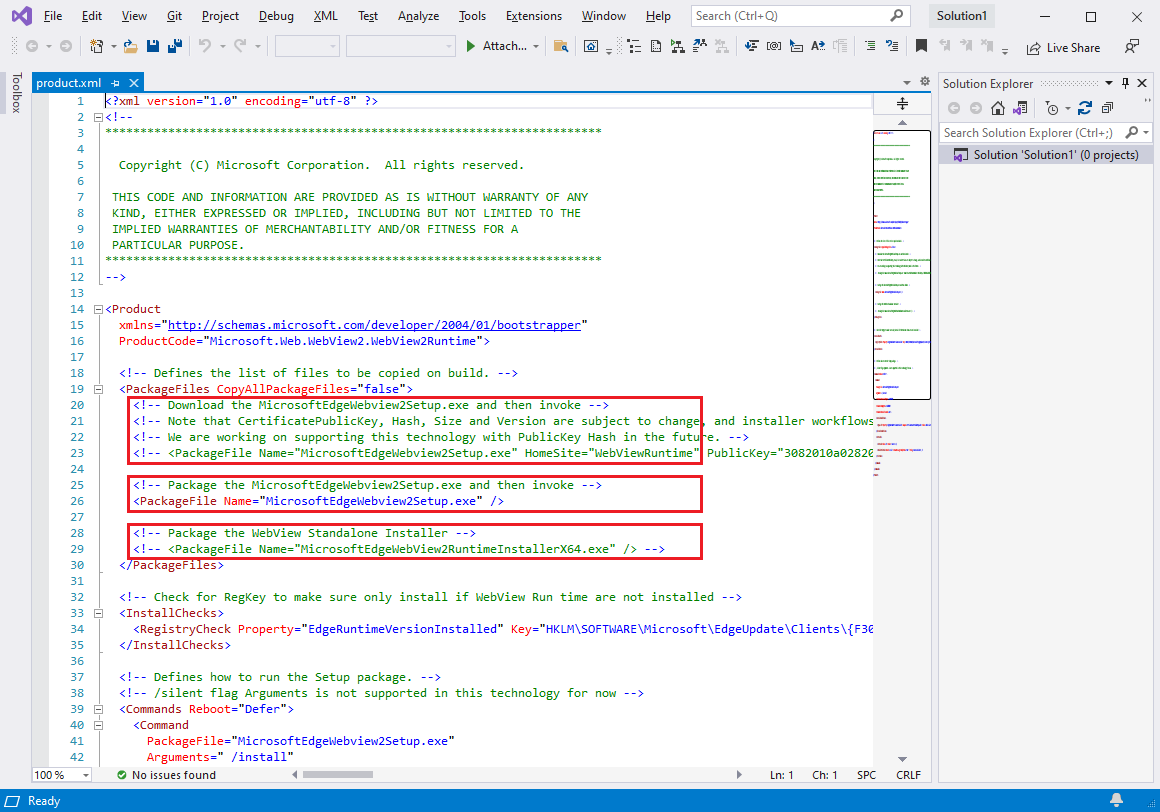
檢查
product.xml。 有三<PackageFile>行。 研究這 3 行中每一行的批注。 以下是簡化的行檢視,並提供說明。第一
<PackageFile>行使用檔案MicrosoftEdgeWebview2Setup.exe,也就是 Evergreen WebView2 運行時間啟動載入器,並指定HomeSite網站。 針對 方法 1 使用這一行:透過鏈接下載 Evergreen WebView2 運行時間啟動載入器:<!-- Download the MicrosoftEdgeWebview2Setup.exe --> <!-- <PackageFile Name="MicrosoftEdgeWebview2Setup.exe" HomeSite="WebViewRuntime" PublicKey="..."/> -->第二
<PackageFile>行使用檔案MicrosoftEdgeWebview2Setup.exe,也就是 Evergreen WebView2 運行時間啟動載入器。 針對 方法 2 使用這一行:使用應用程式封裝 Evergreen WebView2 運行時間啟動載入器:<!-- Package the MicrosoftEdgeWebview2Setup.exe --> <PackageFile Name="MicrosoftEdgeWebview2Setup.exe" />第三
<PackageFile>行使用 檔案MicrosoftEdgeWebView2RuntimeInstallerX64.exe,這是平臺特定的 Evergreen WebView2 運行時間獨立安裝程式。 針對 方法 3 使用這一行:使用您的應用程式封裝 Evergreen WebView2 運行時間獨立安裝程式:<!-- Package the WebView Standalone Installer --> <!-- <PackageFile Name="MicrosoftEdgeWebView2RuntimeInstallerX64.exe" /> -->識別您使用的方法。 方法 2 是預設值;也就是說,使用方法 2 的行會在存放庫的
product.xml檔案中取消批注。編輯
product.xml,如下所示;執行下列三個區段的其中一個步驟。
方法 1:透過鏈接下載 Evergreen WebView2 運行時間啟動載入器
如果您想要讓應用程式透過連結下載 Evergreen WebView2 執行時間啟動載入器 (MicrosoftEdgeWebview2Setup.exe) :
在區段中
<PackageFiles CopyAllPackageFiles="false">,取消批注下列行 (保留長公鑰值) ,並將其他行批注化:<PackageFile Name="MicrosoftEdgeWebview2Setup.exe" HomeSite="WebViewRuntime" PublicKey="..."/>PublicKeyWebView2 運行時間啟動載入器的值可能會在未通知的情況下變更。 我們正努力解決此問題。 目前,您可能需要將 中的product.xml取代為更新的PublicKey值。在和
<Commands Reboot="Defer"></Commands>區段中,請確定PackageFile指向"MicrosoftEdgeWebview2Setup.exe",讓 Visual Studio 安裝程式使用啟動載入器。儲存檔案。
方法 2:使用應用程式封裝 Evergreen WebView2 運行時間啟動載入器
如果您要使用應用程式封裝 Evergreen WebView2 執行時間啟動載入器 (MicrosoftEdgeWebview2Setup.exe) :
在區段中
<PackageFiles CopyAllPackageFiles="false">,取消批注下列這一行,並將其他行批注化:<PackageFile Name="MicrosoftEdgeWebview2Setup.exe" />在區段中
<Commands Reboot="Defer">,請確定PackageFile指向"MicrosoftEdgeWebview2Setup.exe",讓Visual Studio安裝程式使用啟動載入器。儲存檔案。
方法 3:使用您的應用程式封裝 Evergreen WebView2 運行時間獨立安裝程式
如果您要使用應用程式封裝 Evergreen WebView2 執行時間獨立安裝程式:
在區段中
<PackageFiles CopyAllPackageFiles="false">,取消批注下列這一行,並將其他行批注化:<PackageFile Name="MicrosoftEdgeWebView2RuntimeInstallerX64.exe" />在和
<Commands Reboot="Defer"></Commands>區段中,請確定PackageFile指向"MicrosoftEdgeWebView2RuntimeInstallerX64.exe",讓 Visual Studio 安裝程式使用獨立安裝程式。如果您的目標是非 X64 裝置,請編輯
MicrosoftEdgeWebView2RuntimeInstallerX64檔名以反映正確的架構。儲存檔案。
步驟 4 - 下載 WebView2 啟動載入器或獨立安裝程式
如果您想要使用應用程式封裝啟動載入器 (方法 2) 或獨立安裝程式 (方法 3) ,請執行本節中的步驟。 否則,請跳至下一個主要步驟區段。
下載 Microsoft Edge WebView2 啟動載入器或獨立安裝程式。
將下載的啟動載入器或獨立安裝程式儲存在
<repo-location>\WebView2Samples\SampleApps\WV2DeploymentVSInstallerSample\資料夾底下。
步驟 5 - 將 WV2DeploymentVSInstallerSample 資料夾複製到 Packages 資料夾
此步驟適用於 (1、2 或 3) 的所有方法。
複製檔案
<repo-location>\WebView2Samples\SampleApps\WV2DeploymentVSInstallerSample\夾,並將其貼到下列其中一個資料夾中:<drive>:\Program Files (x86)\Microsoft SDKs\ClickOnce Bootstrapper\Packages\<Visual Studio install dir>\MSBuild\Microsoft\VisualStudio\BootstrapperPackages\(至少需要 Visual Studio 2019 Update 7)
的一般
<Visual Studio install dir>路徑:C:\Program Files (x86)\Microsoft Visual Studio\2019\Professional\Common7\IDE\
步驟 6 - 在 Visual Studio 中建立安裝專案
在 Visual Studio 中,選取 [檔案>新增>專案]。 [ 建立新專案] 視窗隨即出現。
在 [ 搜尋範本 ] 文字框中,輸入 安裝專案,然後選取 [ 安裝專案 ] 範本。 請務必選取剛好命名的範本,如下所示:
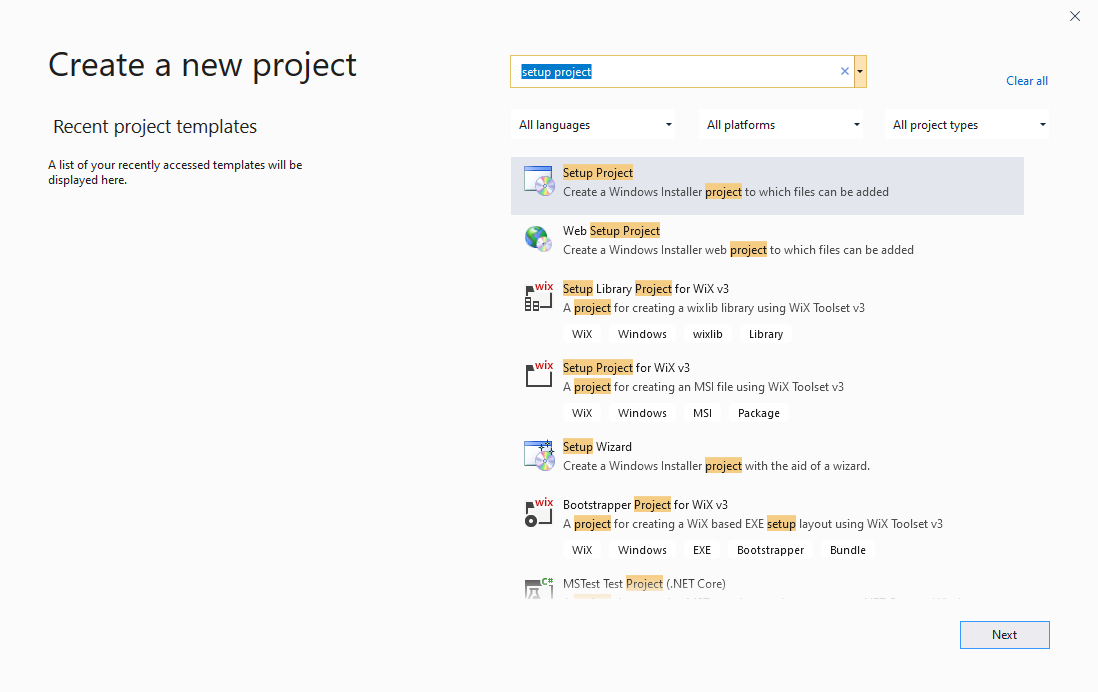
按兩下 [ 下一步] 按鈕。
[ 設定您的新專案:設定專案 ] 對話框隨即開啟,如下所示。
在 [ 項目名稱 ] 文本框中,輸入名稱,例如 MyWin32WV2DeploySample。
在 [ 位置 ] 文本框中,流覽至不在另一個項目目錄中的位置,例如
<repo-path>\WebView2Samples\或不在存放庫目錄中的位置。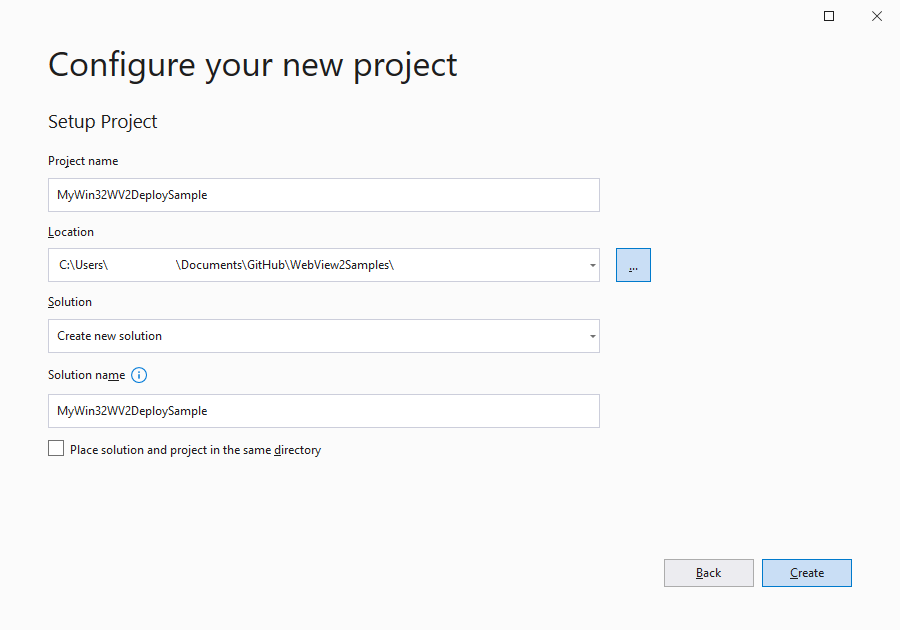
按兩下 [ 建立] 按鈕。
步驟 7 - 新增 WebView2 運行時間作為必要條件
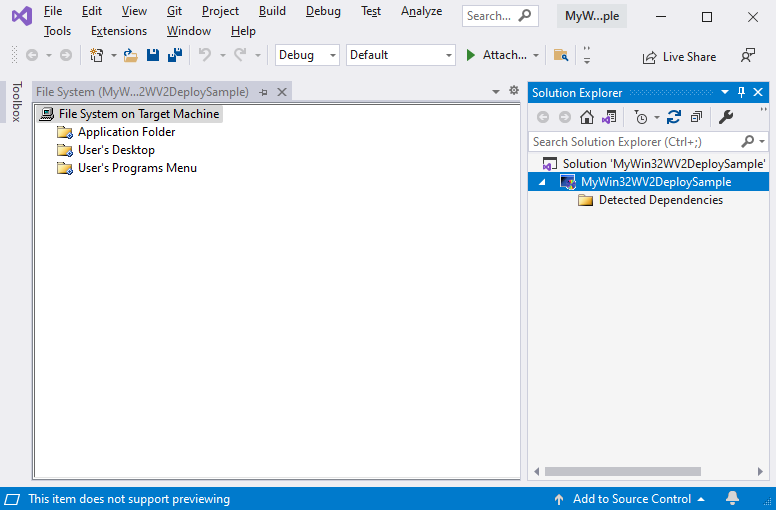
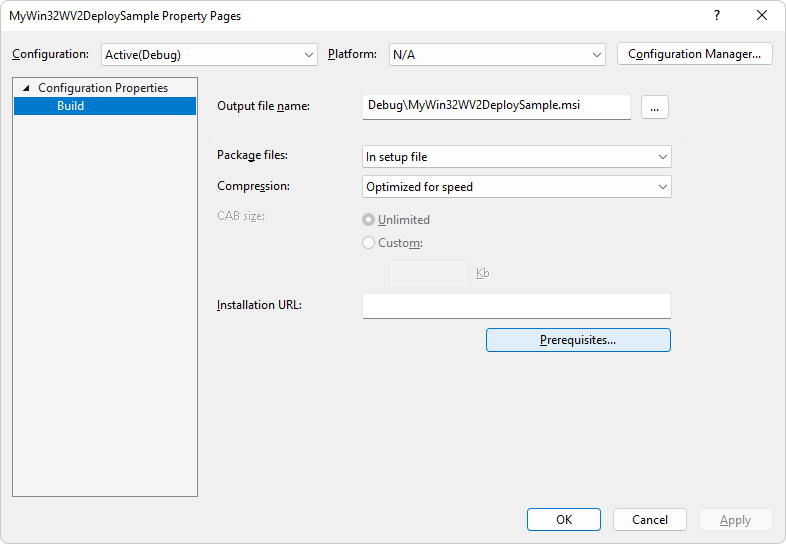
在 Visual Studio 的 [方案總管 中,以滑鼠右鍵按下您的項目,然後選取 [屬性]。 [ 屬性頁 ] 對話框隨即開啟。
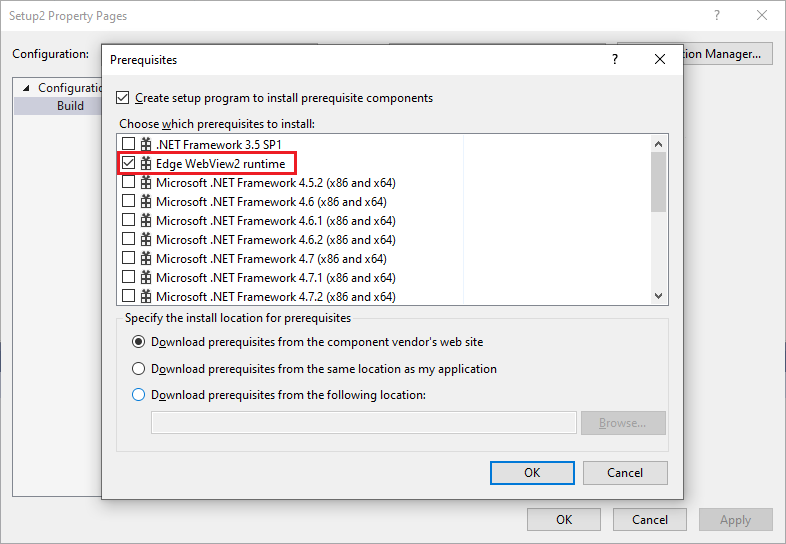
按下 [ 必要條件] 按鈕:
選取 [Edge WebView2 運行時間] 複 選框。
如果未列出該複選框,這可能表示所需的檔案尚未放置在 Packages 資料夾中。 檢查您使用的方法。 您可能需要執行上述步驟,請參閱 步驟 4 - 下載 WebView2 啟動載入器或獨立安裝程式 和 步驟 5 - 將 WV2DeploymentVSInstallerSample 資料夾複製到 Packages 資料夾。
清除其他必要條件複選框。 然後按下 [ 確定] 按鈕:
步驟 8 - 建置安裝專案
- 按 F5 儲存並建置安裝專案。