Auditing changes
A common challenge in many business management applications is avoiding unwanted changes in data. It could be anything from an incorrect customer telephone number to an incorrect posting to the general ledger. This article describes the capabilities for finding out what changed, who changed it, and when the change was made.
About the Change Log
The change log lets you track all direct modifications a user makes to data in the database. You specify each table and field that you want the system to log, and then you activate the change log. The change log is based on changes that are made to data in the tables that you track. On the Change Log Entries page, entries are chronologically ordered and show all changes that are made to the values in fields on the tables you specify.
Tracking changes can affect performance, which can cost you time, and increase the size of your database, which might cost you money. To reduce those costs, keep the following things in mind:
- Use caution when choosing the tables and operations.
- Don't add ledger entries and posted documents. Instead, prioritize system fields such as Created By and Created Date.
- Don't use the All Fields tracking type. Instead, choose Some Fields and track only the most important fields.
Note
The Change Log doesn't track changes for fields that use the autoIncrement property. An example of a field that uses the property is the Integer field on the Error Messages and VAT Report Line tables.
Also for performance reasons, the change log is turned off during the process of upgrading Business Central to the next version. In addition to speeding up the upgrade process, turning off the log also helps reduce clutter in the change log. As soon as the upgrade is complete, the log starts tracking changes again.
Important
Changes display in the Change Log Entries only after the user's session is restarted, which happens as follows:
- The session expired and was refreshed.
- The user selected another company or Role Center.
- The user signed out and signed in again.
Setting up the Change Log
On the Change Log Setup page, you can turn on or turn off the change log. When you do, the activity is logged, so you can always see who made the change.
On the Change Log Setup page, if you choose the Tables action, you can specify which tables you want to track changes for, and which changes to track. Business Central also tracks several system tables.
Note
You can monitor specific fields for changes, such as fields that contain sensitive data, by setting up field monitoring. If you do, to avoid redundancy the table that contains the field will not be available for the change log setup. For more information, see Monitor Sensitive Fields.
After you set up the change log, activated it, and made a change to data, you can view and filter the changes on the Change Log Entries page. If you want to delete entries, set up a retention policy, where you can set filters based on dates and time. To learn more about retention policies, go to Define Retention Policies.
Analyze data in the Change Log
You can use the Data Analysis feature to analyze data in the Change Log from the Change Log Entries page. You don't have to run a report or open another application, such as Excel. The feature provides an interactive and versatile way to calculate, summarize, and examine data. Instead of running reports using options and filters, you can add multiple tabs that represent different tasks or views on the data. Some examples are "Who changed what data, and when," or "Data changes by table/field," or any other view you can imagine. To learn more about how to use the Data Analysis feature, go to Analyze list and query data with analysis mode.
Change Log ad-hoc analysis scenarios
The following sections provide examples of scenarios where analyzing change log can help you monitor and audit important changes.
| Area | To... | Open this page in analysis mode | Using these fields |
|---|---|---|---|
| Who changed what data, and when | See who changed what data. | Change Log Entries | User ID, Date and Time, Table Caption, Field Caption, Primary Key Value 2, Primary Key Value 3, Type of Change, Old Value, and New Value. |
| Data changes by table/field | See data changes by table/field, and who made the change. | Change Log Entries | Table Caption, Field Caption, User ID, Date and Time, Primary Key Value 2, Primary Key Value 3, Type of Change, Old Value, and New Value. |
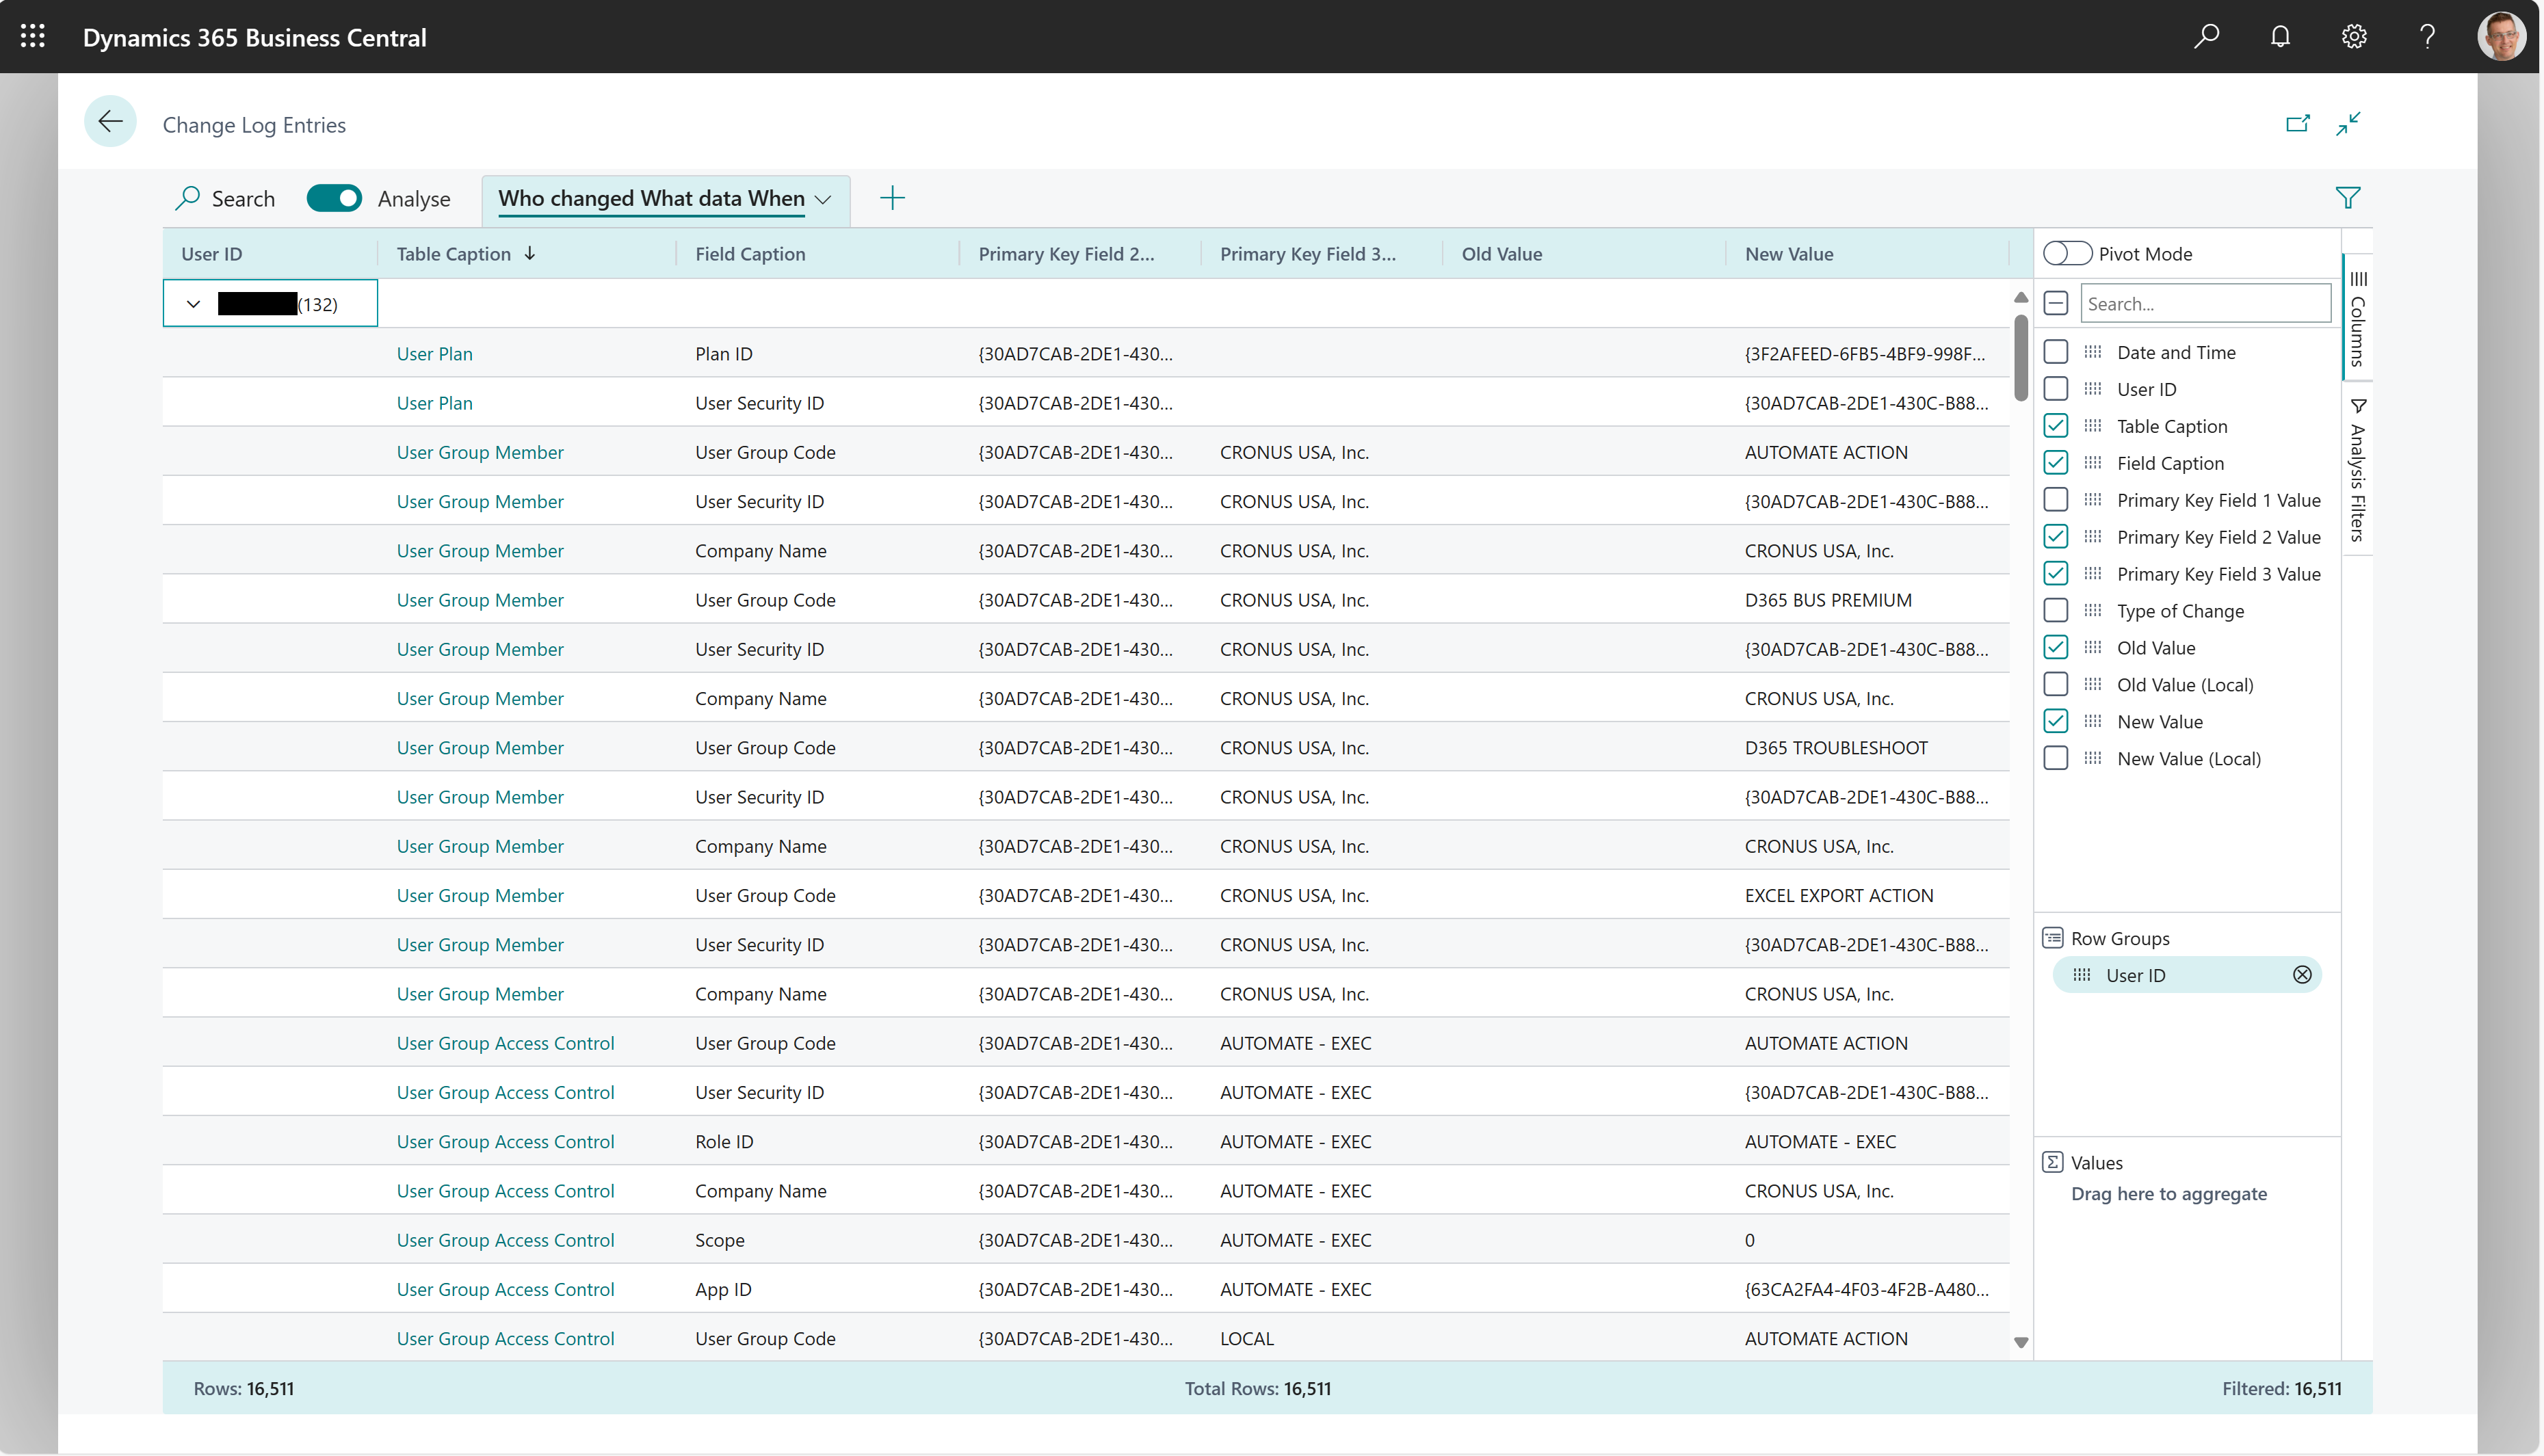
Example: Who changed what data, and when
To analyze Who changed What data When, follow these steps:
- Open the Change Log Entries list, and choose the
 icon to turn on analysis mode.
 - On the Columns menu, remove all columns (select the box next to the Search field on the right).
- Drag the User ID field (who did it) to the Row Groups area.
- Now choose the following fields:
- To show when it happened, choose Date and Time.
- To show the table where it happened, choose Table Caption.
- To show which field, choose Field Caption.
- To show the field code, choose Primary Key Value 2.
- To show the company name, choose Primary Key Value 3.
- To show whether the change was an insert, update, or delete action, choose Type of Change.
- To show the change, choose Old Value and New Value.
- Rename your analysis tab to Who changed what data when, or something that describes this analysis.
The following image shows the result of these steps.
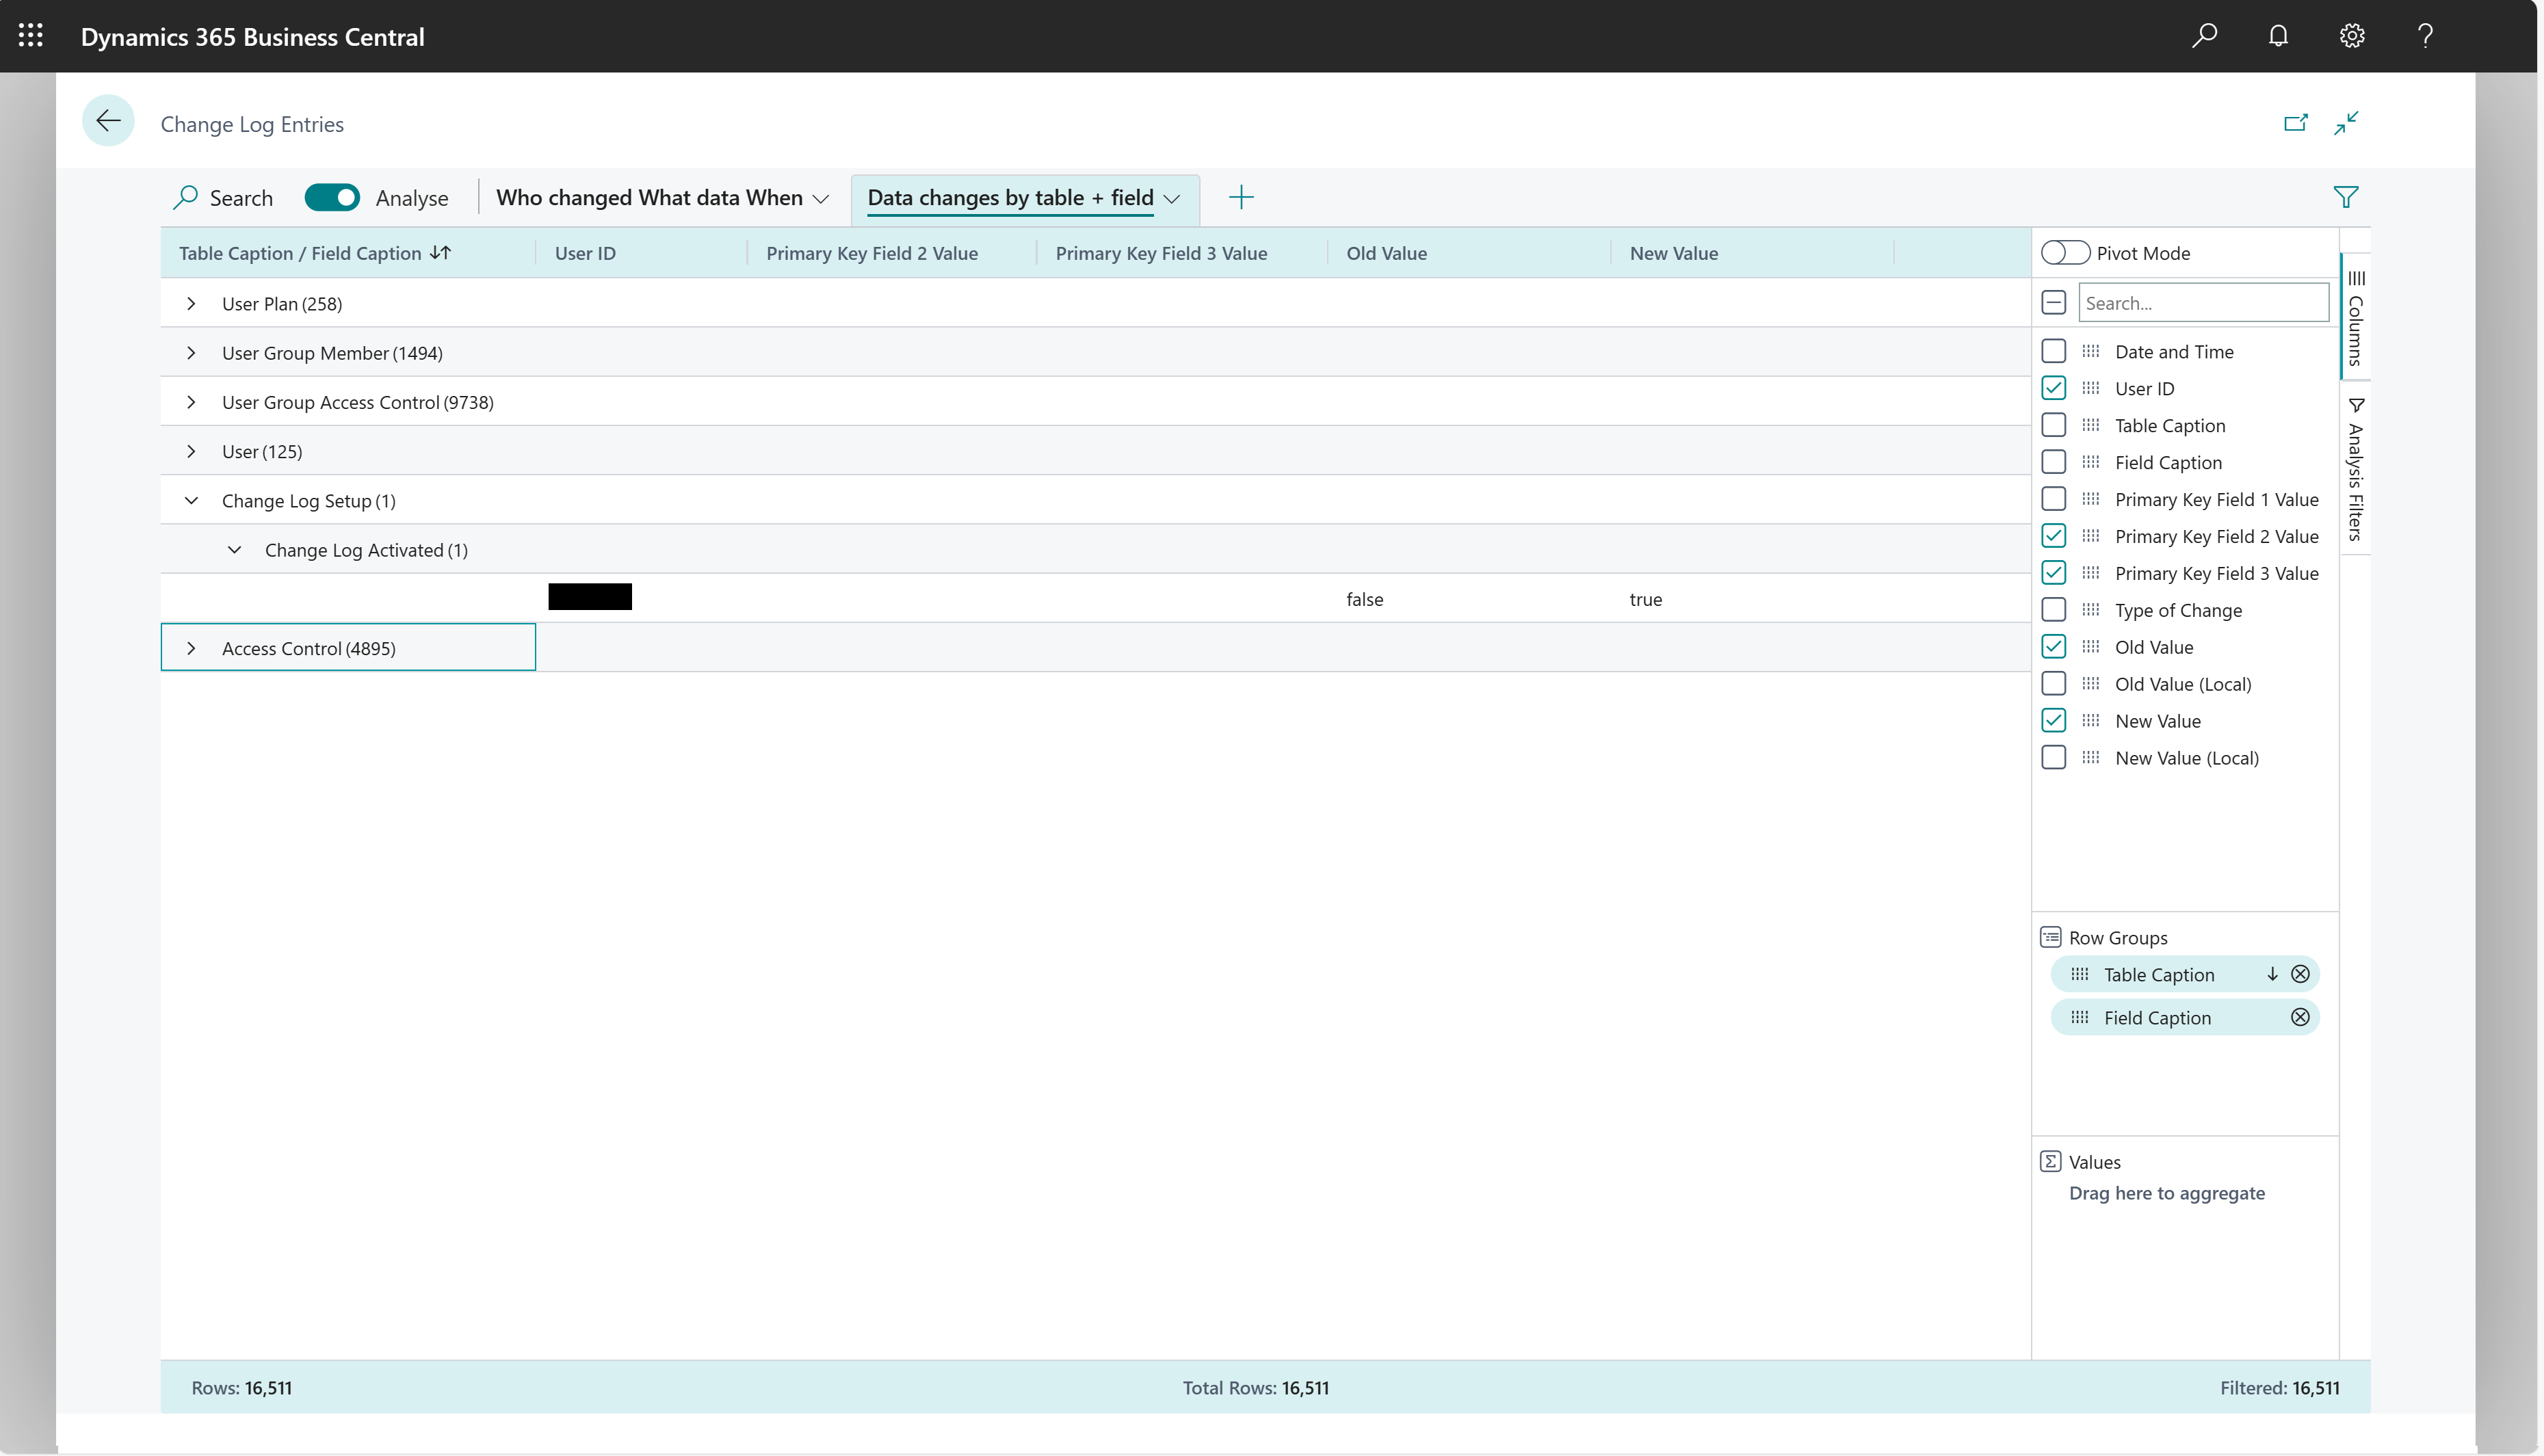
Example: data changes by table/field
To analyze data changes by table/field, follow these steps:
- Open the Change Log Entries list, and choose the
 icon to turn on analysis mode.
 - On the Columns menu, remove all columns (select the box next to the Search field on the right).
- Drag the Table Caption (on what table), and Field Caption (on which field) fields to the Row Groups area.
- Now choose the following fields:
- To show when it happened, choose Date and Time
- To show who made the change, choose User ID.
- To show the code for the field, choose Primary Key Value 2.
- To show the company name, choose Primary Key Value 3 (typically the company name),
- To show whether the change was an insert, update, or delete action, choose Type of Change.
- To show the change, choose Old Value and New Value.
- Rename your analysis tab to Data changes by table + field, or something that describes this analysis.
The following image shows the result of these steps.
About activity logs
From some pages in Business Central, you can view an activity log that shows the status and any errors from files that you export from or import into Business Central.
Work with activity logs
The information is displayed on the Activity Log page according to the context you opened it from. For example, you can open the page from the Document Exchange Service Setup, Incoming Document, Posted Sales Invoice, and Posted Sales Credit Memo pages. You can empty the list of log entries, or just clear the list of entries older than seven days.
Monitor sensitive fields
Keeping sensitive data secure and private is a core concern for most businesses. To add a layer of security, you can monitor important fields and get an email when someone changes a value. For example, you might want to be notified if someone changes your company's IBAN number.
Note
Sending notifications by email requires that you set up the email feature in Business Central. For more information, see Set Up Email.
Set up field monitoring
You can use the Monitor Field Change Setup assisted setup guide to specify the fields that you want to monitor based on filter criteria, such as the data sensitivity classification for the fields. For more information, see Classifying Data Sensitivity. The guide also lets you specify the person who receives an email notification when a change occurs, and the email account that sends the notification. Specify both the user to notify and the account from which to send the notification. After you finish the guide, you can manage settings for field monitoring on the Field Monitoring Setup page.
Note
When you specify the email account from which to send notifications, you must add either the Microsoft 365 or SMTP account types. Notifications should be sent from an account that is not associated with an actual user. Therefore you cannot choose the Current User account type. If you do, notifications will not be sent.
Over time, the list of entries on the Monitored Fields Log Entries page will grow. To reduce the number of entries, you can create a retention policy that will delete entries after a specified period of time. For more information, see Define Retention Policies.
When you set up field monitoring, or change something in the setup, entries are created for your changes. You can specify whether to display entries related to the monitoring setup by showing or hiding them.
You can manage settings for field monitoring, such as whether to send an email notification or just log the change, for each field on the Monitored Fields Worksheet page. The page is also where you can add or remove fields to monitor.
Note
After you add one or more fields and start monitoring, you must sign out of Business Central and sign in again to apply your settings.
Work with field monitoring
Entries for all changed values for monitored fields are available on the Monitored Fields Log Entries page. For example, entries contain the following information:
- The field in which the value changed.
- The original and new values.
- Who made the change, and when they did so.
To further investigate a change, choose a value to open the page where it was made. To view a list of all entries, choose Field Change Entries.
View field monitoring telemetry
You can set up Business Central to send field monitoring activity to an Application Insights resource in Microsoft Azure. Then, using Azure Monitor, you create reports and set up alerts on the gathered data. For more information, see the following articles in the Business Central Developer and IT Pro help:
- Monitoring and Analyzing Telemetry - Enabling Application Insights
- Analyzing Field Monitoring Telemetry
Define retention policies
You can create retention policies to delete unneeded data in logs after a period of time that you specify. For example, over time the number of entries in a log can build up. By cleaning up old entries you can make it easier to focus on more recent, and probably more relevant, entries. To learn more about retention policies, go to Define Retention Policies.
See Also
Monitor Sensitive Fields
Analyzing Field Monitoring Telemetry
Define Retention Policies
Change Basic Settings
Sorting, Searching, and Filtering
Finding Pages and Information with Tell Me
Assign Permissions to Users and Groups
Work with Business Central

