警告
本文件不適用於最新版本的 Windows 服務。 如需使用 BackgroundService 和背景工作服務範本之 Windows 服務的最新內容,請參閱:
本文示範如何在 Visual Studio 中建立將訊息寫入事件記錄的 Windows 服務應用程式。
建立服務
首先,請建立專案並設定服務正常運作所需的值。
從 Visual Studio 的 [檔案] 功能表中,選取 [新增]>[專案] (或按 Ctrl+Shift+N),開啟 [新增專案] 視窗。
尋找並選取Windows 服務 (.NET Framework) 專案範本。
注意
如果您沒有看到Windows 服務範本,您可能需要使用 Visual Studio 安裝程式 安裝.NET 桌面開發工作負載。
針對 [名稱] 輸入 MyNewService,然後選取 [確定]。
[設計] 索引標籤隨即出現 (Service1.cs [Design] 或 Service1.vb [Design])。
專案範本會包含繼承自 System.ServiceProcess.ServiceBase 且名為
Service1的元件類別。 其中包含大部分的基本服務程式碼,例如啟動服務的程式碼。
重新命名服務
將服務 Service1 重新命名為 MyNewService。
在 [方案總管] 中,選取 Service1.cs 或 Service1.vb,然後從捷徑功能表選擇 [重新命名]。 將檔案重新命名為 MyNewService.cs 或 MyNewService.vb,然後按 Enter
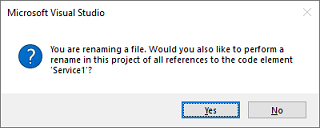
快顯視窗隨即出現,詢問您是否要重新命名程式碼項目 Service1 的所有參考。
在快顯視窗中,選取 [是]。

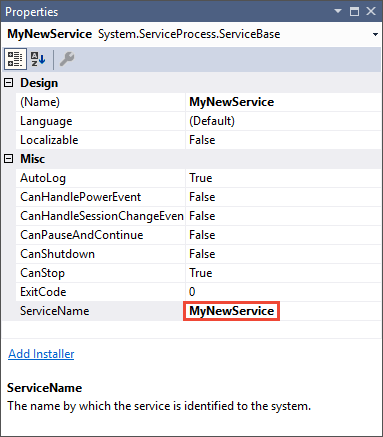
在 [設計] 索引標籤中,從捷徑功能表選取 [屬性]。 從 [屬性] 視窗中,將 ServiceName 值變更為 MyNewService。

從 [檔案] 功能表中選取 [全部儲存]。
在服務中新增功能
在本節中,您要將自訂事件記錄檔加入 Windows 服務中。 EventLog 元件是您可新增至 Windows 服務的元件類型範例。
新增自訂事件記錄功能
在 [方案總管] 中,從 MyNewService.cs 或 MyNewService.vb 的捷徑功能表選擇 [檢視表設計師]。
在 [工具箱] 中,展開 [元件],然後將 [事件記錄檔] 元件拖曳至 [Service1.cs [Design]] 或 [Service1.vb [Design]] 索引標籤。
在 [方案總管] 中,從 MyNewService.cs 或 MyNewService.vb 的捷徑功能表選擇 [檢視程式碼]。
定義自訂的事件記錄檔。
若為 C#,請編輯現有的
MyNewService()建構函式,如下列程式碼片段所示。 若為 Visual Basic,請新增New()建構函式,如下列程式碼片段所示。public MyNewService() { InitializeComponent(); eventLog1 = new System.Diagnostics.EventLog(); if (!System.Diagnostics.EventLog.SourceExists("MySource")) { System.Diagnostics.EventLog.CreateEventSource( "MySource","MyNewLog"); } eventLog1.Source = "MySource"; eventLog1.Log = "MyNewLog"; }' To access the constructor in Visual Basic, select New from the ' method name drop-down list. Public Sub New() MyBase.New() InitializeComponent() Me.EventLog1 = New System.Diagnostics.EventLog If Not System.Diagnostics.EventLog.SourceExists("MySource") Then System.Diagnostics.EventLog.CreateEventSource("MySource", "MyNewLog") End If EventLog1.Source = "MySource" EventLog1.Log = "MyNewLog" End Sub針對 System.Diagnostics 命名空間,將
using陳述式新增至 MyNewService.cs (如果它尚未存在),或將Imports陳述式新增至 MyNewService.vb:using System.Diagnostics;Imports System.Diagnostics從 [檔案] 功能表中選取 [全部儲存]。
定義服務啟動時所執行的動作
在 MyNewService.cs 或 MyNewService.vb 的程式碼編輯器中,找出 OnStart 方法。 當您建立專案時,Visual Studio 會自動建立空的方法定義。 新增程式碼,在服務啟動時將項目寫入事件記錄檔:
protected override void OnStart(string[] args)
{
    eventLog1.WriteEntry("In OnStart.");
}
' To access the OnStart in Visual Basic, select OnStart from the
' method name drop-down list.
Protected Overrides Sub OnStart(ByVal args() As String)
    EventLog1.WriteEntry("In OnStart")
End Sub
輪詢
因為服務應用程式設計為長時間執行,所以通常會輪詢或監視系統,它是您使用 OnStart 方法設定的。 OnStart 方法必須在服務作業開始後返回作業系統,這樣才不會封鎖系統。
若要設定簡單的輪詢機制,請使用 System.Timers.Timer 元件。 計時器會按固定的間隔引發 Elapsed 事件,您的服務可在這段時間執行監視作業。 您使用 Timer 元件,如下所示:
設定輪詢機制
針對 System.Timers 命名空間,將
using陳述式新增至 MyNewService.cs,或將Imports陳述式新增至 MyNewService.vb:using System.Timers;Imports System.Timers在
MyNewService.OnStart事件中新增下列程式碼來設定輪詢機制:// Set up a timer that triggers every minute. Timer timer = new Timer(); timer.Interval = 60000; // 60 seconds timer.Elapsed += new ElapsedEventHandler(this.OnTimer); timer.Start();' Set up a timer that triggers every minute. Dim timer As Timer = New Timer() timer.Interval = 60000 ' 60 seconds AddHandler timer.Elapsed, AddressOf Me.OnTimer timer.Start()在
MyNewService類別中,新增成員變數。 它會包含要寫入事件記錄檔之下個事件的識別碼:private int eventId = 1;Private eventId As Integer = 1在
MyNewService類別中,新增OnTimer方法以處理 Timer.Elapsed 事件:public void OnTimer(object sender, ElapsedEventArgs args) { // TODO: Insert monitoring activities here. eventLog1.WriteEntry("Monitoring the System", EventLogEntryType.Information, eventId++); }Private Sub OnTimer(sender As Object, e As Timers.ElapsedEventArgs) ' TODO: Insert monitoring activities here. eventLog1.WriteEntry("Monitoring the System", EventLogEntryType.Information, eventId) eventId = eventId + 1 End Sub
您可能會使用背景工作執行緒來執行工作,而不是在主執行緒上執行所有工作。 如需詳細資訊,請參閱System.ComponentModel.BackgroundWorker。
定義服務停止時所執行的動作
在 OnStop 方法插入一行程式碼,以在服務停止時於事件記錄檔中新增項目:
protected override void OnStop()
{
    eventLog1.WriteEntry("In OnStop.");
}
Protected Overrides Sub OnStop()
    EventLog1.WriteEntry("In OnStop.")
End Sub
為服務定義其他動作
您可以覆寫 OnPause、OnContinue 和 OnShutdown 方法,以定義額外的元件處理方式。
下列程式碼示範如何在 MyNewService 類別中覆寫 OnContinue 方法:
protected override void OnContinue()
{
    eventLog1.WriteEntry("In OnContinue.");
}
Protected Overrides Sub OnContinue()
    EventLog1.WriteEntry("In OnContinue.")
End Sub
設定服務狀態
服務將它們的狀態報告給服務控制管理員,讓使用者也可以知道服務是否運作正常。 根據預設,繼承自 ServiceBase服務會報告一組有限狀態設定,其中包括 SERVICE_STOPPED, SERVICE_PAUSED, and SERVICE_RUNNING。 如果服務需要一些時間才能啟動,則報告 SERVICE_START_PENDING 狀態會有所幫助。
您也可以新增程式碼,呼叫 Windows SetServiceStatus 函式,以實作 SERVICE_START_PENDING 和 SERVICE_STOP_PENDING 狀態設定。
實作服務暫止狀態
針對 System.Runtime.InteropServices 命名空間,將
using陳述式新增至 MyNewService.cs,或將Imports陳述式新增至 MyNewService.vb:using System.Runtime.InteropServices;Imports System.Runtime.InteropServices將下列程式碼新增至 MyNewService.cs 或 MyNewService.vb,宣告
ServiceState值及新增狀態結構,您會在平台叫用呼叫中用到它們:public enum ServiceState { SERVICE_STOPPED = 0x00000001, SERVICE_START_PENDING = 0x00000002, SERVICE_STOP_PENDING = 0x00000003, SERVICE_RUNNING = 0x00000004, SERVICE_CONTINUE_PENDING = 0x00000005, SERVICE_PAUSE_PENDING = 0x00000006, SERVICE_PAUSED = 0x00000007, } [StructLayout(LayoutKind.Sequential)] public struct ServiceStatus { public int dwServiceType; public ServiceState dwCurrentState; public int dwControlsAccepted; public int dwWin32ExitCode; public int dwServiceSpecificExitCode; public int dwCheckPoint; public int dwWaitHint; };Public Enum ServiceState SERVICE_STOPPED = 1 SERVICE_START_PENDING = 2 SERVICE_STOP_PENDING = 3 SERVICE_RUNNING = 4 SERVICE_CONTINUE_PENDING = 5 SERVICE_PAUSE_PENDING = 6 SERVICE_PAUSED = 7 End Enum <StructLayout(LayoutKind.Sequential)> Public Structure ServiceStatus Public dwServiceType As Long Public dwCurrentState As ServiceState Public dwControlsAccepted As Long Public dwWin32ExitCode As Long Public dwServiceSpecificExitCode As Long Public dwCheckPoint As Long Public dwWaitHint As Long End Structure注意
服務控制管理員使用 SERVICE_STATUS 結構的
dwWaitHint和dwCheckpoint成員,判斷等候 Windows 服務啟動或關閉需要多長時間。 如果您的OnStart和OnStop方法需長時間執行,則服務可以使用遞增的dwCheckPoint值再次呼叫SetServiceStatus以要求更多時間。在
MyNewService類別中,使用平台叫用宣告 SetServiceStatus 函式:[DllImport("advapi32.dll", SetLastError = true)] private static extern bool SetServiceStatus(System.IntPtr handle, ref ServiceStatus serviceStatus);Declare Auto Function SetServiceStatus Lib "advapi32.dll" (ByVal handle As IntPtr, ByRef serviceStatus As ServiceStatus) As Boolean若要實作 SERVICE_START_PENDING 狀態,請將下列程式碼新增至 OnStart 方法的開頭:
// Update the service state to Start Pending.
ServiceStatus serviceStatus = new ServiceStatus();
serviceStatus.dwCurrentState = ServiceState.SERVICE_START_PENDING;
serviceStatus.dwWaitHint = 100000;
SetServiceStatus(this.ServiceHandle, ref serviceStatus);
' Update the service state to Start Pending. Dim serviceStatus As ServiceStatus = New ServiceStatus() serviceStatus.dwCurrentState = ServiceState.SERVICE_START_PENDING serviceStatus.dwWaitHint = 100000 SetServiceStatus(Me.ServiceHandle, serviceStatus)將程式碼新增至
OnStart方法的結尾處,將狀態設為 SERVICE_RUNNING:// Update the service state to Running. serviceStatus.dwCurrentState = ServiceState.SERVICE_RUNNING; SetServiceStatus(this.ServiceHandle, ref serviceStatus);' Update the service state to Running. serviceStatus.dwCurrentState = ServiceState.SERVICE_RUNNING SetServiceStatus(Me.ServiceHandle, serviceStatus)(選擇性) 如果 OnStop 是長時間執行的方法,請在
OnStop方法中重複此程序。 實作 SERVICE_STOP_PENDING 狀態,並在OnStop方法結束前傳回 SERVICE_STOPPED 狀態。例如:
// Update the service state to Stop Pending.
ServiceStatus serviceStatus = new ServiceStatus();
serviceStatus.dwCurrentState = ServiceState.SERVICE_STOP_PENDING;
serviceStatus.dwWaitHint = 100000;
SetServiceStatus(this.ServiceHandle, ref serviceStatus);

// Update the service state to Stopped.
serviceStatus.dwCurrentState = ServiceState.SERVICE_STOPPED;
SetServiceStatus(this.ServiceHandle, ref serviceStatus);
' Update the service state to Stop Pending. Dim serviceStatus As ServiceStatus = New ServiceStatus() serviceStatus.dwCurrentState = ServiceState.SERVICE_STOP_PENDING serviceStatus.dwWaitHint = 100000 SetServiceStatus(Me.ServiceHandle, serviceStatus) ' Update the service state to Stopped. serviceStatus.dwCurrentState = ServiceState.SERVICE_STOPPED SetServiceStatus(Me.ServiceHandle, serviceStatus)
將安裝程式新增至服務
您必須先安裝 Windows 服務向服務控制管理員登錄,才能執行此服務。 將安裝程式新增至專案,以處理登錄詳細資料。
在 [方案總管] 中,從 MyNewService.cs 或 MyNewService.vb 的捷徑功能表選擇 [檢視表設計師]。
在 [設計] 檢視中,選取背景區域,然後從捷徑功能表選擇 [新增安裝程式]。
根據預設,Visual Studio 會將名為
ProjectInstaller的元件類別新增至您的專案,此類別包含兩個安裝程式。 這些安裝程式適用於您的服務及該服務的相關聯流程。在 ProjectInstaller 的 [設計] 檢視中,針對 Visual C# 專案選取 [serviceInstaller1],或針對 Visual Basic 專案選取 [ServiceInstaller1],然後從捷徑功能表選擇 [屬性]。
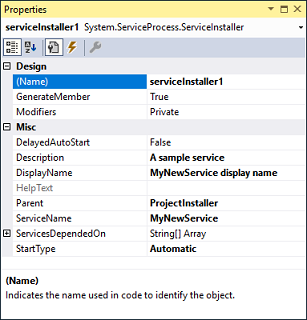
在 [屬性] 視窗中,驗證 ServiceName 屬性已設為 MyNewService。
將文字新增至 Description 屬性,例如「範例服務」。
此文字會出現在 [服務] 視窗的 [描述] 欄中,向使用者說明服務。
![服務描述 [服務] 視窗中的服務描述。](media/windows-service-description.png)
將文字新增至 DisplayName 屬性。 例如,「MyNewService 顯示名稱」。
此文字會出現在 [服務] 視窗的 [顯示名稱] 欄中。 這個名稱可以和系統使用的 ServiceName 屬性名稱不同 (例如,您用於
net start命令來啟動服務的名稱)。完成後,[屬性] 視窗看起來應該如下圖:

在 ProjectInstaller 的 [設計] 檢視中,針對 Visual C# 專案選擇 serviceProcessInstaller1,或針對 Visual Basic 專案選擇 ServiceProcessInstaller1,然後從捷徑功能表選擇 [屬性]。 從下拉式清單中將 Account 屬性設為 LocalSystem。
此設定會安裝服務,並使用本機系統帳戶來加以執行。
重要
LocalSystem 帳戶具有概括性的使用權限,包括寫入事件記錄檔的能力。 因此,請謹慎使用這個帳戶,因為它會增加您遭受惡意軟體攻擊的風險。 至於其他工作,建議使用 LocalService 帳戶,可在本機電腦上做為沒有權限的使用者,並提供匿名認證給任何遠端伺服器。 如果您嘗試使用 LocalService 帳戶,因為需要寫入事件記錄檔的權限,所以這個範例會失敗。
如需安裝程式的詳細資訊,請參閱操作說明:將安裝程式新增至服務應用程式。
(選擇性) 設定啟動參數
注意
決定新增啟動參數之前,請考慮這是否為將資訊傳遞至服務的最佳方式。 雖然它們容易使用及剖析,且使用者也可以輕鬆覆寫它們,但在沒有文件時,使用者可能很難探索及使用它們。 一般而言,如果服務需要的不只是幾個啟動參數,則您應該考慮改用登錄或組態檔。
Windows 服務可以接受命令列引數或啟動參數。 當您新增程式碼以處理啟動參數時,使用者可在服務的 [屬性] 視窗中,以自己的自訂啟動參數來啟動服務。 不過,這些啟動參數不會保留到下次服務啟動時。 若要永久設定啟動參數,請在登錄中設定。
每項 Windows 服務在 HKEY_LOCAL_MACHINE\SYSTEM\CurrentControlSet\Services 子機碼下都有登錄項目。 在每項服務的子機碼下,使用 Parameters 子機碼即可儲存您服務可以存取的資訊。 對於 Windows 服務,您可以用與其他類型的程式相同的方式來使用應用程式組態檔。 如需範例程式碼,請參閱 ConfigurationManager.AppSettings。
新增啟動參數
選取 Program.cs 或 MyNewService.Designer.vb,然後從捷徑功能表選擇 [檢視程式碼]。 在
Main方法中,變更程式碼以新增輸入參數,並將它傳遞至服務建構函式:static void Main(string[] args) { ServiceBase[] ServicesToRun; ServicesToRun = new ServiceBase[] { new MyNewService(args) }; ServiceBase.Run(ServicesToRun); }Shared Sub Main(ByVal cmdArgs() As String) Dim ServicesToRun() As System.ServiceProcess.ServiceBase = New System.ServiceProcess.ServiceBase() {New MyNewService(cmdArgs)} System.ServiceProcess.ServiceBase.Run(ServicesToRun) End Sub在 MyNewService.cs 或 MyNewService.vb 中,變更
MyNewService建構函式以處理輸入參數,如下所示:using System.Diagnostics; public MyNewService(string[] args) { InitializeComponent(); string eventSourceName = "MySource"; string logName = "MyNewLog"; if (args.Length > 0) { eventSourceName = args[0]; } if (args.Length > 1) { logName = args[1]; } eventLog1 = new EventLog(); if (!EventLog.SourceExists(eventSourceName)) { EventLog.CreateEventSource(eventSourceName, logName); } eventLog1.Source = eventSourceName; eventLog1.Log = logName; }Imports System.Diagnostics Public Sub New(ByVal cmdArgs() As String) InitializeComponent() Dim eventSourceName As String = "MySource" Dim logName As String = "MyNewLog" If (cmdArgs.Count() > 0) Then eventSourceName = cmdArgs(0) End If If (cmdArgs.Count() > 1) Then logName = cmdArgs(1) End If eventLog1 = New EventLog() If (Not EventLog.SourceExists(eventSourceName)) Then EventLog.CreateEventSource(eventSourceName, logName) End If eventLog1.Source = eventSourceName eventLog1.Log = logName End Sub此程式碼會根據使用者提供的啟動參數來設定事件來源和記錄檔名稱。 如未提供任何引數,則它會使用預設值。
若要指定命令列引數,請將下列程式碼新增至 ProjectInstaller.cs 或 ProjectInstaller.vb 中的
ProjectInstaller類別:protected override void OnBeforeInstall(IDictionary savedState) { string parameter = "MySource1\" \"MyLogFile1"; Context.Parameters["assemblypath"] = "\"" + Context.Parameters["assemblypath"] + "\" \"" + parameter + "\""; base.OnBeforeInstall(savedState); }Protected Overrides Sub OnBeforeInstall(ByVal savedState As IDictionary) Dim parameter As String = "MySource1"" ""MyLogFile1" Context.Parameters("assemblypath") = """" + Context.Parameters("assemblypath") + """ """ + parameter + """" MyBase.OnBeforeInstall(savedState) End Sub一般而言,這個值包含 Windows 服務的可執行檔完整路徑。 使用者必須以引號括住路徑和每個個別參數,服務才能正確啟動。 使用者可以變更 ImagePath 登錄項目中的參數,以變更 Windows 服務的啟動參數。 不過,更好的方法是以程式設計方式變更此值,並以使用者方便的方式公開功能,例如使用管理或組態公用程式。
建置服務
在 [方案總管] 中,從 MyNewService 專案的捷徑功能表選擇 [屬性]。
專案的屬性頁面隨即出現。
在 [應用程式] 索引標籤的 [啟始物件] 清單中,針對 Visual Basic 專案選擇 MyNewService.Program 或 Sub Main。
若要建置專案,請在 [方案總管] 中,從專案的捷徑功能表選擇 [建置] (或按 Ctrl+Shift+B)。
安裝服務
建置 Windows 服務之後,您就可以安裝它了。 若要安裝 Windows 服務,您必須有安裝所在電腦的系統管理員認證。
在 [Visual Studio 開發人員命令提示字元] 中,巡覽至包含專案輸出的資料夾 (預設為專案的 \bin\Debug 子目錄)。
輸入下列命令:
installutil MyNewService.exe如果服務安裝成功,則命令會報告成功。
如果系統找不到 installutil.exe,請確定它存在於您的電腦中。 此工具會與資料夾%windir%\Microsoft.NET\Framework[64]\ < framework 版本 >一起安裝.NET Framework。 例如,64 位元版本的預設路徑是 %windir%\Microsoft.NET\Framework64\v4.0.30319\InstallUtil.exe。
如果 installutil.exe 程序失敗,請檢查安裝記錄以找出原因。 根據預設,記錄檔與服務可執行檔位於同一資料夾。 安裝可能失敗的原因:
- RunInstallerAttribute 類別不存在於
ProjectInstaller類別中。 - 屬性未設為
true。 ProjectInstaller類別未定義為public。
- RunInstallerAttribute 類別不存在於
如需詳細資訊,請參閱如何:安裝及解除安裝服務。
啟動並執行服務
在 Windows 中,開啟 [服務] 桌面應用程式。 按 Windows+R 開啟 [執行] 方塊,輸入 services.msc,然後按 Enter 或選取 [確定]。
您應該會看到您的服務列在 [服務] 中,並以您為其設定的顯示名稱按字母順序顯示。
![在 [服務] 視窗中的 MyNewService。](media/windowsservices-serviceswindow.png)
若要啟動服務,請從服務的捷徑功能表選擇 [啟動]。
若要停止服務,請從服務的捷徑功能表選擇 [停止]。
(選擇性) 在命令列中,使用 net start <服務名稱> 和 net stop <服務名稱> 命令來啟動和停止您的服務。
確認服務的事件記錄輸出
在 Windows 中,開啟事件檢視器桌面應用程式。 在 Windows 搜尋列中輸入事件檢視器,然後從搜尋結果選取 [事件檢視器]。
提示
在 Visual Studio 中,您可以從 [檢視] 功能表開啟 [伺服器總管] (或按 Ctrl+Alt+S),然後展開本機電腦的 [事件記錄檔] 節點來存取事件記錄。
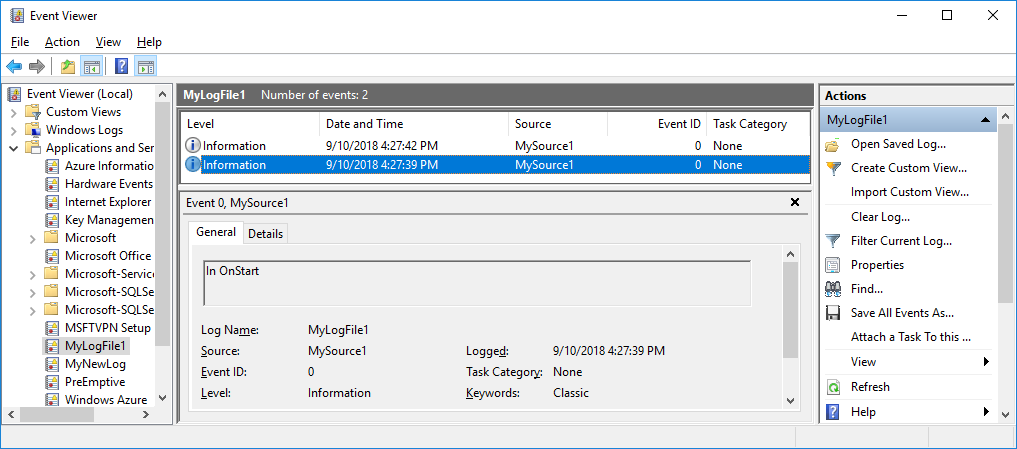
在 [事件檢視器] 中,展開 [應用程式及服務記錄]。
找到並展開 MyNewLog 的清單 (如果遵循新增命令列引數的程序,則為 MyLogFile1)。 您應該會看到服務所執行兩個動作 (啟動和停止) 的項目。

清除資源
如果您不再需要 Windows 服務應用程式,您可以移除它。
以系統管理認證開啟 [Visual Studio 的開發人員命令提示字元]。
在 [Visual Studio 開發人員命令提示字元] 視窗中,巡覽至包含專案輸出的資料夾。
輸入下列命令:
installutil.exe /u MyNewService.exe如已成功解除安裝服務,命令會回報已成功移除您的服務。 如需詳細資訊,請參閱如何:安裝及解除安裝服務。
下一步
建立服務之後,您就可以:
建立獨立安裝程式,供其他人用來安裝您的 Windows 服務。 使用 WiX 工具組 建立 Windows 服務的安裝程式。 如需相關資訊,請參閱建立安裝程式套件。
探索 ServiceController 元件,它可讓您將命令傳送至已安裝的服務。
在安裝應用程式時使用安裝程式建立事件記錄檔,而不是在應用程式執行時建立事件記錄檔。 當您解除安裝應用程式時,安裝程式會刪除事件記錄檔。 如需詳細資訊,請參閱EventLogInstaller。
