使用 BackgroundService 建立 Windows 服務
.NET Framework 開發人員可能已熟悉 Windows 服務應用程式。 在 .NET Core 和 .NET 5+ 之前,依賴 .NET Framework 的開發人員可能會建立 Windows 服務,以執行背景工作或執行長時間的流程。 此功能仍可供使用,而且您可以建立以 Windows 服務執行的背景工作服務。
在本教學課程中,您將了解如何:
- 將 .NET 背景工作角色應用程式發佈為單一檔案可執行檔。
- 建立 Windows 服務。
- 建立
BackgroundService應用程式作為 Windows 服務。 - 啟動和停止 Windows 服務。
- 檢視事件記錄檔。
- 刪除 Windows 服務。
提示
範例瀏覽器中提供所有「.NET 中的背景工作角色」範例原始程式碼以供下載。 如需詳細資訊,請參閱瀏覽程式碼範例:.NET 中的背景工作角色。
重要
安裝 .NET SDK,也會安裝 Microsoft.NET.Sdk.Worker 和背景工作角色範本。 換句話說,安裝 .NET SDK 之後,您可以使用 dotnet new worker 命令建立新的背景工作角色。 如果您使用 Visual Studio,在安裝選擇性的 ASP.NET 和 Web 開發工作負載前,範本將會隱藏。
必要條件
- .NET 8.0 SDK 或更新版本
- Windows 作業系統
- .NET 整合式開發環境 (IDE)
- 歡迎使用 Visual Studio
建立新專案
若要使用 Visual Studio Code 建立新的背景工作服務專案,您將選取 [檔案]>[新增]>[專案...]。從 [建立新專案] 對話方塊搜尋 [背景工作服務],然後選取 [背景工作服務] 範本。 如果您想要使用 .NET CLI,請在工作目錄中開啟您慣用的終端。 執行 dotnet new 命令,並以您想要的專案名稱取代 <Project.Name>。
dotnet new worker --name <Project.Name>
如需 .NET CLI 新的背景工作角色服務專案命令的詳細資訊,請參閱 dotnet new worker。
提示
如果您使用 Visual Studio Code,您可以從整合式終端執行 .NET CLI 命令。 如需詳細資訊,請參閱 Visual Studio Code:整合式終端。
安裝 NuGet 套件
若要從 .NET IHostedService 實作與原生 Windows 服務互通,您必須安裝 Microsoft.Extensions.Hosting.WindowsServices NuGet 套件。
若要從 Visual Studio 安裝此專案,請使用 [管理 NuGet 套件...] 對話方塊。 搜尋 「Microsoft.Extensions.Hosting.WindowsServices」,並加以安裝。 如果您想要使用 .NET CLI,請執行 dotnet add package 命令:
dotnet add package Microsoft.Extensions.Hosting.WindowsServices
如需 .NET CLI 新增套件命令的詳細資訊,請參閱 dotnet add package。
成功新增套件之後,您的專案檔現在應該包含下列套件參考:
<ItemGroup>
  <PackageReference Include="Microsoft.Extensions.Hosting" Version="8.0.0" />
  <PackageReference Include="Microsoft.Extensions.Hosting.WindowsServices" Version="8.0.0" />
</ItemGroup>
更新專案檔
此背景工作專案會使用 C# 的可為 Null 的參考型別。 若要在整個專案中啟用,請依此更新專案檔:
<Project Sdk="Microsoft.NET.Sdk.Worker">

  <PropertyGroup>
    <TargetFramework>net8.0-windows</TargetFramework>
    <Nullable>enable</Nullable>
    <ImplicitUsings>true</ImplicitUsings>
    <RootNamespace>App.WindowsService</RootNamespace>
  </PropertyGroup>

  <ItemGroup>
    <PackageReference Include="Microsoft.Extensions.Hosting" Version="8.0.0" />
    <PackageReference Include="Microsoft.Extensions.Hosting.WindowsServices" Version="8.0.0" />
  </ItemGroup>
</Project>
上述專案檔變更會新增 <Nullable>enable<Nullable> 節點。 如需詳細資訊,請參閱設定可為 Null 的內容。
建立服務
將新的類別新增至名為 JokeService.cs 的專案,並用下列 C# 程式碼取代其內容:
namespace App.WindowsService;

public sealed class JokeService
{
    public string GetJoke()
    {
        Joke joke = _jokes.ElementAt(
            Random.Shared.Next(_jokes.Count));

        return $"{joke.Setup}{Environment.NewLine}{joke.Punchline}";
    }

    // Programming jokes borrowed from:
    // https://github.com/eklavyadev/karljoke/blob/main/source/jokes.json
    private readonly HashSet<Joke> _jokes = new()
    {
        new Joke("What's the best thing about a Boolean?", "Even if you're wrong, you're only off by a bit."),
        new Joke("What's the object-oriented way to become wealthy?", "Inheritance"),
        new Joke("Why did the programmer quit their job?", "Because they didn't get arrays."),
        new Joke("Why do programmers always mix up Halloween and Christmas?", "Because Oct 31 == Dec 25"),
        new Joke("How many programmers does it take to change a lightbulb?", "None that's a hardware problem"),
        new Joke("If you put a million monkeys at a million keyboards, one of them will eventually write a Java program", "the rest of them will write Perl"),
        new Joke("['hip', 'hip']", "(hip hip array)"),
        new Joke("To understand what recursion is...", "You must first understand what recursion is"),
        new Joke("There are 10 types of people in this world...", "Those who understand binary and those who don't"),
        new Joke("Which song would an exception sing?", "Can't catch me - Avicii"),
        new Joke("Why do Java programmers wear glasses?", "Because they don't C#"),
        new Joke("How do you check if a webpage is HTML5?", "Try it out on Internet Explorer"),
        new Joke("A user interface is like a joke.", "If you have to explain it then it is not that good."),
        new Joke("I was gonna tell you a joke about UDP...", "...but you might not get it."),
        new Joke("The punchline often arrives before the set-up.", "Do you know the problem with UDP jokes?"),
        new Joke("Why do C# and Java developers keep breaking their keyboards?", "Because they use a strongly typed language."),
        new Joke("Knock-knock.", "A race condition. Who is there?"),
        new Joke("What's the best part about TCP jokes?", "I get to keep telling them until you get them."),
        new Joke("A programmer puts two glasses on their bedside table before going to sleep.", "A full one, in case they gets thirsty, and an empty one, in case they don’t."),
        new Joke("There are 10 kinds of people in this world.", "Those who understand binary, those who don't, and those who weren't expecting a base 3 joke."),
        new Joke("What did the router say to the doctor?", "It hurts when IP."),
        new Joke("An IPv6 packet is walking out of the house.", "He goes nowhere."),
        new Joke("3 SQL statements walk into a NoSQL bar. Soon, they walk out", "They couldn't find a table.")
    };
}

readonly record struct Joke(string Setup, string Punchline);
上述的惡作劇服務原始程式碼會公開單一部份功能,也就是 GetJoke 方法。 這是一種 string 傳回方法,代表隨機程式設計惡作劇。 類別範圍 _jokes 欄位是用來儲存惡作劇清單。 系統會從清單中選取隨機惡作劇並傳回。
重寫 Worker 類別
以下列 C# 程式碼取代範本的現有 Worker,並將檔案重新命名為 WindowsBackgroundService.cs:
namespace App.WindowsService;

public sealed class WindowsBackgroundService(
    JokeService jokeService,
    ILogger<WindowsBackgroundService> logger) : BackgroundService
{
    protected override async Task ExecuteAsync(CancellationToken stoppingToken)
    {
        try
        {
            while (!stoppingToken.IsCancellationRequested)
            {
                string joke = jokeService.GetJoke();
                logger.LogWarning("{Joke}", joke);

                await Task.Delay(TimeSpan.FromMinutes(1), stoppingToken);
            }
        }
        catch (OperationCanceledException)
        {
            // When the stopping token is canceled, for example, a call made from services.msc,
            // we shouldn't exit with a non-zero exit code. In other words, this is expected...
        }
        catch (Exception ex)
        {
            logger.LogError(ex, "{Message}", ex.Message);

            // Terminates this process and returns an exit code to the operating system.
            // This is required to avoid the 'BackgroundServiceExceptionBehavior', which
            // performs one of two scenarios:
            // 1. When set to "Ignore": will do nothing at all, errors cause zombie services.
            // 2. When set to "StopHost": will cleanly stop the host, and log errors.
            //
            // In order for the Windows Service Management system to leverage configured
            // recovery options, we need to terminate the process with a non-zero exit code.
            Environment.Exit(1);
        }
    }
}
在上述程式碼中,JokeService 會與 ILogger 一起插入。 這兩者都可當做 private readonly 欄位供類別使用。 在 ExecuteAsync 方法中,惡作劇服務會要求惡作劇,並將其寫入記錄器。 在此情況下,記錄器是由 Windows 事件記錄檔進行實作 - Microsoft.Extensions.Logging.EventLog.EventLogLogger。 記錄會寫入 [事件檢視器],且可在其中檢視。
注意
根據預設,「事件記錄檔」嚴重性為 Warning。 這可加以設定,但基於示範目的,請使用 LogWarning 擴充方法記錄 WindowsBackgroundService。 若要特別以 EventLog 層級為目標,請在 appsettings {Environment}.json 中新增輸入,或提供 EventLogSettings.Filter 值。
{
  "Logging": {
    "LogLevel": {
      "Default": "Warning"
    },
    "EventLog": {
      "SourceName": "The Joke Service",
      "LogName": "Application",
      "LogLevel": {
        "Microsoft": "Information",
        "Microsoft.Hosting.Lifetime": "Information"
      }
    }
  }
}
如需設定記錄層級的詳細資訊,請參閱 .NET 中的記錄提供者:設定 Windows EventLog。
重寫 Program 類別
使用下列 C# 程式碼取代範本 Program.cs 檔案內容:
using App.WindowsService;
using Microsoft.Extensions.Logging.Configuration;
using Microsoft.Extensions.Logging.EventLog;

HostApplicationBuilder builder = Host.CreateApplicationBuilder(args);
builder.Services.AddWindowsService(options =>
{
    options.ServiceName = ".NET Joke Service";
});

LoggerProviderOptions.RegisterProviderOptions<
    EventLogSettings, EventLogLoggerProvider>(builder.Services);

builder.Services.AddSingleton<JokeService>();
builder.Services.AddHostedService<WindowsBackgroundService>();

IHost host = builder.Build();
host.Run();
AddWindowsService 擴充方法會設定應用程式如 Windows 服務般運作。 服務名稱已設為 ".NET Joke Service"。 託管服務已完成相依性插入註冊。
如需註冊服務的詳細資訊,請參閱 .NET 中的相依性插入。
發行應用程式
若要將 .NET 背景工作服務應用程式建立為 Windows 服務,建議您將應用程式發佈為單一檔案可執行檔。 由於檔案系統上沒有任何相依的檔案,因此較不容易有獨立式的可執行檔。 然而,您可以選擇可完全接受的不同發佈形式,只需建立可由 Windows 服務控制管理員鎖定目標的 *.exe 檔案即可。
重要
替代的發佈方法是建置 *.dll (而非 *.exe),並在您使用 Windows 服務控制管理員安裝已發佈的應用程式時,委派給 .NET CLI 並傳遞 DLL。 如需詳細資訊,請參閱 .NET CLI:dotnet 命令。
sc.exe create ".NET Joke Service" binpath="C:\Path\To\dotnet.exe C:\Path\To\App.WindowsService.dll"
<Project Sdk="Microsoft.NET.Sdk.Worker">

  <PropertyGroup>
    <TargetFramework>net8.0-windows</TargetFramework>
    <Nullable>enable</Nullable>
    <ImplicitUsings>true</ImplicitUsings>
    <RootNamespace>App.WindowsService</RootNamespace>
    <OutputType>exe</OutputType>
    <PublishSingleFile Condition="'$(Configuration)' == 'Release'">true</PublishSingleFile>
    <RuntimeIdentifier>win-x64</RuntimeIdentifier>
    <PlatformTarget>x64</PlatformTarget>
  </PropertyGroup>

  <ItemGroup>
    <PackageReference Include="Microsoft.Extensions.Hosting" Version="8.0.0" />
    <PackageReference Include="Microsoft.Extensions.Hosting.WindowsServices" Version="8.0.0" />
  </ItemGroup>
</Project>
上述專案檔的醒目提示行會定義下列行為:
<OutputType>exe</OutputType>:建立主控台應用程式 (Console Application)。<PublishSingleFile Condition="'$(Configuration)' == 'Release'">true</PublishSingleFile>:啟用單一檔案發佈。<RuntimeIdentifier>win-x64</RuntimeIdentifier>:指定win-x64的 RID。<PlatformTarget>x64</PlatformTarget>:指定 64 位元的目標平台 CPU。
若要從 Visual Studio 發佈應用程式,您可以建立已保存發行設定檔。 發行設定檔以 XML 為基礎,且副檔名為 .pubxml。 Visual Studio 會隱含地使用此設定檔來發佈應用程式,而如果您使用 .NET CLI,則必須明確指定要使用的發行設定檔。
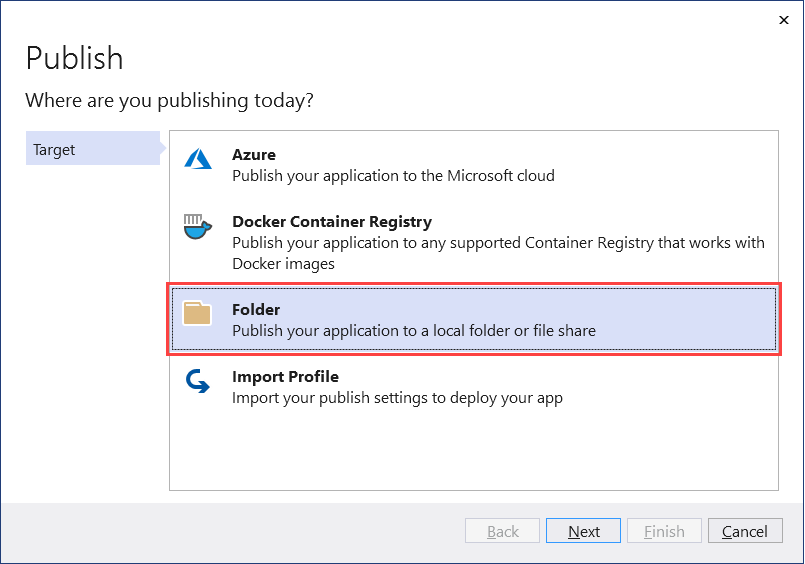
以滑鼠右鍵按一下 [方案總管] 中的專案,然後選取 [發佈]。 然後,選取 [新增發行設定檔] 以建立設定檔。 從 [發佈] 對話方塊中,選取 [資料夾] 作為您的 [目標]。
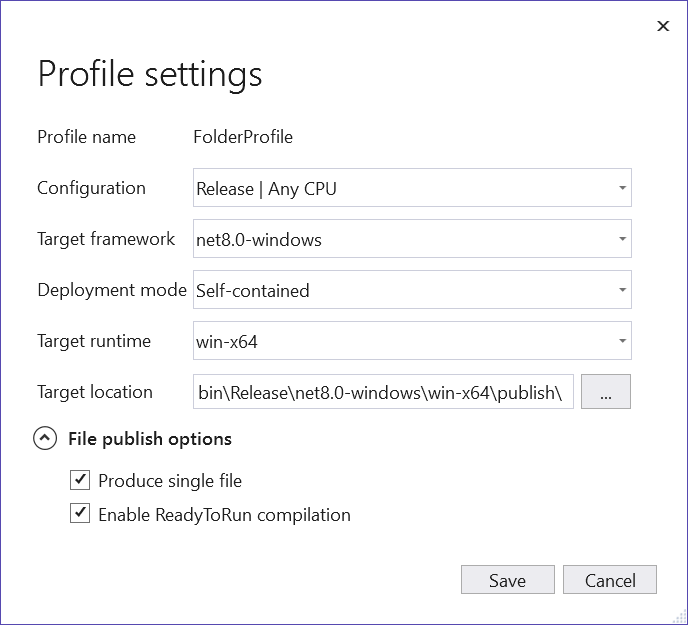
保留預設 [位置],然後選取 [完成]。 建立設定檔之後,請選取 [顯示所有設定],然後確認您的 [設定檔設定]。
請確定已指定下列設定:
- 部署模式:獨立式
- 產生單一檔案:已選取
- 啟用 ReadyToRun 編譯:已選取
- 修剪未使用的組件 (預覽):未選取
最後,選取 [發佈]。 應用程式會進行編譯,而產生的.exe 檔案會發佈至 /publish 輸出目錄。
或者,您可以使用 .NET CLI 來發佈應用程式:
dotnet publish --output "C:\custom\publish\directory"
如需詳細資訊,請參閱dotnet publish。
重要
使用 .NET 6 時,如果您嘗試使用 <PublishSingleFile>true</PublishSingleFile> 設定對應用程式進行偵錯,您將無法對應用程式進行偵錯。 如需詳細資訊,請參閱進行 'PublishSingleFile' .NET 6 應用程式偵錯時無法附加至 CoreCLR。
建立 Windows 服務
如果您不熟悉使用 PowerShell,而您想要為服務建立安裝程式,請參閱 建立 Windows 服務安裝程式。 或者,若要建立 Windows 服務,請使用原生 Windows 服務控制管理員的 (sc.exe) 來建立命令。 以系統管理員身分執行 PowerShell。
sc.exe create ".NET Joke Service" binpath="C:\Path\To\App.WindowsService.exe"
提示
如果您需要變更主機設定的內容根目錄,您可以在指定 binpath 時將其作為命令列引數傳遞:
sc.exe create "Svc Name" binpath="C:\Path\To\App.exe --contentRoot C:\Other\Path"
您會看到輸出訊息:
[SC] CreateService SUCCESS
如需詳細資訊,請參閱建立 sc.exe。
設定 Windows 服務
建立服務之後,您可以選擇性進行設定。 如果您使用的是服務預設值,請跳至驗證服務功能區段。
Windows 服務提供復原設定選項。 您可以使用 sc.exe qfailure "<Service Name>" (其中 <Service Name> 是您服務的名稱) 命令查詢目前的設定,讀取目前的復原設定值:
sc qfailure ".NET Joke Service"
[SC] QueryServiceConfig2 SUCCESS

SERVICE_NAME: .NET Joke Service
        RESET_PERIOD (in seconds)    : 0
        REBOOT_MESSAGE               :
        COMMAND_LINE                 :
此命令會輸出復原設定,這是預設值,因為尚未進行設定。
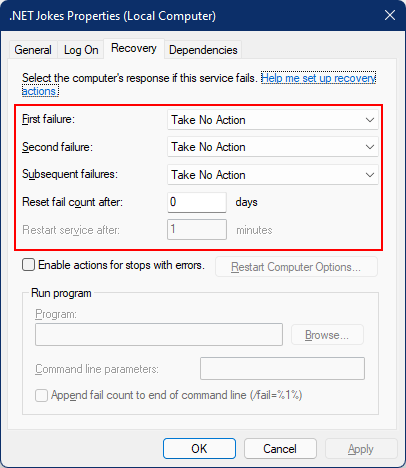
若要設定復原,請使用 sc.exe failure "<Service Name>",其中 <Service Name> 是您服務的名稱:
sc.exe failure ".NET Joke Service" reset=0 actions=restart/60000/restart/60000/run/1000
[SC] ChangeServiceConfig2 SUCCESS
提示
若要設定復原選項,您的終端機工作階段必須以系統管理員身分執行。
成功設定之後,您可以使用 sc.exe qfailure "<Service Name>" 命令再次查詢值:
sc qfailure ".NET Joke Service"
[SC] QueryServiceConfig2 SUCCESS

SERVICE_NAME: .NET Joke Service
        RESET_PERIOD (in seconds)    : 0
        REBOOT_MESSAGE               :
        COMMAND_LINE                 :
        FAILURE_ACTIONS              : RESTART -- Delay = 60000 milliseconds.
                                       RESTART -- Delay = 60000 milliseconds.
                                       RUN PROCESS -- Delay = 1000 milliseconds.
您會看到已設定的重新啟動值。
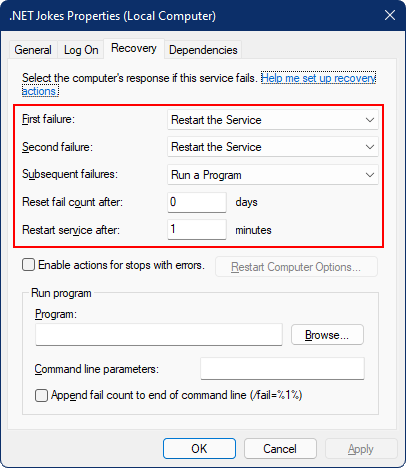
服務復原選項和 .NET BackgroundService 執行個體
.NET 6 在 .NET 中新增了新的裝載例外狀況處理行為。 BackgroundServiceExceptionBehavior 列舉已加入 Microsoft.Extensions.Hosting 命名空間,並用來指定擲回例外狀況時的服務行為。 下表列出可用選項:
| 選項 | 描述 |
|---|---|
| Ignore | 忽略 BackgroundService 中擲回的例外狀況。 |
| StopHost | 擲回未處理的例外狀況時,將會停止 IHost。 |
.NET 6 之前的預設行為是 Ignore,這會導致「廢止流程」(未執行任何動作的執行流程)。 .NET 6 的預設行為是 StopHost,這會導致主機在例外狀況擲回時停止。 然而,主機會完全停止,意即 Windows 服務管理系統不會重新啟動服務。 若要正確允許服務重新啟動,您可以使用非零結束代碼呼叫 Environment.Exit。 請考慮下列醒目提示的 catch 區塊:
namespace App.WindowsService;

public sealed class WindowsBackgroundService(
    JokeService jokeService,
    ILogger<WindowsBackgroundService> logger) : BackgroundService
{
    protected override async Task ExecuteAsync(CancellationToken stoppingToken)
    {
        try
        {
            while (!stoppingToken.IsCancellationRequested)
            {
                string joke = jokeService.GetJoke();
                logger.LogWarning("{Joke}", joke);

                await Task.Delay(TimeSpan.FromMinutes(1), stoppingToken);
            }
        }
        catch (OperationCanceledException)
        {
            // When the stopping token is canceled, for example, a call made from services.msc,
            // we shouldn't exit with a non-zero exit code. In other words, this is expected...
        }
        catch (Exception ex)
        {
            logger.LogError(ex, "{Message}", ex.Message);

            // Terminates this process and returns an exit code to the operating system.
            // This is required to avoid the 'BackgroundServiceExceptionBehavior', which
            // performs one of two scenarios:
            // 1. When set to "Ignore": will do nothing at all, errors cause zombie services.
            // 2. When set to "StopHost": will cleanly stop the host, and log errors.
            //
            // In order for the Windows Service Management system to leverage configured
            // recovery options, we need to terminate the process with a non-zero exit code.
            Environment.Exit(1);
        }
    }
}
驗證服務功能
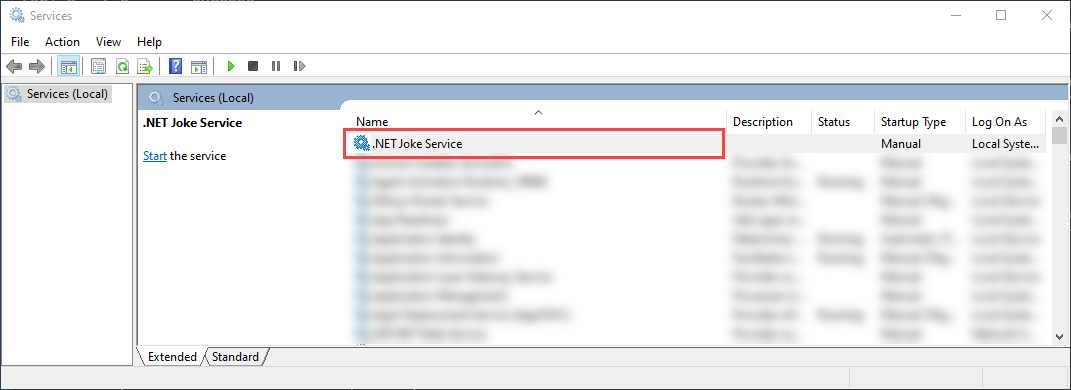
若要查看建立為 Windows 服務的應用程式,請開啟 [服務]。 選取 Windows 鍵 (或 Ctrl + Esc),然後從 [服務] 搜尋。 從 [服務] 應用程式,您應能夠依其名稱尋找您的服務。
重要
根據預設,一般 (非管理員) 使用者無法管理 Windows 服務。 若要確認此應用程式如預期運作,您必須使用管理帳戶。
若要確認服務依預期運作,您需要:
- 啟動服務
- 檢視記錄檔
- 停止此服務
重要
若要偵錯應用程式,請確定您「未」嘗試對正在 Windows 服務流程內執行的可執行檔進行偵錯。
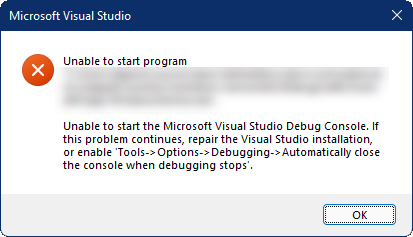
啟動 Windows 服務
若要啟動 Windows 服務,請使用 sc.exe start 命令:
sc.exe start ".NET Joke Service"
您會看到類似下方的輸出:
SERVICE_NAME: .NET Joke Service
    TYPE               : 10  WIN32_OWN_PROCESS
    STATE              : 2  START_PENDING
                            (NOT_STOPPABLE, NOT_PAUSABLE, IGNORES_SHUTDOWN)
    WIN32_EXIT_CODE    : 0  (0x0)
    SERVICE_EXIT_CODE  : 0  (0x0)
    CHECKPOINT         : 0x0
    WAIT_HINT          : 0x7d0
    PID                : 37636
    FLAGS
服務 [狀態] 將會從 START_PENDING 轉換為 [執行中]。
檢視記錄
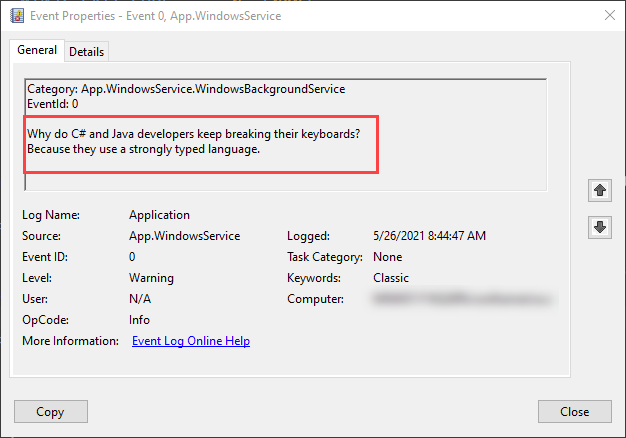
若要檢視記錄,請開啟 [事件檢視器]。 選取 Windows 鍵 (或 Ctrl + Esc),然後搜尋 "Event Viewer"。 選取 [事件檢視器 (本機)]> [Windows 記錄]> [應用程式] 節點。 您應可看到 [警告] 層級項目,其中包含符合應用程式命名空間的 [來源]。 按兩下專案,或以滑鼠右鍵按一下並選取 [事件屬性] 以檢視詳細資料。
在 [事件記錄檔] 中看到記錄之後,您應停止服務。 其設計目的在於將隨機惡作劇每分鐘記錄一次。 這是刻意的行為,但「不」適用於生產服務。
停止 Windows 服務
若要停止 Windows 服務,請使用 sc.exe stop 命令:
sc.exe stop ".NET Joke Service"
您會看到類似下方的輸出:
SERVICE_NAME: .NET Joke Service
    TYPE               : 10  WIN32_OWN_PROCESS
    STATE              : 3  STOP_PENDING
                            (STOPPABLE, NOT_PAUSABLE, ACCEPTS_SHUTDOWN)
    WIN32_EXIT_CODE    : 0  (0x0)
    SERVICE_EXIT_CODE  : 0  (0x0)
    CHECKPOINT         : 0x0
    WAIT_HINT          : 0x0
服務 [狀態] 將會從 STOP_PENDING 轉換為 [已停止]。
刪除 Windows 服務
若要刪除 Windows 服務,請使用原生 Windows 服務控制管理員的 (sc.exe) delete 命令。 以系統管理員身分執行 PowerShell。
重要
如果服務不是處於 [已停止] 狀態,將不會立即刪除。 在發出 delete 命令之前,請確定服務已停止運作。
sc.exe delete ".NET Joke Service"
您會看到輸出訊息:
[SC] DeleteService SUCCESS
如需詳細資訊,請參閱sc.exe delete。
