在 Node.js 中協調 .NET Aspire 應用程式
在本文中,您將瞭解如何在 .NET.NET Aspire 專案中使用 Node.js 和 Node Package Manager (npm) 應用程式。 本文中的範例應用程式示範 Angular、React和 Vue 客戶端體驗。 下列 .NET.NET Aspire API 存在以支持這些場景,且屬於 Aspire的一部分,這是 .Hosting.NodeJS NuGet 套件中的內容。
這兩個 API 之間的差異在於,前者用來裝載 Node.js 應用程式,而後者則用來裝載從 package.json 檔案 scripts 區段執行的應用程式,以及對應的 npm run <script-name> 命令。
提示
本文的範例原始程式碼可在 GitHub取得,而且 Vue 頁面的 。
重要
雖然本文著重於 Single-Page 應用程式(SPA)前端位,但 程式代碼範例:.NET AspireNode.js 範例 頁面提供額外的 Node.js 範例,示範如何使用 Node.js 作為具有 express的伺服器應用程式。
先決條件
若要與 .NET.NET Aspire一起工作,您需要在本地安裝以下項目:
- .NET 8.0 或 .NET 9.0
- 符合 OCI 規範的容器運行時間,例如:
- 整合式開發人員環境 (IDE) 或程式碼編輯器,例如:
- Visual Studio 2022 17.9 版或更高版本 (選用)
-
Visual Studio Code (選擇性)
- C# Dev Kit:擴充功能(選擇性)
- JetBrains Rider 搭配 .NET.NET Aspire 外掛程式 (選用)
如需詳細資訊,請參閱 .NET.NET Aspire 設定和工具和 .NET.NET Aspire SDK。
此外,您必須在計算機上安裝 Node.js。 本文中的範例應用程式是使用 Node.js 20.12.2 版和 npm 10.5.1 版所建置。 若要確認您的 Node.js 和 npm 版本,請執行下列命令:
node --version
npm --version
若要下載
複製範例原始程式碼
若要從 GitHub複製範例原始程式碼,請執行下列命令:
git clone https://github.com/dotnet/aspire-samples.git
複製存放庫之後,流覽至 samples/AspireWithJavaScript 資料夾:
cd samples/AspireWithJavaScript
在此目錄中,下列列表描述了六個子目錄。
- AspireJavaScript。Angular:Angular 應用程式,會取用天氣預報 API,並在數據表中顯示數據。
- AspireJavaScript.AppHost:協調此範例中其他應用程式的 .NET.NET Aspire 專案。 如需詳細資訊,請參閱 .NET.NET Aspire協調流程概觀。
- AspireJavaScript.MinimalApi:傳回隨機產生的天氣預報數據的 HTTP API。
- AspireJavaScript。React:React 應用程式,會取用天氣預報 API,並在數據表中顯示數據。
- AspireJavaScript.ServiceDefaults:.NET.NET Aspire 項目的預設共享專案。 如需詳細資訊,請參閱 .NET.NET Aspire 服務預設值。
- AspireJavaScript。Vue:Vue 應用程式,會取用天氣預報 API,並在數據表中顯示數據。
安裝用戶端相依性
範例應用程式示範如何使用建置在 Node.js之上的 JavaScript 用戶端應用程式。 每個用戶端應用程式都是使用 npm create 範本命令或手動撰寫。 下表列出用來建立每個用戶端應用程式的範本命令,以及預設埠:
| 應用程式類型 | 建立範本命令 | 默認埠 |
|---|---|---|
| Angular | npm create @angular@latest |
4200 |
| React | 未使用範本。 | PORT env var |
| Vue | npm create vue@latest |
5173 |
提示
您不需要執行上述任何命令,因為範例應用程式已經包含用戶端。 相反地,這是建立用戶端的來源參考點。 如需詳細資訊,請參閱 npm-init。
若要執行應用程式,您必須先為每個用戶端安裝相依性。 若要這樣做,請瀏覽至每個客戶端資料夾並執行 npm install (或安裝別名 npm i) 命令。
安裝 Angular 依賴項
npm i ./AspireJavaScript.Angular/
如需 Angular 應用程式的詳細資訊,請參閱 探索 Angular 用戶端。
安裝 React 依賴項
npm i ./AspireJavaScript.React/
如需 React 應用程式的詳細資訊,請參閱 探索 React 用戶端。
安裝 Vue 依賴項
npm i ./AspireJavaScript.Vue/
如需 Vue 應用程式的詳細資訊,請參閱 探索 Vue 用戶端。
執行範例應用程式
若要執行範例應用程式,請呼叫 dotnet run 命令,並使用協調器應用程式主機 AspireJavaScript.AppHost.csproj 作為 --project 開關:
dotnet run --project ./AspireJavaScript.AppHost/AspireJavaScript.AppHost.csproj
.NET .NET Aspire 儀錶板 會在預設瀏覽器中啟動,而每個用戶端應用程式端點會顯示在 [資源] 頁面的 [端點] 數據行底下。 下圖描述此範例應用程式的儀錶板:
weatherapi 服務端點會解析到一個記錄 HTTP API 的 Swagger UI 頁面。 每個用戶端應用程式都會使用此服務來顯示天氣預報數據。 您可以瀏覽至 .NET.NET Aspire 儀錶板中的對應端點,以檢視每個用戶端應用程式。 下列各節會詳細說明其螢幕快照和從範本起點進行的修改。
在您用來執行應用程式的相同終端機會話中,按 Ctrl Ctrl + C 以停止應用程式。
探索應用程式主機
若要協助瞭解每個用戶端應用程式資源的協調方式,請查看應用程式主機專案。 為了裝載 Aspire 應用程式,應用程式主機需要 Node.js NuGet 套件。
<Project Sdk="Microsoft.NET.Sdk">

  <Sdk Name="Aspire.AppHost.Sdk" Version="9.0.0" />

  <PropertyGroup>
    <OutputType>Exe</OutputType>
    <TargetFramework>net8.0</TargetFramework>
    <ImplicitUsings>enable</ImplicitUsings>
    <Nullable>enable</Nullable>
    <IsAspireHost>true</IsAspireHost>
  </PropertyGroup>

  <ItemGroup>
    <PackageReference Include="Aspire.Hosting.AppHost" Version="9.0.0" />
    <PackageReference Include="Aspire.Hosting.NodeJs" Version="9.0.0" />
  </ItemGroup>

  <ItemGroup>
    <ProjectReference Include="..\AspireJavaScript.MinimalApi\AspireJavaScript.MinimalApi.csproj" />
  </ItemGroup>

  <Target Name="RestoreNpm" BeforeTargets="Build" Condition=" '$(DesignTimeBuild)' != 'true' ">
    <ItemGroup>
      <PackageJsons Include="..\*\package.json" />
    </ItemGroup>

    <!-- Install npm packages if node_modules is missing -->
    <Message Importance="Normal" Text="Installing npm packages for %(PackageJsons.RelativeDir)" Condition="!Exists('%(PackageJsons.RootDir)%(PackageJsons.Directory)/node_modules')" />
    <Exec Command="npm install" WorkingDirectory="%(PackageJsons.RootDir)%(PackageJsons.Directory)" Condition="!Exists('%(PackageJsons.RootDir)%(PackageJsons.Directory)/node_modules')" />
  </Target>

</Project>
項目檔也會定義建置目標,以確保在建置應用程式主機之前已安裝 npm 相依性。 應用程式主機程式代碼 (Program.cs) 會使用 AddNpmApp(IDistributedApplicationBuilder, String, String, String, String[]) API 宣告用戶端應用程式資源。
var builder = DistributedApplication.CreateBuilder(args);

var weatherApi = builder.AddProject<Projects.AspireJavaScript_MinimalApi>("weatherapi")
    .WithExternalHttpEndpoints();

builder.AddNpmApp("angular", "../AspireJavaScript.Angular")
    .WithReference(weatherApi)
    .WaitFor(weatherApi)
    .WithHttpEndpoint(env: "PORT")
    .WithExternalHttpEndpoints()
    .PublishAsDockerFile();

builder.AddNpmApp("react", "../AspireJavaScript.React")
    .WithReference(weatherApi)
    .WaitFor(weatherApi)
    .WithEnvironment("BROWSER", "none") // Disable opening browser on npm start
    .WithHttpEndpoint(env: "PORT")
    .WithExternalHttpEndpoints()
    .PublishAsDockerFile();

builder.AddNpmApp("vue", "../AspireJavaScript.Vue")
    .WithReference(weatherApi)
    .WaitFor(weatherApi)
    .WithHttpEndpoint(env: "PORT")
    .WithExternalHttpEndpoints()
    .PublishAsDockerFile();

builder.AddNpmApp("reactvite", "../AspireJavaScript.Vite")
    .WithReference(weatherApi)
    .WithEnvironment("BROWSER", "none")
    .WithHttpEndpoint(env: "VITE_PORT")
    .WithExternalHttpEndpoints()
    .PublishAsDockerFile();

builder.Build().Run();
上述程式代碼:
- 建立 DistributedApplicationBuilder。
- 將 「weatherapi」 服務新增為應用程式主機的專案。
- 將 HTTP 端點標示為外部端點。
- 使用 「weatherapi」 服務的參考,將 「angular」、“react” 和 「vue」 用戶端應用程式新增為 npm 應用程式。
- 每個用戶端應用程式都會設定為在不同的容器埠上執行,並使用
PORT環境變數來判斷埠。 - 所有用戶端應用程式也都依賴 Dockerfile 來建置其容器映像,並設定為從 PublishAsDockerFile API 以容器的形式在發佈指令清單中表達自己。
- 每個用戶端應用程式都會設定為在不同的容器埠上執行,並使用
如需內部循環網路的詳細資訊,請參閱 .NET.NET Aspire 內部循環網路概觀。 如需部署應用程式的詳細資訊,請參閱部署工具產生器的
當應用程式主機協調每個用戶端應用程式的啟動時,它會使用 npm run start 命令。 此命令定義於每個用戶端應用程式 package.json 檔案的 scripts 區段中。
start 文稿可用來在指定的埠上啟動用戶端應用程式。 每個用戶端應用程式都依賴 Proxy 來要求 「weatherapi」 服務。
代理伺服器被設定於:
- Angular 用戶端的 proxy.conf.js 檔案。
- React 用戶端的 webpack.config.js 檔案。
- Vue 用戶端的 vite.config.ts 檔案。
探索 Angular 用戶端
相較於原始 Angular 範本,做出了數個主要修改。 第一個是新增 proxy.conf.js 檔案。 此檔案用來將來自 Angular 用戶端的要求代理到「weatherapi」服務。
module.exports = {
  "/api": {
    target:
      process.env["services__weatherapi__https__0"] ||
      process.env["services__weatherapi__http__0"],
    secure: process.env["NODE_ENV"] !== "development",
    pathRewrite: {
      "^/api": "",
    },
  },
};
.NET
.NET Aspire 應用程式主機會設定 services__weatherapi__http__0 環境變數,用來解析 「weatherapi」 服務端點。 上述組態 Proxy 會將開頭為 /api 的 HTTP 要求傳送至環境變數中指定的目標 URL。
第二個更新是 package.json 檔案。 此檔案可用來設定 Angular 用戶端,以在與預設埠不同的埠上執行。 這是透過使用 PORT 環境變數和 run-script-os npm 套件來設定埠以達成此目的。
{
  "name": "angular-weather",
  "version": "0.0.0",
  "engines": {
    "node": ">=20.12"
  },
  "scripts": {
    "ng": "ng",
    "start": "run-script-os",
    "start:win32": "ng serve --port %PORT%",
    "start:default": "ng serve --port $PORT",
    "build": "ng build",
    "watch": "ng build --watch --configuration development",
    "test": "ng test"
  },
  "private": true,
  "dependencies": {
    "@angular/animations": "^19.1.4",
    "@angular/common": "^19.1.4",
    "@angular/compiler": "^19.1.4",
    "@angular/core": "^19.1.4",
    "@angular/forms": "^19.1.4",
    "@angular/platform-browser": "^19.1.4",
    "@angular/platform-browser-dynamic": "^19.1.4",
    "@angular/router": "^19.1.4",
    "rxjs": "~7.8.1",
    "tslib": "^2.8.1",
    "zone.js": "~0.15.0"
  },
  "devDependencies": {
    "@angular-devkit/build-angular": "^19.1.4",
    "@angular/cli": "^19.1.4",
    "@angular/compiler-cli": "^19.1.4",
    "@types/jasmine": "~5.1.5",
    "jasmine-core": "~5.5.0",
    "karma": "~6.4.4",
    "karma-chrome-launcher": "~3.2.0",
    "karma-coverage": "~2.2.1",
    "karma-jasmine": "~5.1.0",
    "karma-jasmine-html-reporter": "~2.1.0",
    "typescript": "~5.7.3",
    "run-script-os": "^1.1.6"
  }
}
package.json 檔案的 scripts 區段是用來定義 start 腳本。
npm start 命令會使用此腳本來啟動 Angular 客戶端應用程式。
start 腳本設定為使用 run-script-os 套件來設定埠,這會根據OS適用的語法,將委派給傳遞適當 ng serve 參數的 --port 命令。
若要對 「weatherapi」 服務進行 HTTP 呼叫,Angular 用戶端應用程式必須設定為提供相依性插入 AngularHttpClient。 這可透過在 provideHttpClient 檔案中配置應用程式時,使用 輔助函式來達成。
import { ApplicationConfig } from '@angular/core';
import { provideHttpClient } from '@angular/common/http';
import { provideRouter } from '@angular/router';

import { routes } from './app.routes';

export const appConfig: ApplicationConfig = {
  providers: [
    provideRouter(routes),
    provideHttpClient()
  ]
};
最後,Angular 用戶端應用程式必須呼叫 /api/WeatherForecast 端點,以擷取天氣預報數據。 有數個 HTML、CSS 和 TypeScript 更新,這些更新全都對下列檔案進行:
- app.component.css:更新 CSS 以設定表格樣式。
- app.component.html:更新 HTML,以在數據表中顯示天氣預報數據。
-
app.component.ts:更新 TypeScript 以呼叫
/api/WeatherForecast端點,並在數據表中顯示數據。
import { Component, Injectable } from '@angular/core';
import { CommonModule } from '@angular/common';
import { RouterOutlet } from '@angular/router';
import { HttpClient } from '@angular/common/http';
import { WeatherForecasts } from '../types/weatherForecast';

@Injectable()
@Component({
  selector: 'app-root',
  standalone: true,
  imports: [CommonModule, RouterOutlet],
  templateUrl: './app.component.html',
  styleUrl: './app.component.css'
})
export class AppComponent {
  title = 'weather';
  forecasts: WeatherForecasts = [];

  constructor(private http: HttpClient) {
    http.get<WeatherForecasts>('api/weatherforecast').subscribe({
      next: result => this.forecasts = result,
      error: console.error
    });
  }
}
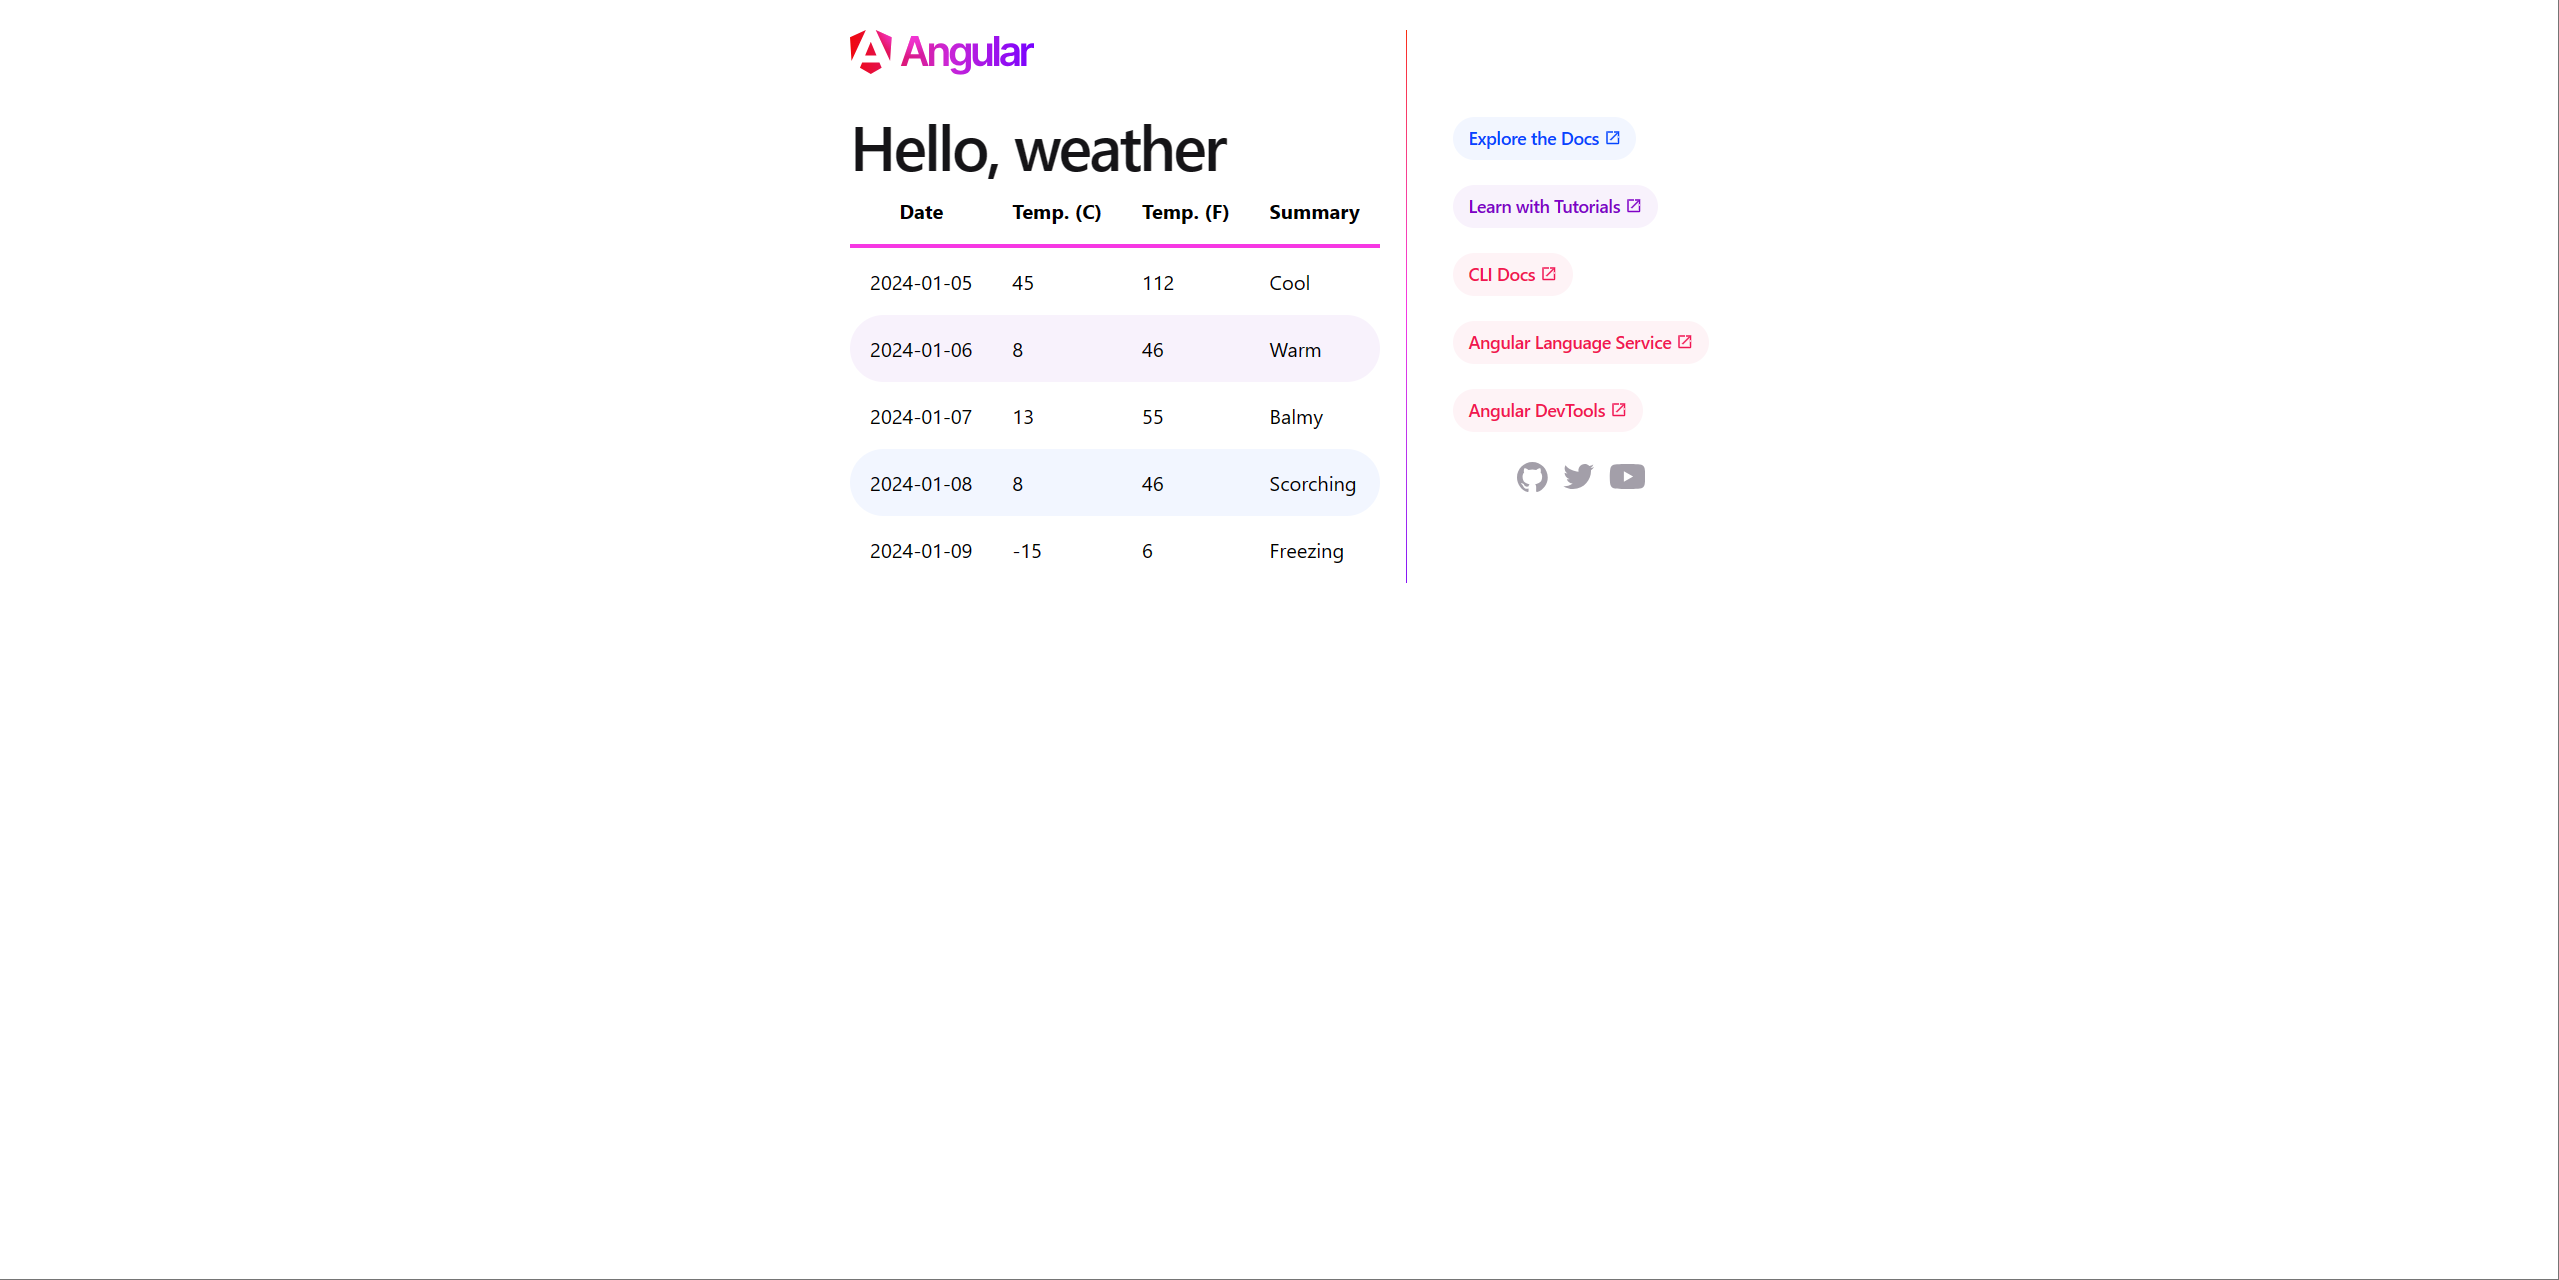
Angular應用程式執行中
若要將 Angular 用戶端應用程式可視化,請流覽至 .NET Aspire 儀錶板中的「angular」端點。 下圖描述 Angular 用戶端應用程式:
探索 React 用戶端
React 應用程式並未使用範本撰寫,而是手動撰寫。 您可以在 dotnet/aspire-samples 存放庫 中找到完整的原始程式碼,。 在 src/App.js 檔案中可以找到一些重點:
import { useEffect, useState } from "react";
import "./App.css";

function App() {
  const [forecasts, setForecasts] = useState([]);

  const requestWeather = async () => {
    const weather = await fetch("api/weatherforecast");
    console.log(weather);

    const weatherJson = await weather.json();
    console.log(weatherJson);

    setForecasts(weatherJson);
  };

  useEffect(() => {
    requestWeather();
  }, []);

  return (
    <div className="App">
      <header className="App-header">
        <h1>React Weather</h1>
        <table>
          <thead>
            <tr>
              <th>Date</th>
              <th>Temp. (C)</th>
              <th>Temp. (F)</th>
              <th>Summary</th>
            </tr>
          </thead>
          <tbody>
            {(
              forecasts ?? [
                {
                  date: "N/A",
                  temperatureC: "",
                  temperatureF: "",
                  summary: "No forecasts",
                },
              ]
            ).map((w) => {
              return (
                <tr key={w.date}>
                  <td>{w.date}</td>
                  <td>{w.temperatureC}</td>
                  <td>{w.temperatureF}</td>
                  <td>{w.summary}</td>
                </tr>
              );
            })}
          </tbody>
        </table>
      </header>
    </div>
  );
}

export default App;
App 函式是 React 用戶端應用程式的進入點。 它會使用 useState 和 useEffect 掛鉤來管理天氣預報資料的狀態。
fetch API 可用來對 /api/WeatherForecast 端點提出 HTTP 要求。 然後,回應會轉換成 JSON,並設定為天氣預報數據的狀態。
const HTMLWebpackPlugin = require("html-webpack-plugin");

module.exports = (env) => {
  return {
    entry: "./src/index.js",
    devServer: {
      port: env.PORT || 4001,
      allowedHosts: "all",
      proxy: [
        {
          context: ["/api"],
          target:
            process.env.services__weatherapi__https__0 ||
            process.env.services__weatherapi__http__0,
          pathRewrite: { "^/api": "" },
          secure: false,
        },
      ],
    },
    output: {
      path: `${__dirname}/dist`,
      filename: "bundle.js",
    },
    plugins: [
      new HTMLWebpackPlugin({
        template: "./src/index.html",
        favicon: "./src/favicon.ico",
      }),
    ],
    module: {
      rules: [
        {
          test: /\.js$/,
          exclude: /node_modules/,
          use: {
            loader: "babel-loader",
            options: {
              presets: [
                "@babel/preset-env",
                ["@babel/preset-react", { runtime: "automatic" }],
              ],
            },
          },
        },
        {
          test: /\.css$/,
          exclude: /node_modules/,
          use: ["style-loader", "css-loader"],
        },
      ],
    },
  };
};
上述程式代碼會定義 module.exports,如下所示:
-
entry屬性設為 src/index.js 檔案。 -
devServer依賴 Proxy 將要求轉送至 「weatherapi」 服務、將埠設定為PORT環境變數,並允許所有主機。 -
output會產生一個包含 bundle.js 檔案的 dist 資料夾。 -
plugins會將 src/index.html 檔案設定為範本,並公開 favicon.ico 檔案。
對以下檔案進行了最後的更新:
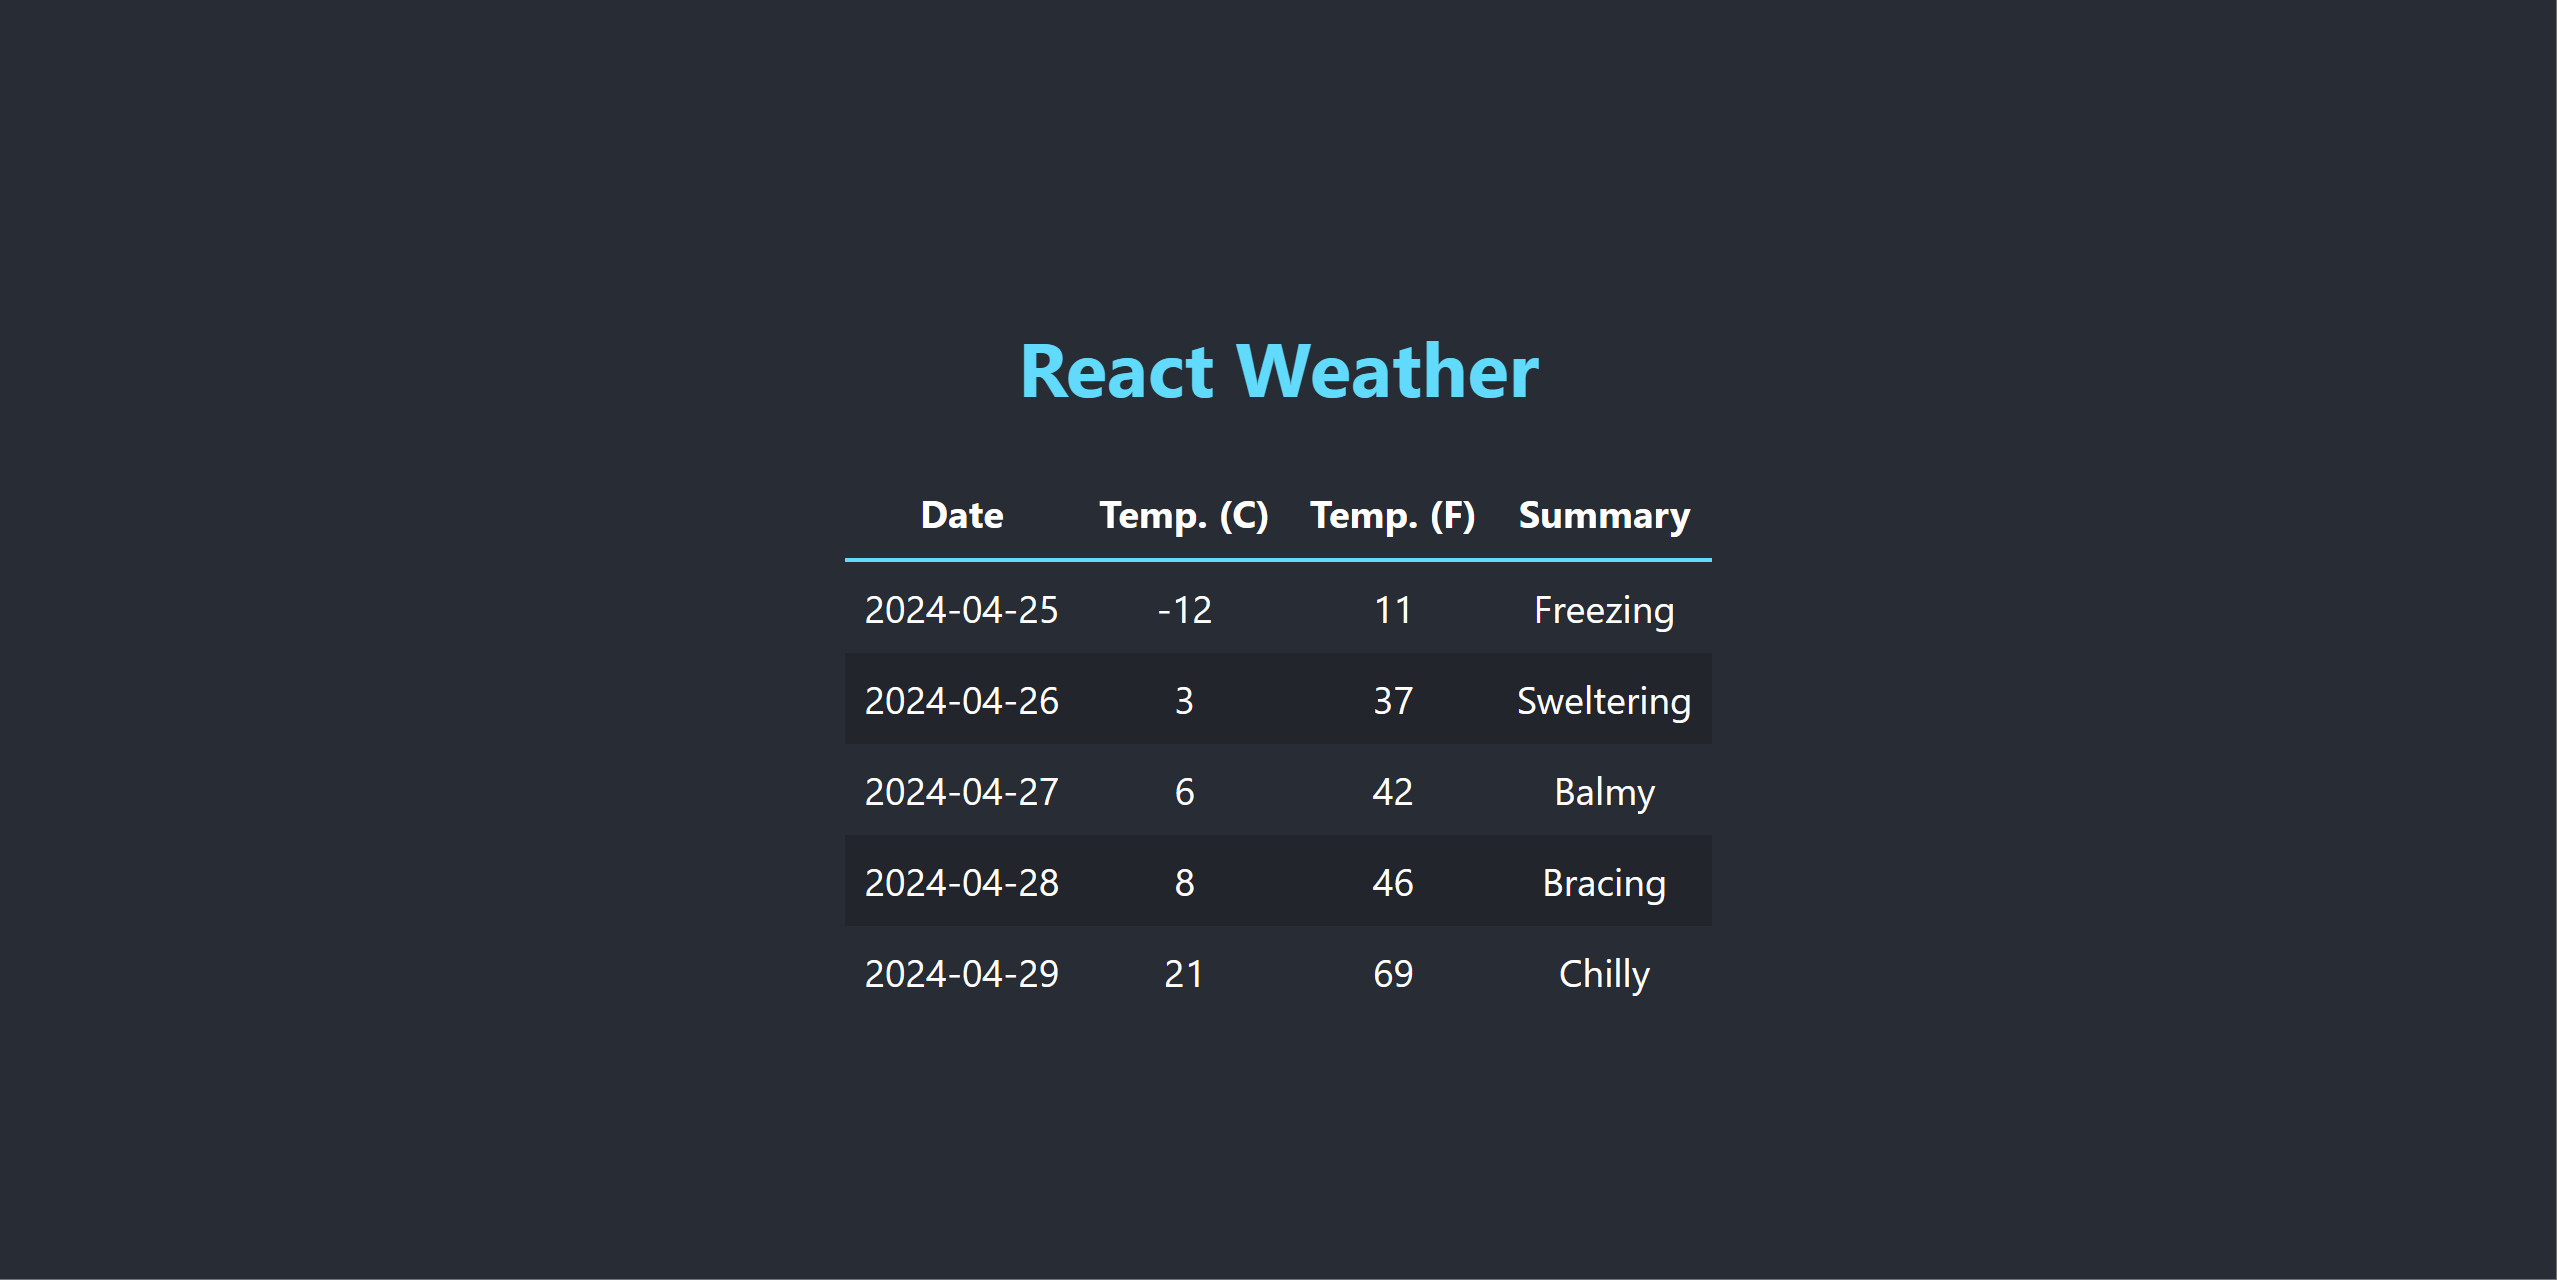
React應用程式執行中
若要將 React 用戶端應用程式可視化,請流覽至 .NET Aspire 儀錶板中的「react」端點。 下圖描述 React 用戶端應用程式:
探索 Vue 用戶端
相較於原始 Vue 範本,做出了數個主要修改。 主要更新是在 TheWelcome.vue 檔案中新增 fetch 呼叫,以從 /api/WeatherForecast 端點擷取天氣預報數據。 下列代碼段示範 fetch 呼叫:
<script lang="ts">
interface WeatherForecast {
  date: string
  temperatureC: number
  temperatureF: number
  summary: string
};

type Forecasts = WeatherForecast[];

export default {
  name: 'TheWelcome',
  data() {
    return {
      forecasts: [],
      loading: true,
      error: null
    }
  },
  mounted() {
    fetch('api/weatherforecast')
      .then(response => response.json())
      .then(data => {
        this.forecasts = data
      })
      .catch(error => {
        this.error = error
      })
      .finally(() => (this.loading = false))
  }
}
</script>

<template>
  <table>
    <thead>
      <tr>
        <th>Date</th>
        <th>Temp. (C)</th>
        <th>Temp. (F)</th>
        <th>Summary</th>
      </tr>
    </thead>
    <tbody>
      <tr v-for="forecast in (forecasts as Forecasts)">
        <td>{{ forecast.date }}</td>
        <td>{{ forecast.temperatureC }}</td>
        <td>{{ forecast.temperatureF }}</td>
        <td>{{ forecast.summary }}</td>
      </tr>
    </tbody>
  </table>
</template>

<style>
table {
  border: none;
  border-collapse: collapse;
}

th {
  font-size: x-large;
  font-weight: bold;
  border-bottom: solid .2rem hsla(160, 100%, 37%, 1);
}

th,
td {
  padding: 1rem;
}

td {
  text-align: center;
  font-size: large;
}

tr:nth-child(even) {
  background-color: var(--vt-c-black-soft);
}
</style>
當 TheWelcome 整合 mounted時,它會呼叫 /api/weatherforecast 端點來擷取天氣預報數據。 然後,回應會設定為 forecasts 數據屬性。 若要設定伺服器埠,Vue 用戶端應用程式會使用 PORT 環境變數。 藉由更新 vite.config.ts 檔案來達成此目的:
import { fileURLToPath, URL } from 'node:url'

import { defineConfig } from 'vite'
import vue from '@vitejs/plugin-vue'

// https://vitejs.dev/config/
export default defineConfig({
  plugins: [
    vue(),
  ],
  resolve: {
    alias: {
      '@': fileURLToPath(new URL('./src', import.meta.url))
    }
  },
  server: {
    host: true,
    port: parseInt(process.env.PORT ?? "5173"),
    proxy: {
      '/api': {
        target: process.env.services__weatherapi__https__0 || process.env.services__weatherapi__http__0,
        changeOrigin: true,
        rewrite: path => path.replace(/^\/api/, ''),
        secure: false
      }
    }
  }
})
此外,Vite 配置中指定了 server.proxy 屬性,以將請求轉發至「weatherapi」服務。 這是使用 services__weatherapi__http__0 環境變數來達成,而環境變數是由 .NET.NET Aspire 應用程式主機所設定。
已將範本的最終更新應用到 TheWelcome.vue 檔案。 此檔案會呼叫 /api/WeatherForecast 端點來擷取氣象預報數據,並在數據表中顯示數據。 其中包含 CSS、HTML 和 TypeScript 更新。
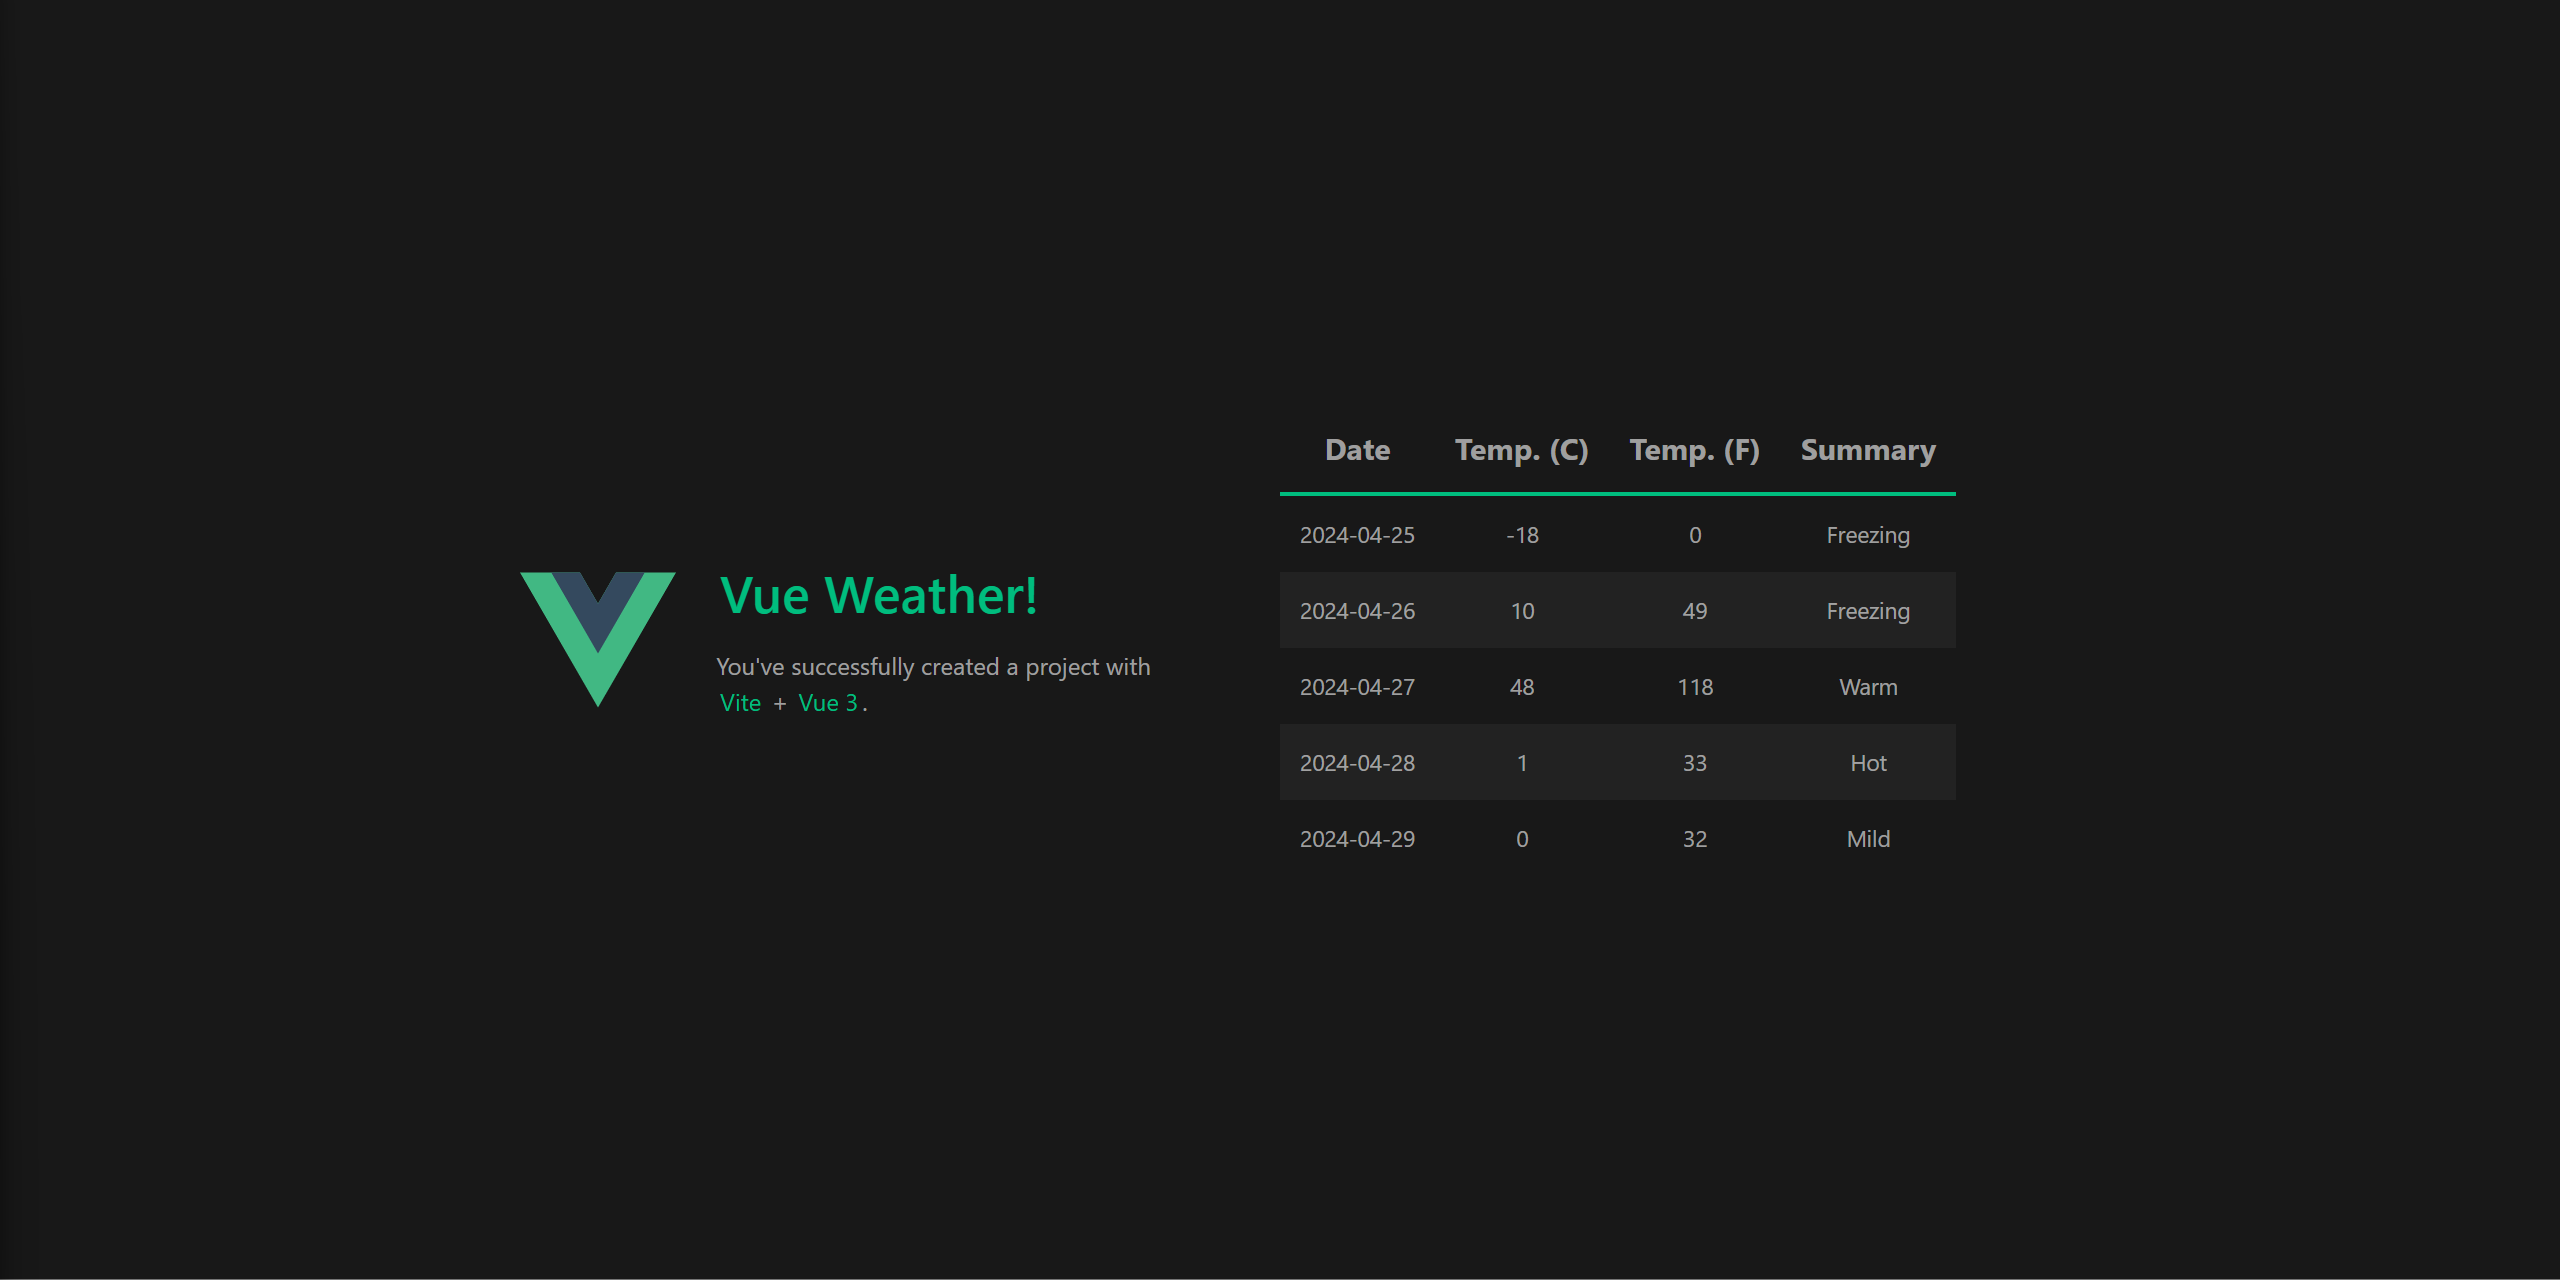
Vue應用程式執行中
若要將 Vue 用戶端應用程式可視化,請流覽至 .NET Aspire 儀錶板中的 「vue」 端點。 下圖描述 Vue 用戶端應用程式:
部署考慮
本文的範例原始碼是設計為在本機執行。 每個客戶端應用程式都會部署為容器映像。 每個用戶端應用程式的 Dockerfile 可用來建置容器映像。 每個 Dockerfile 都相同,使用多階段組建來建立可用於生產環境的容器映像檔。
FROM node:20 as build

WORKDIR /app

COPY package.json package.json
COPY package-lock.json package-lock.json

RUN npm install

COPY . .

RUN npm run build

FROM nginx:alpine

COPY --from=build /app/default.conf.template /etc/nginx/templates/default.conf.template
COPY --from=build /app/dist/weather/browser /usr/share/nginx/html

# Expose the default nginx port
EXPOSE 80

CMD ["nginx", "-g", "daemon off;"]
用戶端應用程式目前已設定以純SPA應用程式方式運行,且未設定為在伺服器端渲染模式中運行。 它們位於 nginx後面,用來伺服靜態檔案。 他們會使用
server {
    listen       ${PORT};
    listen  [::]:${PORT};
    server_name  localhost;

    access_log  /var/log/nginx/server.access.log  main;

    location / {
        root /usr/share/nginx/html;
        try_files $uri $uri/ /index.html;
    }

    location /api/ {
        proxy_pass ${services__weatherapi__https__0};
        proxy_http_version 1.1;
        proxy_ssl_server_name on;
        proxy_set_header X-Forwarded-For $proxy_add_x_forwarded_for;
        rewrite ^/api(/.*)$ $1 break;
    }
}
Node.js 伺服器應用程式注意事項
雖然本文著重於用戶端應用程式,但您可能需要裝載 Node.js 伺服器應用程式。 托管 Node.js 伺服器應用程式與 SPA 用戶端應用程式需要相同的語義。
.NET
.NET Aspire 應用程式主機需要 Aspire的 .Hosting.NodeJS NuGet 套件的參考,並且程式代碼必須呼叫 AddNodeApp 或 AddNpmApp。 這些 API 適用於將現有的 JavaScript 應用程式新增至 .NET.NET Aspire 應用程式主機。
設定秘密並將環境變數傳遞至 JavaScript 型應用程式時,無論是客戶端或伺服器應用程式,請使用參數。 如需詳細資訊,請參閱 .NET.NET Aspire:外部參數— 秘密。
使用 OpenTelemetry JavaScript SDK
若要從 Node.js 伺服器應用程式匯出 OpenTelemetry 記錄、追蹤和計量,請使用 OpenTelemetry JavaScript SDK。
如需使用 OpenTelemetry JavaScript SDK 之 Node.js 伺服器應用程式的完整範例,您可以參考 程式代碼範例:.NET AspireNode.js 範例 頁面。 請考慮範例的 instrumentation.js 檔案,示範如何設定 OpenTelemetry JavaScript SDK 來導出記錄、追蹤和計量:
import { env } from 'node:process';
import { NodeSDK } from '@opentelemetry/sdk-node';
import { OTLPTraceExporter } from '@opentelemetry/exporter-trace-otlp-grpc';
import { OTLPMetricExporter } from '@opentelemetry/exporter-metrics-otlp-grpc';
import { OTLPLogExporter } from '@opentelemetry/exporter-logs-otlp-grpc';
import { SimpleLogRecordProcessor } from '@opentelemetry/sdk-logs';
import { PeriodicExportingMetricReader } from '@opentelemetry/sdk-metrics';
import { HttpInstrumentation } from '@opentelemetry/instrumentation-http';
import { ExpressInstrumentation } from '@opentelemetry/instrumentation-express';
import { RedisInstrumentation } from '@opentelemetry/instrumentation-redis-4';
import { diag, DiagConsoleLogger, DiagLogLevel } from '@opentelemetry/api';
import { credentials } from '@grpc/grpc-js';

const environment = process.env.NODE_ENV || 'development';

// For troubleshooting, set the log level to DiagLogLevel.DEBUG
//diag.setLogger(new DiagConsoleLogger(), environment === 'development' ? DiagLogLevel.INFO : DiagLogLevel.WARN);

const otlpServer = env.OTEL_EXPORTER_OTLP_ENDPOINT;

if (otlpServer) {
    console.log(`OTLP endpoint: ${otlpServer}`);

    const isHttps = otlpServer.startsWith('https://');
    const collectorOptions = {
        credentials: !isHttps
            ? credentials.createInsecure()
            : credentials.createSsl()
    };

    const sdk = new NodeSDK({
        traceExporter: new OTLPTraceExporter(collectorOptions),
        metricReader: new PeriodicExportingMetricReader({
            exportIntervalMillis: environment === 'development' ? 5000 : 10000,
            exporter: new OTLPMetricExporter(collectorOptions),
        }),
        logRecordProcessor: new SimpleLogRecordProcessor({
            exporter: new OTLPLogExporter(collectorOptions)
        }),
        instrumentations: [
            new HttpInstrumentation(),
            new ExpressInstrumentation(),
            new RedisInstrumentation()
        ],
    });

    sdk.start();
}
提示
若要設定 .NET.NET Aspire 儀錶板的OTEL CORS設置,請參閱 .NET.NET Aspire 儀錶板的OTEL CORS設置 頁面。
總結
雖然有數個超出本文範圍的考慮事項,但您已經學習如何建置使用 .NET Aspire 和 Node Package Manager(Node.js)的 npm 專案。 您也瞭解如何使用 AddNpmApp APIs 分別裝載 Node.js 應用程式和從 package.json 檔案執行的應用程式。 最後,您已瞭解如何使用 npm CLI 來建立 Angular、React和 Vue 用戶端應用程式,以及如何設定它們在不同的埠上執行。


