使用深入指南 .NET Aspire 將 Azure Container Apps 專案部署至 Azure Developer CLI。
Azure Developer CLI(azd)已擴充,以支援部署 .NET.NET Aspire 專案。 依循本指南一步一步帶領,使用 .NET Aspire建立並部署 Azure Container Apps 專案至 Azure Developer CLI。 在本教學課程中,您將瞭解下列概念:
- 探索
azd整合如何與 .NET.NET Aspire 專案搭配運作 - 使用 Azure 在 .NET Aspire 專案的
azd上配置和部署資源 - 使用
azd產生 Bicep 基礎架構和其他範本檔案
先決條件
若要運作 .NET.NET Aspire,您需要在本機安裝下列項目:
- .NET 8.0 或 .NET 9.0
- 符合 OCI 規範的容器運行時間,例如:
- 整合式開發人員環境 (IDE) 或程式碼編輯器,例如:
- Visual Studio 2022 17.9 版或更高版本 (選用)
-
Visual Studio Code (選擇性)
- C# Dev Kit:擴充功能(選擇性)
- JetBrains Rider 搭配 .NET.NET Aspire 外掛程式 (選用)
如需詳細資訊,請參閱 .NET.NET Aspire 設定和工具和 .NET.NET Aspire SDK。
您還需要在本機安裝 Azure Developer CLI。 常見的安裝選項包括下列各項:
Azure Developer CLI 整合的運作方式
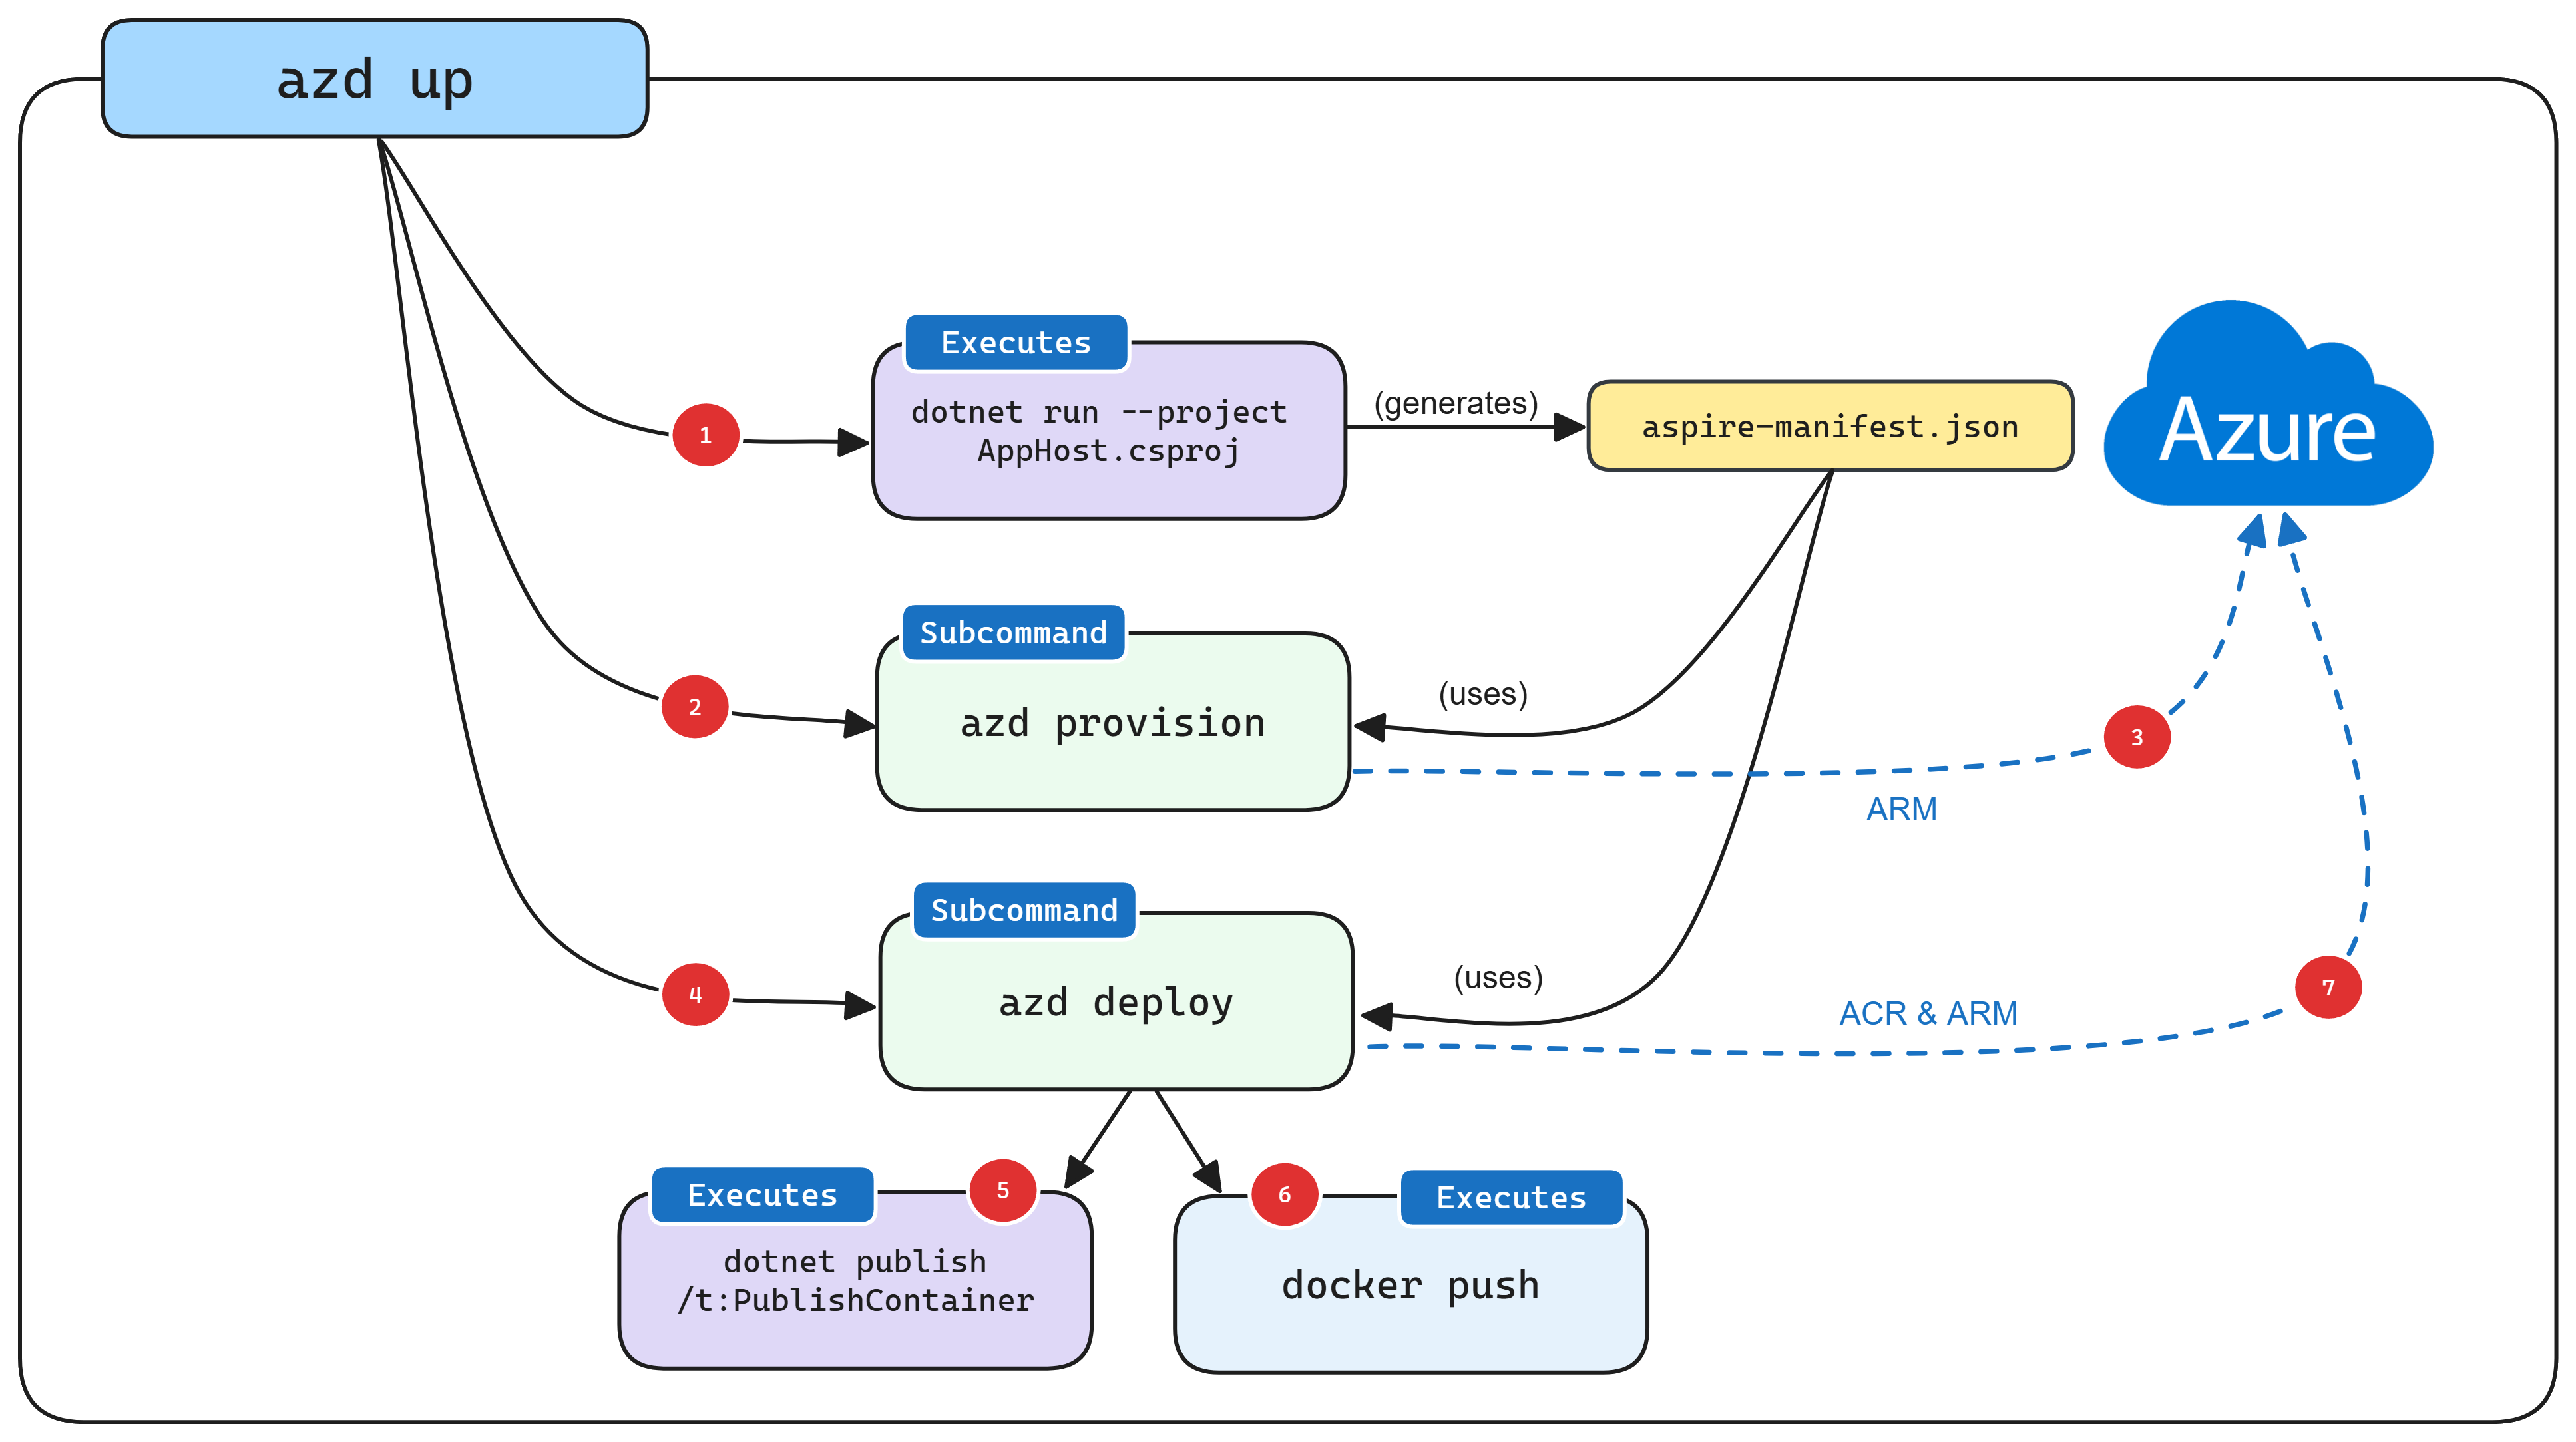
azd init 工作流程提供 .NET.NET Aspire 專案的自定義支援。 下圖說明此流程在概念上的運作方式,以及如何整合 azd 和 .NET.NET Aspire:

- 當
azd以 .NET.NET Aspire 項目為目標時,它會以特殊命令 (dotnet run --project AppHost.csproj --output-path manifest.json --publisher manifest) 啟動 AppHost,其會產生 Aspire指令清單檔案。 - 指令清單檔案會受到
azd provision子命令邏輯的訊問,以僅產生記憶體中的 Bicep 檔案(預設為 )。 - 產生 Bicep 檔案之後,會使用 Azure的 ARM API 來觸發部署,目標是先前提供的訂用帳戶和資源群組。
- 設定基礎 Azure 資源之後,就會執行
azd deploy子命令邏輯,以使用相同的 Aspire 指令清單檔。 - 在部署期間,
azd呼叫dotnet publish,使用 .NET的內建容器發佈支援來產生容器映像。 -
azd建置容器映射之後,它會將它們推送至布建階段期間建立的 ACR 登錄。 - 最後,一旦容器映像位於 ACR 中,
azd使用 ARM 更新資源,以開始使用新版本的容器映射。
注意
azd 也可讓您將產生的 Bicep 輸出至專案中的 infra 資料夾,您可以在 從 .NET.NET Aspire 應用程式模型 章節了解詳情。
布建和部署 .NET.NET Aspire 入門應用程式
本節中的步驟示範如何建立 .NET Aspire 啟動程式,並使用 Azure處理布建和將應用程式資源部署至 azd。
建立 .NET.NET Aspire 入門應用程式
使用 .NET 命令建立新的 .NET Aspiredotnet new 專案。 您也可以使用 Visual Studio建立專案。
dotnet new aspire-starter --use-redis-cache -o AspireSample
cd AspireSample
dotnet run --project AspireSample.AppHost\AspireSample.AppHost.csproj
上述命令將依據 .NET 範本創建一個新的 .NET Aspireaspire-starter 專案,其中包括對 Redis 快取的相依性。 它會執行 .NET.NET Aspire 專案,以驗證一切正常運作。
初始化範本
開啟新的終端機視窗,然後
cd至您的.NET.NET Aspire方案目錄。執行
azd init命令,以使用azd初始化專案,這會檢查本機目錄結構,並判斷應用程式的類型。azd init如需
azd init命令的詳細資訊,請參閱 azd init。當 提示您使用兩個應用程式初始化選項時,請選取
azd。? How do you want to initialize your app? [Use arrows to move, type to filter] > Use code in the current directory Select a template掃描目錄之後,
會提示您確認它找到正確的 appHost 專案 。 選取 [確認並繼續初始化我的應用程式 選項。 Detected services: .NET (Aspire) Detected in: D:\source\repos\AspireSample\AspireSample.AppHost\AspireSample.AppHost.csproj azd will generate the files necessary to host your app on Azure using Azure Container Apps. ? Select an option [Use arrows to move, type to filter] > Confirm and continue initializing my app Cancel and exit輸入環境名稱,用來命名 Azure 中布建的資源,以及管理不同的環境,例如
dev和prod。Generating files to run your app on Azure: (✓) Done: Generating ./azure.yaml (✓) Done: Generating ./next-steps.md SUCCESS: Your app is ready for the cloud! You can provision and deploy your app to Azure by running the azd up command in this directory. For more information on configuring your app, see ./next-steps.md
azd 會產生數個檔案,並將其放在工作目錄中。 這些檔案包括:
- azure.yaml:描述應用程式的服務,例如 .NET Aspire AppHost 專案,並將其對應至 Azure 資源。
-
.azure/config.json:組態檔,告知
azd目前作用中的環境為何。 - .azure/aspireazddev/.env:包含特定環境的覆蓋設定。
azure.yaml 檔案具有下列內容:
# yaml-language-server: $schema=https://raw.githubusercontent.com/Azure/azure-dev/main/schemas/v1.0/azure.yaml.json

name: AspireSample
services:
  app:
    language: dotnet
    project: .\AspireSample.AppHost\AspireSample.AppHost.csproj
    host: containerapp
資源命名
當您建立新的 Azure 資源時,請務必遵循命名需求。 針對 Azure Container Apps,名稱長度必須為 2-32 個字元,且包含小寫字母、數位和連字元。 名稱開頭必須是字母,並以英數位元結尾。
如需詳細資訊,請參閱 Azure 資源的命名規則和限制。
初始部署
為了部署 .NET Aspire 專案,請先驗證以登入 Azure AD,然後呼叫 Azure 資源管理 API。
azd auth login上一個命令會啟動瀏覽器來驗證命令行會話。
驗證之後,請從 AppHost 項目目錄執行下列命令,以布建和部署應用程式。
azd up重要
若要將容器映射推送至 Azure Container Registry (ACR),您必須具有
Microsoft.Authorization/roleAssignments/write存取權。 這可以藉由在註冊表上啟用 系統管理員用户 來達成。 開啟 Azure 入口網站,流覽至 ACR 資源/設定/存取密鑰,然後選取 [系統管理員使用者] 複選框。 如需詳細資訊,請參閱 啟用系統管理員使用者。出現提示時,選取應部署資源的訂用帳戶和位置。 選取這些選項之後,將會部署 .NET.NET Aspire 專案。
By default, a service can only be reached from inside the Azure Container Apps environment it is running in. Selecting a service here will also allow it to be reached from the Internet. ? Select which services to expose to the Internet webfrontend ? Select an Azure Subscription to use: 1. <YOUR SUBSCRIPTION> ? Select an Azure location to use: 1. <YOUR LOCATION> Packaging services (azd package) Provisioning Azure resources (azd provision) Provisioning Azure resources can take some time. Subscription: <YOUR SUBSCRIPTION> Location: <YOUR LOCATION> You can view detailed progress in the Azure Portal: <LINK TO DEPLOYMENT> (✓) Done: Resource group: <YOUR RESOURCE GROUP> (✓) Done: Container Registry: <ID> (✓) Done: Log Analytics workspace: <ID> (✓) Done: Container Apps Environment: <ID> SUCCESS: Your application was provisioned in Azure in 1 minute 13 seconds. You can view the resources created under the resource group <YOUR RESOURCE GROUP> in Azure Portal: <LINK TO RESOURCE GROUP OVERVIEW> Deploying services (azd deploy) (✓) Done: Deploying service apiservice - Endpoint: <YOUR UNIQUE apiservice APP>.azurecontainerapps.io/ (✓) Done: Deploying service webfrontend - Endpoint: <YOUR UNIQUE webfrontend APP>.azurecontainerapps.io/ Aspire Dashboard: <LINK TO DEPLOYED .NET ASPIRE DASHBOARD> SUCCESS: Your up workflow to provision and deploy to Azure completed in 3 minutes 50 seconds.azd命令的最後一行輸出是 Azure 入口網站的連結,其中顯示已部署的所有 Azure 資源:
此應用程式內會部署三個容器:
-
webfrontend:包含入門範本中 Web 專案的程式代碼。 -
apiservice:包含入門範本中 API 服務專案中的程式代碼。 -
cache:提供前端快取的 Redis 容器映像檔。
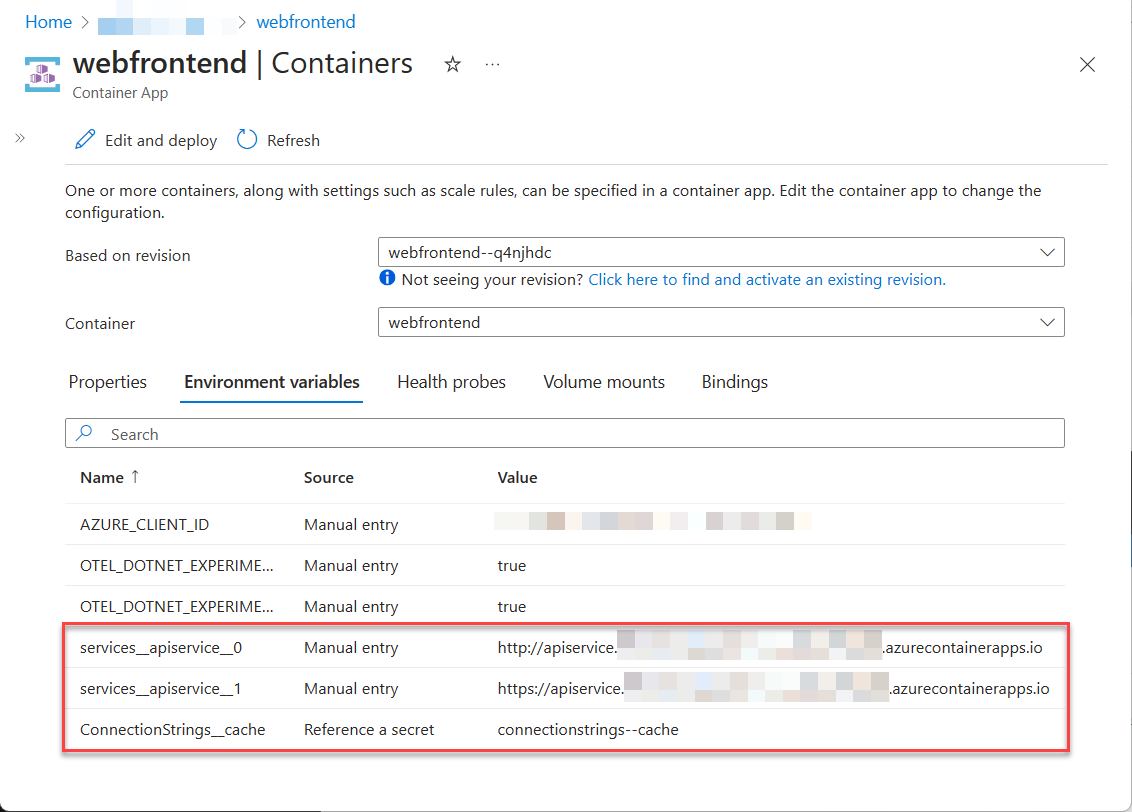
就像在本地開發中一樣,已自動處理連接字串的配置。 在此情況下,azd 負責解譯應用程式模型,並將其轉譯為適當的部署步驟。 例如,請考慮插入至 webfrontend 容器的連接字串和服務探索變數,讓它知道如何連線到 Redis 快取,並 apiservice。
如需 .NET.NET Aspire 專案如何處理連接字串和服務探索的詳細資訊,請參閱 .NET.NET Aspire 協調流程概觀。
部署應用程式更新
執行 azd up 命令時,基礎 Azure 資源會 布建,並建置容器映射,並將 部署 至裝載 .NET.NET Aspire 專案的容器應用程式。 一般而言,一旦開發正在進行,且部署 Azure 資源時,不需要在每次更新程式碼時布建 Azure 資源,這特別適用於開發人員內部迴圈。
若要加快程式代碼變更的部署,azd 支援在容器映像中部署程式代碼更新。 這是使用 azd deploy 命令完成的:
azd deploy
Deploying services (azd deploy)

  (✓) Done: Deploying service apiservice
  - Endpoint: <YOUR UNIQUE apiservice APP>.azurecontainerapps.io/

  (✓) Done: Deploying service webfrontend
  - Endpoint: <YOUR UNIQUE webfrontend APP>.azurecontainerapps.io/

Aspire Dashboard: <LINK TO DEPLOYED .NET ASPIRE DASHBOARD>
不需要每次部署所有服務。
azd 瞭解 .NET.NET Aspire 專案模型,您可以使用下列命令只部署其中一個指定的服務:
azd deploy webfrontend
如需詳細資訊,請參閱 Azure Developer CLI 參考:azd deploy。
部署基礎結構更新
每當 .NET.NET Aspire 專案內的相依性結構變更時,azd 必須重新布建基礎 Azure 資源。
azd provision 命令可用來將這些變更套用至基礎結構。
若要看到此操作的成果,請將 AppHost 專案中的 Program.cs 檔案更新為以下內容:
var builder = DistributedApplication.CreateBuilder(args);

var cache = builder.AddRedis("cache");

// Add the locations database.
var locationsdb = builder.AddPostgres("db").AddDatabase("locations");

// Add the locations database reference to the API service.
var apiservice = builder.AddProject<Projects.AspireSample_ApiService>("apiservice")
    .WithReference(locationsdb);

builder.AddProject<Projects.AspireSample_Web>("webfrontend")
    .WithReference(cache)
    .WithReference(apiservice);

builder.Build().Run();
儲存檔案並執行下列命令:
azd provision
azd provision 命令會藉由建立容器應用程式來裝載 Postgres 資料庫,來更新基礎結構。
azd provision 命令未更新 apiservice 容器的連接字串。 若要更新連接字串以指向新布建 Postgres 資料庫,必須再次叫用 azd deploy 命令。 如不確定時,請使用 azd up 來提供和部署。
清除資源
請記得清除您在本逐步解說期間建立的 Azure 資源。 因為 `azd` 知道它在哪個資源群組中建立了資源,所以可以使用下列命令來關閉環境:
azd down
上一個命令可能需要一些時間才能執行,但完成資源群組及其所有資源時,應該刪除。
Deleting all resources and deployed code on Azure (azd down)
Local application code is not deleted when running 'azd down'.

  Resource group(s) to be deleted:

    • <YOUR RESOURCE GROUP>: <LINK TO RESOURCE GROUP OVERVIEW>

? Total resources to delete: 7, are you sure you want to continue? Yes
Deleting your resources can take some time.

  (✓) Done: Deleting resource group: <YOUR RESOURCE GROUP>

SUCCESS: Your application was removed from Azure in 9 minutes 59 seconds.
從 .NET.NET Aspire 專案模型產生 Bicep
雖然開發小組可以自由使用 azd up(或 azd provision 和 azd deploy)命令來進行開發和生產用途的部署,但有些小組可能會選擇產生 Bicep 檔案,讓他們可以檢閱和管理作為版本控制一部分的 Bicep 檔案(這也允許將這些 Bicep 檔案參考為較複雜 Azure 部署的一部分)。
azd 包含可以透過以下命令輸出用來布建的 Bicep 腳本的功能:
azd config set alpha.infraSynth on
azd infra synth
在本指南中使用的入門範例中執行此命令之後,會在 AppHost 項目目錄中建立下列檔案:
- infra/main.bicep:代表部署的主要進入點。
- 基礎架構/main.parameters.json:作為主要 Bicep 的參數,對應到在 .azure 資料夾中定義的環境變數。
- infra/resources.bicep:定義支援 Azure 專案模型所需的 .NET Aspire 資源。
-
AspireSample.Web/manifests/containerApp.tmpl.yaml:
webfrontend的容器應用程式定義。 -
AspireSample.ApiService/manifests/containerApp.tmpl.yaml:
apiservice的容器應用程式定義。
基礎結構\resources.bicep 檔案不包含容器應用程式本身的任何定義(例外是那些作為相依性的容器應用程式,如 Redis 和 Postgres):
@description('The location used for all deployed resources')
param location string = resourceGroup().location

@description('Tags that will be applied to all resources')
param tags object = {}

var resourceToken = uniqueString(resourceGroup().id)

resource managedIdentity 'Microsoft.ManagedIdentity/userAssignedIdentities@2023-01-31' = {
  name: 'mi-${resourceToken}'
  location: location
  tags: tags
}

resource containerRegistry 'Microsoft.ContainerRegistry/registries@2023-07-01' = {
  name: replace('acr-${resourceToken}', '-', '')
  location: location
  sku: {
    name: 'Basic'
  }
  tags: tags
}

resource caeMiRoleAssignment 'Microsoft.Authorization/roleAssignments@2022-04-01' = {
  name: guid(containerRegistry.id, managedIdentity.id, subscriptionResourceId('Microsoft.Authorization/roleDefinitions', '7f951dda-4ed3-4680-a7ca-43fe172d538d'))
  scope: containerRegistry
  properties: {
    principalId: managedIdentity.properties.principalId
    principalType: 'ServicePrincipal'
    roleDefinitionId:  subscriptionResourceId('Microsoft.Authorization/roleDefinitions', '7f951dda-4ed3-4680-a7ca-43fe172d538d')
  }
}

resource logAnalyticsWorkspace 'Microsoft.OperationalInsights/workspaces@2022-10-01' = {
  name: 'law-${resourceToken}'
  location: location
  properties: {
    sku: {
      name: 'PerGB2018'
    }
  }
  tags: tags
}

resource containerAppEnvironment 'Microsoft.App/managedEnvironments@2023-05-01' = {
  name: 'cae-${resourceToken}'
  location: location
  properties: {
    appLogsConfiguration: {
      destination: 'log-analytics'
      logAnalyticsConfiguration: {
        customerId: logAnalyticsWorkspace.properties.customerId
        sharedKey: logAnalyticsWorkspace.listKeys().primarySharedKey
      }
    }
  }
  tags: tags
}

resource cache 'Microsoft.App/containerApps@2023-05-02-preview' = {
  name: 'cache'
  location: location
  properties: {
    environmentId: containerAppEnvironment.id
    configuration: {
      service: {
        type: 'redis'
      }
    }
    template: {
      containers: [
        {
          image: 'redis'
          name: 'redis'
        }
      ]
    }
  }
  tags: union(tags, {'aspire-resource-name': 'cache'})
}

resource locations 'Microsoft.App/containerApps@2023-05-02-preview' = {
  name: 'locations'
  location: location
  properties: {
    environmentId: containerAppEnvironment.id
    configuration: {
      service: {
        type: 'postgres'
      }
    }
    template: {
      containers: [
        {
          image: 'postgres'
          name: 'postgres'
        }
      ]
    }
  }
  tags: union(tags, {'aspire-resource-name': 'locations'})
}
output MANAGED_IDENTITY_CLIENT_ID string = managedIdentity.properties.clientId
output AZURE_CONTAINER_REGISTRY_ENDPOINT string = containerRegistry.properties.loginServer
output AZURE_CONTAINER_REGISTRY_MANAGED_IDENTITY_ID string = managedIdentity.id
output AZURE_CONTAINER_APPS_ENVIRONMENT_ID string = containerAppEnvironment.id
output AZURE_CONTAINER_APPS_ENVIRONMENT_DEFAULT_DOMAIN string = containerAppEnvironment.properties.defaultDomain
如需關於使用 Bicep 來自動化部署到 Azure 的詳細資訊,請參閱 Bicep 是什麼?
來自 .NET 服務專案的容器應用程式定義會分別包含在每個專案中 目錄中的 manifests 檔案中。 以下是來自 webfrontend 專案的範例:
location: {{ .Env.AZURE_LOCATION }}
identity:
  type: UserAssigned
  userAssignedIdentities:
    ? "{{ .Env.AZURE_CONTAINER_REGISTRY_MANAGED_IDENTITY_ID }}"
    : {}
properties:
  environmentId: {{ .Env.AZURE_CONTAINER_APPS_ENVIRONMENT_ID }}
  configuration:
    activeRevisionsMode: single
    ingress:
      external: true
      targetPort: 8080
      transport: http
      allowInsecure: false
    registries:
    - server: {{ .Env.AZURE_CONTAINER_REGISTRY_ENDPOINT }}
      identity: {{ .Env.AZURE_CONTAINER_REGISTRY_MANAGED_IDENTITY_ID }}
  template:
    containers:
    - image: {{ .Env.SERVICE_WEBFRONTEND_IMAGE_NAME }}
      name: webfrontend
      env:
      - name: AZURE_CLIENT_ID
        value: {{ .Env.MANAGED_IDENTITY_CLIENT_ID }}
      - name: ConnectionStrings__cache
        value: {{ connectionString "cache" }}
      - name: OTEL_DOTNET_EXPERIMENTAL_OTLP_EMIT_EVENT_LOG_ATTRIBUTES
        value: "true"
      - name: OTEL_DOTNET_EXPERIMENTAL_OTLP_EMIT_EXCEPTION_LOG_ATTRIBUTES
        value: "true"
      - name: services__apiservice__0
        value: http://apiservice.internal.{{ .Env.AZURE_CONTAINER_APPS_ENVIRONMENT_DEFAULT_DOMAIN }}
      - name: services__apiservice__1
        value: https://apiservice.internal.{{ .Env.AZURE_CONTAINER_APPS_ENVIRONMENT_DEFAULT_DOMAIN }}
tags:
  azd-service-name: webfrontend
  aspire-resource-name: webfrontend
執行 azd infra synth 命令後,當呼叫 azd provision 和 azd deploy 時,將會使用 Bicep 與生成的支援檔案。
重要
如果再次呼叫 azd infra synth,它會以剛產生的檔案取代任何修改過的檔案,並提示您進行確認,然後再這麼做。
用於偵錯的隔離環境
由於 azd 使布建新環境變得簡單,因此每個小組成員都能擁有獨立的雲端環境,用於在接近生產環境的設定中進行程式碼偵錯。 執行此動作時,每個小組成員都應該使用下列命令建立自己的環境:
azd env new
這將會再次提示使用者輸入訂用帳戶和資源群組資訊,而後續 azd up、azd provision和 azd deploy 調用預設會使用此新環境。
--environment 開關可以套用至這些命令,以在環境之間切換。
清除資源
當您不再需要您所建立 Azure 資源時,請執行下列 Azure CLI 命令來刪除資源群組。 刪除資源群組也會刪除其內含的資源。
az group delete --name <your-resource-group-name>
如需詳細資訊,請在


