使用 Azure Cosmos DB 適用於 MongoDB 的 API 建立 Angular 應用程式 - 使用 Angular 建置 UI
適用於: MongoDB
這個多部分的教學課程示範如何使用 Express 和 Angular 來建立以 Node.js 撰寫的新應用程式,然後將其連線至使用適用於 MongoDB 的 Azure Cosmos DB API 設定的 Azure Cosmos DB 帳戶。
本教學課程的第 3 部分是以第 2 部分為基礎並涵蓋下列工作:
- 建置 Angular UI
- 使用 CSS 來設定外觀與風格
- 在本機測試應用程式
影片逐步解說
必要條件
開始本教學課程的這個部分之前,請確定您已完成本教學課程第 2 部分中的步驟。
提示
本教學課程會為您解說逐步建置應用程式的步驟。 如果您需要下載已完成的專案,您可以從 GitHub 上的 angular-cosmosdb 存放庫取得已完成的應用程式。
建置 UI
在 Visual Studio Code 中按一下 [停止] 按鈕
 ,以停止 Node 應用程式。
在 Windows 命令提示字元或 Mac 終端機視窗中,輸入下列命令以產生 Hero 元件。 在此程式碼中,g = 產生、c = 元件、heroes=元件名稱,而且其使用一般檔案結構 (-flat),所以不會為它建立子資料夾。
ng g c heroes --flat終端機視窗會顯示新元件的確認。

讓我們查看已建立和更新的檔案。
在 Visual Studio Code 的 [總管] 窗格中,瀏覽至新的 src\app 資料夾,然後開啟 app 資料夾內所產生的新 heroes.component.ts 檔案。 前一個命令會建立這個 TypeScript 元件檔案。
提示
如果應用程式資料夾未顯示在 Visual Studio Code 中,在 Mac 上輸入 CMD + SHIFT P 或在 Windows 上輸入 Ctrl + Shift + P 以開啟 [命令選擇區],然後進入 [重新載入視窗] 以挑選系統變更。
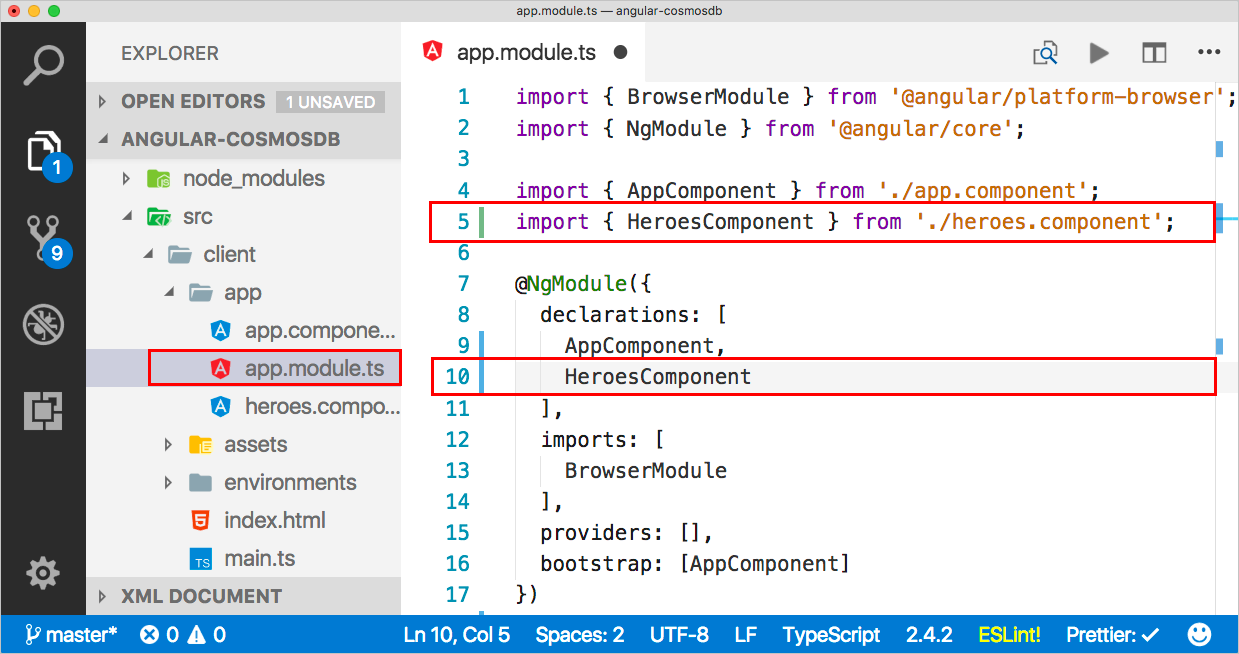
在相同的資料夾中,開啟 app.module.ts 檔案,並請注意它已將
HeroesComponent新增至第 5 行上的宣告,並且也在第 10 行上匯入它。
請回到 heroes.component.html 檔案並在此程式碼中複製。
<div>是整個頁面的容器。 容器內部有我們需要建立的 Hero 清單,因此當您按一下其中一個 Hero 時,您可以在 UI 中選取您、編輯或刪除它。 然後在 HTML 中,我們已取得一些樣式,因此您知道已選取哪一個 Hero。 另外還有一個編輯區域,以便您新增 Hero 或編輯現有的 Hero。<div> <ul class="heroes"> <li *ngFor="let hero of heroes" (click)="onSelect(hero)" [class.selected]="hero === selectedHero"> <button class="delete-button" (click)="deleteHero(hero)">Delete</button> <div class="hero-element"> <div class="badge">{{hero.id}}</div> <div class="name">{{hero.name}}</div> <div class="saying">{{hero.saying}}</div> </div> </li> </ul> <div class="editarea"> <button (click)="enableAddMode()">Add New Hero</button> <div *ngIf="selectedHero"> <div class="editfields"> <div> <label>id: </label> <input [(ngModel)]="selectedHero.id" placeholder="id" *ngIf="addingHero" /> <label *ngIf="!addingHero" class="value">{{selectedHero.id}}</label> </div> <div> <label>name: </label> <input [(ngModel)]="selectedHero.name" placeholder="name" /> </div> <div> <label>saying: </label> <input [(ngModel)]="selectedHero.saying" placeholder="saying" /> </div> </div> <button (click)="cancel()">Cancel</button> <button (click)="save()">Save</button> </div> </div> </div>我們現在已備妥 HTML,我們需要將它新增至 heroes.component.ts 檔案,以便與範本互動。 下列程式碼會在元件檔案中新增範本。 已新增建構函式,以取得一些 Hero,並初始化 Hero 服務元件以取得所有資料。 此程式碼也會新增所有必要的方法,以便在 UI 中處理事件。 您可以複製下列程式碼並蓋掉 heroes.component.ts 中的現有程式碼。 您應該會在 Hero 和 HeroService 區域看到錯誤,因為對應的元件尚未匯入,下一節您會修正這些錯誤。
import { Component, OnInit } from '@angular/core';

@Component({
  selector: 'app-heroes',
  templateUrl: './heroes.component.html',
  styleUrls: ['./heroes.component.scss']
})
export class HeroesComponent implements OnInit {
  addingHero = false;
  heroes: any = [];
  selectedHero: Hero;

  constructor(private heroService: HeroService) {}

  ngOnInit() {
   this.getHeroes();
  }

  cancel() {
    this.addingHero = false;
    this.selectedHero = null;
  }

  deleteHero(hero: Hero) {
    this.heroService.deleteHero(hero).subscribe(res => {
      this.heroes = this.heroes.filter(h => h !== hero);
      if (this.selectedHero === hero) {
        this.selectedHero = null;
      }
    });
  }

  getHeroes() {
    return this.heroService.getHeroes().subscribe(heroes => {
      this.heroes = heroes;
    });
  }

  enableAddMode() {
    this.addingHero = true;
    this.selectedHero = new Hero();
  }

  onSelect(hero: Hero) {
    this.addingHero = false;
    this.selectedHero = hero;
  }

  save() {
    if (this.addingHero) {
      this.heroService.addHero(this.selectedHero).subscribe(hero => {
        this.addingHero = false;
        this.selectedHero = null;
        this.heroes.push(hero);
      });
    } else {
      this.heroService.updateHero(this.selectedHero).subscribe(hero => {
        this.addingHero = false;
        this.selectedHero = null;
      });
    }
  }
}
在 [總管] 中,開啟 app/app.module.ts 檔案,並更新 import 區段,以針對
FormsModule新增 import。 import 區段現在應該如下所示︰imports: [ BrowserModule, FormsModule ],在 app/app.module.ts 檔案的第 3 行,為新的 FormsModule 模組新增 import。
import { BrowserModule } from '@angular/platform-browser';
import { NgModule } from '@angular/core';
import { FormsModule } from '@angular/forms';
使用 CSS 來設定外觀與風格
在 [總管] 窗格中,開啟 src/styles.scss 檔案。
將下列程式碼複製到 styles.scss 檔案,並取代檔案的現有內容。
/* You can add global styles to this file, and also import other style files */

* {
  font-family: Arial;
}
h2 {
  color: #444;
  font-weight: lighter;
}
body {
  margin: 2em;
}

body,
input[text],
button {
  color: #888;
  // font-family: Cambria, Georgia;
}
button {
  font-size: 14px;
  font-family: Arial;
  background-color: #eee;
  border: none;
  padding: 5px 10px;
  border-radius: 4px;
  cursor: pointer;
  cursor: hand;
  &:hover {
    background-color: #cfd8dc;
  }
  &.delete-button {
    float: right;
    background-color: gray !important;
    background-color: rgb(216, 59, 1) !important;
    color: white;
    padding: 4px;
    position: relative;
    font-size: 12px;
  }
}
div {
  margin: .1em;
}

.selected {
  background-color: #cfd8dc !important;
  background-color: rgb(0, 120, 215) !important;
  color: white;
}

.heroes {
  float: left;
  margin: 0 0 2em 0;
  list-style-type: none;
  padding: 0;
  li {
    cursor: pointer;
    position: relative;
    left: 0;
    background-color: #eee;
    margin: .5em;
    padding: .5em;
    height: 3.0em;
    border-radius: 4px;
    width: 17em;
    &:hover {
      color: #607d8b;
      color: rgb(0, 120, 215);
      background-color: #ddd;
      left: .1em;
    }
    &.selected:hover {
      /*background-color: #BBD8DC !important;*/
      color: white;
    }
  }
  .text {
    position: relative;
    top: -3px;
  }
  .saying {
    margin: 5px 0;
  }
  .name {
    font-weight: bold;
  }
  .badge {
    /* display: inline-block; */
    float: left;
    font-size: small;
    color: white;
    padding: 0.7em 0.7em 0 0.5em;
    background-color: #607d8b;
    background-color: rgb(0, 120, 215);
    background-color:rgb(134, 183, 221);
    line-height: 1em;
    position: relative;
    left: -1px;
    top: -4px;
    height: 3.0em;
    margin-right: .8em;
    border-radius: 4px 0 0 4px;
    width: 1.2em;
  }
}

.header-bar {
  background-color: rgb(0, 120, 215);
  height: 4px;
  margin-top: 10px;
  margin-bottom: 10px;
}

label {
  display: inline-block;
  width: 4em;
  margin: .5em 0;
  color: #888;
  &.value {
    margin-left: 10px;
    font-size: 14px;
  }
}

input {
  height: 2em;
  font-size: 1em;
  padding-left: .4em;
  &::placeholder {
      color: lightgray;
      font-weight: normal;
      font-size: 12px;
      letter-spacing: 3px;
  }
}

.editarea {
  float: left;
  input {
    margin: 4px;
    height: 20px;
    color: rgb(0, 120, 215);
  }
  button {
    margin: 8px;
  }
  .editfields {
    margin-left: 12px;
  }
}
儲存檔案。
顯示元件
我們現在已有元件,如何讓它顯示在螢幕上? 讓我們在 app.component.ts 中修改預設元件。
在 [總管] 窗格中,開啟 /app/app.component.ts,將標題變更為 Heroes,然後放置我們在 heroes.components.ts 中建立的元件名稱 (app-heroes) 以參照該新元件。 此檔案的內容應該如下所示:
import { Component } from '@angular/core';

@Component({
  selector: 'app-root',
  templateUrl: './app.component.html',
  styleUrls: ['./app.component.scss'],
  template: `
  <h1>Heroes</h1>
  <div class="header-bar"></div>
  <app-heroes></app-heroes>
`
})
export class AppComponent {
  title = 'app';
}
heroes.components.ts 中還有我們參照的其他元件,像是 Hero 元件,所以我們也需要建立該元件。 在 Angular CLI 命令提示字元中,使用下列命令以建立 Hero 模型和名為 hero.ts 的檔案,其中 g=產生、cl=類別,而 hero=類別名稱。
ng g cl hero在 [總管] 窗格中,開啟 src\app\hero.ts。 在 hero.ts 中,以下列程式碼取代檔案內容,其可新增包含識別碼、名稱和招呼語的 Hero 類別。
  export class Hero {
  id: number;
  name: string;
  saying: string;
}
回到 heroes.components.ts,並請注意
selectedHero: Hero;行 (第 10 行) 上的Hero底下有紅線。以滑鼠左鍵按一下
Hero一詞,而 Visual Studio 會在程式碼區塊的左側顯示燈泡圖示。
按一下燈泡,然後按一下 [從 "app/hero" 匯入 Hero] 或 [從 "./hero" 匯入 Hero]。(此訊息會根據您的設定而變更)
第 2 行上會出現一行新程式碼。 如果第 2 行參照 /app/hero,請加以修改,讓它從本機資料夾 (./hero) 參照 Hero 檔案。 第 2 行看起來應該如下所示:
import { Hero } from "./hero";該行會處理模型,但我們還是需要建立服務。
建立服務
在 Angular CLI 命令提示字元中,輸入下列命令以在 app.module.ts 中建立 Hero 服務,其中 g=產生、cl=類別、hero=服務名稱、-m=放入 app.module 中。
ng g s hero -m app.module在 Visual Studio Code 中,回到 heroes.components.ts。 請注意
constructor(private heroService: HeroService) {}行 (第 13 行) 上的HeroService底下有紅線。 按一下HeroService,您將會在程式碼區塊的左側取得燈泡。 按一下燈泡然後按一下 [從 "./hero.service" 匯入 HeroService。] 或 [從 "/app/hero.service" 匯入 HeroService。]按一下燈泡會在第 2 行上插入一行新程式碼。 如果第 2 行參考 /app/hero.service 資料夾,請加以修改,讓它從本機資料夾 (./hero.service) 參考 Hero 檔案。 第 2 行看起來應該如下所示:
import { HeroService } from "./hero.service"在 Visual Studio Code 中,開啟 hero.service.ts,複製下列程式碼並取代檔案內容。
import { Injectable } from '@angular/core';
import { HttpClient } from '@angular/common/http';

import { Hero } from './hero';

const api = '/api';

@Injectable()
export class HeroService {
  constructor(private http: HttpClient) {}

  getHeroes() {
    return this.http.get<Array<Hero>>(`${api}/heroes`)
  }

  deleteHero(hero: Hero) {
    return this.http.delete(`${api}/hero/${hero.id}`);
  }

  addHero(hero: Hero) {
    return this.http.post<Hero>(`${api}/hero/`, hero);
  }

  updateHero(hero: Hero) {
    return this.http.put<Hero>(`${api}/hero/${hero.id}`, hero);
  }
}
此程式碼使用 Angular 提供的最新版 HttpClient,這是您需要提供的模組,因此我們接下來會執行該作業。
在 Visual Studio Code 中,開啟 app.module.ts,並藉由更新 import 區段以包含 HttpClientModule 來匯入 HttpClientModule。
imports: [
  BrowserModule,
  FormsModule,
  HttpClientModule
],
在 app.module.ts 中,將 HttpClientModule import 陳述式新增至 import 清單。
import { HttpClientModule } from '@angular/common/http';在 Visual Studio Code 中儲存所有檔案。
建置應用程式
在命令提示字元,輸入下列命令以建置 Angular 應用程式。
ng b如有任何問題,終端機視窗會顯示要修正之檔案的相關資訊。 當組建完成時,新的檔案會移入 dist 資料夾中。 您可以視需要檢閱 dist 資料夾中的新檔案。
現在可以執行應用程式。
在 Visual Studio Code 中,按一下左側的 [偵錯] 按鈕
 ,然後按一下 [開始偵錯] 按鈕
  。
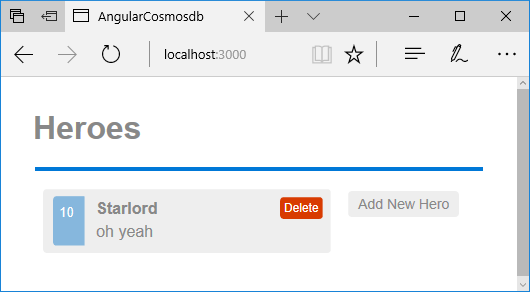
。現在開啟網際網路瀏覽器並瀏覽至 localhost:3000,以查看在本機執行的應用程式。

下一步
在本教學課程中,您已完成下列作業:
- 已建置 Angular UI
- 已在本機測試應用程式
您可以繼續進行本教學課程的下一個部分,以建立 Azure Cosmos DB 帳戶。
正在嘗試為遷移至 Azure Cosmos DB 進行容量規劃嗎? 您可以使用現有資料庫叢集的相關資訊進行容量規劃。
- 如果您知道現有資料庫叢集中的虛擬核心和伺服器數目,請參閱使用虛擬核心或 vCPU 來估計要求單位
- 如果您知道目前資料庫工作負載的一般要求率,請參閱使用 Azure Cosmos DB 容量規劃工具來估計要求單位