在 Azure 通訊聊天中使用 UI 程式庫與 Azure Blob 儲存體啟用檔案共用
重要
此 Azure 通訊服務功能目前處於預覽狀態。
提供的預覽 API 和 SDK 並無服務等級協定。 建議您不要將其用於生產工作負載。 部分功能可能不受支援,或是在功能上有所限制。
如需詳細資訊,請參閱 Microsoft Azure 預覽版增補使用規定。
在 Azure 通訊服務聊天中,我們可以在通訊使用者之間啟用檔案共用。 請注意,Azure 通訊服務聊天與 Teams 互通性聊天 (「互通性聊天」) 不同。 如果您想要在互通性聊天中啟用檔案共用,請參閱在 Teams 互通性聊天中使用 UI 程式庫新增檔案共用。
在本教學課程中,我們將設定 Azure 通訊服務 UI 程式庫聊天複合項目,以啟用檔案共用。 UI 程式庫聊天複合項目提供了一組豐富的元件和 UI 控制項,可用來啟用檔案共用。 我們將使用 Azure Blob 儲存體來儲存透過聊天對話共用的檔案。
重要
Azure 通訊服務不提供檔案儲存體服務。 您必須使用自己的檔案儲存體服務進行檔案共用。 針對本教學課程的目的,我們使用 Azure Blob 儲存體。**
下載程式碼
在 GitHub 上存取本教學課程的完整程式碼。 如果您想要使用 UI 元件進行檔案共用,請參考此範例。
必要條件
- 具有有效訂用帳戶的 Azure 帳戶。 如需詳細資訊,請參閱免費建立帳戶。
- 其中一個支援平台上的 Visual Studio Code。
-
Node.js、作用中 LTS 和維修 LTS 版本 (建議使用 10.14.1)。 請使用
node --version命令來檢查您的版本。 - 作用中的 Azure 通訊服務資源和連接字串。 建立通訊服務資源。
本教學課程假設您已了解如何設定及執行聊天複合項目。 您可以參考聊天複合項目教學課程,了解如何設定及執行聊天複合項目。
概觀
UI 程式庫聊天複合項目可讓開發人員將 URL 傳遞至透過 Azure 通訊服務聊天服務傳送的託管檔案,藉此支援檔案共用。 UI 程式庫會轉譯附加的檔案,並支援多個延伸模組,以設定所傳送檔案的外觀和風格。 更具體地說,其支援下列功能:
- 附加檔案按鈕,以透過 OS 檔案選擇器來挑選檔案
- 設定允許的副檔名。
- 啟用/停用多個上傳。
- 各種檔案類型的檔案圖示。
- 具有進度指標的檔案上傳/下載卡片。
- 能夠動態驗證每個檔案上傳並在 UI 上顯示錯誤。
- 能夠取消上傳,以及在已上傳的檔案傳送之前加以移除。
- 在 MessageThread 中檢視已上傳的檔案,加以下載。 允許非同步下載。
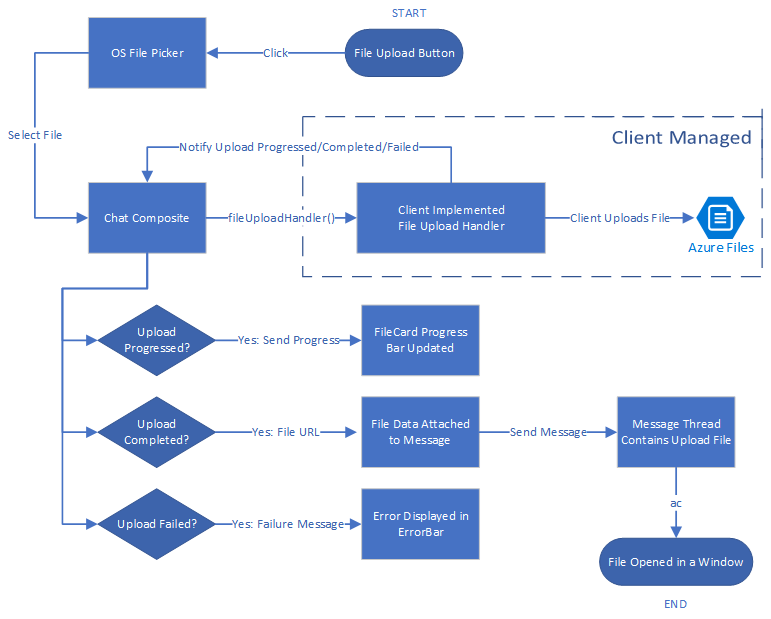
此圖顯示上傳和下載的檔案共用案例的一般流程。 標示為 Client Managed 的區段顯示開發人員需要實作的建置組塊。

使用 Azure Blob 設定檔案儲存體
您可以參考使用 Azure 函式將檔案上傳至 Azure Blob 儲存體教學課程,以撰寫檔案共用所需的後端程式碼。
實作之後,您可以在 handleAttachmentSelection 函式內呼叫此 Azure 函式,以將檔案上傳至 Azure Blob 儲存體。 本教學課程的其餘部分假設您已使用先前連結的 Azure Blob 儲存體教學課程產生函式。
保護您的 Azure Blob 儲存體容器
本教學課程假設您的 Azure Blob 儲存體容器允許公開存取您所上傳的檔案。 不建議將 Azure 儲存體容器公開給實際生產應用程式使用。
若要下載您上傳至 Azure Blob 儲存體的檔案,可以使用共用存取簽章 (SAS)。 共用存取簽章 (SAS) 可提供您儲存體帳戶中資源的安全委派存取權。 使用 SAS 時,控制用戶端存取資料的方式更為精細。
可下載的 GitHub 範例示範如何使用 SAS 來建立 Azure 儲存體內容的 SAS URL。 此外,您可以深入了解 SAS。
UI 程式庫需要設定 React 環境。 接著,我們將執行該設定。 如果您已有 React 應用程式,可以跳過這一節。
設定 React 應用程式
本快速入門使用 create-react-app 範本。 如需詳細資訊,請參閱:開始使用 React
npx create-react-app ui-library-quickstart-composites --template typescript

cd ui-library-quickstart-composites
在此程序結束時,資料夾 ui-library-quickstart-composites 內應該會有完整的應用程式。
在本快速入門中,我們會修改 src 資料夾內的檔案。
Install the package
使用 npm install 命令來安裝適用於 JavaScript 的搶鮮版 (Beta) Azure 通訊服務 UI 程式庫。
npm install @azure/communication-react@1.16.0-beta.1
@azure/communication-react 會將核心 Azure 通訊服務指定為 peerDependencies,以便您盡可能一致地從應用程式中的核心程式庫使用 API。 您也需要安裝下列程式庫:
npm install @azure/communication-calling@1.24.1-beta.2
npm install @azure/communication-chat@1.6.0-beta.1
建立 React 應用程式
我們將執行下列命令,藉以測試「建立 React 應用程式」安裝:
npm run start
設定聊天複合項目以啟用檔案共用
您必須為初始化聊天複合項目所需的兩個通用變數替換變數值。
App.tsx
import { initializeFileTypeIcons } from '@fluentui/react-file-type-icons';
import {
  ChatComposite,
  AttachmentUploadTask,
  AttachmentUploadOptions,
  AttachmentSelectionHandler,
  fromFlatCommunicationIdentifier,
  useAzureCommunicationChatAdapter
} from '@azure/communication-react';
import React, { useMemo } from 'react';

initializeFileTypeIcons();

function App(): JSX.Element {
  // Common variables
  const endpointUrl = 'INSERT_ENDPOINT_URL';
  const userId = ' INSERT_USER_ID';
  const displayName = 'INSERT_DISPLAY_NAME';
  const token = 'INSERT_ACCESS_TOKEN';
  const threadId = 'INSERT_THREAD_ID';

  // We can't even initialize the Chat and Call adapters without a well-formed token.
  const credential = useMemo(() => {
    try {
      return new AzureCommunicationTokenCredential(token);
    } catch {
      console.error('Failed to construct token credential');
      return undefined;
    }
  }, [token]);

  // Memoize arguments to `useAzureCommunicationChatAdapter` so that
  // a new adapter is only created when an argument changes.
  const chatAdapterArgs = useMemo(
    () => ({
      endpoint: endpointUrl,
      userId: fromFlatCommunicationIdentifier(userId) as CommunicationUserIdentifier,
      displayName,
      credential,
      threadId
    }),
    [userId, displayName, credential, threadId]
  );
  const chatAdapter = useAzureCommunicationChatAdapter(chatAdapterArgs);

  if (!!chatAdapter) {
    return (
      <>
        <div style={containerStyle}>
          <ChatComposite
            adapter={chatAdapter}
            options={{
              attachmentOptions: {
                uploadOptions: uploadOptions,
                downloadOptions: downloadOptions,
              }
            }} />
        </div>
      </>
    );
  }
  if (credential === undefined) {
    return <h3>Failed to construct credential. Provided token is malformed.</h3>;
  }
  return <h3>Initializing...</h3>;
}

const uploadOptions: AttachmentUploadOptions = {
  // default is false
  disableMultipleUploads: false,
  // define mime types
  supportedMediaTypes: ["image/jpg", "image/jpeg"]
  handleAttachmentSelection: attachmentSelectionHandler,
}

const attachmentSelectionHandler: AttachmentSelectionHandler = async (uploadTasks) => {
  for (const task of uploadTasks) {
    try {
      const uniqueFileName = `${v4()}-${task.file?.name}`;
      const url = await uploadFileToAzureBlob(task);
      task.notifyUploadCompleted(uniqueFileName, url);
    } catch (error) {
      if (error instanceof Error) {
        task.notifyUploadFailed(error.message);
      }
    }
  }
}

const uploadFileToAzureBlob = async (uploadTask: AttachmentUploadTask) => {
  // You need to handle the file upload here and upload it to Azure Blob Storage.
  // This is how you can configure the upload
  // Optionally, you can also update the file upload progress.
  uploadTask.notifyUploadProgressChanged(0.2);
  return {
    url: 'https://sample.com/sample.jpg', // Download URL of the file.
  };
設定上傳方法以使用 Azure Blob 儲存體
若要啟用 Azure Blob 儲存體上傳,我們要修改先前使用下列程式碼宣告的 uploadFileToAzureBlob 方法。 您必須取代 Azure 函式資訊以上傳檔案。
App.tsx
const uploadFileToAzureBlob = async (uploadTask: AttachmentUploadTask) => {
  const file = uploadTask.file;
  if (!file) {
    throw new Error("uploadTask.file is undefined");
  }

  const filename = file.name;
  const fileExtension = file.name.split(".").pop();

  // Following is an example of calling an Azure Function to handle file upload
  // The https://learn.microsoft.com/azure/developer/javascript/how-to/with-web-app/azure-function-file-upload
  // tutorial uses 'username' parameter to specify the storage container name.
  // the container in the tutorial is private by default. To get default downloads working in
  // this sample, you need to change the container's access level to Public via Azure Portal.
  const username = "ui-library";

  // You can get function url from the Azure Portal:
  const azFunctionBaseUri = "<YOUR_AZURE_FUNCTION_URL>";
  const uri = `${azFunctionBaseUri}&username=${username}&filename=${filename}`;

  const formData = new FormData();
  formData.append(file.name, file);

  const response = await axios.request({
    method: "post",
    url: uri,
    data: formData,
    onUploadProgress: (p) => {
      // Optionally, you can update the file upload progress.
      uploadTask.notifyUploadProgressChanged(p.loaded / p.total);
    },
  });

  const storageBaseUrl = "https://<YOUR_STORAGE_ACCOUNT>.blob.core.windows.net";

  return {
    url: `${storageBaseUrl}/${username}/${filename}`,
  };
};
錯誤處理
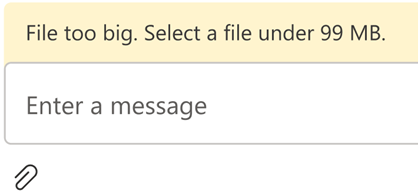
上傳失敗時,UI 程式庫聊天複合項目會顯示錯誤訊息。

以下是示範如何因大小驗證錯誤而無法上傳的範例程式代碼:
App.tsx
import { AttachmentSelectionHandler } from from '@azure/communication-react';

const attachmentSelectionHandler: AttachmentSelectionHandler = async (uploadTasks) => {
  for (const task of uploadTasks) {
    if (task.file && task.file.size > 99 * 1024 * 1024) {
      // Notify ChatComposite about upload failure.
      // Allows you to provide a custom error message.
      task.notifyUploadFailed('File too big. Select a file under 99 MB.');
    }
  }
}

export const attachmentUploadOptions: AttachmentUploadOptions = {
  handleAttachmentSelection: attachmentSelectionHandler
};
檔案下載 - 進階使用
根據預設,UI 連結庫會開啟新的索引標籤,指向您在 時 notifyUploadCompleted設定的 URL。 或者,您可以有自定義邏輯,可透過 actionsForAttachment處理附件下載。 讓我們看看範例。
App.tsx
import { AttachmentDownloadOptions } from "communication-react";

const downloadOptions: AttachmentDownloadOptions = {
  actionsForAttachment: handler
}

const handler = async (attachment: AttachmentMetadata, message?: ChatMessage) => {
   // here we are returning a static action for all attachments and all messages
   // alternately, you can provide custom menu actions based on properties in `attachment` or `message`
   return [defaultAttachmentMenuAction];
};

const customHandler = = async (attachment: AttachmentMetadata, message?: ChatMessage) => {
   if (attachment.extension === "pdf") {
    return [
      {
        title: "Custom button",
        icon: (<i className="custom-icon"></i>),
        onClick: () => {
          return new Promise((resolve, reject) => {
              // custom logic here
              window.alert("custom button clicked");
              resolve();
              // or to reject("xxxxx") with a custom message
          })
        }
      },
      defaultAttachmentMenuAction
    ];
  } else if (message?.senderId === "user1") {
    return [
      {
        title: "Custom button 2",
        icon: (<i className="custom-icon-2"></i>),
        onClick: () => {
          return new Promise((resolve, reject) => {
            window.alert("custom button 2 clicked");
            resolve();
          })
        }
      },
      // you can also override the default action partially
      {
        ...defaultAttachmentMenuAction,
        onClick: () => {
          return new Promise((resolve, reject) => {
            window.alert("default button clicked");
            resolve();
          })
        }
      }
    ];
  }
}
如果在下載期間發生任何問題,而且用戶必須收到通知,我們可以只 throw 收到函式中 onClick 訊息的錯誤,則訊息會顯示在聊天複合上方的錯誤列中。
![顯示 [檔案下載錯誤] 的螢幕快照。 檔案下載錯誤](media/download-error.png)
清除資源
如果您想要清除並移除通訊服務訂用帳戶,您可以刪除資源或資源群組。 刪除資源群組也會刪除與其相關聯的任何其他資源。 您可以深入了解清除 Azure 通訊服務資源和清除 Azure 函式資源。
下一步
您可能也會想要: