開始使用 Azure 通訊服務 UI 程式庫 JavaScript 套件組合對 Teams 通話佇列和自動語音應答進行通話
重要
此 Azure 通訊服務功能目前處於預覽狀態。
提供的預覽 API 和 SDK 並無服務等級協定。 建議您不要將其用於生產工作負載。 部分功能可能不受支援,或是在功能上有所限制。
如需詳細資訊,請參閱 Microsoft Azure 預覽版增補使用規定。
為了協助客戶進行更好的業務通訊,Azure 通訊服務 UI 連結庫提供 JavaScript 套件組合,以試用使用 UI 連結庫的跨平台解決方案。 本教學課程是使用UI連結庫和Teams進入通話最快的方式。
請遵循本教學課程:
- 可讓您在任何將客戶連線到您企業的網頁上放置通話體驗
- 在 React 以外的 平臺中建立通話體驗
必要條件
您必須先完成這些步驟,才能完成整個體驗。 如果您有設定 Teams 語音應用程式或 Teams 租使用者同盟的問題,請連絡 Teams 系統管理員。
- 其中一個支援平台上的 Visual Studio Code。
- 建議使用Node.js、作用中 LTS 和維護 LTS 版本節點 20 LTS。 請使用
node --version命令來檢查您的版本。 - Azure 通訊服務資源。 建立通訊資源。
- 完成 Teams 租用戶設定,以與您的 Azure 通訊服務 資源進行互操作性
- 使用 Teams 通話佇列和 Azure 通訊服務。
- 使用 Teams 自動語音應答和 Azure 通訊服務。
檢查節點和 VS Code
您可以使用此命令檢查 是否已正確安裝 Node 。
node -v
輸出會告訴您已安裝的版本,如果未安裝 Node 並新增至您的 PATH,則會失敗。 就像使用 Node 一樣,您可以檢查 Visual Studio Code 是否已使用此命令安裝。
code --version
與 Node 一樣,如果電腦上安裝 VS Code 時發生問題,此命令就會失敗。
開始使用
我們會透過 4 個簡單的步驟建立此專案。
1.建立專案
若要開始使用,我們將讓專案的新資料夾在終端機或命令提示字元中執行下列命令。
針對使用命令提示字元的 Windows,請使用此命令:
mkdir ui-library-js-test-application; cd ui-library-js-test-application
針對使用終端機的 macOS,請使用下列命令:
mkdir ui-library-js-test-application && cd ui-library-js-test-application
這些文本會建立新的資料夾,並將您移至其中。
接下來,我們想要建立名為 index.html的新檔案。 這是我們附加呼叫體驗的網頁。
2.取得程序代碼
首先,從輸出呼叫複合 JavaScript 檔案下載 JavaScript 套件組合。 將此套件組合放在與 相同的 index.html目錄中。
接下來您想要在 VS Code 中開啟 index.html ,並新增下列代碼段。
<!DOCTYPE html>

<head>
  <meta charset="utf-8" />
  <title>Embedded call composite basic example</title>
  <style>
    /* These styles are something we provide for the calling experience, please update for your needs */
    /* these apply to the calling experience you will need to style your button how your desire */
    #outbound-call-composite-container-ready {
      height: 22rem;
      width: 32rem;
      position: absolute;
      bottom: 1rem;
      right: 1rem;
      box-shadow: 0 0 0.5rem 0;
      border-radius: 1rem;
      padding: 0.5rem;
      z-index: 5;
    }
  </style>
</head>

<body>
  <div id="outbound-call-composite-container"></div>
  <button id="start-call-button">Your calling button</button>
  <!-- replace with https://github.com/Azure/communication-ui-library/releases/latest/download/outboundCallComposite.js for development and prototyping -->
  <script src="./outboundCallComposite.js"></script>
  <script type="module">
    const createCallingExperience = async () => {
      const userId = { communicationUserId: "<Add your ACS ID here>" };
      const token = "<Enter your ACS token>";
      const displayName = "Enter the DisplayName for your user";

      const callAdapter = await outboundCallComposite.loadCallComposite(
        {
          userId: userId,
          token: token,
          displayName: displayName,
          targetCallees: [
            { teamsAppId: "<Enter your Teams voice application Resource Account ID here>", cloud: "public" },
          ], // Provide the identifier you want to call, can be flat as a string.
        },
        document.getElementById("outbound-call-composite-container"),
        {
          options: {
            callControls: {
              cameraButton: true,
              screenShareButton: false,
              moreButton: true,
              peopleButton: false,
              raiseHandButton: false,
              displayType: "compact",
            },
            localVideoTile: { position: "floating" },
          },
        }
      );

      window.onbeforeunload = () => {
        callAdapter.dispose();
      };
      // Update the container id to trigger the styles we set above
      const container = document.getElementById("outbound-call-composite-container");
      container.setAttribute("id", "outbound-call-composite-container-ready");
    };
    const startCallButton = document.getElementById("start-call-button");
    startCallButton.onclick = createCallingExperience;
  </script>
</body>
[!重要] 請務必注意,如果您想要不編輯此檔案中的任何匯入,此檔案 index.html 和 JavaScript 套件組合 outboundCallComposite.js 必須位於相同的資料夾中。
3.設定 Azure 通訊服務 和 Teams 語音應用程式
接下來,我們想要建立本機使用者的 身分 識別,以便我們使用該身分來驗證本機用戶並啟動呼叫。 當您有和 token 的這些值id之後,我們想要在稍早建立的index.html檔案中進行一些編輯。
const userId = { communicationUserId: "<Add your ACS ID here>" };
const token = "<Enter your ACS token>";
const displayName = "Enter the DisplayName for your user";
我們想要使用 更新此資訊,userId並從 token Azure 入口網站 或 Azure CLI 取得。 您也應該設定 。displayName
接下來,我們想要進行編輯,以在您建立 Azure 通訊服務資源同盟時,為稍早擷取的 Teams 語音應用程式設定資源帳戶標識碼。 如果尚未這麼做,請連絡您的 Teams 系統管理員。
const callAdapter = await outboundCallComposite.loadCallComposite(
    {
        userId: userId,
        token: token,
        displayName: displayName,
        targetCallees: [
        { teamsAppId: "<Enter your Teams voice application Resource Account ID here>", cloud: "public" }, // <- update this teamsAppId value.
        ],
    },
    document.getElementById("outbound-call-composite-container")
);
4.執行應用程式
既然我們已經完成所有設定,是時候執行應用程式了。
在該目錄中開啟終端機或命令提示字元視窗,然後執行下列命令。
npx http-server@latest -p 3000
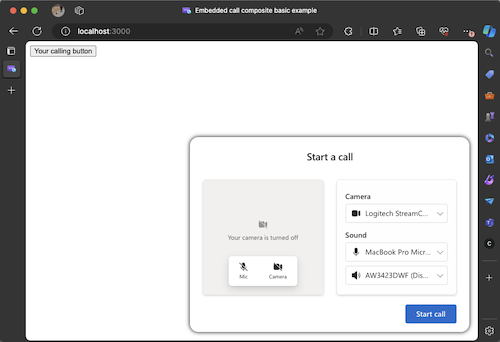
此腳本會使用 Node 啟動 HTTP 伺服器,並裝載 index.html 檔案和 JavaScript 套件組合。 在瀏覽器中開啟 http://localhost:3000. 您應該會看到具有按鈕的白色頁面,當您按兩下該頁面時,您應該會看到下列畫面。
[!重要] 注意,如果您嘗試移至頁面而非使用本機主機,您的通話體驗將無法運作,因為安全性原因。
按兩下 UI 連結start call庫中CallComposite看到的按鈕,以起始 Teams 語音應用程式的通話。
移至生產環境
本教學課程和 JS 套件組合目前處於公開預覽狀態。 如果您對於按兩下通話感到興奮,並想要瞭解如何使用 CallComposite 來建立您產品的隨選通話體驗,我們 GitHub 存放庫中有一個討論文章,說明如何在其他 Node Framework 上整合 UI 連結庫。 您剛才完成的教學課程步驟會直接轉譯到此節目中概述的內容,並告知如何在 React 以外的其他架構中載入 UI 連結庫複合。
下一步
如需 Teams 語音應用程式的詳細資訊,請參閱 Teams 自動語音應答和 Teams 通話佇列的相關文件。 或者,另請參閱我們的教學課程,以使用 React 建置更完整的體驗。
