Multiple database copies per volume Auto-Reseed
Multiple database copies per volume Auto-Reseed.
Microsoft Exchange server 2013 introduced a new feature called AutoReseed which is used by Exchange 2013 DAG member servers. Its purpose is to quickly restore database redundancy after a disk failure with no manual intervention.
Before, I have written, how to setup a single database for auto seeding. This explained the process and concept for a single database per volume.
I would recommend first going through this blog before continuing. As I do not re-explain all steps.
The Steps we will follow:
- Determine directory structure
- Set AutoDagDatabasecopiespervolume
- Create 1st Directory structure
- Mount volumes
- Create 2nd directory structure
- Create Databases
So let’s get started
Scenario
Let’s say you have 3 database per volume and which you want to setup for auto-reseeding. DB1, DB2 and DB3 is their respective names. You can changes these, but remember to change the file directory names accordingly as well.
First of all the most important steps in the process is the naming and directory structures. If this is not 100% correct the Autoreseed workflow will fail.
- 1. Directory Structure
First we need to decide where our DAG’s root folder paths is going to be.
I will use the following paths
- AutoDagDatabasesRootFolderPath C:\ExchDB
- AutoDagVolumesRootFolderPath C:\ExchVol
You can create the directory on each DAG member server as follow.
md C:\ExchDB
md C:\ExchVol
Get-DatabaseAvailabilityGroup <DAG Name> | Format-List auto*Folder*
Results should show as follow:
- 2. AutoDagDatabasecopiesperVolume
Since we will have 3 Databases per volume, we need to set the AutoDagDatabasecopiesperVolume to 3
Set -DatabaseAvailabilityGroup <DAG Name> -AutoDagDatabaseCopiesPerVolume 3
- 3. 1st Directory Structures
Now that we have our Root folders created and properties set, we have 2 next tasks to complete.
- Create Database Directories
- Create Volume Directories
My Database names is DB1, DB2 & DB3 respectively. So I will create them as follow:
md C:\ExchDB\DB1
md C:\ExchDB\DB2
md C:\ExchDB\DB3
md C:\ExchDB\Volume1
md C:\ExchDB\Volume2
- 4. Mounting Volumes
The next steps is key. We need to mount our volumes to the newly created directory structures.
Let’s say we have Volume1 and Volume2. Volume1 will be used as my active database Volume and Volume2 as my spare volume.
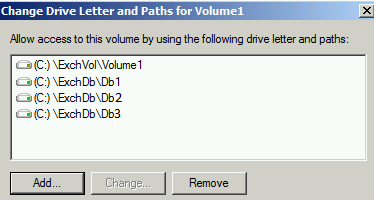
Mount Volume1 to Paths
C:\ExchDB\DB1
C:\ExchDB\DB2
C:\ExchDB\DB3
C:\ExchVol\Volume1
You’re mount points on your volume should like this:
Mount Volume2 to paths
C:\ExchVol\Volume2
We have now mounted our volumes and database directories, the folder structure should like this now:
- 5. 2nd Set of Directories
We now need to create the last set of directories for our database logs and db files.
For Volume1 “Active” we do:
md C:\ExchVol\Volume1\DB1.db
md C:\ExchVol\Volume1\DB2.db
md C:\ExchVol\Volume1\DB3.db
md C:\ExchVol\Volume1\DB1.log
md C:\ExchVol\Volume1\DB2.log
md C:\ExchVol\Volume1\DB3.log
and for Volume2 we do:
md C:\ExchVol\Volume2\DB1.db
md C:\ExchVol\Volume2\DB2.db
md C:\ExchVol\Volume2\DB3.db
md C:\ExchVol\Volume2\DB1.log
md C:\ExchVol\Volume2\DB2.log
md C:\ExchVol\Volume2\DB3.log
Steps 3 to 5 should be done on all DAG member servers
- 6. Create Databases
We have now created all directory structures and last thing left is to create our databases.
DB1
New-MailboxDatabase -Name "DB1" -EdbFilePath “ c:\ExchDb\db1\db1.db \MailboxDatabase01.edb” –LogFolderPath “ c:\ExchDb\Db1\db1.log”
DB2
New-MailboxDatabase -Name "DB2" -EdbFilePath “ c:\ExchDb\db2\db2.db \MailboxDatabase02.edb” –LogFolderPath “ c:\ExchDb\Db2\db2.log”
DB3
New-MailboxDatabase -Name "DB3" -EdbFilePath “ c:\ExchDb\db3\db3.db \MailboxDatabase03.edb” –LogFolderPath “ c:\ExchDb\Db3\db3.log”
Now that our databases are created you can add your Database copies to your DAG members.
The process is now complete.
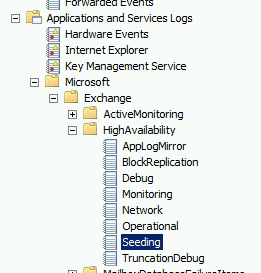
Any information on the workflow in case of failure can be found in the Seeding logs : Event Viewer\Applications and Services Logs\Microsoft\exchange\HighAvailability\seeding
Comments
- Anonymous
January 28, 2014
There's no requirement to create the folder structure on volume 2. Exchange will do that for you when failing over. - Anonymous
May 12, 2014
Microsoft Exchange server 2013 introduced a new feature called AutoReseed which is used by Exchange 2013 DAG member servers. Its purpose is to quickly restore database redundancy after a disk failure with no manual intervention.
Before, I have written - Anonymous
February 12, 2016
How does this lend itself to more complex disk layouts. From what I read above, this is only good if you have a small disk/database footprint per server. In my case I have 16 databases and 5 disks. I can't see a way to design the directory structure to support the needs of autoreseed, and I can't put all the DBs onto 1 disk, seems like I should have more servers, but if Exchange 2013 supports 50 DBs were they all intended to be on the same disk?


