Exchange 2013 - Steps to create a auto reseed database.
Microsoft Exchange server 2013 introduced a new feature called AutoReseed which is used by Exchange 2013 DAG member servers. It's purpose is to quickly restore database redundancy after a disk failure with no manual intervention.
Before we can begin, there are a couple of requirements that needs to be met for a successful Autoreseedable database.
- You need the appropriate rights to perform the actions on the DAG.
- A working and healthy Exchange 2013 DAG.
- Spare Hard Drives & Volumes.
The AutoReseed cleverly makes use of mount points to achieve the wanted goal. Let’s first take a look at the properties of your DAG.
Within the EMS type the following, change the DAG name to match your DAG name.
Get-DatabaseAvailabilityGroup <DAG Name> | Format-List *auto*
Results should show as follow:
The important properties we will be using are as follows:
- AutoDagVolumesRootFolderPath
- AutoDagDatabasesRootFolderPath
- AutoDagDatabaseCopiesPerVolume
AutoDagVolumesRootFolderPath is the root folder for the volumes and the default value is C:\ExchangeVolumes
AutoDagDatabasesRootFolderPath is the root path for the databases and default value is C:\ExchangeDatabases
AutoDagDatabaseCopiesPerVolume is the amount of databases per volume.
In this scenario we will have a single database per volume and is illustrated with the image below. Therefor the value of AutoDagDatabaseCopiesPerVolume will remain at 1.
Preparing your Volumes
We start the process by first preparing the directories, drives and volumes.
In disk manager create your volumes per disk. Since this is for hardware failure you will create one volume per disk. Note: “disk” here can also by JBOD or even a set of disks without parity. Assign “NO” paths or drive letters to these volumes yet.
It should look something like this, where Disk 1 and Disk 2 will be my Volumes hosting my Databases. Disk 2 will be my spare.
Preparing your directory structure
In the following example we will be using the C:\ drive to host the root paths.
Create the “root” directories.
md c:\ExchDb
md c:\ExchVol
You should set your DAG properties to match these.
Set-DatabaseAvailabilityGroup <DAG> - AutoDagVolumesRootFolderPath c:\ExchVol
Set-DatabaseAvailabilityGroup <DAG> - AutoDagDatabasesRootFolderPath c:\ExchDb
Or
Set-DatabaseAvailabilityGroup <DAG> - AutoDagVolumesRootFolderPath c:\ExchVol - AutoDagDatabasesRootFolderPath c:\ExchDb
Run Get-DatabaseAvailabilityGroup <DAG Name> | Format-List *auto*root* to verify the paths has changed to the directories you have created.
Mounting the volumes
We first need to create our mount point’s directories for our volumes and database
md c:\ExchVol\Volume1
md c:\ExchVol\Volume2
md c:\ExchDb\DB1
The next step is to mount the Volumes to the mount points.
You can do this by right clicking your volume and select “Change Drive letters and Paths”.
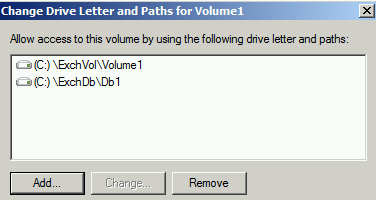
Mount Volume1 to the directory c:\ExchVol\Volume1
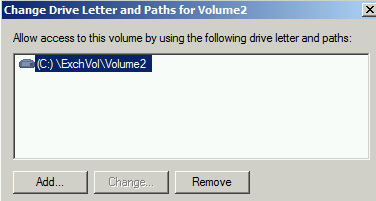
Follow the same steps and mount Volume2 to the directory c:\ExchVol\Volume2
We now also need to mount the DB path. Volume1 will be the primary volume for my database “DB1”. So “only” on Volume1 add the additional mount point C:\Exchdb\Db1.
Your mounts points for Volume1 and Volume2 should look like this respectively.
Volume1
Volume2
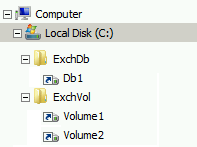
In windows explorer your directory structure should look something like this.
Now we have the AutoDagVolumesRootFolderPath and AutoDagDatabasesRootFolderPath set on the DAG
and all volumes mounted for the Database.
Remember to change the value of AutoDagDatabaseCopiesPerVolume to match your configuration. In this case it will remain on 1.
Creating the Database
We need to create our Directory structure for the database.
Volume1
md c:\ExchVol\Volume1\db1.db
md c:\ExchVol\Volume1\db1.log
Volume2
md c:\ExchVol\Volume2\db1.db
md c:\ExchVol\Volume2\db1.log
Note: You will now see that c:\ExchDb\DB1 & c:\ExchVol\Volume1 match in directory structure.
Now let’s create our Database.
New-MailboxDatabase -Name "DB1" -EdbFilePath “ c:\ExchDb\db1\db1.db \MailboxDatabase01.edb” –LogFolderPath “ c:\ExchDb\Db1\db1.log”
Add your Mailboxdatabasecopy’s to your different DAG members. This can be done via the EMS or EMC
Your AutoReseed setup process is now complete for DB1.
Other things to know
Volume1 Contains the primary Volume1 and volume2 acts as a spare.
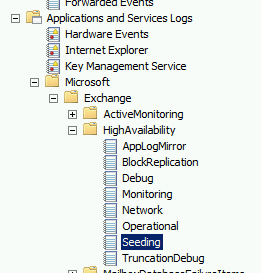
Seeding logs can be found in Event Viewer\Applications and Services Logs\Microsoft\exchange\HighAvailability\seeding
You can make use of one spare for several db1 or several active volumes.
The normal DAG rule still applies when creating Databases: ”The directory structure must remain the same across all DAG members.”
The health of the database copies are checked by the Microsoft Exchange Replication services periodically and is looking for a state of FailedSuspended before it start with the Auto reseed test’s and tasks.
Comments
Anonymous
January 01, 2003
httpDepends on your model and design. Have a look at my other blog blogs.technet.com/.../multiple-database-copies-per-volume-auto-reseed.aspxAnonymous
July 30, 2013
If we have 10 active database, then how many spare i volumes would need ? Do i need one for every active database ? regards, Krishna smtpport25.wordpress.com


