使用關聯性來管理數位對應項的圖表
Azure Digital Twins 的核心是代表整個環境的對應項圖表。 對應項圖表是由透過關聯性連接的數個獨立數位對應項所組成。 本文著重於管理關聯性和整體圖表;若要使用個別的數位對應項,請參閱管理數位對應項。
當您擁有運作中的 Azure Digital Twins 執行個體,並且在用戶端應用程式中設定驗證碼之後,您就可以在 Azure Digital Twins 執行個體中建立、修改及刪除數位對應項及其關聯性。
必要條件
若要使用本文中的 Azure Digital Twins,您必須設定 Azure Digital Twins 執行個體以及必要的使用權限。 如果您已經設定好 Azure Digital Twins 執行個體,您可以直接使用該執行個體,並跳至下一節。 否則,請依照設定執行個體和驗證中的指示進行。 指示中包含的資訊可協助您確認已成功完成每個步驟。
設定執行個體之後,請記下執行個體的主機名稱。 您可以在 Azure 入口網站中找到主機名稱。
開發人員介面
本文重點摘要如何使用 .NET (C#) SDK 來完成不同的管理作業。 您也可以使用 Azure Digital Twins API 和 SDK 中所述的其他語言 SDK 來製作這些相同的管理呼叫。
其他可用來完成這些作業的開發人員介面包括:
視覺效果
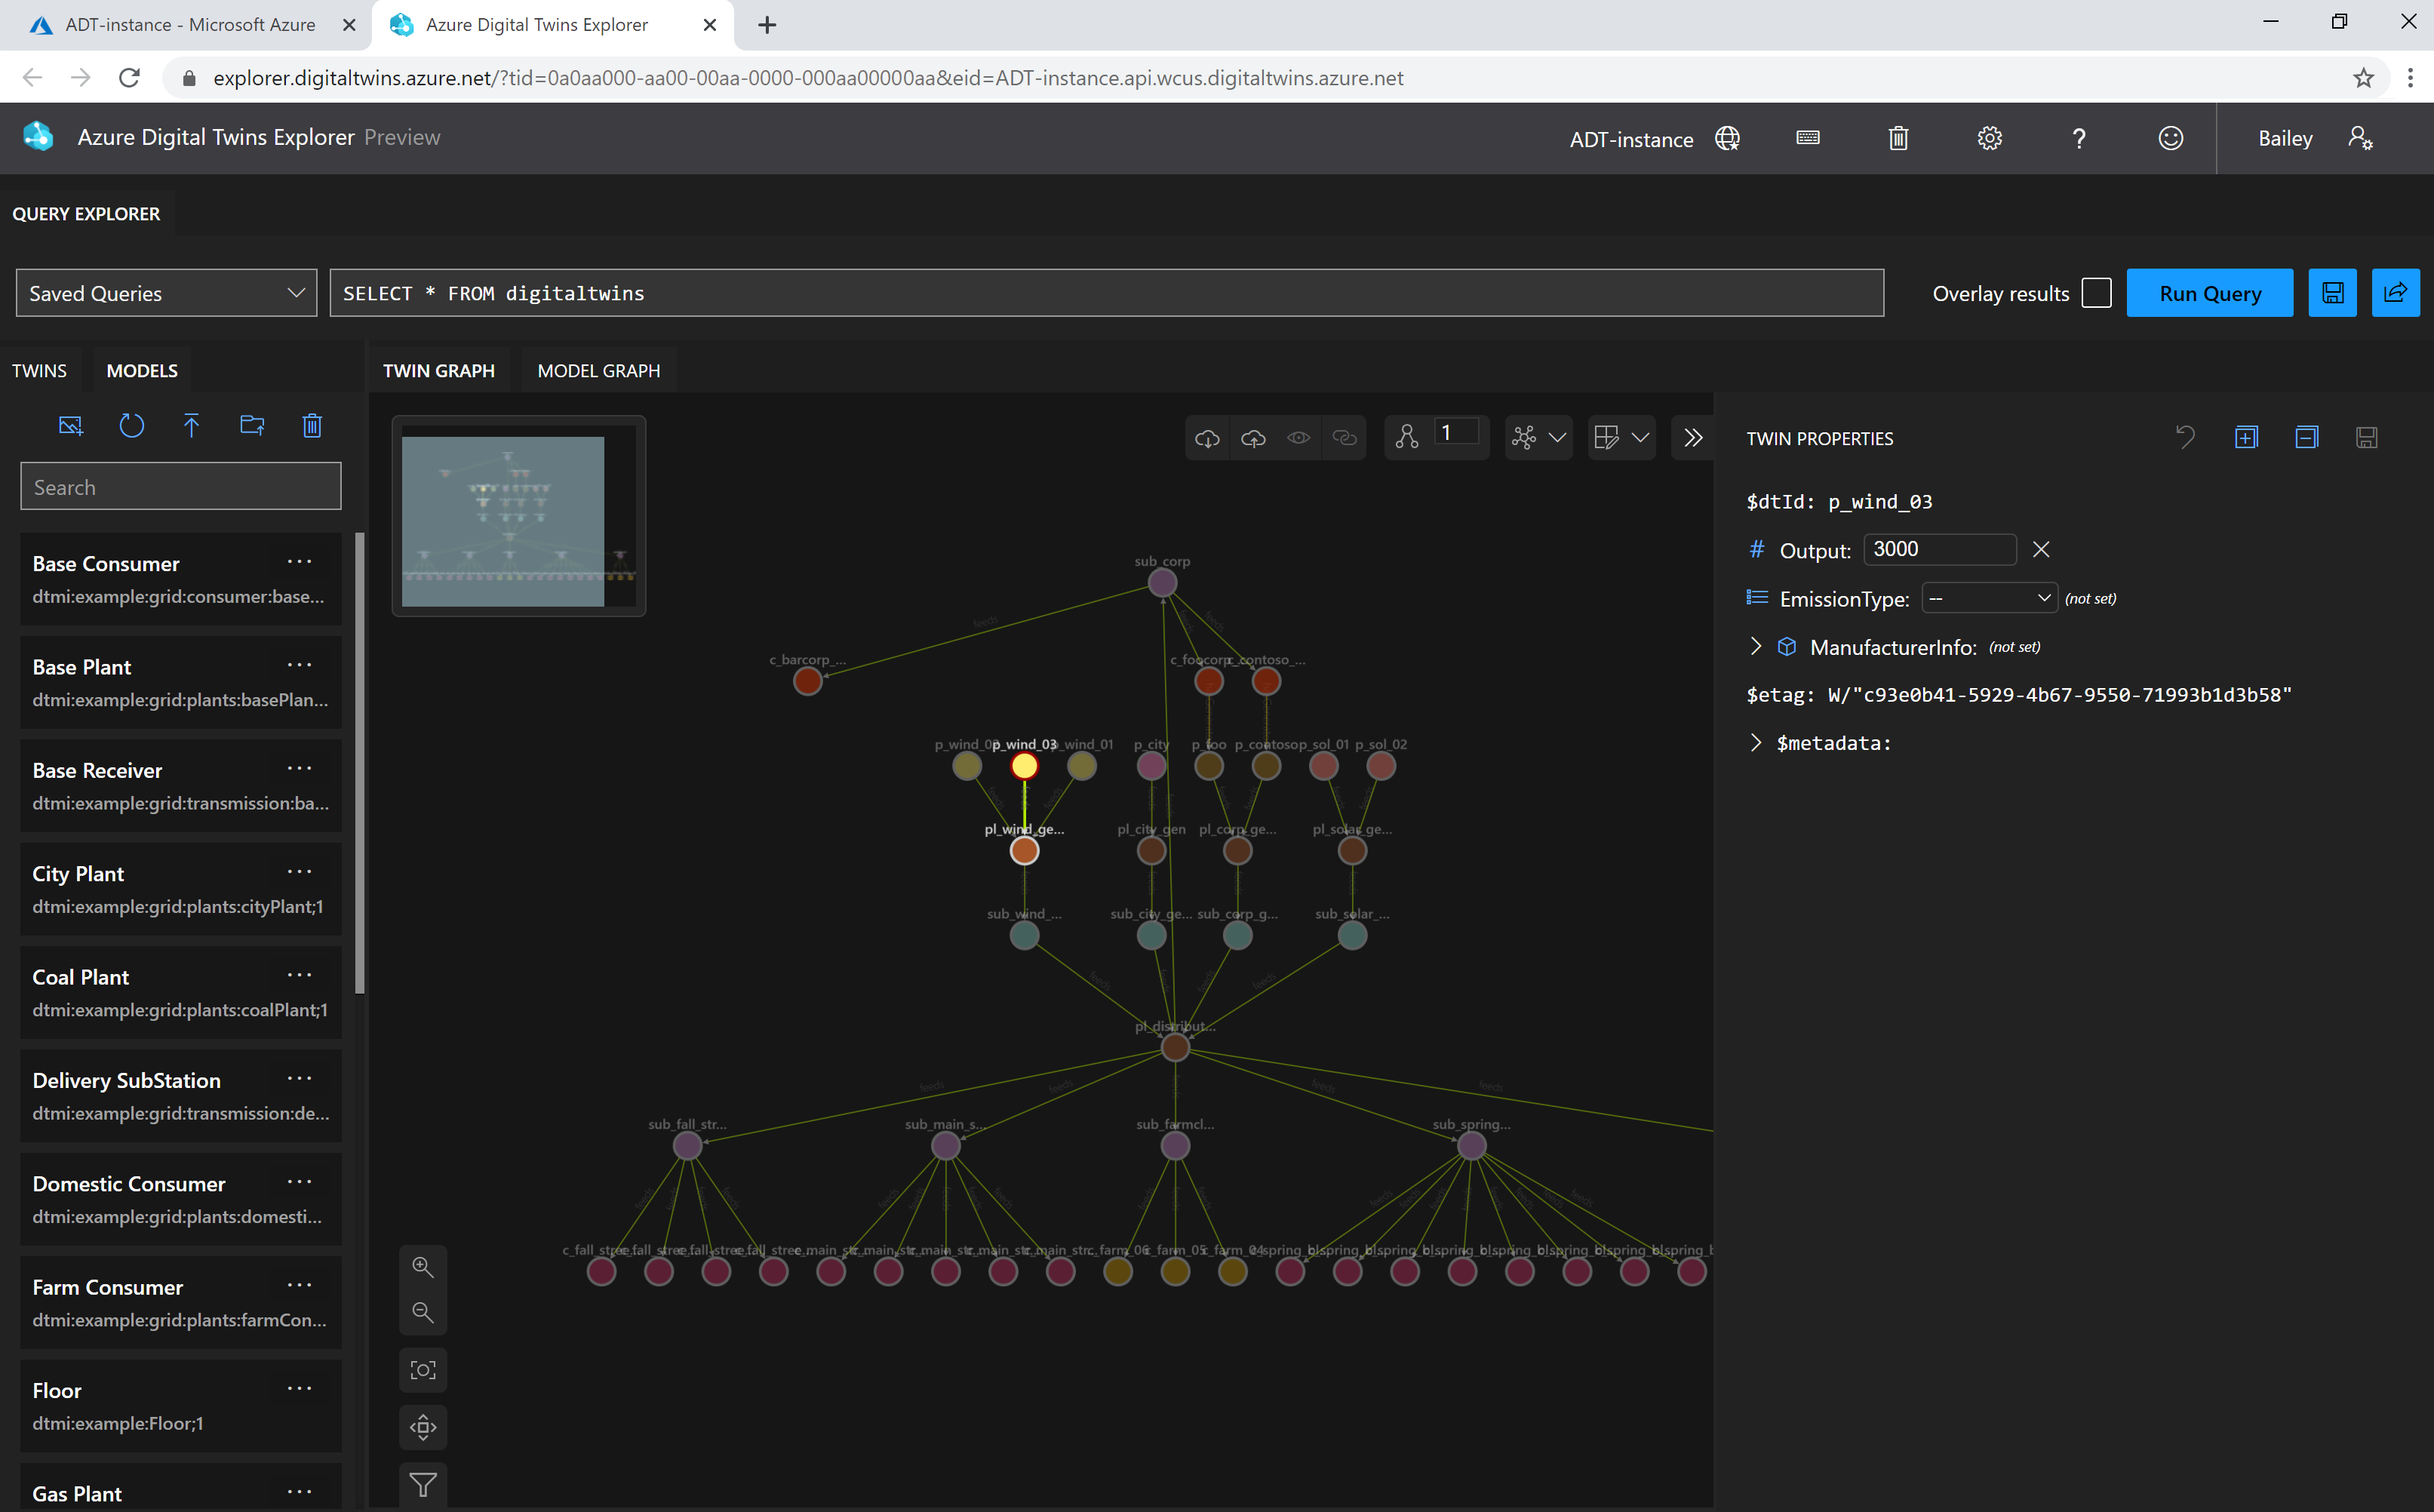
Azure Digital Twins Explorer 是一種視覺工具,可探索您 Azure Digital Twins 圖表中的資料。 您可以使用總管來檢視、查詢及編輯模型、對應項和關聯性。
如需閱讀 Azure Digital Twins Explorer 工具的相關資訊,請參閱 Azure Digital Twins Explorer。 如需如何使用其功能的詳細步驟,請參閱使用 Azure Digital Twins Explorer。
以下是視覺效果的外觀:
建立關聯
關聯性會說明不同數位對應項彼此連接的方式,這是形成對應項圖表的基礎。
可以從一個 (來源) 對應項建立到另一個 (目標) 對應項的關聯性類型,會定義為來源對應項 DTDL 模型的一部分。 您可以使用 CreateOrReplaceRelationshipAsync() SDK 呼叫搭配 DTDL 定義的對應項和關聯性詳細資料,來建立關聯性的執行個體。
若要建立關聯性,您必須指定:
- 來源對應項識別碼 (下列程式碼範例中的
srcId):關聯性來源對應項的識別碼。 - 目標對應項識別碼 (下列程式碼範例中的
targetId):關聯性目的地對應項的識別碼。 - 關聯性名稱 (下列程式碼範例中的
relName):關聯性的泛型型別,類似 contains。 - 關聯性識別碼 (下列程式碼範例中的
relId):此關聯性的特定名稱,類似 Relationship1。
關聯性識別碼在指定的來源對應項內必須是唯一的。 不需要是全域唯一的。 以對應項 Foo 為例,每個特定的關聯性識別碼都必須是唯一的。 但另一個對應項列可以有與 Foo 關聯性相同識別碼相符的傳出關聯性。
下列程式碼範例示範如何在 Azure Digital Twins 執行個體中建立關聯性。 其會在較大型程式內容中所出現的自訂方法內使用 SDK 呼叫 (反白顯示)。
private async static Task CustomMethod_CreateRelationshipAsync(DigitalTwinsClient client, string srcId, string targetId, string relName, IDictionary<string,object> inputProperties)
{
    var relationship = new BasicRelationship
    {
        TargetId = targetId,
        Name = relName,
        Properties = inputProperties
    };

    try
    {
        string relId = $"{srcId}-{relName}->{targetId}";
        await client.CreateOrReplaceRelationshipAsync<BasicRelationship>(srcId, relId, relationship);
        Console.WriteLine($"Created {relName} relationship successfully. Relationship ID is {relId}.");
    }
    catch (RequestFailedException rex)
    {
        Console.WriteLine($"Create relationship error: {rex.Status}:{rex.Message}");
    }

}
您現在可以呼叫此自訂函式,以下列方式建立 contains 關聯性:
await CustomMethod_CreateRelationshipAsync(client, srcId, targetId, "contains", properties);
如果您想要建立多個關聯性,可以重複呼叫相同的方法,並將不同的關聯性類型傳遞至引數。
如需關於協助程式類別 BasicRelationship 的詳細資訊,請參閱 Azure Digital Twins API 和 SDK。
建立對應項之間的多個關聯性
關聯性可以分類為以下二者之一:
- 傳出關聯性:屬於此對應項,指向外部以連接其他對應項的關聯性。 您可使用
GetRelationshipsAsync()方法取得對應項的傳出關聯性。 - 連入關聯性:屬於其他對應項,向內指向此對應項以建立「傳入」連結的關聯性。 您可使用
GetIncomingRelationshipsAsync()方法取得對應項的連入關聯性。
兩個對應項之間的關聯性數目不受限制,您希望對應項間有多少個關聯性就可以有多少。
這項事實表示您可以一次在兩個對應項之間表達數種不同類型的關聯性。 例如,對應項 A 和對應項 B 之間可以同時有預存關聯性和製造關聯性。
您甚至可以視需要在相同的兩個對應項之間建立多個相同類型關聯性的執行個體。 在此範例中,只要關聯性使用不同的關聯性識別碼,對應項 A 和 Twin B 就可以有兩個不同的預存關聯性。
注意
Azure Digital Twins 目前不支援 minMultiplicity 和 maxMultiplicity 的 DTDL 屬性,即使其定義為模型的一部分,服務也不會強制執行這些屬性。 如需詳細資訊,請參閱服務特定 DTDL 備註。
使用匯入作業 API 大量建立關聯性
您可以使用匯入作業 API,在單一 API 呼叫中一次建立許多關聯性。 此方法需要使用 Azure Blob 儲存體,以及 Azure Digital Twins 執行個體中關聯性和大量作業的寫入權限。
提示
匯入作業 API 也允許在相同的呼叫中匯入模型和對應項,以一次建立圖形的所有部分。 如需此程序的詳細資訊,請參閱使用匯入作業 API 大量上傳模型、對應項和關聯性。
若要大量匯入關聯性,您必須將關聯性 (以及大量匯入作業中包含的任何其他資源) 建構為 NDJSON 檔案。 Relationships 區段位於 Twins 區段之後,使其成為檔案中的最後一個圖形資料區段。 檔案中定義的關聯性可以參考此檔案中定義或已存在於執行個體中的對應項,且其可以選擇性地包含關聯性所擁有任何屬性的初始化。
您可以在匯入作業 API 簡介中檢視範例匯入檔案和範例專案,以建立這些檔案。
接下來,檔案必須上傳至 Azure Blob 儲存體中的附加 Blob。 如需如何建立 Azure 儲存體容器的指示,請參閱建立容器。 然後,使用您慣用的上傳方法來上傳檔案 (一些選項如 AzCopy 命令、Azure CLI 或 Azure 入口網站)。
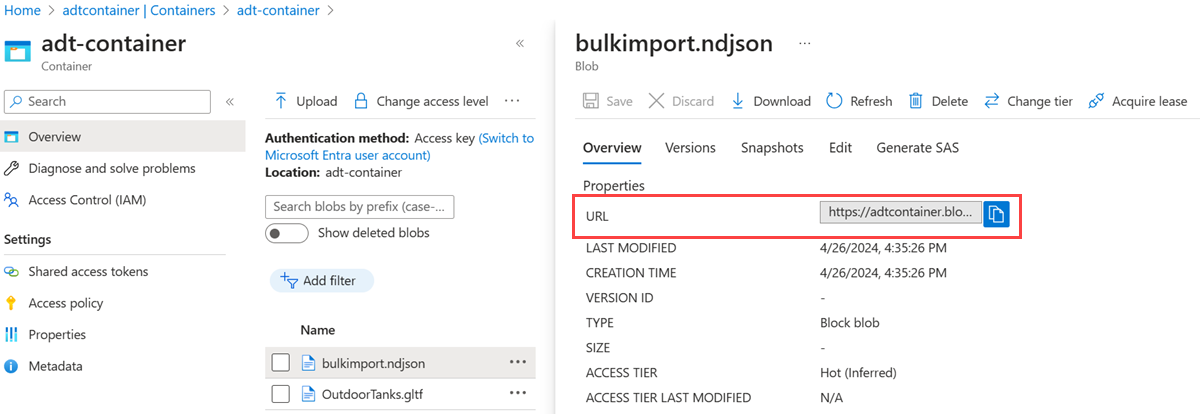
將 NDJSON 文件案上傳至容器之後,請在 Blob 容器內取得其 URL。 您稍後會在大量匯入 API 呼叫的本文中使用此值。
以下螢幕擷取畫面顯示 Azure 入口網站中 Blob 檔案的 URL 值:
然後,您可以在匯入作業 API 呼叫中使用檔案。 您會提供輸入檔的 Blob 儲存體 URL,以及新的 Blob 儲存體 URL,以指出您在服務建立輸出記錄之後,想要儲存輸出記錄的位置。
列出關聯性
列出單一關聯性的屬性
您一律可以將關聯性資料還原序列化為您選擇的類型。 如需關聯性的基本存取權,請使用 BasicRelationship 類型。 BasicRelationship 協助程式類別也可讓您透過 IDictionary<string, object> 存取關聯性上定義的屬性。 若要列出屬性,您可以使用:
public async Task ListRelationshipProperties(DigitalTwinsClient client, string twinId, string relId, BasicDigitalTwin twin)
{

    var res = await client.GetRelationshipAsync<BasicRelationship>(twinId, relId);
    BasicRelationship rel = res.Value;
    Console.WriteLine($"Relationship Name: {rel.Name}");
    foreach (string prop in rel.Properties.Keys)
    {
        if (twin.Contents.TryGetValue(prop, out object value))
        {
            Console.WriteLine($"Property '{prop}': {value}");
        }
    }
}
列出來自數位對應項的傳出關聯性
若要存取圖表中指定對應項的傳出關聯性清單,您可以使用 GetRelationships() 方法,如下所示:
AsyncPageable<BasicRelationship> rels = client.GetRelationshipsAsync<BasicRelationship>(dtId);
這個方法會傳回 Azure.Pageable<T> 或 Azure.AsyncPageable<T>,視您使用呼叫的同步或非同步版本而定。
以下是擷取關聯性清單的範例。 其會在較大型程式內容中所出現的自訂方法內使用 SDK 呼叫 (反白顯示)。
private static async Task<List<BasicRelationship>> CustomMethod_FindOutgoingRelationshipsAsync(DigitalTwinsClient client, string dtId)
{
    // Find the relationships for the twin

    try
    {
        // GetRelationshipsAsync will throw if an error occurs
        AsyncPageable<BasicRelationship> rels = client.GetRelationshipsAsync<BasicRelationship>(dtId);
        var results = new List<BasicRelationship>();
        await foreach (BasicRelationship rel in rels)
        {
            results.Add(rel);
            Console.WriteLine($"Found relationship: {rel.Id}");

            //Print its properties
            Console.WriteLine($"Relationship properties:");
            foreach(KeyValuePair<string, object> property in rel.Properties)
            {
                Console.WriteLine("{0} = {1}", property.Key, property.Value);
            }
        }

        return results;
    }
    catch (RequestFailedException ex)
    {
        Console.WriteLine($"*** Error {ex.Status}/{ex.ErrorCode} retrieving relationships for {dtId} due to {ex.Message}");
        return null;
    }
}
您現在可以呼叫此自訂方法,查看對應項的傳出關聯性,如下所示:
await CustomMethod_FindOutgoingRelationshipsAsync(client, twin_Id);
您可以使用擷取的關聯性來瀏覽至圖表中的其他對應項,方法是從傳回的關聯性讀取 target 欄位,並將其用做為下一次呼叫 GetDigitalTwin() 的識別碼。
列出數位對應項的傳入關聯性
Azure Digital Twins 也有 SDK 呼叫可尋找指定對應項的所有傳入關聯性。 此 SDK 在反向瀏覽或刪除對應項時非常實用。
注意
IncomingRelationship 呼叫不會傳回關聯性的完整主體。 如需關於 IncomingRelationship 類別的詳細資訊,請參閱其參考文件。
上一節中的程式碼範例著重於從對應項尋找傳出關聯性。 下列範例的結構類似,但會改為尋找對應項的傳入關聯性。 此範例也會在較大型程式內容中所出現的自訂方法內使用 SDK 呼叫 (反白顯示)。
private static async Task<List<IncomingRelationship>> CustomMethod_FindIncomingRelationshipsAsync(DigitalTwinsClient client, string dtId)
{
    // Find the relationships for the twin

    try
    {
        // GetRelationshipsAsync will throw an error if a problem occurs
        AsyncPageable<IncomingRelationship> incomingRels = client.GetIncomingRelationshipsAsync(dtId);

        var results = new List<IncomingRelationship>();
        await foreach (IncomingRelationship incomingRel in incomingRels)
        {
            results.Add(incomingRel);
            Console.WriteLine($"Found incoming relationship: {incomingRel.RelationshipId}");

            //Print its properties
            Response<BasicRelationship> relResponse = await client.GetRelationshipAsync<BasicRelationship>(incomingRel.SourceId, incomingRel.RelationshipId);
            BasicRelationship rel = relResponse.Value;
            Console.WriteLine($"Relationship properties:");
            foreach(KeyValuePair<string, object> property in rel.Properties)
            {
                Console.WriteLine("{0} = {1}", property.Key, property.Value);
            }
        }
        return results;
    }
    catch (RequestFailedException ex)
    {
        Console.WriteLine($"*** Error {ex.Status}/{ex.ErrorCode} retrieving incoming relationships for {dtId} due to {ex.Message}");
        return null;
    }
}
您現在可以呼叫此自訂方法,查看對應項的連入關聯性,如下所示:
await CustomMethod_FindIncomingRelationshipsAsync(client, twin_Id);
列出所有對應項屬性和關聯性
使用上述方法來列出對應項的傳出和傳入關聯性,您可以建立一個方法來列印完整對應項資訊,包括對應項的屬性及其兩種關聯性。 以下範例自訂方法示範如何針對此目的合併上述自訂方法。
private static async Task CustomMethod_FetchAndPrintTwinAsync(string twin_Id, DigitalTwinsClient client)
{
    Response<BasicDigitalTwin> res = await client.GetDigitalTwinAsync<BasicDigitalTwin>(twin_Id);
    await CustomMethod_FindOutgoingRelationshipsAsync(client, twin_Id);
    await CustomMethod_FindIncomingRelationshipsAsync(client, twin_Id);

    return;
}
您現在可以呼叫此自訂函式,如下所示:
await CustomMethod_FetchAndPrintTwinAsync(srcId, client);
更新關聯性
會使用 UpdateRelationship 方法來更新關聯性。
用戶端呼叫的必要參數為:
- 來源對應項的識別碼 (關聯性來源的對應項)。
- 所要更新關聯性的識別碼。
- JSON 修補程式文件,其中包含您想要更新的屬性和新值。
以下是示範如何使用此方法的範例程式碼片段。 此範例會在較大型程式內容中所出現的自訂方法內使用 SDK 呼叫 (反白顯示)。
private async static Task CustomMethod_UpdateRelationshipAsync(DigitalTwinsClient client, string srcId, string relId, Azure.JsonPatchDocument updateDocument)
{

    try
    {
        await client.UpdateRelationshipAsync(srcId, relId, updateDocument);
        Console.WriteLine($"Successfully updated {relId}");
    }
    catch (RequestFailedException rex)
    {
        Console.WriteLine($"Update relationship error: {rex.Status}:{rex.Message}");
    }

}
以下是呼叫這個自訂方法的範例,並傳入 JSON 修補程式文件,其中包含更新屬性的資訊。
var updatePropertyPatch = new JsonPatchDocument();
updatePropertyPatch.AppendAdd("/ownershipUser", "ownershipUser NEW value");
await CustomMethod_UpdateRelationshipAsync(client, srcId, $"{srcId}-contains->{targetId}", updatePropertyPatch);
刪除關聯
第一個參數會指定來源對應項 (關聯性來源的對應項)。 另一個參數是關聯性識別碼。 您需要對應項識別碼和關聯性識別碼,因為關聯性識別碼只有在對應項範圍內才是唯一的。
以下是示範如何使用此方法的範例程式碼。 此範例會在較大型程式內容中所出現的自訂方法內使用 SDK 呼叫 (反白顯示)。
private static async Task CustomMethod_DeleteRelationshipAsync(DigitalTwinsClient client, string srcId, string relId)
{
    try
    {
        Response response = await client.DeleteRelationshipAsync(srcId, relId);
        await CustomMethod_FetchAndPrintTwinAsync(srcId, client);
        Console.WriteLine("Deleted relationship successfully");
    }
    catch (RequestFailedException e)
    {
        Console.WriteLine($"Error {e.ErrorCode}");
    }
}
您現在可以呼叫這個自訂方法,以刪除如下的關聯性:
await CustomMethod_DeleteRelationshipAsync(client, srcId, $"{srcId}-contains->{targetId}");
注意
如果您想要一次刪除執行個體中的所有模型、對應項和關聯性,請使用刪除作業 API。
一次建立多個圖形元素
本節描述建立具有多個元素圖形的策略,而不是使用個別 API 呼叫來上傳模型、對應項和關聯性來加以逐一上傳。
使用匯入作業 API 大量上傳模型、對應項和關聯性
您可以使用匯入作業 API,將多個模型、對應項和關聯性上傳至單一 API 呼叫中的執行個體,有效地一次建立所有圖形。 此方法需要使用 Azure Blob 儲存體,以及 Azure Digital Twins 執行個體中圖形元素 (模型、對應項和關聯性) 及大量作業的寫入權限。
若要大量匯入資源,請先建立包含您資源詳細資料的 NDJSON 檔案。 檔案開頭為 Header 區段,隨後接著選擇性區段 Models、Twins 和 Relationships。 您不必在檔案中包含這三種類型的圖形資料,但存在的任何區段全都必須遵循該順序。 檔案中定義的對應項可以參考此檔案中定義或已存在於執行個體中的模型,且其可以選擇性地包含對應項屬性的初始化。 檔案中定義的關聯性可以參考此檔案中定義或已存在於執行個體中的對應項,且其可以選擇性地包含關聯性屬性的初始化。
您可以在匯入作業 API 簡介中檢視範例匯入檔案和範例專案,以建立這些檔案。
接下來,檔案必須上傳至 Azure Blob 儲存體中的附加 Blob。 如需如何建立 Azure 儲存體容器的指示,請參閱建立容器。 然後,使用您慣用的上傳方法來上傳檔案 (一些選項如 AzCopy 命令、Azure CLI 或 Azure 入口網站)。
將 NDJSON 文件案上傳至容器之後,請在 Blob 容器內取得其 URL。 您稍後會在大量匯入 API 呼叫的本文中使用此值。
以下螢幕擷取畫面顯示 Azure 入口網站中 Blob 檔案的 URL 值:
然後,您可以在匯入作業 API 呼叫中使用檔案。 您會提供輸入檔的 Blob 儲存體 URL,以及新的 Blob 儲存體 URL,以指出您在服務建立輸出記錄之後,想要儲存輸出記錄的位置。
使用 Azure Digital Twins Explorer 匯入圖形
Azure Digital Twins Explorer 是一種視覺化工具,可用來檢視及與對應項圖形進行互動。 其包含一項功能,可以 JSON 或 Excel 格式匯入圖形檔案,其中可能包含多個模型、對應項和關聯性。
如需使用此功能的詳細資訊,請參閱 Azure Digital Twins Explorer 文件中的匯入圖形。
從 CSV 檔案建立對應項和關聯性
有時候,您可能必須從儲存在不同資料庫、或是試算表或 CSV 檔案中的資料建立對應項階層。 本節說明如何從 CSV 檔案讀取資料,並從中建立對應項圖表。
請考慮下列資料表,描述一組數位對應項和關聯性。 此檔案中參考的模型必須已存在於 Azure Digital Twins 執行個體中。
| Model ID | 對應項識別碼 (必須是唯一的) | 關聯性名稱 | 目標對應項識別碼 | 對應項 init 資料 |
|---|---|---|---|---|
| dtmi:example:Floor;1 | Floor1 | contains | Room1 | |
| dtmi:example:Floor;1 | Floor0 | contains | Room0 | |
| dtmi:example:Room;1 | Room1 | {"Temperature": 80} | ||
| dtmi:example:Room;1 | Room0 | {"Temperature": 70} |
將此資料放入 Azure Digital Twins 的其中一種方法,是將資料表轉換成 CSV 檔案。 轉換資料表之後,就可以撰寫程式碼,將檔案解譯成命令來建立對應項和關聯性。 下列程式碼範例說明如何從 CSV 檔案讀取資料,並在 Azure Digital Twins 中建立對應項圖表。
在下列程式碼中,CSV 檔案稱為 data.csv,而且有一個預留位置代表 Azure Digital Twins 執行個體的主機名稱。 此範例也會使用數個套件,您可以將這些套件新增至專案以協助進行此程序。
using System;
using System.Collections.Generic;
using System.Threading.Tasks;
using Azure;
using Azure.DigitalTwins.Core;
using Azure.Identity;

namespace creating_twin_graph_from_csv
{
    class Program
    {
        static async Task Main(string[] args)
        {
            var relationshipRecordList = new List<BasicRelationship>();
            var twinList = new List<BasicDigitalTwin>();
            List<List<string>> data = ReadData();
            DigitalTwinsClient client = CreateDtClient();

            // Interpret the CSV file data, by each row
            foreach (List<string> row in data)
            {
                string modelID = row.Count > 0 ? row[0].Trim() : null;
                string srcID = row.Count > 1 ? row[1].Trim() : null;
                string relName = row.Count > 2 ? row[2].Trim() : null;
                string targetID = row.Count > 3 ? row[3].Trim() : null;
                string initProperties = row.Count > 4 ? row[4].Trim() : null;
                Console.WriteLine($"ModelID: {modelID}, TwinID: {srcID}, RelName: {relName}, TargetID: {targetID}, InitData: {initProperties}");
                var props = new Dictionary<string, object>();
                // Parse properties into dictionary (left out for compactness)
                // ...

                // Null check for source and target IDs
                if (!string.IsNullOrWhiteSpace(srcID) && !string.IsNullOrWhiteSpace(targetID) && !string.IsNullOrWhiteSpace(relName))
                {
                    relationshipRecordList.Add(
                        new BasicRelationship
                        {
                            SourceId = srcID,
                            TargetId = targetID,
                            Name = relName,
                        });
                }

                if (!string.IsNullOrWhiteSpace(srcID) && !string.IsNullOrWhiteSpace(modelID))
                twinList.Add(
                    new BasicDigitalTwin
                    {
                        Id = srcID,
                        Metadata = { ModelId = modelID },
                        Contents = props,
                    });
            }

            // Create digital twins
            foreach (BasicDigitalTwin twin in twinList)
            {
                try
                {
                    await client.CreateOrReplaceDigitalTwinAsync<BasicDigitalTwin>(twin.Id, twin);
                    Console.WriteLine("Twin is created");
                }
                catch (RequestFailedException ex)
                {
                    Console.WriteLine($"Error {ex.Status}: {ex.Message}");
                }
            }

            // Create relationships between the twins
            foreach (BasicRelationship rec in relationshipRecordList)
            {
                string relId = $"{rec.SourceId}-{rec.Name}->{rec.TargetId}";
                try
                {
                    await client.CreateOrReplaceRelationshipAsync<BasicRelationship>(rec.SourceId, relId, rec);
                    Console.WriteLine($"Relationship {relId} is created");
                }
                catch (RequestFailedException ex)
                {
                    Console.WriteLine($"Error creating relationship {relId}. {ex.Status}: {ex.Message}");
                }
            }
        }

        // Method to ingest data from the CSV file
        public static List<List<string>> ReadData()
        {
            string path = "<path-to>/data.csv";
            string[] lines = System.IO.File.ReadAllLines(path);
            var data = new List<List<string>>();
            int count = 0;
            foreach (string line in lines)
            {
                if (count++ == 0)
                    continue;
                var cols = new List<string>();
                string[] columns = line.Split(',');
                foreach (string column in columns)
                {
                    cols.Add(column);
                }
                data.Add(cols);
            }
            return data;
        }

        // Method to create the digital twins client
        private static DigitalTwinsClient CreateDtClient()
        {
            string adtInstanceUrl = "https://<your-instance-hostname>";
            var credentials = new DefaultAzureCredential();
            return new DigitalTwinsClient(new Uri(adtInstanceUrl), credentials);
        }
    }
}
可執行對應項圖表範例
下列可執行程式碼片段會使用本文中的關聯性作業,從數位對應項和關聯性建立對應項圖表。
設定範例專案檔
程式碼片段會使用兩個範例模型定義:Room.json 和 Floor.json。 若要下載模型檔案,以便在程式碼中加以使用,請使用這些連結直接移至 GitHub 中的檔案。 然後,以滑鼠右鍵按一下畫面上的任何位置,在瀏覽器的右鍵功能表中選取 [另存新檔],然後使用 [另存新檔] 視窗,將檔案儲存為 Room.json 和 Floor.json。
接下來,在 Visual Studio 或您選擇的編輯器中,建立新的主控台應用程式專案。
然後,將可執行範例的下列程式碼複製到您的專案中:
using System;
using System.Threading.Tasks;
using System.IO;
using System.Collections.Generic;
using Azure;
using Azure.DigitalTwins.Core;
using Azure.Identity;

namespace DigitalTwins_Samples
{
    public class GraphOperationsSample
    {
        public static async Task Main(string[] args)
        {
            Console.WriteLine("Hello World!");

            // Create the Azure Digital Twins client for API calls
            DigitalTwinsClient client = createDtClient();
            Console.WriteLine($"Service client created – ready to go");
            Console.WriteLine();

            // Upload models
            Console.WriteLine($"Upload models");
            Console.WriteLine();
            string dtdl = File.ReadAllText("<path-to>/Room.json");
            string dtdl1 = File.ReadAllText("<path-to>/Floor.json");
            var models = new List<string>
            {
                dtdl,
                dtdl1,
            };
            // Upload the models to the service
            await client.CreateModelsAsync(models);

            // Create new (Floor) digital twin
            var floorTwin = new BasicDigitalTwin();
            string srcId = "myFloorID";
            floorTwin.Metadata.ModelId = "dtmi:example:Floor;1";
            // Floor twins have no properties, so nothing to initialize
            // Create the twin
            await client.CreateOrReplaceDigitalTwinAsync<BasicDigitalTwin>(srcId, floorTwin);
            Console.WriteLine("Twin created successfully");

            // Create second (Room) digital twin
            var roomTwin = new BasicDigitalTwin();
            string targetId = "myRoomID";
            roomTwin.Metadata.ModelId = "dtmi:example:Room;1";
            // Initialize properties
            roomTwin.Contents.Add("Temperature", 35.0);
            roomTwin.Contents.Add("Humidity", 55.0);
            // Create the twin
            await client.CreateOrReplaceDigitalTwinAsync<BasicDigitalTwin>(targetId, roomTwin);

            // Create relationship between them
            var properties = new Dictionary<string, object>
            {
                { "ownershipUser", "ownershipUser original value" },
            };
            // <UseCreateRelationship>
            await CustomMethod_CreateRelationshipAsync(client, srcId, targetId, "contains", properties);
            // </UseCreateRelationship>
            Console.WriteLine();

            // Update relationship's Name property
            // <UseUpdateRelationship>
            var updatePropertyPatch = new JsonPatchDocument();
            updatePropertyPatch.AppendAdd("/ownershipUser", "ownershipUser NEW value");
            await CustomMethod_UpdateRelationshipAsync(client, srcId, $"{srcId}-contains->{targetId}", updatePropertyPatch);
            // </UseUpdateRelationship>
            Console.WriteLine();

            //Print twins and their relationships
            Console.WriteLine("--- Printing details:");
            Console.WriteLine($"Outgoing relationships from source twin, {srcId}:");
            // <UseFetchAndPrint>
            await CustomMethod_FetchAndPrintTwinAsync(srcId, client);
            // </UseFetchAndPrint>
            Console.WriteLine();
            Console.WriteLine($"Incoming relationships to target twin, {targetId}:");
            await CustomMethod_FetchAndPrintTwinAsync(targetId, client);
            Console.WriteLine("--------");
            Console.WriteLine();

            // Delete the relationship
            // <UseDeleteRelationship>
            await CustomMethod_DeleteRelationshipAsync(client, srcId, $"{srcId}-contains->{targetId}");
            // </UseDeleteRelationship>
            Console.WriteLine();

            // Print twins and their relationships again
            Console.WriteLine("--- Printing details (after relationship deletion):");
            Console.WriteLine("Outgoing relationships from source twin:");
            await CustomMethod_FetchAndPrintTwinAsync(srcId, client);
            Console.WriteLine();
            Console.WriteLine("Incoming relationships to target twin:");
            await CustomMethod_FetchAndPrintTwinAsync(targetId, client);
            Console.WriteLine("--------");
            Console.WriteLine();
        }

        private static DigitalTwinsClient createDtClient()
        {
            string adtInstanceUrl = "https://<your-instance-hostname>";
            var credentials = new DefaultAzureCredential();
            var client = new DigitalTwinsClient(new Uri(adtInstanceUrl), credentials);
            return client;
        }

        // <CreateRelationshipMethod>
        private async static Task CustomMethod_CreateRelationshipAsync(DigitalTwinsClient client, string srcId, string targetId, string relName, IDictionary<string,object> inputProperties)
        {
            var relationship = new BasicRelationship
            {
                TargetId = targetId,
                Name = relName,
                Properties = inputProperties
            };

            try
            {
                string relId = $"{srcId}-{relName}->{targetId}";
                await client.CreateOrReplaceRelationshipAsync<BasicRelationship>(srcId, relId, relationship);
                Console.WriteLine($"Created {relName} relationship successfully. Relationship ID is {relId}.");
            }
            catch (RequestFailedException rex)
            {
                Console.WriteLine($"Create relationship error: {rex.Status}:{rex.Message}");
            }

        }
        // </CreateRelationshipMethod>

        // <UpdateRelationshipMethod>
        private async static Task CustomMethod_UpdateRelationshipAsync(DigitalTwinsClient client, string srcId, string relId, Azure.JsonPatchDocument updateDocument)
        {

            try
            {
                await client.UpdateRelationshipAsync(srcId, relId, updateDocument);
                Console.WriteLine($"Successfully updated {relId}");
            }
            catch (RequestFailedException rex)
            {
                Console.WriteLine($"Update relationship error: {rex.Status}:{rex.Message}");
            }

        }
        // </UpdateRelationshipMethod>

        // <FetchAndPrintMethod>
        private static async Task CustomMethod_FetchAndPrintTwinAsync(string twin_Id, DigitalTwinsClient client)
        {
            Response<BasicDigitalTwin> res = await client.GetDigitalTwinAsync<BasicDigitalTwin>(twin_Id);
            // <UseFindOutgoingRelationships>
            await CustomMethod_FindOutgoingRelationshipsAsync(client, twin_Id);
            // </UseFindOutgoingRelationships>
            // <UseFindIncomingRelationships>
            await CustomMethod_FindIncomingRelationshipsAsync(client, twin_Id);
            // </UseFindIncomingRelationships>

            return;
        }
        // </FetchAndPrintMethod>

        // <FindOutgoingRelationshipsMethod>
        private static async Task<List<BasicRelationship>> CustomMethod_FindOutgoingRelationshipsAsync(DigitalTwinsClient client, string dtId)
        {
            // Find the relationships for the twin

            try
            {
                // GetRelationshipsAsync will throw if an error occurs
                // <GetRelationshipsCall>
                AsyncPageable<BasicRelationship> rels = client.GetRelationshipsAsync<BasicRelationship>(dtId);
                // </GetRelationshipsCall>
                var results = new List<BasicRelationship>();
                await foreach (BasicRelationship rel in rels)
                {
                    results.Add(rel);
                    Console.WriteLine($"Found relationship: {rel.Id}");

                    //Print its properties
                    Console.WriteLine($"Relationship properties:");
                    foreach(KeyValuePair<string, object> property in rel.Properties)
                    {
                        Console.WriteLine("{0} = {1}", property.Key, property.Value);
                    }
                }

                return results;
            }
            catch (RequestFailedException ex)
            {
                Console.WriteLine($"*** Error {ex.Status}/{ex.ErrorCode} retrieving relationships for {dtId} due to {ex.Message}");
                return null;
            }
        }
        // </FindOutgoingRelationshipsMethod>

        // <FindIncomingRelationshipsMethod>
        private static async Task<List<IncomingRelationship>> CustomMethod_FindIncomingRelationshipsAsync(DigitalTwinsClient client, string dtId)
        {
            // Find the relationships for the twin

            try
            {
                // GetRelationshipsAsync will throw an error if a problem occurs
                AsyncPageable<IncomingRelationship> incomingRels = client.GetIncomingRelationshipsAsync(dtId);

                var results = new List<IncomingRelationship>();
                await foreach (IncomingRelationship incomingRel in incomingRels)
                {
                    results.Add(incomingRel);
                    Console.WriteLine($"Found incoming relationship: {incomingRel.RelationshipId}");

                    //Print its properties
                    Response<BasicRelationship> relResponse = await client.GetRelationshipAsync<BasicRelationship>(incomingRel.SourceId, incomingRel.RelationshipId);
                    BasicRelationship rel = relResponse.Value;
                    Console.WriteLine($"Relationship properties:");
                    foreach(KeyValuePair<string, object> property in rel.Properties)
                    {
                        Console.WriteLine("{0} = {1}", property.Key, property.Value);
                    }
                }
                return results;
            }
            catch (RequestFailedException ex)
            {
                Console.WriteLine($"*** Error {ex.Status}/{ex.ErrorCode} retrieving incoming relationships for {dtId} due to {ex.Message}");
                return null;
            }
        }
        // </FindIncomingRelationshipsMethod>

        // <DeleteRelationshipMethod>
        private static async Task CustomMethod_DeleteRelationshipAsync(DigitalTwinsClient client, string srcId, string relId)
        {
            try
            {
                Response response = await client.DeleteRelationshipAsync(srcId, relId);
                await CustomMethod_FetchAndPrintTwinAsync(srcId, client);
                Console.WriteLine("Deleted relationship successfully");
            }
            catch (RequestFailedException e)
            {
                Console.WriteLine($"Error {e.ErrorCode}");
            }
        }
        // </DeleteRelationshipMethod>
    }
}
注意
目前有已知問題會影響 DefaultAzureCredential 包裝函式類別,這可能會導致在驗證時發生錯誤。 如果遇到此問題,您可以嘗試使用下列選擇性參數將 DefaultAzureCredential 具現化,以解決此問題:new DefaultAzureCredential(new DefaultAzureCredentialOptions { ExcludeSharedTokenCacheCredential = true });
如需關於此問題的詳細資訊,請參閱 Azure Digital Twins 已知問題。
設定專案
接下來,完成下列步驟以設定您的專案程式碼:
將您稍早下載的 Room.json 和 Floor.json 檔案新增至您的專案,並取代程式碼中的
<path-to>預留位置,以告知程式可在何處找到。將預留位置
<your-instance-hostname>取代為您 Azure Digital Twins 執行個體的主機名稱。將兩個相依性新增至您的專案,以使用 Azure Digital Twins。 第一個是適用於 .NET 的 Azure Digital Twins SDK 的套件,第二個則會提供協助驗證 Azure 的工具。
dotnet add package Azure.DigitalTwins.Core
dotnet add package Azure.Identity
如果您想要直接執行範例,則也需要設定本機認證。 下一節將逐步解說此程序。
設定本機 Azure 認證
這個範例會使用 DefaultAzureCredential (屬於 Azure.Identity 程式庫),在本機電腦上執行時,使用 Azure Digital Twins 執行個體來驗證使用者。 如需深入了解用戶端應用程式向 Azure Digital Twins 進行驗證的不同方式,請參閱撰寫應用程式驗證碼。
使用 DefaultAzureCredential,該範例會搜尋本機環境中的認證,例如在本機 Azure CLI 中或在 Visual Studio 或 Visual Studio Code 中的 Azure 登入。 因此,您應該透過下列其中一種機制本機登入 Azure,以設定該範例的認證。
如果您使用 Visual Studio 或 Visual Studio Code 來執行程式碼範例,請確定使用要用來存取 Azure Digital Twins 執行個體的相同 Azure 認證來登入該編輯器。 如果您使用本機 CLI 視窗,請執行 az login 命令來登入您的 Azure 帳戶。 之後,當您執行程式碼範例時,應該會自動驗證。
執行範例
現在您已完成設定,可以執行範例程式碼專案。
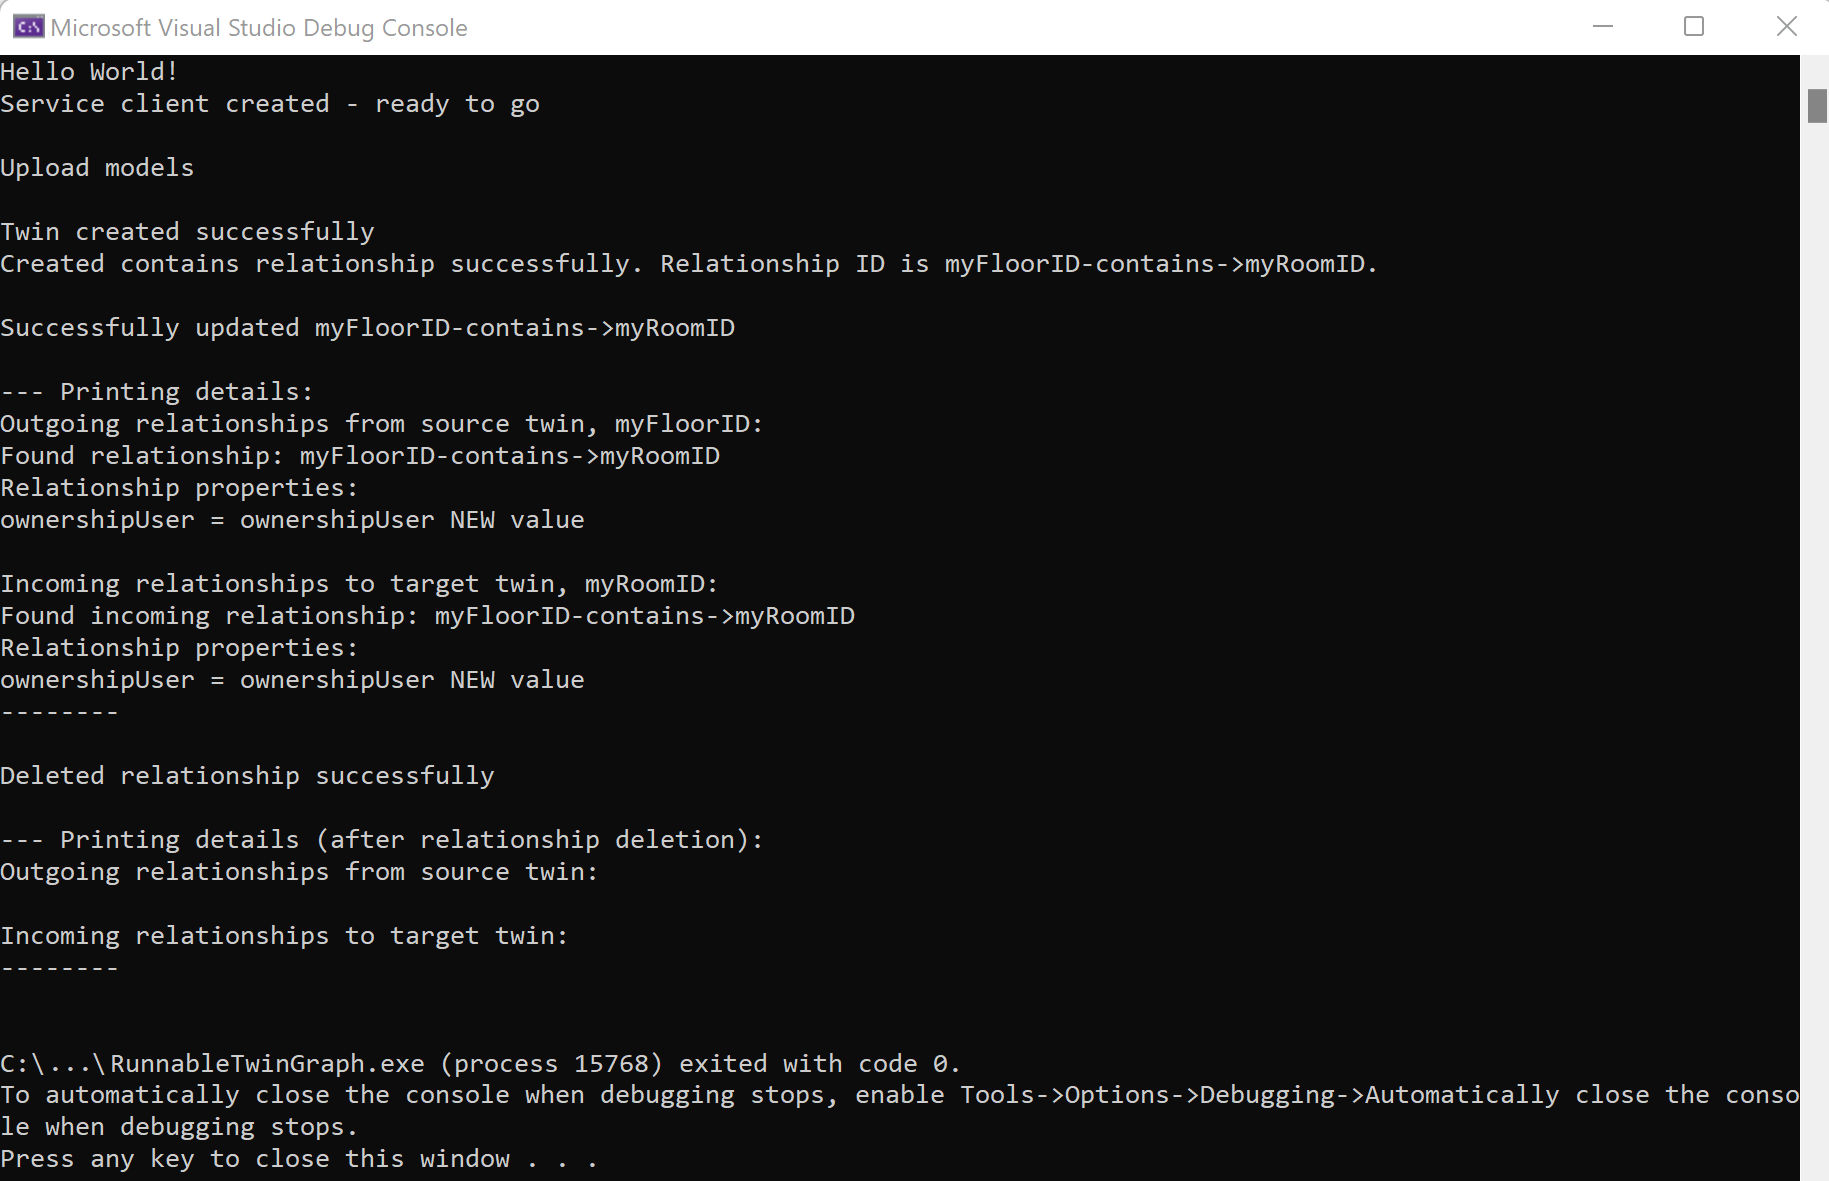
以下是程式的主控台輸出:
提示
對應項圖表是在對應項之間建立關聯性的概念。 如果您想要檢視對應項圖表的視覺化標記法,請參閱本文的視覺效果一節。
下一步
了解如何查詢 Azure Digital Twins 對應項圖表:


