添加控件
注意
本主题是使用 DirectX 创建简单的通用 Windows 平台 (UWP) 游戏教程系列的一部分。 此链接上的主题设置了该系列的上下文。
[ 已针对 Windows 10 上的 UWP 应用更新。 有关 Windows 8.x 文章,请参阅存档 ]
良好的通用 Windows 平台 (UWP) 游戏支持各种接口。 潜在的玩家可能拥有 Windows 10 平板电脑(无物理按钮)、附加游戏控制器的电脑,或具有高性能鼠标和游戏键盘的最新桌面游戏机。 在我们的游戏中,控件在MoveLookController类中实现。 此类将所有三种类型的输入(鼠标和键盘、触摸和游戏板)聚合到单个控制器中。 最终结果是第一人称射击游戏,它使用用于多种设备的流派标准移动观看控件。
目标
此时,我们有可呈现的游戏,但我们无法移动玩家或射击目标。 我们将查看游戏如何为 UWP DirectX 游戏中的以下类型输入实现第一人称射击游戏移动观看控件。
- 鼠标和键盘
- 触控
- 游戏板
注意
如果尚未下载用于此示例的最新游戏代码,请转到 Direct3D 示例游戏。 此示例是大量 UWP 功能示例集合的一部分。 有关如何下载该示例的说明,请参阅Windows 开发的示例应用程序。
常见控件行为
触摸控件和鼠标/键盘控件的核心实现非常相似。 在 UWP 应用中,指针只是屏幕上的一个点。 可以滑动鼠标或在触摸屏上滑动手指以移动它。 因此,可以注册单个事件集,不必担心玩家是使用鼠标还是触摸屏移动并按下指针。
在初始化该示例游戏中的 MoveLookController 类时,将注册四个特定于指针的事件和一个特定于鼠标的事件:
| 事件 | 说明 |
|---|---|
| CoreWindow::PointerPressed | 按下(并按住)了鼠标左右键,或者触摸了触摸屏。 |
| CoreWindow::PointerMoved | 鼠标移动或在触摸屏上执行了拖动操作。 |
| CoreWindow::PointerReleased | 释放了鼠标左键,或者解除了接触触摸屏的对象。 |
| CoreWindow::PointerExited | 指针移出主窗口。 |
| Windows::Devices::Input::MouseMoved | 鼠标移动了一定距离。 请注意,我们只对鼠标移动增量值(不是当前的 X-Y 位置)感兴趣。 |
这些事件处理程序设置为在应用程序窗口中初始化MoveLookController后立即开始侦听用户输入。
void MoveLookController::InitWindow(_In_ CoreWindow const& window)
{
    ResetState();

    window.PointerPressed({ this, &MoveLookController::OnPointerPressed });

    window.PointerMoved({ this, &MoveLookController::OnPointerMoved });

    window.PointerReleased({ this, &MoveLookController::OnPointerReleased });

    window.PointerExited({ this, &MoveLookController::OnPointerExited });

    ...

    // There is a separate handler for mouse-only relative mouse movement events.
    MouseDevice::GetForCurrentView().MouseMoved({ this, &MoveLookController::OnMouseMoved });

    ...
}
GitHub 上可以看到InitWindow的完整代码。
为了确定游戏什么时候应侦听特定输入,MoveLookController类具有三种特定于控制器的状态,而不考虑控制器类型:
| 状态 | 说明 |
|---|---|
| 无 | 这是控制器的初始化状态。 由于游戏未预期任何控制器输入,因此会忽略所有输入。 |
| WaitForInput | 控制器正在等待玩家使用鼠标左键、触摸事件、或游戏板上的输入菜单按钮以确认来自游戏的消息。 |
| 活动 | 控制器处于活动游戏模式。 |
WaitForInput 状态和暂停游戏
游戏暂停时进入WaitForInput状态。 当玩家将指针移到游戏主窗口外或按暂停按钮(P 键或游戏板“开始”按钮)时,会发生这种情况。 MoveLookController注册按下,并在调用isPauseRequested方法时通知游戏循环。 此时,如果IsPauseRequested返回true,游戏循环会在moveLookController上调用WaitForPress,将控制器移动到WaitForInput状态。
进入WaitForInput状态后,游戏会停止处理几乎所有游戏输入事件,直到它返回到活动状态。 异常是暂停按钮,按下此按钮会导致游戏返回到活动状态。 除了暂停按钮之外,要让游戏回退到 Active 状态,玩家需要选择菜单项。
活动状态
在活动状态期间,MoveLookController实例正在处理所有已启用输入设备的事件,并解释玩家的意图。 因此,它会更新玩家视图的速度和观看方向,并在从游戏循环中调用更新后与游戏共享更新的数据。
所有指针输入都以活动状态进行跟踪,并使用不同的指针 ID 对应于不同的指针操作。 收到PointerPressed事件时,MoveLookController获取窗口创建的指针 ID 值。 指针 ID 表示特定类型的输入。 例如,在多点触控设备上,可能同时存在多个不同的活动输入。 ID 用于跟踪玩家正在使用的输入。 如果一个事件位于触摸屏的移动矩形中,会分配指针 ID 以跟踪移动矩形中的任何指针事件。 使用单独的指针 ID 单独跟踪触发矩形中的其他指针事件。
注意
游戏板鼠标和右控制杆的输入也具有单独处理的 ID。
将指针事件映射到特定游戏操作后,可以更新MoveLookController对象与主游戏循环共享的数据。
示例游戏中的 Update 方法被调用时,会处理输入并更新速度和观看方向变量(m_velocity 和 m_lookdirection),然后游戏循环通过调用公共 Velocity 和 LookDirection 方法检索这些变量。
注意
有关更新方法的更多详细信息,可稍后在此页查看。
游戏循环可以调用MoveLookController实例上的IsFiring方法,以测试玩家是否正在触发。 MoveLookController检查玩家是否在三种输入类型之一上按下了触发按钮。
bool MoveLookController::IsFiring()
{
    if (m_state == MoveLookControllerState::Active)
    {
        if (m_autoFire)
        {
            return (m_fireInUse || (m_mouseInUse && m_mouseLeftInUse) || PollingFireInUse());
        }
        else
        {
            if (m_firePressed)
            {
                m_firePressed = false;
                return true;
            }
        }
    }
    return false;
}
现在,我们将较为详细地讨论这三种控件类型中每个类型的实现。
添加相对鼠标控件
如果检测到鼠标移动,我们希望使用该移动确定相机的新俯仰角和偏航角。 我们通过实现相对鼠标控件来实现这一点,即处理鼠标移动的相对距离—移动开始和停止之间的增量—而不是记录运动的绝对 x-y 像素坐标。
为此,我们检查由MouseMoved事件返回的Windows::Device::Input::MouseEventArgs::MouseDelta参数对象上的MouseDelta::X和MouseDelta::Y字段,从而获取 X(水平运动)和 Y(垂直运动)坐标的更改。
void MoveLookController::OnMouseMoved(
    _In_ MouseDevice const& /* mouseDevice */,
    _In_ MouseEventArgs const& args
    )
{
    // Handle Mouse Input via dedicated relative movement handler.

    switch (m_state)
    {
    case MoveLookControllerState::Active:
        XMFLOAT2 mouseDelta;
        mouseDelta.x = static_cast<float>(args.MouseDelta().X);
        mouseDelta.y = static_cast<float>(args.MouseDelta().Y);

        XMFLOAT2 rotationDelta;
        // Scale for control sensitivity.
        rotationDelta.x = mouseDelta.x * MoveLookConstants::RotationGain;
        rotationDelta.y = mouseDelta.y * MoveLookConstants::RotationGain;

        // Update our orientation based on the command.
        m_pitch -= rotationDelta.y;
        m_yaw += rotationDelta.x;

        // Limit pitch to straight up or straight down.
        float limit = XM_PI / 2.0f - 0.01f;
        m_pitch = __max(-limit, m_pitch);
        m_pitch = __min(+limit, m_pitch);

        // Keep longitude in sane range by wrapping.
        if (m_yaw > XM_PI)
        {
            m_yaw -= XM_PI * 2.0f;
        }
        else if (m_yaw < -XM_PI)
        {
            m_yaw += XM_PI * 2.0f;
        }
        break;
    }
}
添加触摸支持
触摸控件非常适合支持拥有平板电脑的用户。 此游戏对屏幕的某些区域进行分区以收集触摸输入,每个区域都与特定的游戏内操作保持一致。 此游戏的触摸输入使用三个区域。
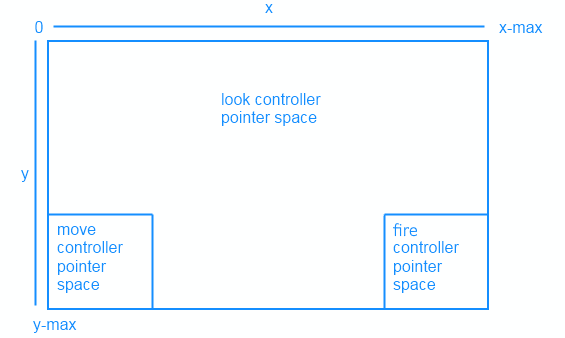
以下命令总结了触摸控件行为。 用户输入 | 操作 :------- | :-------- 移动矩形 | 将触控输入转换为虚拟游戏杆,这时,垂直运动将转换为向前/向后位置移动,水平运动将转换为向左/向右位置移动。 射击矩形 |发射球体。 触摸移动矩形和射击矩形之外的位置 | 更改相机视图的旋转(俯仰和偏航)。
MoveLookController检查指针 ID 以确定事件发生的位置,并执行以下操作之一:
- 如果在移动或触发矩形中发生了PointerMoved事件,则更新控制器的指针位置。
- 如果PointerMoved事件发生在屏幕(定义为观看控件)的其余位置,则计算观看方向向量的俯仰角和偏航角。
实现触摸控件后,之前使用 Direct2D 绘制的矩形将指示玩家移动、触发和观看区域的位置。
现在让我们看看如何实现每个控件。
移动和触发控制器
屏幕左下象限中的移动控制器矩形用作方向键。 在此空间中左右滑动拇指会将玩家左右移动,上下滑动会将相机前后移动。 设置后,点击屏幕右下象限中的触发控制器会触发球体。
SetMoveRect和SetFireRect方法创建输入矩形,采用两个 2D 向量指定屏幕上每个矩形的左上角和右下角位置。
然后将参数分配给“m_fireUpperLeft”和“m_fireLowerRight”,它们将有助于确定用户是否在矩形内触摸。
m_fireUpperLeft = upperLeft;
m_fireLowerRight = lowerRight;
如果调整屏幕大小,这些矩形将重绘为适当的大小。
现在,我们已将控件分区,可以确定用户实际使用它们的时间。 为此,我们在MoveLookController::InitWindow方法中设置一些事件处理程序,以确定用户按下、移动或释放指针的时间。
window.PointerPressed({ this, &MoveLookController::OnPointerPressed });

window.PointerMoved({ this, &MoveLookController::OnPointerMoved });

window.PointerReleased({ this, &MoveLookController::OnPointerReleased });
首先,我们将确定当用户首次使用OnPointerPressed方法在移动或触发矩形内按下时会发生什么情况。 在这里,我们检查它们触摸控件的位置,以及指针是否已在该控制器中。 如果这是触摸特定控件的第一根手指,请执行以下操作。
- 在“m_moveFirstDown”或“m_fireFirstDown”中将触摸位置存储为 2D 矢量。
- 将指针 ID 分配到“m_movePointerID”或“m_firePointerID”。
- 将正确的“InUse”标志(“m_moveInUse”或“m_fireInUse”)设置为
true,因为我们现在已有该控件的活动指针。
PointerPoint point = args.CurrentPoint();
uint32_t pointerID = point.PointerId();
Point pointerPosition = point.Position();
PointerPointProperties pointProperties = point.Properties();
auto pointerDevice = point.PointerDevice();
auto pointerDeviceType = pointerDevice.PointerDeviceType();

XMFLOAT2 position = XMFLOAT2(pointerPosition.X, pointerPosition.Y);

...
case MoveLookControllerState::Active:
    switch (pointerDeviceType)
    {
    case winrt::Windows::Devices::Input::PointerDeviceType::Touch:
        // Check to see if this pointer is in the move control.
        if (position.x > m_moveUpperLeft.x &&
            position.x < m_moveLowerRight.x &&
            position.y > m_moveUpperLeft.y &&
            position.y < m_moveLowerRight.y)
        {
            // If no pointer is in this control yet.
            if (!m_moveInUse)
            {
                // Process a DPad touch down event.
                // Save the location of the initial contact
                m_moveFirstDown = position;
                // Store the pointer using this control
                m_movePointerID = pointerID;
                // Set InUse flag to signal there is an active move pointer
                m_moveInUse = true;
            }
        }
        // Check to see if this pointer is in the fire control.
        else if (position.x > m_fireUpperLeft.x &&
            position.x < m_fireLowerRight.x &&
            position.y > m_fireUpperLeft.y &&
            position.y < m_fireLowerRight.y)
        {
            if (!m_fireInUse)
            {
                // Save the location of the initial contact
                m_fireLastPoint = position;
                // Store the pointer using this control
                m_firePointerID = pointerID;
                // Set InUse flag to signal there is an active fire pointer
                m_fireInUse = true;
                ...
            }
        }
        ...
现在,我们已确定用户是触摸移动还是触发控件,我们看看玩家是否用按下的手指进行任何移动。 使用MoveLookController::OnPointerMoved方法,检查指针已移动,然后将其新位置存储为 2D 向量。
PointerPoint point = args.CurrentPoint();
uint32_t pointerID = point.PointerId();
Point pointerPosition = point.Position();
PointerPointProperties pointProperties = point.Properties();
auto pointerDevice = point.PointerDevice();

// convert to allow math
XMFLOAT2 position = XMFLOAT2(pointerPosition.X, pointerPosition.Y);

switch (m_state)
{
case MoveLookControllerState::Active:
    // Decide which control this pointer is operating.

    // Move control
    if (pointerID == m_movePointerID)
    {
        // Save the current position.
        m_movePointerPosition = position;
    }
    // Look control
    else if (pointerID == m_lookPointerID)
    {
        ...
    }
    // Fire control
    else if (pointerID == m_firePointerID)
    {
        m_fireLastPoint = position;
    }
    ...
当用户在控件中做出手势后,他们将释放指针。 使用MoveLookController::OnPointerReleased方法确定已发布的指针并执行一系列重置。
如果移动控件已发布,我们执行以下操作。
- 将玩家在所有方向中的速度设置为
0,以阻止他们在游戏中移动。 - 将“m_moveInUse”切换到
false,因为用户不会再触摸移动控制器。 - 将移动指针 ID 设置为
0,因为移动控制器中不再有指针。
if (pointerID == m_movePointerID)
{
    // Stop on release.
    m_velocity = XMFLOAT3(0, 0, 0);
    m_moveInUse = false;
    m_movePointerID = 0;
}
对于触发控件,如果已释放,我们所做的就是将m_fireInUse标志切换为false,并将触发指针 ID 切换为0。因为触发控件中不再有指针。
else if (pointerID == m_firePointerID)
{
    m_fireInUse = false;
    m_firePointerID = 0;
}
观看控制器
我们将屏幕未使用区域的触摸设备指针事件视为观看控制器。 在该区域周围滑动手指会改变玩家相机的俯仰角和偏航角(旋转)。
如果MoveLookController::OnPointerPressed事件在此区域的触摸设备上引发,并且游戏状态设置为活动,会为其分配指针 ID。
// If no pointer is in this control yet.
if (!m_lookInUse)
{
    // Save point for later move.
    m_lookLastPoint = position;
    // Store the pointer using this control.
    m_lookPointerID = pointerID;
    // These are for smoothing.
    m_lookLastDelta.x = m_lookLastDelta.y = 0;
    m_lookInUse = true;
}
在这里,MoveLookController将触发事件的指针的指针 ID 分配给与观看区域对应的特定变量。 如果触摸发生在观看区域内,则将“m_lookPointerID”变量设置为触发该事件的指针 ID。 并设置布尔值变量“m_lookInUse”以指示控件尚未释放。
现在,我们介绍示例游戏如何处理 PointerMoved 触摸屏事件。
在MoveLookController::OnPointerMoved方法中,我们检查分配给事件的指针 ID 类型。 如果是m_lookPointerID,我们会计算指针位置的更改。 然后,我们使用此增量计算旋转应更改多少。 最后,我们可以更新游戏中使用的“m_pitch”和“m_yaw”以更改玩家旋转。
// This is the look pointer.
else if (pointerID == m_lookPointerID)
{
    // Look control.
    XMFLOAT2 pointerDelta;
    // How far did the pointer move?
    pointerDelta.x = position.x - m_lookLastPoint.x;
    pointerDelta.y = position.y - m_lookLastPoint.y;

    XMFLOAT2 rotationDelta;
    // Scale for control sensitivity.
    rotationDelta.x = pointerDelta.x * MoveLookConstants::RotationGain;
    rotationDelta.y = pointerDelta.y * MoveLookConstants::RotationGain;
    // Save for next time through.
    m_lookLastPoint = position;

    // Update our orientation based on the command.
    m_pitch -= rotationDelta.y;
    m_yaw += rotationDelta.x;

    // Limit pitch to straight up or straight down.
    float limit = XM_PI / 2.0f - 0.01f;
    m_pitch = __max(-limit, m_pitch);
    m_pitch = __min(+limit, m_pitch);
    ...
}
我们要介绍的最后一个部分是示例游戏如何处理 PointerReleased 触摸屏事件。
用户完成触摸手势并从屏幕中删除手指后,MoveLookController::OnPointerReleased启动。
如果触发PointerReleased事件的指针的 ID 是之前录制的移动指针的 ID,MoveLookController会将速度设置为0,因为玩家已停止触摸观看区域。
else if (pointerID == m_lookPointerID)
{
    m_lookInUse = false;
    m_lookPointerID = 0;
}
添加鼠标和键盘支持
此游戏具有以下键盘和鼠标的控件布局。
| 用户输入 | 操作 |
|---|---|
| W | 向前移动玩家 |
| A | 向左移动玩家 |
| S | 向后移动玩家 |
| 日 | 向右移动玩家 |
| X | 上移视图 |
| 空格键 | 下移视图 |
| P | 暂停游戏 |
| 鼠标移动 | 更改相机视图的旋转(俯仰角和偏航角) |
| 鼠标左键 | 触发球体 |
若要使用键盘,示例游戏可在 MoveLookController::InitWindow 方法内注册两个新事件 CoreWindow::KeyUp 和 CoreWindow::KeyDown。 这些事件处理键的按下和释放。
window.KeyDown({ this, &MoveLookController::OnKeyDown });

window.KeyUp({ this, &MoveLookController::OnKeyUp });
即使鼠标使用指针,鼠标处理方式与触摸控件也稍有不同。 为了与控件布局对齐,MoveLookController会在移动鼠标时旋转相机,并在按下鼠标左键时触发。
这在MoveLookController的 OnPointerPressed方法中进行处理。
在此方法中,我们检查与Windows::Devices::Input::PointerDeviceType枚举结合使用的指针设备类型。
如果游戏处于活动状态,并且PointerDeviceType不是触摸,则假定它是鼠标输入。
case MoveLookControllerState::Active:
    switch (pointerDeviceType)
    {
    case winrt::Windows::Devices::Input::PointerDeviceType::Touch:
        // Behavior for touch controls
        ...

    default:
        // Behavior for mouse controls
        bool rightButton = pointProperties.IsRightButtonPressed();
        bool leftButton = pointProperties.IsLeftButtonPressed();

        if (!m_autoFire && (!m_mouseLeftInUse && leftButton))
        {
            m_firePressed = true;
        }

        if (!m_mouseInUse)
        {
            m_mouseInUse = true;
            m_mouseLastPoint = position;
            m_mousePointerID = pointerID;
            m_mouseLeftInUse = leftButton;
            m_mouseRightInUse = rightButton;
            // These are for smoothing.
            m_lookLastDelta.x = m_lookLastDelta.y = 0;
        }
        break;
    }
    break;
当玩家停止按下其中一个鼠标按钮时,会引发CoreWindow::PointerReleased鼠标事件,调用 MoveLookController::OnPointerReleased方法,输入完成。 此时,如果之前按下鼠标左键并现已释放,球体将停止触发。 由于始终启用观看,游戏会继续使用相同的鼠标指针跟踪正在进行的观看事件。
case MoveLookControllerState::Active:
    // Touch points
    if (pointerID == m_movePointerID)
    {
        // Stop movement
        ...
    }
    else if (pointerID == m_lookPointerID)
    {
        // Stop look rotation
        ...
    }
    // Fire button has been released
    else if (pointerID == m_firePointerID)
    {
        // Stop firing
        ...
    }
    // Mouse point
    else if (pointerID == m_mousePointerID)
    {
        bool rightButton = pointProperties.IsRightButtonPressed();
        bool leftButton = pointProperties.IsLeftButtonPressed();

        // Mouse no longer in use so stop firing
        m_mouseInUse = false;

        // Don't clear the mouse pointer ID so that Move events still result in Look changes.
        // m_mousePointerID = 0;
        m_mouseLeftInUse = leftButton;
        m_mouseRightInUse = rightButton;
    }
    break;
现在,让我们看看我们将支持的最后一种控件类型:游戏板。 游戏板与触摸和鼠标控件分开处理,因为它们不使用指针对象。 因此,需要添加一些新的事件处理程序和方法。
添加游戏板支持
对于此游戏,调用Windows.Gaming.Input API 以添加游戏板支持。 这组 API 提供对游戏控制器输入(例如,赛车方向盘和飞行摇杆)的访问权限。
以下是我们的游戏板控件。
| 用户输入 | 操作 |
|---|---|
| 左模拟摇杆 | 移动玩家 |
| 右模拟摇杆 | 更改相机视图的旋转(俯仰角和偏航角) |
| 右扳机键 | 触发球体 |
| “开始/菜单”按钮 | 暂停或恢复游戏 |
在InitWindow方法中,我们新增了两个事件,以确定游戏板是否已添加或删除。 这些事件更新m_gamepadsChanged属性。 这在“UpdatePollingDevices”方法中用于检查是否已更改已知游戏板的列表。
// Detect gamepad connection and disconnection events.
Gamepad::GamepadAdded({ this, &MoveLookController::OnGamepadAdded });

Gamepad::GamepadRemoved({ this, &MoveLookController::OnGamepadRemoved });
注意
当 UWP 应用不聚焦时,应用无法从游戏控制器接收输入。
UpdatePollingDevices 方法
MoveLookController实例的 UpdatePollingDevices方法会立即检查游戏板是否已连接。 如果是,我们将开始使用Gamepad.GetCurrentReading读取其状态。 这会返回GamepadReading结构,允许我们检查已点击的按钮或移动的控制杆。
如果游戏的状态为WaitForInput,我们只侦听控制器的“开始/菜单”按钮,以便可以恢复游戏。
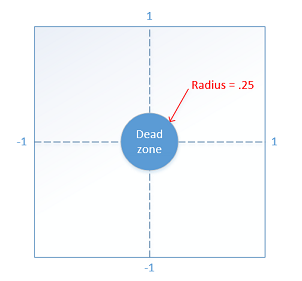
如果处于活动状态,我们会检查用户的输入并确定需要执行哪些游戏内操作。 例如,如果用户在特定方向移动了左模拟摇杆,这会让游戏了解我们需要沿摇杆移动的方向移动玩家。 以特定方向移动摇杆必须注册为大于死区半径;否则,不会发生任何情况。 此死区半径是阻止“偏移”的必需项,即当玩家的拇指停留在摇杆上时,控制器会捕捉其小动作。 如果没有死区,控件可能会对用户过于敏感。
对于 x 轴和 y 轴,控制杆输入介于 -1 和 1 之间。 以下常量指定操纵杆死区半径。
#define THUMBSTICK_DEADZONE 0.25f
使用此变量,然后开始处理可操作的控制杆输入。 任一轴上的移动值都介于 [-1, -.26] 或 [.26, 1] 之间。
UpdatePollingDevices方法的这一部分处理左右控制杆。 检查每个摇杆的 X 值和 Y 值,以查看它们是否位于死区外。 如果一个或两者位于死区外,我们将更新相应的组件。 例如,如果左控制杆沿 X 轴向左移动,我们会将 -1 添加到m_moveCommand向量的x组件。 此向量用于聚合跨所有设备的所有移动,稍后将用于计算玩家应移动的位置。
// Use the left thumbstick to control the eye point position
// (position of the player).

// Check if left thumbstick is outside of dead zone on x axis
if (reading.LeftThumbstickX > THUMBSTICK_DEADZONE ||
    reading.LeftThumbstickX < -THUMBSTICK_DEADZONE)
{
    // Get value of left thumbstick's position on x axis
    float x = static_cast<float>(reading.LeftThumbstickX);
    // Set the x of the move vector to 1 if the stick is being moved right.
    // Set to -1 if moved left.
    m_moveCommand.x -= (x > 0) ? 1 : -1;
}

// Check if left thumbstick is outside of dead zone on y axis
if (reading.LeftThumbstickY > THUMBSTICK_DEADZONE ||
    reading.LeftThumbstickY < -THUMBSTICK_DEADZONE)
{
    // Get value of left thumbstick's position on y axis
    float y = static_cast<float>(reading.LeftThumbstickY);
    // Set the y of the move vector to 1 if the stick is being moved forward.
    // Set to -1 if moved backwards.
    m_moveCommand.y += (y > 0) ? 1 : -1;
}
与左摇杆控制移动的方式类似,右摇杆控制相机的旋转。
右拇指摇杆行为与鼠标在鼠标和键盘控件设置中的鼠标移动行为保持一致。 如果摇杆位于死区外,我们会计算当前指针位置与用户现在尝试观看的位置之间的差异。 然后,此指针位置 (pointerDelta) 的更改用于更新相机旋转的俯仰角和偏航角(稍后在更新方法中应用)。 pointerDelta矢量可能看起来很熟悉,因为它也用于MoveLookController::OnPointerMoved方法以跟踪鼠标和触摸输入的指针位置的更改。
// Use the right thumbstick to control the look at position

XMFLOAT2 pointerDelta;

// Check if right thumbstick is outside of deadzone on x axis
if (reading.RightThumbstickX > THUMBSTICK_DEADZONE ||
    reading.RightThumbstickX < -THUMBSTICK_DEADZONE)
{
    float x = static_cast<float>(reading.RightThumbstickX);
    // Register the change in the pointer along the x axis
    pointerDelta.x = x * x * x;
}
// No actionable thumbstick movement. Register no change in pointer.
else
{
    pointerDelta.x = 0.0f;
}
// Check if right thumbstick is outside of deadzone on y axis
if (reading.RightThumbstickY > THUMBSTICK_DEADZONE ||
    reading.RightThumbstickY < -THUMBSTICK_DEADZONE)
{
    float y = static_cast<float>(reading.RightThumbstickY);
    // Register the change in the pointer along the y axis
    pointerDelta.y = y * y * y;
}
else
{
    pointerDelta.y = 0.0f;
}

XMFLOAT2 rotationDelta;
// Scale for control sensitivity.
rotationDelta.x = pointerDelta.x * 0.08f;
rotationDelta.y = pointerDelta.y * 0.08f;

// Update our orientation based on the command.
m_pitch += rotationDelta.y;
m_yaw += rotationDelta.x;

// Limit pitch to straight up or straight down.
m_pitch = __max(-XM_PI / 2.0f, m_pitch);
m_pitch = __min(+XM_PI / 2.0f, m_pitch);
游戏的控件不会完成, 没有触发球体的能力!
此UpdatePollingDevices方法还会检查是否按下了正确的触发器。 如果是,我们的m_firePressed属性会被翻转为 true,向游戏发出信号,指示球体应开始触发。
if (reading.RightTrigger > TRIGGER_DEADZONE)
{
    if (!m_autoFire && !m_gamepadTriggerInUse)
    {
        m_firePressed = true;
    }

    m_gamepadTriggerInUse = true;
}
else
{
    m_gamepadTriggerInUse = false;
}
更新方法
最后,让我们深入了解更新方法。 此方法合并玩家使用任何受支持的输入进行的任何移动或旋转,以生成速度向量,并更新游戏循环访问的俯仰角和偏航角值。
更新方法调用UpdatePollingDevices以更新控制器的状态,从而启动操作。 此方法还会从游戏板收集任何输入,并将其移动添加到m_moveCommand向量。
在更新方法中,然后执行以下输入检查。
- 如果玩家正在使用移动控制器矩形,我们将确定指针位置的更改,并使用该更改计算用户是否已将指针移出控制器的死区。 如果在死区之外,m_moveCommand向量属性会使用虚拟游戏杆值进行更新。
- 如果按下了任何移动键盘输入,
1.0f或-1.0f的值将添加到 m_moveCommand 矢量的相应组件中,1.0f代表向前,-1.0f代表向后。
考虑到所有移动输入,然后,我们通过一些计算运行m_moveCommand向量,以生成新的向量,表示玩家在游戏世界中的方向。
然后,我们获取与世界相关的移动,并将它们作为该方向上的速度应用于玩家。
最后,我们将m_moveCommand向量重置为(0.0f, 0.0f, 0.0f),以便为下一个游戏框架做好一切准备。
void MoveLookController::Update()
{
    // Get any gamepad input and update state
    UpdatePollingDevices();

    if (m_moveInUse)
    {
        // Move control.
        XMFLOAT2 pointerDelta;

        pointerDelta.x = m_movePointerPosition.x - m_moveFirstDown.x;
        pointerDelta.y = m_movePointerPosition.y - m_moveFirstDown.y;

        // Figure out the command from the virtual joystick.
        XMFLOAT3 commandDirection = XMFLOAT3(0.0f, 0.0f, 0.0f);
        // Leave 32 pixel-wide dead spot for being still.
        if (fabsf(pointerDelta.x) > 16.0f)
            m_moveCommand.x -= pointerDelta.x / fabsf(pointerDelta.x);

        if (fabsf(pointerDelta.y) > 16.0f)
            m_moveCommand.y -= pointerDelta.y / fabsf(pointerDelta.y);
    }

    // Poll our state bits set by the keyboard input events.
    if (m_forward)
    {
        m_moveCommand.y += 1.0f;
    }
    if (m_back)
    {
        m_moveCommand.y -= 1.0f;
    }
    if (m_left)
    {
        m_moveCommand.x += 1.0f;
    }
    if (m_right)
    {
        m_moveCommand.x -= 1.0f;
    }
    if (m_up)
    {
        m_moveCommand.z += 1.0f;
    }
    if (m_down)
    {
        m_moveCommand.z -= 1.0f;
    }

    // Make sure that 45deg cases are not faster.
    if (fabsf(m_moveCommand.x) > 0.1f ||
        fabsf(m_moveCommand.y) > 0.1f ||
        fabsf(m_moveCommand.z) > 0.1f)
    {
        XMStoreFloat3(&m_moveCommand, XMVector3Normalize(XMLoadFloat3(&m_moveCommand)));
    }

    // Rotate command to align with our direction (world coordinates).
    XMFLOAT3 wCommand;
    wCommand.x = m_moveCommand.x * cosf(m_yaw) - m_moveCommand.y * sinf(m_yaw);
    wCommand.y = m_moveCommand.x * sinf(m_yaw) + m_moveCommand.y * cosf(m_yaw);
    wCommand.z = m_moveCommand.z;

    // Scale for sensitivity adjustment.
    // Our velocity is based on the command. Y is up.
    m_velocity.x = -wCommand.x * MoveLookConstants::MovementGain;
    m_velocity.z = wCommand.y * MoveLookConstants::MovementGain;
    m_velocity.y = wCommand.z * MoveLookConstants::MovementGain;

    // Clear movement input accumulator for use during next frame.
    m_moveCommand = XMFLOAT3(0.0f, 0.0f, 0.0f);
}
后续步骤
现在添加控件后,需要添加另一项功能以创建沉浸式游戏:声音! 音乐和音效对任何游戏都很重要,因此接下来,让我们讨论添加声音。