高级快速视图功能
本教程基于以下教程构建:高级卡片视图功能。
从上一教程 高级卡片视图功能 中的 HelloWorld ACE 开始。 HelloWorld ACE 可显示总步骤计数,或一次显示一个单个步骤。 使用快速视图,ACE 可以显示所有步骤的列表。 此外,ACE 可以显示有关特定步骤的更多详细信息(如果已选择)。
在快速视图中显示所有项目
在项目中定位并打开以下文件:./src/adaptiveCardExtensions/helloWorld/quickView/QuickView.ts。
使用以下更改更新 QuickView.ts 文件中的代码:
import { IListItem } from '../HelloWorldAdaptiveCardExtension';

..

export interface IQuickViewData {
  items: IListItem[];
}

..

public get data(): IQuickViewData {
  return {
    items: this.state.items
  };
}
接下来,找到并打开文件 src/adaptiveCardExtensions/helloWorld/quickView/template/QuickViewTemplate.json, 并将其内容替换为以下 JSON。 这将更新在 ACE 中呈现的快速视图卡片:
{
  "$schema": "http://adaptivecards.io/schemas/adaptive-card.json",
  "type": "AdaptiveCard",
  "version": "1.2",
  "body": [
    {
      "type": "Container",
      "$data": "${items}",
      "selectAction": {
        "type": "Action.Submit",
        "data": {
          "id": "selectAction",
          "newIndex": "${index}"
        }
      },
      "separator": true,
      "items": [
        {
          "type": "TextBlock",
          "text": "${title}",
          "color": "dark",
          "weight": "Bolder",
          "size": "large",
          "wrap": true,
          "maxLines": 1,
          "spacing": "None"
        },
        {
          "type": "TextBlock",
          "text": "${description}",
          "color": "dark",
          "wrap": true,
          "size": "medium",
          "maxLines": 1,
          "spacing": "None"
        }
      ]
    }
  ]
}
如 JSON 模板中所示,我们使用 ${index} 将所选项索引传递到 QuickView。 若要使此功能正常工作,必须添加并填充
index在上一教程中定义的 对象的 属性IListItem。 打开并找到文件 ./src/adaptiveCardExtensions/helloWorld/HelloWorldAdaptiveCardExtension.ts,然后将属性index添加到IListItem定义:export interface IListItem { title: string; description: string; index: number; }最后,在同一类中找到
fetchData()方法,并将其内部的映射函数修改为:... .then((jsonResponse) => jsonResponse.value.map( (item, index) => { return { title: item.Title, description: item.Description, index: index }; }) ) ...
在托管工作台中生成并启动 ACE:
gulp serve
加载本地 webserver 后,导航到托管工作台:https://{tenant}.sharepoint.com/_layouts/15/workbench.aspx
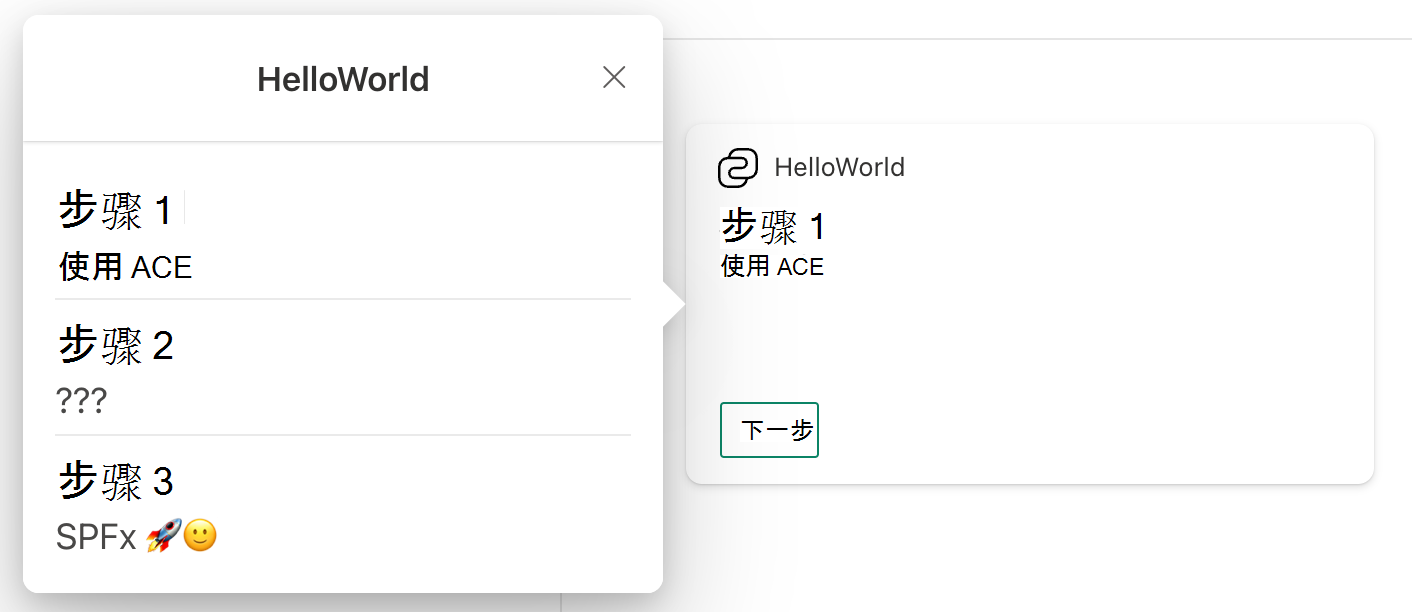
打开工具箱并选择 ACE。 选择卡片以打开快速视图:

由于 onAction() 处理程序尚未更改为处理项目单击,因此选择某个项目不会执行任何操作。 你将在下一步中解决此问题。
创建新的快速视图
创建新文件以保存新的快速视图卡片:./src/adaptiveCardExtensions/helloWorld/quickView/DetailedQuickViewTemplate.json。
将以下 JSON 添加到 DetailedQuickViewTemplate.json 文件:
{
  "$schema": "http://adaptivecards.io/schemas/adaptive-card.json",
  "type": "AdaptiveCard",
  "version": "1.2",
  "body": [
    {
      "type": "ColumnSet",
      "columns": [
        {
          "type": "Column",
          "items": [
            {
              "type": "TextBlock",
              "text": "${title}",
              "size": "ExtraLarge"
            },
            {
              "type": "TextBlock",
              "text": "${description}",
              "size": "Medium"
            }
          ]
        },
        {
          "type": "Column",
          "style": "emphasis",
          "items": [
            {
              "type": "TextBlock",
              "text": "${details}",
              "weight": "Lighter"
            }
          ]
        }
      ]
    },
    {
      "type": "ActionSet",
      "actions": [
        {
          "type": "Action.Submit",
          "title": "Back",
          "data": {
            "id": "back"
          }
        }
      ]
    }
  ]
}
创建新文件来实现新的快速视图 :./src/adaptiveCardExtensions/helloWorld/quickView/DetailedQuickView.ts
将以下代码添加到 DetailedQuickView.ts 文件:
import { BaseAdaptiveCardView, IActionArguments, ISPFxAdaptiveCard } from '@microsoft/sp-adaptive-card-extension-base';
import { IHelloWorldAdaptiveCardExtensionProps, IHelloWorldAdaptiveCardExtensionState } from '../HelloWorldAdaptiveCardExtension';

export interface IDetailedViewData {
  title: string;
  description: string;
  details: string;
}

export class DetailedView extends BaseAdaptiveCardView<
  IHelloWorldAdaptiveCardExtensionProps,
  IHelloWorldAdaptiveCardExtensionState,
  IDetailedViewData
> {
  public get data(): IDetailedViewData {
    const { description, title } = this.state.items[this.state.currentIndex];
    return {
      description,
      title,
      details: 'More details'
    };
  }

  public get template(): ISPFxAdaptiveCard {
    return require('./template/DetailedQuickViewTemplate.json');
  }
}
注册新的快速视图
创建新的详细快速视图后,现在你需要在 ACE 中注册:
在项目中定位并打开以下文件: ./src/adaptiveCardExtensions/helloWorld/HelloWorldAdaptiveCardExtension.ts。
使用以下更改修改 HelloWorldAdaptiveCardExtension.ts 文件中的代码:
import { DetailedView } from './quickView/DetailedQuickView';

..

export const DETAILED_QUICK_VIEW_REGISTRY_ID: string = 'HelloWorld_DETAILED_QUICK_VIEW';

..

public onInit(): Promise<void> {
  // ...
  this.quickViewNavigator.register(QUICK_VIEW_REGISTRY_ID, () => new QuickView());
  this.quickViewNavigator.register(DETAILED_QUICK_VIEW_REGISTRY_ID, () => new DetailedView());
  // ...
}
ViewNavigator
ACE 的 cardNavigator和quickViewNavigator 是 ViewNavigator的实例。
ViewNavigator 的 功能不仅仅只是注册新视图。 ViewNavigator是卡片和快速视图的状态管理 API。 创建视图时,它们将自动推送到视图堆栈。
AES 可以使用 ViewNavigator 操作堆栈。
ViewNavigator.push():将新视图推送到视图堆栈的顶部。ViewNavigator.replace():将顶部视图替换为新视图。ViewNavigator.pop():如果有多个视图,则从视图堆栈中弹出顶部视图。ViewNavigator.close():关闭当前视图并从视图堆栈中删除顶部视图。
在视图之间导航
更新快速视图以在视图之间导航:
在项目中定位并打开以下文件:./src/adaptiveCardExtensions/helloWorld/quickView/QuickView.ts。
更新 QuickView.ts 文件中的代码,以便在从快速视图中选择项目时进行处理:
import { DETAILED_QUICK_VIEW_REGISTRY_ID } from '../HelloWorldAdaptiveCardExtension'; .. public onAction(action: IActionArguments): void { if (action.type === 'Submit') { const { id, newIndex } = action.data; if (id === 'selectAction') { this.quickViewNavigator.push(DETAILED_QUICK_VIEW_REGISTRY_ID, true); this.setState({ currentIndex: newIndex}); } } }在项目中定位并打开以下文件:./src/adaptiveCardExtensions/helloWorld/quickView/DetailedQuickView.ts
选择"详细快速视图"的后退按钮后,将 DetailedQuickView.ts 文件中的代码更新为"处理":
public onAction(action: IActionArguments): void {
  if (action.type === 'Submit') {
    const { id } = action.data;
    if (id === 'back') {
      this.quickViewNavigator.pop();
    }
  }
}
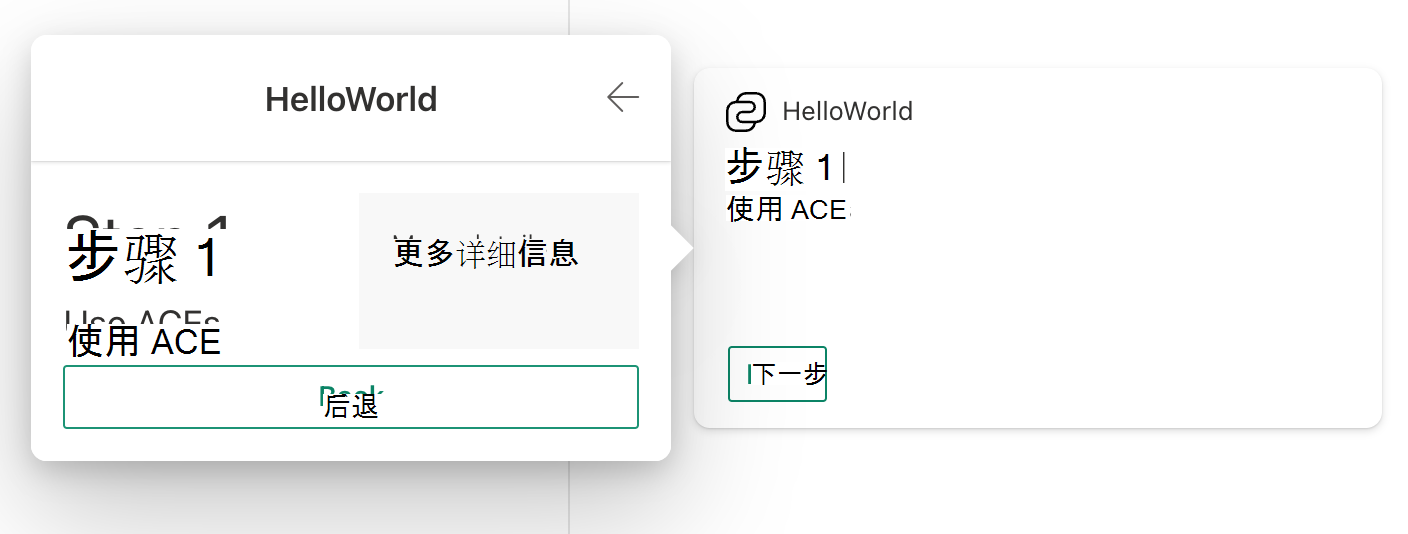
重新加载工作台,选择卡片打开快速视图,然后选择快速视图中的项目。

请尝试选择“后退”并选择其他项目。
onRenderTypeChanged()
当 ACE 从一个 RenderType 转换为另一个时,使用前一个 RenderType 调用 onRenderTypeChanged() 方法;此时将更新 this.renderType。 这可用于在转换期间执行的任何任务。
例如,你可能想要在打开快速视图时保持卡片状态。 让我们来开始此操作:
在项目中定位并打开以下文件: ./src/adaptiveCardExtensions/helloWorld/HelloWorldAdaptiveCardExtension.ts。
更新 HelloWorldAdaptiveCardExtension.ts 文件中的代码,以引入在 RenderType 更改期间跟踪上一个索引的专用成员:
import { RenderType } from '@microsoft/sp-adaptive-card-extension-base';
import { DetailedView } from './quickView/DetailedQuickView';

private _cardIndex: number;

..

protected onRenderTypeChanged(oldRenderType: RenderType): void {
  if (oldRenderType === 'QuickView') {
    // Reset to the Card state when the Quick View was opened.
    this.setState({ currentIndex: this._cardIndex });
  } else {
    // The Quick View is opened, save the current index.
    this._cardIndex = this.state.currentIndex;
  }
}
重新加载工作台。 尝试在单击不同的项目后打开和关闭快速视图。 请注意,卡片视图将保持其打开状态。
总结
经过该实验后,应熟悉以下内容:
- 创建和注册快速视图
- 使用
ViewNavigator进行导航 - 处理快速视图中的操作
- 使用
onRenderTypeChanged() - 高级快速视图操作