Xamarin.Forms CarouselView 数据
CarouselView 包括以下用于定义要显示的数据及其外观的属性:
ItemsSource,类型为IEnumerable,指定要显示的项集合,其默认值为null。ItemTemplate,类型为DataTemplate,指定将应用于要显示的项集合中的各个项的模板。
这些属性由 BindableProperty 对象提供支持,这意味着这些属性可以作为数据绑定的目标。
注意
CarouselView 定义 ItemsUpdatingScrollMode 属性,表示 CarouselView 添加新项时的滚动行为。 有关此属性的详细信息,请参阅添加新项时的控件滚动位置。
CarouselView 支持在用户滚动时进行增量数据虚拟化。 有关详细信息,请参阅以增量方式加载数据。
使用数据填充 CarouselView
通过将 CarouselView 的 ItemsSource 属性设置为实现 IEnumerable 的任何集合来填充数据。 默认情况下,CarouselView 水平显示项。
重要说明
如果在基础集合中添加、移除或更改项时需要刷新 CarouselView,则基础集合应是发送属性更改通知的 IEnumerable 集合,例如 ObservableCollection。
通过使用数据绑定将 CarouselView 的 ItemsSource 属性绑定到 IEnumerable 集合即可对其填充数据。 在 XAML 中,此过程可通过使用 Binding 标记扩展实现:
<CarouselView ItemsSource="{Binding Monkeys}" />
等效 C# 代码如下:
CarouselView carouselView = new CarouselView();
carouselView.SetBinding(ItemsView.ItemsSourceProperty, "Monkeys");
在此示例中, ItemsSource 属性数据绑定到所连接视图模型的 Monkeys 属性。
注意
可启用已编译的绑定来提升 Xamarin.Forms 应用程序中的数据绑定性能。 有关详细信息,请参阅已编译的绑定。
有关如何更改 CarouselView 方向的信息,请参阅 Xamarin.Forms CarouselView 布局。 有关如何定义 CarouselView 每个项的外观的信息,请参阅定义项外观。 若要深入了解数据绑定,请参阅 Xamarin.Forms 数据绑定。
定义项外观
将 CarouselView.ItemTemplate 属性设置为 DataTemplate 可定义 CarouselView 中每个项的外观:
<CarouselView ItemsSource="{Binding Monkeys}">
    <CarouselView.ItemTemplate>
        <DataTemplate>
            <StackLayout>
                <Frame HasShadow="True"
                       BorderColor="DarkGray"
                       CornerRadius="5"
                       Margin="20"
                       HeightRequest="300"
                       HorizontalOptions="Center"
                       VerticalOptions="CenterAndExpand">
                    <StackLayout>
                        <Label Text="{Binding Name}"
                               FontAttributes="Bold"
                               FontSize="Large"
                               HorizontalOptions="Center"
                               VerticalOptions="Center" />
                        <Image Source="{Binding ImageUrl}"
                               Aspect="AspectFill"
                               HeightRequest="150"
                               WidthRequest="150"
                               HorizontalOptions="Center" />
                        <Label Text="{Binding Location}"
                               HorizontalOptions="Center" />
                        <Label Text="{Binding Details}"
                               FontAttributes="Italic"
                               HorizontalOptions="Center"
                               MaxLines="5"
                               LineBreakMode="TailTruncation" />
                    </StackLayout>
                </Frame>
            </StackLayout>
        </DataTemplate>
    </CarouselView.ItemTemplate>
</CarouselView>
等效 C# 代码如下:
CarouselView carouselView = new CarouselView();
carouselView.SetBinding(ItemsView.ItemsSourceProperty, "Monkeys");

carouselView.ItemTemplate = new DataTemplate(() =>
{
    Label nameLabel = new Label { ... };
    nameLabel.SetBinding(Label.TextProperty, "Name");

    Image image = new Image { ... };
    image.SetBinding(Image.SourceProperty, "ImageUrl");

    Label locationLabel = new Label { ... };
    locationLabel.SetBinding(Label.TextProperty, "Location");

    Label detailsLabel = new Label { ... };
    detailsLabel.SetBinding(Label.TextProperty, "Details");

    StackLayout stackLayout = new StackLayout
    {
        Children = { nameLabel, image, locationLabel, detailsLabel }
    };

    Frame frame = new Frame { ... };
    StackLayout rootStackLayout = new StackLayout
    {
        Children = { frame }
    };

    return rootStackLayout;
});
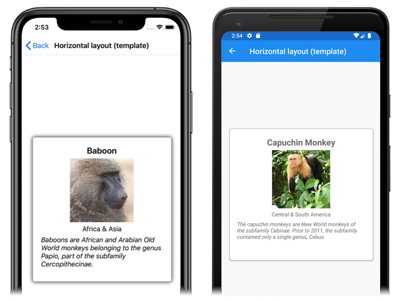
DataTemplate 中指定的元素定义 CarouselView 中各个项的外观。 在此示例中,DataTemplate 中的布局由 StackLayout 管理,并且数据通过一个 Image 对象和三个 Label 对象显示,这些对象都绑定到 Monkey 类的属性:
public class Monkey
{
    public string Name { get; set; }
    public string Location { get; set; }
    public string Details { get; set; }
    public string ImageUrl { get; set; }
}
下面的屏幕截图显示了每个项模板化后的结果:
有关数据模板的详细信息,请参阅 Xamarin.Forms 数据模板。
在运行时选择项外观
通过将 CarouselView.ItemTemplate 属性设置为 DataTemplateSelector 对象,可以在运行时根据项值选择 CarouselView 中每个项的外观:
<ContentPage ...
             xmlns:controls="clr-namespace:CarouselViewDemos.Controls"
             x:Class="CarouselViewDemos.Views.HorizontalLayoutDataTemplateSelectorPage">
    <ContentPage.Resources>
        <DataTemplate x:Key="AmericanMonkeyTemplate">
            ...
        </DataTemplate>

        <DataTemplate x:Key="OtherMonkeyTemplate">
            ...
        </DataTemplate>

        <controls:MonkeyDataTemplateSelector x:Key="MonkeySelector"
                                             AmericanMonkey="{StaticResource AmericanMonkeyTemplate}"
                                             OtherMonkey="{StaticResource OtherMonkeyTemplate}" />
    </ContentPage.Resources>

    <CarouselView ItemsSource="{Binding Monkeys}"
                  ItemTemplate="{StaticResource MonkeySelector}" />
</ContentPage>
等效 C# 代码如下:
CarouselView carouselView = new CarouselView
{
    ItemTemplate = new MonkeyDataTemplateSelector { ... }
};
carouselView.SetBinding(ItemsView.ItemsSourceProperty, "Monkeys");
ItemTemplate 属性设置为 MonkeyDataTemplateSelector 对象。 以下示例显示了 MonkeyDataTemplateSelector 类:
public class MonkeyDataTemplateSelector : DataTemplateSelector
{
    public DataTemplate AmericanMonkey { get; set; }
    public DataTemplate OtherMonkey { get; set; }

    protected override DataTemplate OnSelectTemplate(object item, BindableObject container)
    {
        return ((Monkey)item).Location.Contains("America") ? AmericanMonkey : OtherMonkey;
    }
}
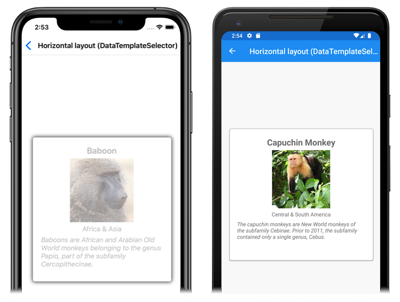
MonkeyDataTemplateSelector 类定义了设置为不同数据模板的 AmericanMonkey 和 OtherMonkey DataTemplate 属性。 当猴子名称包含“America”时,OnSelectTemplate 替代将返回 AmericanMonkey 模板。 当猴子名称不包含“America”时,OnSelectTemplate 替代将返回 OtherMonkey 模板,该模板将其数据显示为灰色:
有关数据模板选择器的详细信息,请参阅创建 Xamarin.Forms DataTemplateSelector。
重要说明
使用 CarouselView 时,切勿将 DataTemplate 对象的根元素设置为 ViewCell。 这将导致引发异常,因为 CarouselView 没有单元格的概念。
显示指示器
可在 CarouselView 旁边显示表示 CarouselView 中的项数和当前位置的指示器。 这可以通过 IndicatorView 控件来实现:
<StackLayout>
    <CarouselView ItemsSource="{Binding Monkeys}"
                  IndicatorView="indicatorView">
        <CarouselView.ItemTemplate>
            <!-- DataTemplate that defines item appearance -->
        </CarouselView.ItemTemplate>
    </CarouselView>
    <IndicatorView x:Name="indicatorView"
                   IndicatorColor="LightGray"
                   SelectedIndicatorColor="DarkGray"
                   HorizontalOptions="Center" />
</StackLayout>
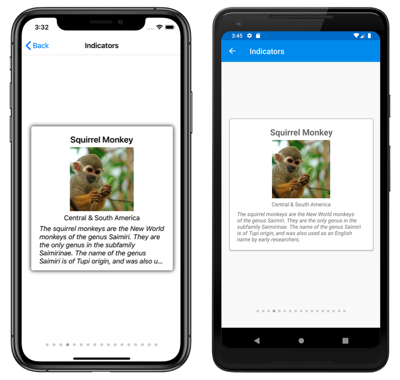
在此示例中,IndicatorView 呈现在 CarouselView 下方,其中包含 CarouselView 中每个项的指示器。 IndicatorView 通过将 CarouselView.IndicatorView 属性设置为 IndicatorView 对象来填充数据。 每个指示器都是浅灰色圆圈,而表示 CarouselView 中当前项的指示器为深灰色:
重要
设置 CarouselView.IndicatorView 属性会导致 IndicatorView.Position 属性绑定到 CarouselView.Position 属性,且 IndicatorView.ItemsSource 属性绑定到 CarouselView.ItemsSource 属性。
有关指示器的详细信息,请参阅 Xamarin.Forms IndicatorView。
上下文菜单
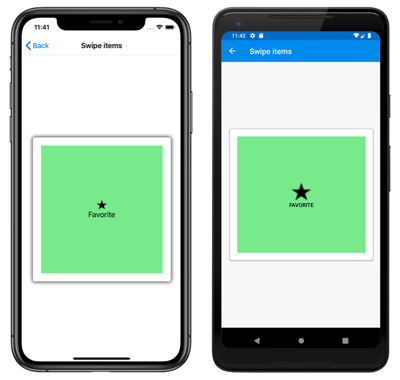
CarouselView 支持通过 SwipeView 查看上下文菜单的数据项,此控件通过轻扫手势显示上下文菜单。 SwipeView 是一个容器控件,该控件包围内容项,并为该内容项提供上下文菜单项。 因此,通过创建 SwipeView 并定义 SwipeView 包围的内容以及通过轻扫手势显示的上下文菜单项,可以针对 CarouselView 实现上下文菜单。 实现方法就是将 SwipeView 添加到 DataTemplate 以定义 CarouselView 中各数据项的外观:
<CarouselView x:Name="carouselView"
              ItemsSource="{Binding Monkeys}">
    <CarouselView.ItemTemplate>
        <DataTemplate>
            <StackLayout>
                    <Frame HasShadow="True"
                           BorderColor="DarkGray"
                           CornerRadius="5"
                           Margin="20"
                           HeightRequest="300"
                           HorizontalOptions="Center"
                           VerticalOptions="CenterAndExpand">
                        <SwipeView>
                            <SwipeView.TopItems>
                                <SwipeItems>
                                    <SwipeItem Text="Favorite"
                                               IconImageSource="favorite.png"
                                               BackgroundColor="LightGreen"
                                               Command="{Binding Source={x:Reference carouselView}, Path=BindingContext.FavoriteCommand}"
                                               CommandParameter="{Binding}" />
                                </SwipeItems>
                            </SwipeView.TopItems>
                            <SwipeView.BottomItems>
                                <SwipeItems>
                                    <SwipeItem Text="Delete"
                                               IconImageSource="delete.png"
                                               BackgroundColor="LightPink"
                                               Command="{Binding Source={x:Reference carouselView}, Path=BindingContext.DeleteCommand}"
                                               CommandParameter="{Binding}" />
                                </SwipeItems>
                            </SwipeView.BottomItems>
                            <StackLayout>
                                <!-- Define item appearance -->
                            </StackLayout>
                        </SwipeView>
                    </Frame>
            </StackLayout>
        </DataTemplate>
    </CarouselView.ItemTemplate>
</CarouselView>
等效 C# 代码如下:
CarouselView carouselView = new CarouselView();
carouselView.SetBinding(ItemsView.ItemsSourceProperty, "Monkeys");

carouselView.ItemTemplate = new DataTemplate(() =>
{
    StackLayout stackLayout = new StackLayout();
    Frame frame = new Frame { ... };

    SwipeView swipeView = new SwipeView();
    SwipeItem favoriteSwipeItem = new SwipeItem
    {
        Text = "Favorite",
        IconImageSource = "favorite.png",
        BackgroundColor = Color.LightGreen
    };
    favoriteSwipeItem.SetBinding(MenuItem.CommandProperty, new Binding("BindingContext.FavoriteCommand", source: carouselView));
    favoriteSwipeItem.SetBinding(MenuItem.CommandParameterProperty, ".");

    SwipeItem deleteSwipeItem = new SwipeItem
    {
        Text = "Delete",
        IconImageSource = "delete.png",
        BackgroundColor = Color.LightPink
    };
    deleteSwipeItem.SetBinding(MenuItem.CommandProperty, new Binding("BindingContext.DeleteCommand", source: carouselView));
    deleteSwipeItem.SetBinding(MenuItem.CommandParameterProperty, ".");

    swipeView.TopItems = new SwipeItems { favoriteSwipeItem };
    swipeView.BottomItems = new SwipeItems { deleteSwipeItem };

    StackLayout swipeViewStackLayout = new StackLayout { ... };
    swipeView.Content = swipeViewStackLayout;
    frame.Content = swipeView;
    stackLayout.Children.Add(frame);

    return stackLayout;
});
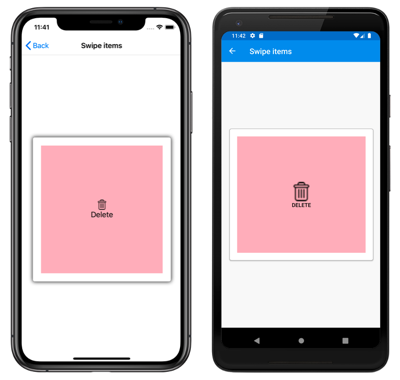
在此示例中, SwipeView 内容是一个 StackLayout,用于定义 CarouselView 中由 Frame 包围的每个项的外观。 轻扫项用于对 SwipeView 内容执行操作,它们在从顶部和底部轻扫控件时显示:
SwipeView 支持四个不同的轻扫方向,并且轻扫方向由添加 SwipeItems 对象的 SwipeItems 方向集合定义。 默认情况下,轻扫项会在用户点击时执行。 此外,执行某个轻扫项后,该轻扫项将会隐藏,并重新显示 SwipeView 内容。 但是,此类行为可以更改。
有关 SwipeView 控件的详细信息,请参阅 Xamarin.Forms SwipeView。
下拉以刷新
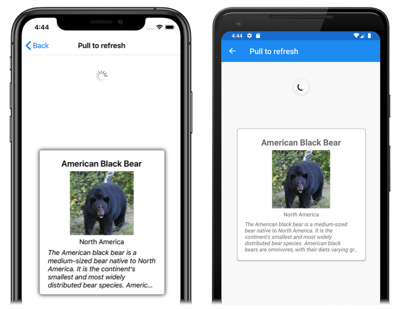
CarouselView 支持通过 RefreshView 实现下拉以刷新功能,此控件允许通过向下拉动项来刷新要显示的数据。 RefreshView 是一个容器控件,该控件可为其子级提供下拉以刷新功能,前提是该子级支持可滚动内容。 因此,通过将 CarouselView 设置为 RefreshView 的子级可实现其下拉以刷新功能:
<RefreshView IsRefreshing="{Binding IsRefreshing}"
             Command="{Binding RefreshCommand}">
    <CarouselView ItemsSource="{Binding Animals}">
        ...
    </CarouselView>
</RefreshView>
等效 C# 代码如下:
RefreshView refreshView = new RefreshView();
ICommand refreshCommand = new Command(() =>
{
    // IsRefreshing is true
    // Refresh data here
    refreshView.IsRefreshing = false;
});
refreshView.Command = refreshCommand;

CarouselView carouselView = new CarouselView();
carouselView.SetBinding(ItemsView.ItemsSourceProperty, "Animals");
refreshView.Content = carouselView;
// ...
当用户启动刷新时,将执行由 Command 属性定义的 ICommand,这将刷新所显示的项。 刷新时会显示刷新可视化效果,其中包含动画形式的圆形进度:
RefreshView.IsRefreshing 属性的值指示 RefreshView 的当前状态。 当用户触发刷新时,此属性将自动转换为 true。 刷新完成后,应将该属性重置为 false。
有关 RefreshView 的详细信息,请参阅 Xamarin.Forms RefreshView。
以增量方式加载数据
CarouselView 支持在用户滚动时进行增量数据虚拟化。 这可实现诸如在用户滚动时从 Web 服务异步加载数据页等方案。 此外,加载更多数据的点是可配置的,这样用户就看不到空白,也不会停止滚动。
CarouselView 定义下列属性,用于控制数据的增量加载:
RemainingItemsThreshold,类型为int,列表中尚不可见的项的阈值,达到此阈值时将触发RemainingItemsThresholdReached事件。RemainingItemsThresholdReachedCommand,类型为ICommand,达到RemainingItemsThreshold时就会执行。RemainingItemsThresholdReachedCommandParameter属于object类型,是传递给RemainingItemsThresholdReachedCommand的参数。
CarouselView 还会定义一个 RemainingItemsThresholdReached 事件,当 CarouselView 滚动得足够远,直到尚未显示 RemainingItemsThreshold 项时,将触发该事件。 可以处理此事件以加载更多项。 此外,在触发 RemainingItemsThresholdReached 事件时,将执行 RemainingItemsThresholdReachedCommand,从而在视图模型中增量加载数据。
RemainingItemsThreshold 属性的默认值为 -1,指示永远不会触发 RemainingItemsThresholdReached 事件。 当属性值为 0 时,将在显示 ItemsSource 中的最后一项时触发 RemainingItemsThresholdReached 事件。 对于大于 0 的值,当 ItemsSource 包含尚未滚动到的项数时将触发 RemainingItemsThresholdReached 事件。
注意
CarouselView 用于验证 RemainingItemsThreshold 属性,使该属性的值始终大于或等于 -1。
下面的 XAML 示例显示了以增量方式加载数据的 CarouselView:
<CarouselView ItemsSource="{Binding Animals}"
              RemainingItemsThreshold="2"
              RemainingItemsThresholdReached="OnCarouselViewRemainingItemsThresholdReached"
              RemainingItemsThresholdReachedCommand="{Binding LoadMoreDataCommand}">
    ...
</CarouselView>
等效 C# 代码如下:
CarouselView carouselView = new CarouselView
{
    RemainingItemsThreshold = 2
};
carouselView.RemainingItemsThresholdReached += OnCollectionViewRemainingItemsThresholdReached;
carouselView.SetBinding(ItemsView.ItemsSourceProperty, "Animals");
在此代码示例中,当有 2 个项尚未滚动到时将触发 RemainingItemsThresholdReached 事件,而响应措施是执行 OnCollectionViewRemainingItemsThresholdReached 事件处理程序:
void OnCollectionViewRemainingItemsThresholdReached(object sender, EventArgs e)
{
    // Retrieve more data here and add it to the CollectionView's ItemsSource collection.
}
注意
还可以通过在视图模型中将 RemainingItemsThresholdReachedCommand 绑定到 ICommand 实现,以增量方式加载数据。
