将设备连接到远程监视预配置解决方案 (Linux)
方案概述
在此方案中,创建会将以下遥测数据发送到远程监视预配置解决方案的设备:
- 外部温度
- 内部温度
- 湿度
为简单起见,设备上的代码将生成示例值,但我们建议通过将实际传感器连接到设备并发送实际的遥测数据来扩展此示例。
该设备还能响应从解决方案仪表板中调用的方法,以及在解决方案仪表板中设置的所需属性值。
要完成此教程,需要一个有效的 Azure 帐户。 如果没有帐户,只需花费几分钟就能创建一个免费试用帐户。 有关详细信息,请参阅 Azure 免费试用。
开始之前
在为设备编写任何代码之前,必须先预配远程监视预配置解决方案,并在该解决方案中预配新的自定义设备。
预配远程监视预配置解决方案
本教程中创建的设备会将数据发送到远程监视预配置解决方案的实例中。 如果尚未在 Azure 帐户中预配远程监视预配置解决方案,请使用以下步骤:
- 在 https://www.azureiotsolutions.com/ 页上,单击“”+以创建解决方案。
- 单击“远程监视”面板上的“选择”创建解决方案。
- 在“创建远程监视解决方案”页上,输入所选的解决方案名称,选择要部署到的区域,并选择要使用的 Azure 订阅。 然后单击“创建解决方案”。
- 等待预配过程完成。
警告
预配置的解决方案使用可计费的 Azure 服务。 当使用完预配置的解决方案之后,请务必将它从订阅中删除,以避免产生任何不必要的费用。 通过访问 https://www.azureiotsolutions.com/ 页,即可将预配置的解决方案从订阅中完全删除。
远程监视解决方案的预配过程完成之后,请单击“启动”,在浏览器中打开解决方案仪表板。

在远程监视解决方案中预配设备
注意
如果已在解决方案中预配了设备,则可以跳过此步骤。 创建客户端应用程序时需要知道设备凭据。
对于连接到预配置解决方案的设备,该设备必须使用有效的凭据将自身标识到 IoT 中心。 可以从解决方案仪表板中检索设备凭据。 在本教程中,稍后会在客户端应用程序中添加设备凭据。
若要在远程监视解决方案中添加设备,请在解决方案仪表板中完成以下步骤:
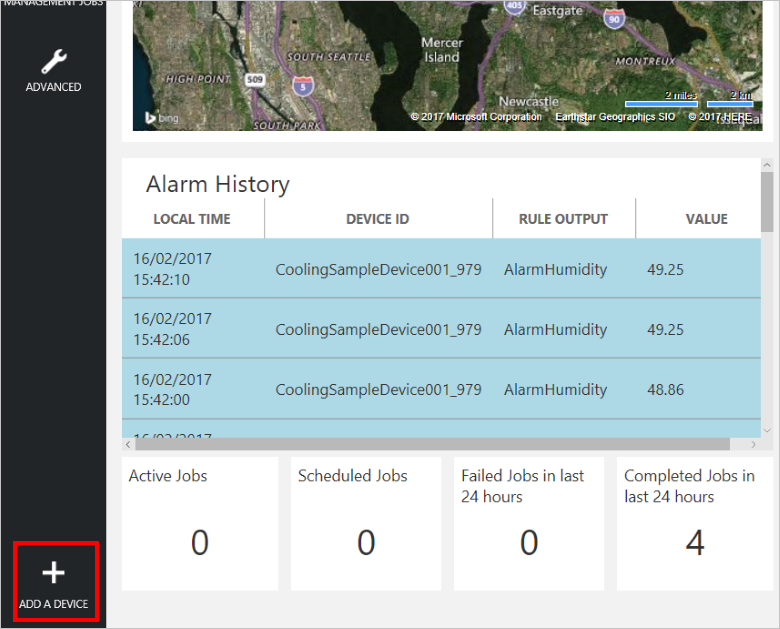
在仪表板左下角,单击“添加设备”。
在“自定义设备”面板中,单击“新增”。

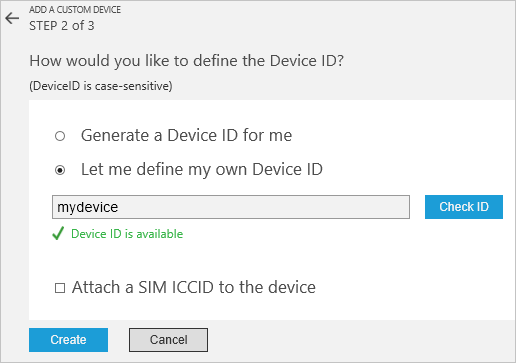
选择“让我定义我自己的设备 ID”。 输入设备 ID(例如“mydevice”),单击“检查 ID”验证该名称是否尚未使用,并单击“创建”预配设备。
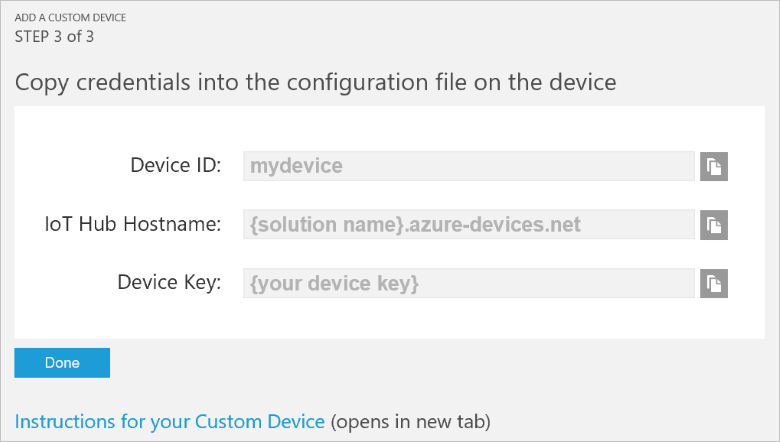
记下设备凭据(设备 ID、IoT 中心主机名和设备密钥)。 客户端应用程序需要这些值才能连接到远程监视解决方案。 然后单击“完成”。
在解决方案仪表板中的设备列表中选择设备。 接着,在“设备详细信息”面板中,单击“启用设备”。 设备状态现在为“正在运行”。 远程监视解决方案现在可以从设备接收遥测数据,并在设备上调用方法。
生成并运行示例 C 客户端 Linux
以下步骤演示如何创建一个客户端应用程序,用来与远程监视预配置解决方案通信。 此应用程序以 C 编写,在 Ubuntu Linux 上生成和运行。
要完成这些步骤,需要一个运行 Ubuntu 版本 15.04 或 15.10 的设备。 继续操作之前,请使用以下命令在 Ubuntu 设备上安装必备组件包:
sudo apt-get install cmake gcc g++
在设备上安装客户端库
Azure IoT 中心客户端库以包的形式提供,可以使用 apt-get 命令在 Ubuntu 设备上安装该包。 完成以下步骤,在 Ubuntu 计算机上安装包含 IoT 中心客户端库和头文件的包:
在 shell 中,向计算机添加 AzureIoT 库:
sudo add-apt-repository ppa:aziotsdklinux/ppa-azureiot
sudo apt-get update
安装 azure-iot-sdk-c-dev 包
sudo apt-get install -y azure-iot-sdk-c-dev
安装 Parson JSON 分析器
IoT 中心客户端库使用 Parson JSON 分析器分析消息有效负载。 在计算机的适当文件夹中,使用以下命令克隆 Parson GitHub 存储库:
git clone https://github.com/kgabis/parson.git
准备项目
在 Ubuntu 计算机上,创建名为 remote_monitoring的文件夹。 在 remote_monitoring 文件夹中:
- 创建 四个文件 main.c、 remote_monitoring.c、 remote_monitoring.h 和 CMakeLists.txt。
- 创建名为 parson 的文件夹。
将 parson.c 和 parson.h 文件从 Parson 存储库的本地副本复制到 remote_monitoring/parson 文件夹中。
在文本编辑器中,打开 remote_monitoring.c 文件。 添加以下 #include 语句:
#include "iothubtransportmqtt.h"
#include "schemalib.h"
#include "iothub_client.h"
#include "serializer_devicetwin.h"
#include "schemaserializer.h"
#include "azure_c_shared_utility/threadapi.h"
#include "azure_c_shared_utility/platform.h"
#include "parson.h"
指定 IoT 设备的行为
IoT 中心序列化程序客户端库使用模型来指定设备与 IoT 中心交换的消息的格式。
在
#include语句之后添加以下变量声明。 将占位符值 [Device ID] 和 [Device Key] 替换为在远程监视解决方案仪表板中记下的设备值。 使用解决方案仪表板中的 IoT 中心主机名替换 [IoTHub Name]。 例如,如果 IoT 中心主机名是 contoso.azure-devices.net,则将 [IoTHub Name] 替换为 contoso:static const char* deviceId = "[Device Id]"; static const char* connectionString = "HostName=[IoTHub Name].azure-devices.net;DeviceId=[Device Id];SharedAccessKey=[Device Key]";添加以下代码以定义使设备可以与 IoT 中心通信的模型。 此模型指定设备:
- 可将温度、外部温度、湿度和设备 ID 作为遥测数据进行发送。
- 可以将关于设备的元数据发送到 IoT 中心。 设备在启动时会发送 DeviceInfo 对象中的基本元数据。
- 可以向 IoT 中心中的设备孪生发送已报告的属性。 这些报告的属性划分为配置、设备和系统属性。
- 可以接收和处理在 IoT 中心的设备孪生中设置的所需属性。
- 可以响应通过解决方案门户调用的 Reboot 和 InitiateFirmwareUpdate 直接方法。 设备使用报告的属性发送有关其支持的直接方法的信息。
// Define the Model
BEGIN_NAMESPACE(Contoso);

/* Reported properties */
DECLARE_STRUCT(SystemProperties,
  ascii_char_ptr, Manufacturer,
  ascii_char_ptr, FirmwareVersion,
  ascii_char_ptr, InstalledRAM,
  ascii_char_ptr, ModelNumber,
  ascii_char_ptr, Platform,
  ascii_char_ptr, Processor,
  ascii_char_ptr, SerialNumber
);

DECLARE_STRUCT(LocationProperties,
  double, Latitude,
  double, Longitude
);

DECLARE_STRUCT(ReportedDeviceProperties,
  ascii_char_ptr, DeviceState,
  LocationProperties, Location
);

DECLARE_MODEL(ConfigProperties,
  WITH_REPORTED_PROPERTY(double, TemperatureMeanValue),
  WITH_REPORTED_PROPERTY(uint8_t, TelemetryInterval)
);

/* Part of DeviceInfo */
DECLARE_STRUCT(DeviceProperties,
  ascii_char_ptr, DeviceID,
  _Bool, HubEnabledState
);

DECLARE_DEVICETWIN_MODEL(Thermostat,
  /* Telemetry (temperature, external temperature and humidity) */
  WITH_DATA(double, Temperature),
  WITH_DATA(double, ExternalTemperature),
  WITH_DATA(double, Humidity),
  WITH_DATA(ascii_char_ptr, DeviceId),

  /* DeviceInfo */
  WITH_DATA(ascii_char_ptr, ObjectType),
  WITH_DATA(_Bool, IsSimulatedDevice),
  WITH_DATA(ascii_char_ptr, Version),
  WITH_DATA(DeviceProperties, DeviceProperties),

  /* Device twin properties */
  WITH_REPORTED_PROPERTY(ReportedDeviceProperties, Device),
  WITH_REPORTED_PROPERTY(ConfigProperties, Config),
  WITH_REPORTED_PROPERTY(SystemProperties, System),

  WITH_DESIRED_PROPERTY(double, TemperatureMeanValue, onDesiredTemperatureMeanValue),
  WITH_DESIRED_PROPERTY(uint8_t, TelemetryInterval, onDesiredTelemetryInterval),

  /* Direct methods implemented by the device */
  WITH_METHOD(Reboot),
  WITH_METHOD(InitiateFirmwareUpdate, ascii_char_ptr, FwPackageURI),

  /* Register direct methods with solution portal */
  WITH_REPORTED_PROPERTY(ascii_char_ptr_no_quotes, SupportedMethods)
);

END_NAMESPACE(Contoso);
实现设备的行为
现在添加实现模型中定义的行为的代码。
添加以下函数,处理在解决方案仪表板中设置的所需属性。 模型中定义了这些所需属性:
void onDesiredTemperatureMeanValue(void* argument)
{
  /* By convention 'argument' is of the type of the MODEL */
  Thermostat* thermostat = argument;
  printf("Received a new desired_TemperatureMeanValue = %f\r\n", thermostat->TemperatureMeanValue);

}

void onDesiredTelemetryInterval(void* argument)
{
  /* By convention 'argument' is of the type of the MODEL */
  Thermostat* thermostat = argument;
  printf("Received a new desired_TelemetryInterval = %d\r\n", thermostat->TelemetryInterval);
}
添加以下函数,处理通过 IoT 中心调用的直接方法。 模型中定义了这些直接方法:
/* Handlers for direct methods */
METHODRETURN_HANDLE Reboot(Thermostat* thermostat)
{
  (void)(thermostat);

  METHODRETURN_HANDLE result = MethodReturn_Create(201, "\"Rebooting\"");
  printf("Received reboot request\r\n");
  return result;
}

METHODRETURN_HANDLE InitiateFirmwareUpdate(Thermostat* thermostat, ascii_char_ptr FwPackageURI)
{
  (void)(thermostat);

  METHODRETURN_HANDLE result = MethodReturn_Create(201, "\"Initiating Firmware Update\"");
  printf("Recieved firmware update request. Use package at: %s\r\n", FwPackageURI);
  return result;
}
添加以下函数,向预配置解决方案发送消息:
/* Send data to IoT Hub */
static void sendMessage(IOTHUB_CLIENT_HANDLE iotHubClientHandle, const unsigned char* buffer, size_t size)
{
  IOTHUB_MESSAGE_HANDLE messageHandle = IoTHubMessage_CreateFromByteArray(buffer, size);
  if (messageHandle == NULL)
  {
    printf("unable to create a new IoTHubMessage\r\n");
  }
  else
  {
    if (IoTHubClient_SendEventAsync(iotHubClientHandle, messageHandle, NULL, NULL) != IOTHUB_CLIENT_OK)
    {
      printf("failed to hand over the message to IoTHubClient");
    }
    else
    {
      printf("IoTHubClient accepted the message for delivery\r\n");
    }

    IoTHubMessage_Destroy(messageHandle);
  }
  free((void*)buffer);
}
添加以下回调处理程序,当设备向预配置解决方案发送新的报告属性值后将运行该处理程序:
/* Callback after sending reported properties */
void deviceTwinCallback(int status_code, void* userContextCallback)
{
  (void)(userContextCallback);
  printf("IoTHub: reported properties delivered with status_code = %u\n", status_code);
}
添加以下函数,将设备连接到云中的预配置解决方案,并交换数据。 此函数执行以下步骤:
- 初始化平台。
- 向序列化库注册 Contoso 命名空间。
- 使用设备连接字符串初始化客户端。
- 创建 Thermostat 模型的实例。
- 创建并发送报告属性值。
- 发送 DeviceInfo 对象。
- 创建循环以便每秒发送遥测数据。
- 取消初始化所有资源。
void remote_monitoring_run(void) { if (platform_init() != 0) { printf("Failed to initialize the platform.\n"); } else { if (SERIALIZER_REGISTER_NAMESPACE(Contoso) == NULL) { printf("Unable to SERIALIZER_REGISTER_NAMESPACE\n"); } else { IOTHUB_CLIENT_HANDLE iotHubClientHandle = IoTHubClient_CreateFromConnectionString(connectionString, MQTT_Protocol); if (iotHubClientHandle == NULL) { printf("Failure in IoTHubClient_CreateFromConnectionString\n"); } else { #ifdef MBED_BUILD_TIMESTAMP // For mbed add the certificate information if (IoTHubClient_SetOption(iotHubClientHandle, "TrustedCerts", certificates) != IOTHUB_CLIENT_OK) { printf("Failed to set option \"TrustedCerts\"\n"); } #endif // MBED_BUILD_TIMESTAMP Thermostat* thermostat = IoTHubDeviceTwin_CreateThermostat(iotHubClientHandle); if (thermostat == NULL) { printf("Failure in IoTHubDeviceTwin_CreateThermostat\n"); } else { /* Set values for reported properties */ thermostat->Config.TemperatureMeanValue = 55.5; thermostat->Config.TelemetryInterval = 3; thermostat->Device.DeviceState = "normal"; thermostat->Device.Location.Latitude = 47.642877; thermostat->Device.Location.Longitude = -122.125497; thermostat->System.Manufacturer = "Contoso Inc."; thermostat->System.FirmwareVersion = "2.22"; thermostat->System.InstalledRAM = "8 MB"; thermostat->System.ModelNumber = "DB-14"; thermostat->System.Platform = "Plat 9.75"; thermostat->System.Processor = "i3-7"; thermostat->System.SerialNumber = "SER21"; /* Specify the signatures of the supported direct methods */ thermostat->SupportedMethods = "{\"Reboot\": \"Reboot the device\", \"InitiateFirmwareUpdate--FwPackageURI-string\": \"Updates device Firmware. Use parameter FwPackageURI to specify the URI of the firmware file\"}"; /* Send reported properties to IoT Hub */ if (IoTHubDeviceTwin_SendReportedStateThermostat(thermostat, deviceTwinCallback, NULL) != IOTHUB_CLIENT_OK) { printf("Failed sending serialized reported state\n"); } else { printf("Send DeviceInfo object to IoT Hub at startup\n"); thermostat->ObjectType = "DeviceInfo"; thermostat->IsSimulatedDevice = 0; thermostat->Version = "1.0"; thermostat->DeviceProperties.HubEnabledState = 1; thermostat->DeviceProperties.DeviceID = (char*)deviceId; unsigned char* buffer; size_t bufferSize; if (SERIALIZE(&buffer, &bufferSize, thermostat->ObjectType, thermostat->Version, thermostat->IsSimulatedDevice, thermostat->DeviceProperties) != CODEFIRST_OK) { (void)printf("Failed serializing DeviceInfo\n"); } else { sendMessage(iotHubClientHandle, buffer, bufferSize); } /* Send telemetry */ thermostat->Temperature = 50; thermostat->ExternalTemperature = 55; thermostat->Humidity = 50; thermostat->DeviceId = (char*)deviceId; while (1) { unsigned char*buffer; size_t bufferSize; (void)printf("Sending sensor value Temperature = %f, Humidity = %f\n", thermostat->Temperature, thermostat->Humidity); if (SERIALIZE(&buffer, &bufferSize, thermostat->DeviceId, thermostat->Temperature, thermostat->Humidity, thermostat->ExternalTemperature) != CODEFIRST_OK) { (void)printf("Failed sending sensor value\r\n"); } else { sendMessage(iotHubClientHandle, buffer, bufferSize); } ThreadAPI_Sleep(1000); } IoTHubDeviceTwin_DestroyThermostat(thermostat); } } IoTHubClient_Destroy(iotHubClientHandle); } serializer_deinit(); } } platform_deinit(); }下面提供发送到预配置解决方案的示例遥测数据消息,以供参考:
{"DeviceId":"mydevice01", "Temperature":50, "Humidity":50, "ExternalTemperature":55}
调用 remote_monitoring_run 函数
在文本编辑器中,打开 remote_monitoring.h 文件。 添加以下代码:
void remote_monitoring_run(void);
在文本编辑器中,打开 main.c 文件。 添加以下代码:
#include "remote_monitoring.h"

int main(void)
{
    remote_monitoring_run();

    return 0;
}
生成并运行应用程序
以下步骤描述如何使用 CMake 生成客户端应用程序。
在文本编辑器中,打开 remote_monitoring 文件夹中的 CMakeLists.txt 文件。
添加以下指令,以定义如何生成客户端应用程序:
macro(compileAsC99)
  if (CMAKE_VERSION VERSION_LESS "3.1")
    if (CMAKE_C_COMPILER_ID STREQUAL "GNU")
      set (CMAKE_C_FLAGS "--std=c99 ${CMAKE_C_FLAGS}")
      set (CMAKE_CXX_FLAGS "--std=c++11 ${CMAKE_CXX_FLAGS}")
    endif()
  else()
    set (CMAKE_C_STANDARD 99)
    set (CMAKE_CXX_STANDARD 11)
  endif()
endmacro(compileAsC99)

cmake_minimum_required(VERSION 2.8.11)
compileAsC99()

set(AZUREIOT_INC_FOLDER "${CMAKE_SOURCE_DIR}" "${CMAKE_SOURCE_DIR}/parson" "/usr/include/azureiot" "/usr/include/azureiot/inc")

include_directories(${AZUREIOT_INC_FOLDER})

set(sample_application_c_files
    ./parson/parson.c
    ./remote_monitoring.c
    ./main.c
)

set(sample_application_h_files
    ./parson/parson.h
    ./remote_monitoring.h
)

add_executable(sample_app ${sample_application_c_files} ${sample_application_h_files})

target_link_libraries(sample_app
    serializer
    iothub_client
    iothub_client_mqtt_transport
    aziotsharedutil
    umqtt
    pthread
    curl
    ssl
    crypto
    m
)
在 remote_monitoring 文件夹中,创建一个文件夹用于存储 CMake 生成的 make 文件,并运行 cmake 和 make 命令,如下所示:
mkdir cmake
cd cmake
cmake ../
make
运行客户端应用程序,并将遥测数据发送到 IoT 中心:
./sample_app
在仪表板中查看设备遥测数据
远程监视解决方案中的仪表板可让用户查看设备发送到 IoT 中心的遥测数据。
在浏览器中,返回到远程监视解决方案仪表板,单击左侧面板中的“设备”导航到“设备列表”。
在“设备列表”中,应会看到设备状态为“正在运行”。 如果不是,请在“设备详细信息”面板中单击“启用设备”。

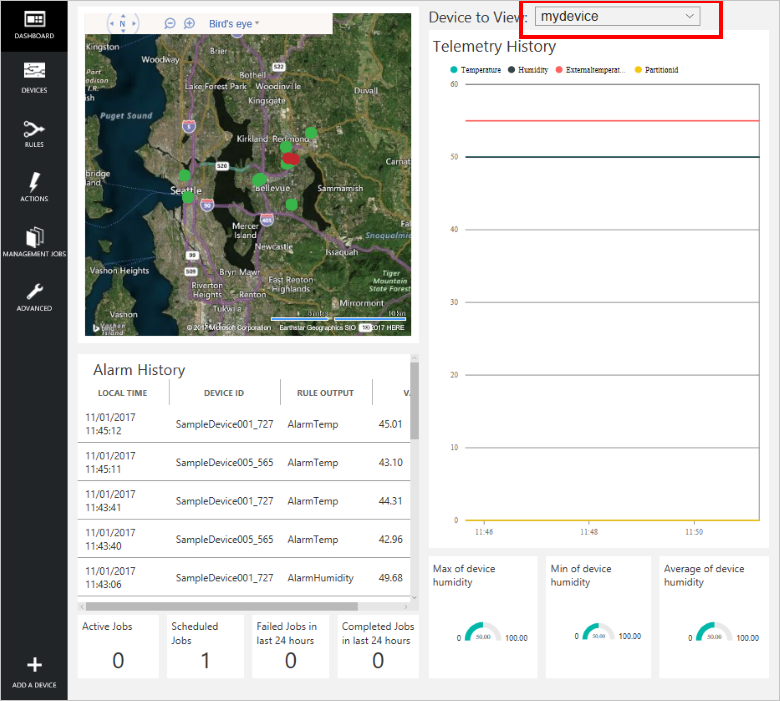
单击“仪表板”返回到仪表板,在“要查看的设备”下拉列表中选择设备,以查看其遥测数据。 示例应用程序的遥测数据是 50 个单位的内部温度、55 个单位的外部温度,以及 50 个单位的湿度。
在设备上调用方法
远程监视解决方案中的仪表板可让用户通过 IoT 中心在设备上调用方法。 例如在远程监视解决方案中,用户可以调用方法来模拟重新启动设备。
在远程监视解决方案仪表板中,单击左侧面板中的“设备”导航到“设备列表”。
在“设备列表”中,单击设备的“设备 ID”。
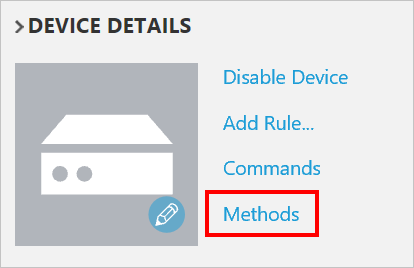
在“设备详细信息”面板中,单击“方法”。
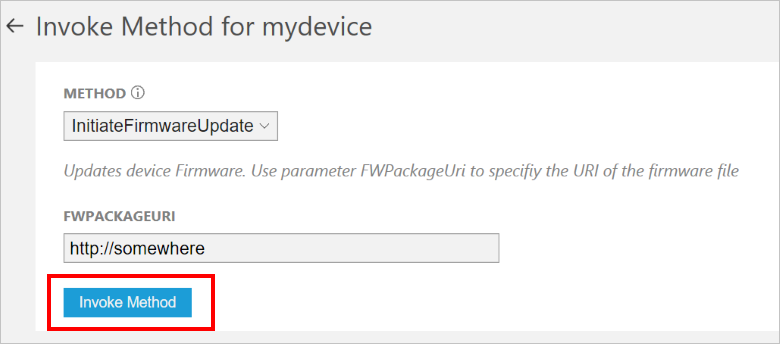
在“方法”下拉列表中,选择“InitiateFirmwareUpdate”,并在“FWPACKAGEURI”中输入虚拟 URL。 单击“调用方法”在设备上调用方法。
设备处理方法时,可在运行设备代码的控制台中看到一则消息。 方法的结果会被添加到解决方案门户中的历史记录上:

后续步骤
自定义预配置解决方案一文介绍了扩展本示例的一些方法。 可能的扩展包括使用真实传感器和实现其他命令。
可以详细了解 azureiotsuite.com 站点权限。