默认 FTP 自定义身份验证提供程序 <providers>
概述
<providers> 元素指定 FTP 站点的自定义 FTP 身份验证提供程序的默认集合。
将自定义身份验证提供程序添加到 FTP 站点后,FTP 服务将按照 FTP 配置设置中指定的提供程序的顺序,尝试使用每个已启用的自定义身份验证提供程序对用户进行身份验证。 如果使用任何自定义身份验证提供程序都无法对用户进行身份验证,FTP 服务将尝试使用基本身份验证(如已启用)对用户进行身份验证。
使用自定义身份验证提供程序的主要优点是,无需在服务器或域上创建用户帐户。 这可以提高网络的安全性。
注意
FTP 7.0 和 FTP 7.5 附带两个自定义身份验证提供程序:
- ASP.NET 成员身份身份验证:使用 ASP.NET 成员身份数据库来验证用户名和密码。 有关详细信息,请参阅 Microsoft IIS.net 网站上的使用 .NET 成员身份身份验证配置 FTP 主题。
- IIS Manager 身份验证:使用 IIS 管理用户存储来验证用户名和密码。 有关详细信息,请参阅 Microsoft IIS.net 网站上的使用 IIS 7.0 Manager 身份验证配置 FTP 主题。
注意
添加到 <customAuthentication/providers> 元素的自定义身份验证提供程序必须在 <system.ftpServer/providerDefinitions> 集合中注册。
注意
FTP 7.5 中引入了对创建自定义身份验证提供程序的支持。 有关如何创建自定义身份验证提供程序的其他信息,请参阅 Microsoft 的 www.iis.net/learn 网站的针对 FTP 7.5 进行开发部分。
兼容性
| 版本 | 说明 |
|---|---|
| IIS 10.0 | <providers> 元素在 IIS 10.0 中未进行修改。 |
| IIS 8.5 | <providers> 元素在 IIS 8.5 中未进行修改。 |
| IIS 8.0 | <providers> 元素在 IIS 8.0 中未进行修改。 |
| IIS 7.5 | <customAuthentication> 元素的 <providers> 元素作为 IIS 7.5 的功能提供。 |
| IIS 7.0 | <customAuthentication> 元素的 <providers> 元素是在 IIS 7.0 的独立下载项 FTP 7.0 中引入的。 |
| IIS 6.0 | <ftpServer> 元素及其子元素替换位于 LM/MSFTPSVC 元数据库路径中的 IIS 6.0 FTP 设置。 |
在 Windows 7 和 Windows Server 2008 R2 中,FTP 7.5 服务作为 IIS 7.5 的功能提供,因此无需再下载 FTP 服务。
安装
若要支持 Web 服务器的 FTP 发布,必须安装 FTP 服务。 为此,请按照以下步骤操作。
Windows Server 2012 或 Windows Server 2012 R2
在任务栏上,单击 “服务器管理器”。
在“服务器管理器”中,单击“管理”菜单,然后单击“添加角色和功能”。
在“添加角色和功能”向导中,单击“下一步”。 选择安装类型,然后单击“下一步”。 选择目标服务器,然后单击“下一步”。
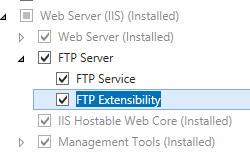
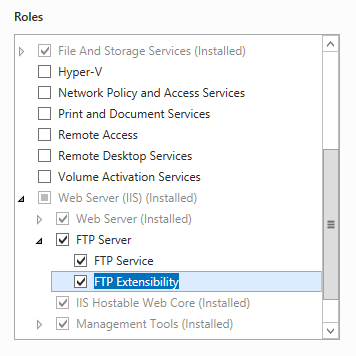
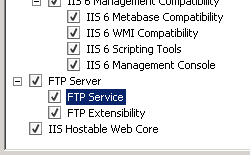
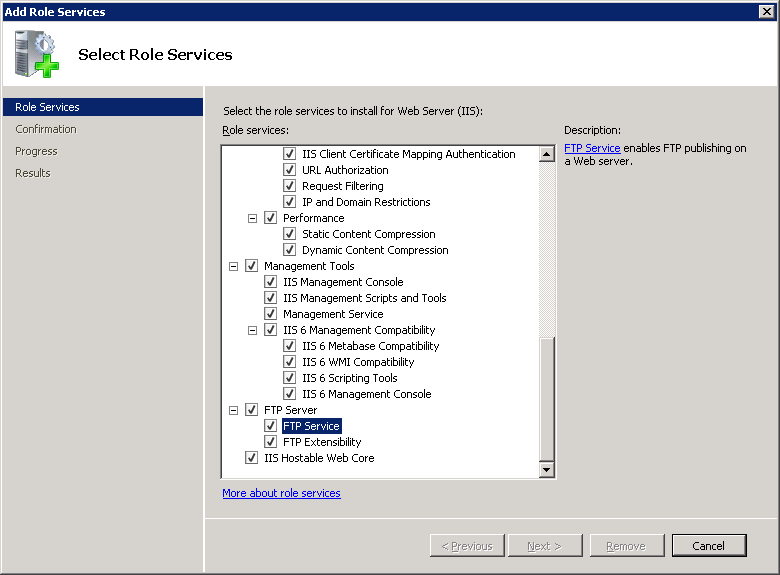
在“服务器角色”页上,展开“Web 服务器 (IIS)”,然后选择“FTP 服务器”。
注意
若要支持 FTP 服务使用 ASP.Membership 身份验证或 IIS Manager 身份验证,除“FTP 服务”外还需选择“FTP 扩展性”。
 。
。单击“下一步”,然后在“选择功能”页上,再次单击“下一步”。
在“确认安装选择”页上,单击“安装”。
在“结果” 页面中单击“关闭” 。
Windows 8 或 Windows 8.1
在“开始”屏幕上,将指针一直移动到左下角,右键单击“开始”按钮,然后单击“控制面板”。
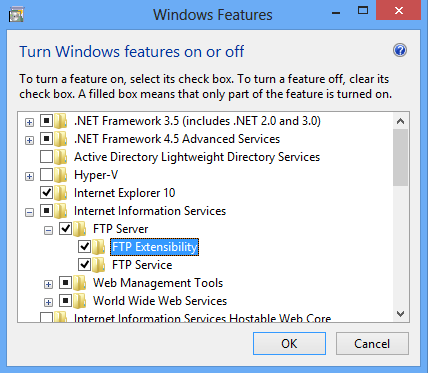
在“控制面板”中,单击“程序与功能”,然后单击“打开或关闭 Windows 功能”。
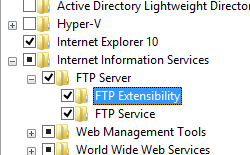
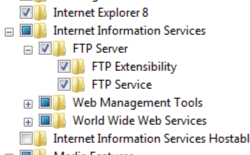
展开“Internet Information Services”,然后选择“FTP 服务器”。
注意
若要支持 FTP 服务使用 ASP.Membership 身份验证或 IIS 管理器身份验证,还需选择“FTP 扩展性”。
单击“确定”。
单击“关闭” 。
Windows Server 2008 R2
在任务栏上,单击“开始”,指向“管理工具”,然后单击“服务器管理器”。
在“服务器管理器”层次结构窗格中,展开“角色”,然后单击“Web 服务器(IIS)”。
在“Web 服务器 (IIS)”窗格中,滚动到“角色服务”部分,然后单击“添加角色服务”。
在“添加角色服务向导”的“选择角色服务”页,展开“FTP 服务器”。
选择“FTP 服务”。
注意
若要支持 FTP 服务使用 ASP.Membership 身份验证或 IIS 管理器身份验证,还需选择“FTP 扩展性”。
单击 “下一步” 。
在“确认安装选择”页中,单击“安装”。
在“结果” 页面中单击“关闭” 。
Windows 7
在任务栏上,单击“开始”,然后单击“控制面板”。
在“控制面板”中,单击“程序与功能”,然后单击“打开或关闭 Windows 功能”。
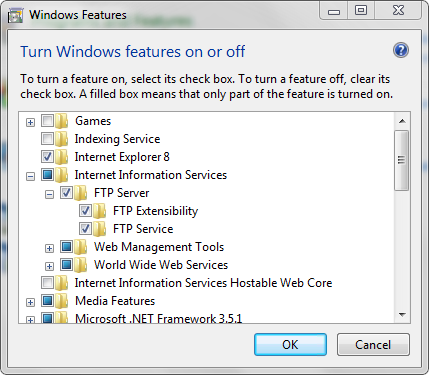
展开“Internet Information Services”,然后展开“FTP 服务器”。
选择“FTP 服务”。
注意
若要支持 FTP 服务使用 ASP.Membership 身份验证或 IIS 管理器身份验证,还需选择“FTP 扩展性”。
单击“确定”。
Windows Server 2008 或 Windows Vista
从以下 URL 下载安装包:
按照以下演练中的说明安装 FTP 服务:
操作方式
如何为 FTP 站点启用 IIS Manager 身份验证
打开 Internet Information Services (IIS) 管理器:
如果使用的是 Windows Server 2012 或 Windows Server 2012 R2:
- 在任务栏上,单击“服务器管理器”,单击“工具”,然后单击“Internet Information Services (IIS)管理器”。
如果使用的是 Windows 8 或 Windows 8.1:
- 按住 Windows 键,按字母 X,然后单击“控制面板”。
- 单击“管理工具”,然后双击“Internet 信息服务(IIS)管理器”。
如果使用的是 Windows Server 2008 或 Windows Server 2008 R2:
- 在任务栏上,单击“开始”,指向“管理工具”,然后单击“Internet Information Services (IIS)管理器”。
如果使用的是 Windows Vista 或 Windows 7:
- 在任务栏上,单击“开始”,然后单击“控制面板”。
- 双击“管理工具”,然后双击“Internet 信息服务(IIS)管理器”。
在“连接”窗格中,展开服务器名称,展开“站点”节点,然后单击站点名称。
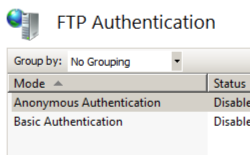
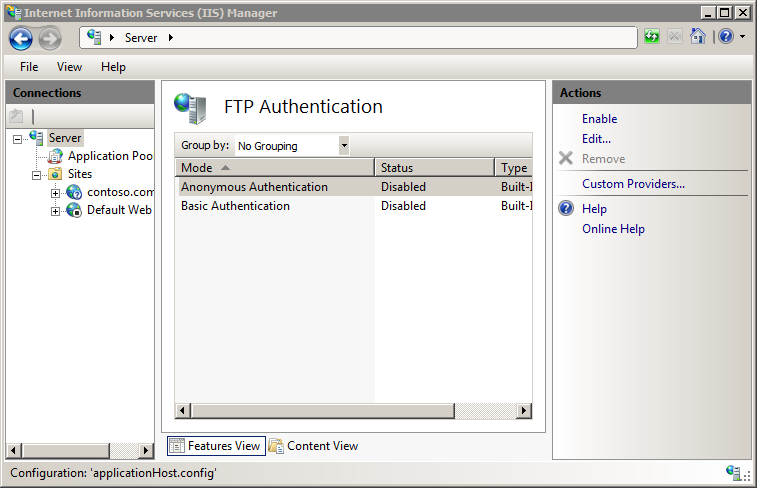
在站点的“主页”窗格中,双击“FTP 身份验证”功能。
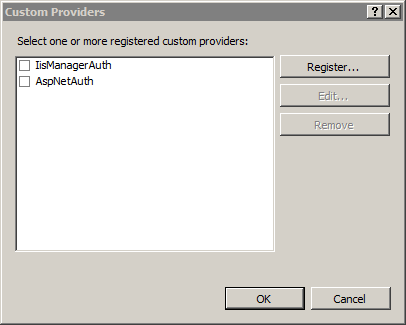
显示“FTP 身份验证”页后,单击“操作”窗格中的“自定义提供程序…”。
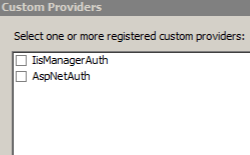
显示“自定义提供程序”对话框后,单击以选择“IIS Manager 身份验证”。 单击“确定”。
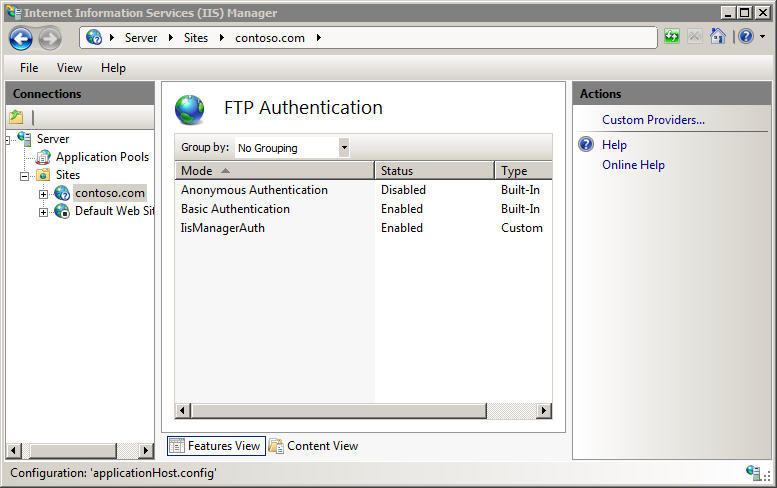
“FTP 身份验证”页现在应显示已启用“IIS Manager 身份验证”。

如果需要,可以禁用“基本身份验证”或“匿名身份验证”,方法是突出显示任一模式,然后在“操作”窗格中单击“禁用”。


有关如何为 FTP 配置 IIS 管理器身份验证的其他信息,请参阅 Microsoft www.iis.net/learn 网站上的使用 IIS 7.0 管理器身份验证配置 FTP 主题。
如何为 FTP 站点添加托管代码自定义身份验证提供程序
注意
这些步骤假定已在服务器的全局程序集缓存 (GAC) 上安装并注册了自定义 FTP 身份验证提供程序。有关如何注册托管程序集的详细信息,请参阅 Microsoft MSDN 网站上的全局程序集缓存工具 (Gacutil.exe) 主题。
确定扩展性提供程序的程序集信息:
- 在 Windows 资源管理器中打开“C:\Windows\assembly”路径,其中 C: 是操作系统驱动器。
- 找到程序集。 例如 FtpAuthenticationDemo。
- 右键单击该程序集,然后单击“属性”。
- 复制“区域性”值。 例如 Neutral。
- 复制“版本号”。 例如 1.0.0.0。
- 复制“公钥标记”值。 例如 426f62526f636b73。
- 单击“取消” 。
将扩展性提供程序添加到 FTP 身份验证提供程序的全局列表中:
- 打开“Internet Information Services (IIS)管理器” 。
- 在“连接”窗格中单击计算机名称。
- 双击主窗口中的“FTP 身份验证”。

- 单击“操作”窗格中的“自定义提供程序...”。
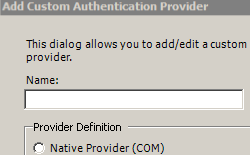
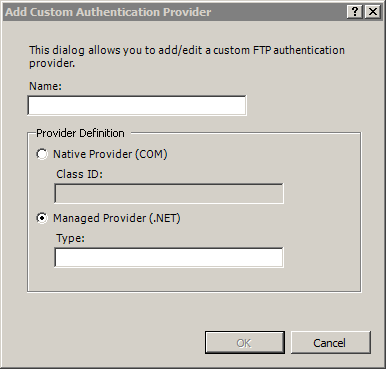
- 单击“注册”。

- 在“名称”框中为自定义身份验证提供程序输入一个易记名称。 例如 FtpAuthenticationDemo。
- 单击“托管提供程序(.NET)”。
- 使用之前复制的信息输入扩展性提供程序的程序集信息。 例如:
FtpAuthentication.FtpAuthDemo, FtpAuthenticationDemo, version=1.0.0.0, Culture=neutral, PublicKeyToken=426f62526f636b73 - 单击“确定”。
- 清除提供程序列表中的自定义身份验证提供程序的复选框。
- 单击“确定”。
为 FTP 站点添加自定义身份验证提供程序:
- 在 Internet Information Services (IIS) 管理器中打开 FTP 站点。
- 双击主窗口中的“FTP 身份验证”。
- 单击“操作”窗格中的“自定义提供程序...”。
- 选中并启用提供程序列表中的自定义身份验证提供程序。
- 单击“确定”。
配置
特性
无。
子元素
| 元素 | 说明 |
|---|---|
add |
可选元素。 可向自定义身份验证提供程序的默认集合中添加提供程序。 |
clear |
可选元素。 清除自定义身份验证提供程序的默认集合。 |
remove |
可选元素。 从自定义身份验证提供程序集合中移除默认提供程序。 |
配置示例
以下配置示例显示了 FTP 服务的 <siteDefaults> 元素示例,此元素用于定义默认自定义身份验证提供程序。
<siteDefaults>
   <ftpServer>
      <security>
         <authentication>
             <customAuthentication>
                <providers>
                   <add name="FtpCustomAuthenticationModule" enabled="true" />
                </providers>
             </customAuthentication>
         </authentication>
      </security>
   </ftpServer>
</siteDefaults>
代码示例
以下代码示例演示了 FTP 服务的默认自定义身份验证提供程序的配置。
AppCmd.exe
appcmd.exe set config -section:system.applicationHost/sites /+"siteDefaults.ftpServer.security.authentication.customAuthentication.providers.[name='FtpCustomAuthenticationModule',enabled='True']" /commit:apphost
注意
使用 AppCmd.exe 配置这些设置时,必须确保将 commit 参数设置为 apphost。 这会将配置设置提交到 ApplicationHost.config 文件中的相应位置部分。
C#
using System;
using System.Text;
using Microsoft.Web.Administration;

internal static class Sample
{
   private static void Main()
   {
      using (ServerManager serverManager = new ServerManager())
      {
         Configuration config = serverManager.GetApplicationHostConfiguration();
         ConfigurationSection sitesSection = config.GetSection("system.applicationHost/sites");
         ConfigurationElement siteDefaultsElement = sitesSection.GetChildElement("siteDefaults");
         ConfigurationElement ftpServerElement = siteDefaultsElement.GetChildElement("ftpServer");

         ConfigurationElement securityElement = ftpServerElement.GetChildElement("security");
         ConfigurationElement authenticationElement = securityElement.GetChildElement("authentication");
         ConfigurationElement customAuthenticationElement = authenticationElement.GetChildElement("customAuthentication");
         ConfigurationElementCollection providersCollection = customAuthenticationElement.GetCollection("providers");
         ConfigurationElement addElement1 = providersCollection.CreateElement("add");
            addElement1["name"] = @"FtpCustomAuthenticationModule";
            addElement1["enabled"] = true;
            providersCollection.Add(addElement1);

         serverManager.CommitChanges();
      }
   }
}
VB.NET
Imports System
Imports System.Text
Imports Microsoft.Web.Administration

Module Sample
   Sub Main()
      Dim serverManager As ServerManager = New ServerManager
      Dim config As Configuration = serverManager.GetApplicationHostConfiguration
      Dim sitesSection As ConfigurationSection = config.GetSection("system.applicationHost/sites")
      Dim siteDefaultsElement As ConfigurationElement = sitesSection.GetChildElement("siteDefaults")
      Dim ftpServerElement As ConfigurationElement = siteDefaultsElement.GetChildElement("ftpServer")

      Dim securityElement As ConfigurationElement = ftpServerElement.GetChildElement("security")
      Dim authenticationElement As ConfigurationElement = securityElement.GetChildElement("authentication")
      Dim customAuthenticationElement As ConfigurationElement = authenticationElement.GetChildElement("customAuthentication")
      Dim providersCollection As ConfigurationElementCollection = customAuthenticationElement.GetCollection("providers")
      Dim addElement1 As ConfigurationElement = providersCollection.CreateElement("add")
         addElement1("name") = "FtpCustomAuthenticationModule"
         addElement1("enabled") = True
         providersCollection.Add(addElement1)

      serverManager.CommitChanges()
   End Sub

End Module
JavaScript
var adminManager = new ActiveXObject('Microsoft.ApplicationHost.WritableAdminManager');
adminManager.CommitPath = "MACHINE/WEBROOT/APPHOST";

var sitesSection = adminManager.GetAdminSection("system.applicationHost/sites", "MACHINE/WEBROOT/APPHOST");
var siteDefaultsElement = sitesSection.ChildElements.Item("siteDefaults");
var ftpServerElement = siteDefaultsElement.ChildElements.Item("ftpServer");

var securityElement = ftpServerElement.ChildElements.Item("security");
var authenticationElement = securityElement.ChildElements.Item("authentication");
var customAuthenticationElement = authenticationElement.ChildElements.Item("customAuthentication");
var providersCollection = customAuthenticationElement.ChildElements.Item("providers").Collection;
var addElement1 = providersCollection.CreateNewElement("add");
   addElement1.Properties.Item("name").Value = "FtpCustomAuthenticationModule";
   addElement1.Properties.Item("enabled").Value = true;
   providersCollection.AddElement(addElement1);

adminManager.CommitChanges();
VBScript
Set adminManager = createObject("Microsoft.ApplicationHost.WritableAdminManager")
adminManager.CommitPath = "MACHINE/WEBROOT/APPHOST"
Set sitesSection = adminManager.GetAdminSection("system.applicationHost/sites", "MACHINE/WEBROOT/APPHOST")
Set siteDefaultsElement = sitesSection.ChildElements.Item("siteDefaults")
Set ftpServerElement = siteDefaultsElement.ChildElements.Item("ftpServer")

Set securityElement = ftpServerElement.ChildElements.Item("security")
Set authenticationElement = securityElement.ChildElements.Item("authentication")
Set customAuthenticationElement = authenticationElement.ChildElements.Item("customAuthentication")
Set providersCollection = customAuthenticationElement.ChildElements.Item("providers").Collection
Set addElement1 = providersCollection.CreateNewElement("add")
   addElement1.Properties.Item("name").Value = "FtpCustomAuthenticationModule"
   addElement1.Properties.Item("enabled").Value = True
   providersCollection.AddElement(addElement1)

adminManager.CommitChanges()