你当前正在访问 Microsoft Azure Global Edition 技术文档网站。 如果需要访问由世纪互联运营的 Microsoft Azure 中国技术文档网站,请访问 https://docs.azure.cn。
REST 教程:使用技能组在 Azure AI 搜索中生成可搜索内容
本教程介绍如何调用 REST API,它用于创建 AI 扩充管道,以便在编制索引期间进行内容提取和转换。
技能组将 AI 处理添加到原始内容,使内容更加统一且可搜索。 了解技能组的工作原理后,便可以支持广泛的转换:从图像分析到自然语言处理,再到外部提供的自定义处理。
本教程帮助你了解如何:
- 在扩充管道中定义对象。
- 构建技能集。 调用 OCR、语言检测、实体识别和关键短语提取。
- 执行管道。 创建和加载搜索索引。
- 使用全文搜索检查结果。
如果你没有 Azure 订阅,请在开始之前建立一个免费帐户。
概述
本教程使用 REST 客户端和 Azure AI 搜索 REST API 来创建数据源、索引、索引器和技能组。
索引器驱动管道中的每个步骤,从 Azure 存储上的 Blob 容器中的示例数据(非结构化文本和图像)的内容提取开始。
提取内容后,技能组将执行 Microsoft 的内置技能来查找和提取信息。 这些技能包括图像上的光学字符识别 (OCR)、文本的语言检测、关键短语提取和实体识别(组织)。 技能组创建的新信息将发送到索引中的字段。 填充索引后,可在查询、Facet 和筛选器中使用这些字段。
先决条件
注意
可在本教程中使用免费搜索服务。 免费层限制为三个索引、三个索引器和三个数据源。 本教程每样创建一个。 在开始之前,请确保服务中有足够的空间可接受新资源。
下载文件
下载示例数据存储库的 zip 文件并提取内容。 了解操作方法。
将示例数据上传到 Azure 存储
在 Azure 存储中,创建新容器并将其命名为 cog-search-demo。
获取存储连接字符串,以便可以在 Azure AI 搜索中构建连接。
在左侧选择“访问密钥”。
复制密钥 1 或密钥 2 对应的连接字符串。 连接字符串如以下示例所示:
DefaultEndpointsProtocol=https;AccountName=<your account name>;AccountKey=<your account key>;EndpointSuffix=core.windows.net
Azure AI 服务
内置 AI 扩充由 Azure AI 服务(包括用于自然语言和图像处理的语言服务与 Azure AI 视觉)提供支持。 对于像本教程这样的小型工作负载,可以为每个索引器免费分配 20 个事务。 对于较大的工作负载,可将 Azure AI 服务多区域资源附加到技能组,这样就会采用即用即付定价。
复制搜索服务 URL 和 API 密钥
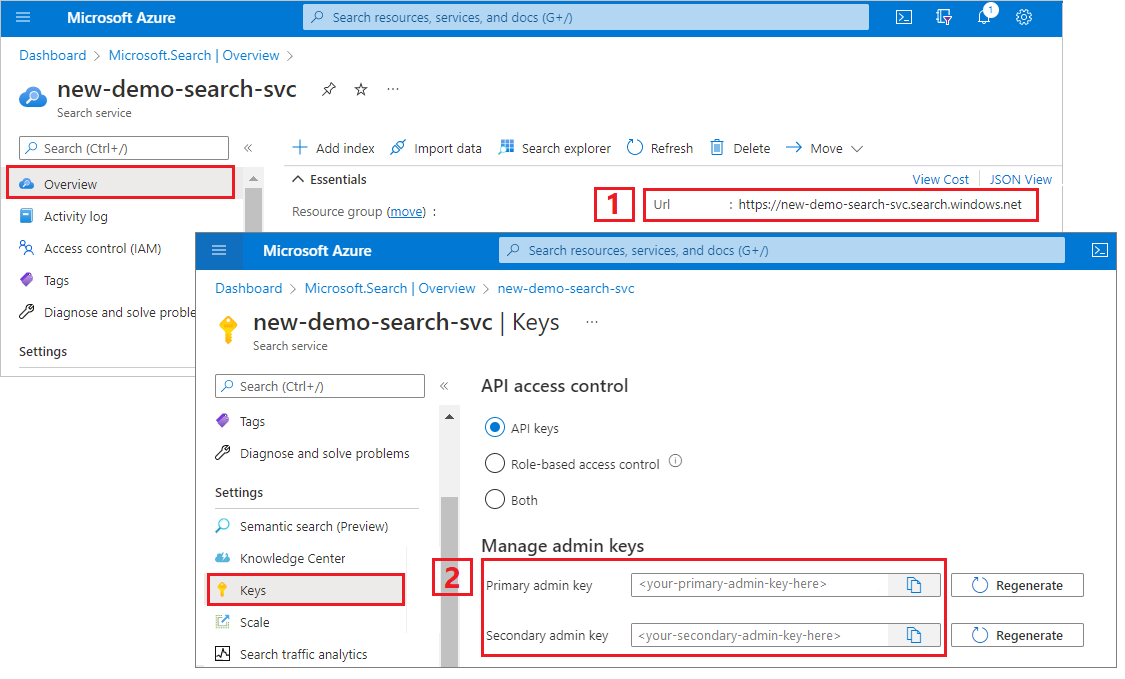
对于本教程,与 Azure AI 搜索的连接需要终结点和 API 密钥。 可以从 Azure 门户获取这些值。
登录到 Azure 门户,导航到搜索服务“概述”页,然后复制 URL。 示例终结点可能类似于
https://mydemo.search.windows.net。在“设置”>“密钥”下,复制管理密钥。 管理密钥用于添加、修改和删除对象。 有两个可互换的管理密钥。 复制其中任意一个。

设置 REST 文件
启动 Visual Studio Code 并打开 skillset-tutorial.rest 文件。 如需 REST 客户端的帮助信息,请参阅快速入门:使用 REST 进行文本搜索。
提供变量的值:搜索服务终结点、搜索服务管理员 API 密钥、索引名称、Azure 存储帐户的连接字符串和 Blob 容器名称。
创建管道
AI 扩充是索引器驱动的。 本演练部分将创建四个对象:数据源、索引定义、技能集和索引器。
步骤 1:创建数据源
调用创建数据源为包含示例数据文件的 Blob 容器提供连接字符串。
### Create a data source
POST {{baseUrl}}/datasources?api-version=2024-07-01  HTTP/1.1
  Content-Type: application/json
  api-key: {{apiKey}}

    {
        "name": "cog-search-demo-ds",
        "description": null,
        "type": "azureblob",
        "subtype": null,
        "credentials": {
            "connectionString": "{{storageConnectionString}}"
        },
        "container": {
            "name": "{{blobContainer}}",
            "query": null
        },
        "dataChangeDetectionPolicy": null,
        "dataDeletionDetectionPolicy": null
    }
步骤 2:创建技能集
调用创建技能组指定将哪些扩充步骤应用于内容。 除非存在依赖项,否则技能将并行执行。
### Create a skillset
POST {{baseUrl}}/skillsets?api-version=2024-07-01  HTTP/1.1
  Content-Type: application/json
  api-key: {{apiKey}}

    {
        "name": "cog-search-demo-ss",
        "description": "Apply OCR, detect language, extract entities, and extract key-phrases.",
        "cognitiveServices": null,
        "skills":
        [
            {
            "@odata.type": "#Microsoft.Skills.Vision.OcrSkill",
            "context": "/document/normalized_images/*",
            "defaultLanguageCode": "en",
            "detectOrientation": true,
            "inputs": [
                {
                    "name": "image",
                    "source": "/document/normalized_images/*"
                }
            ],
            "outputs": [
                {
                    "name": "text"
                }
            ]
            },
            {
            "@odata.type": "#Microsoft.Skills.Text.MergeSkill",
            "description": "Create merged_text, which includes all the textual representation of each image inserted at the right location in the content field. This is useful for PDF and other file formats that supported embedded images.",
            "context": "/document",
            "insertPreTag": " ",
            "insertPostTag": " ",
            "inputs": [
                {
                    "name":"text",
                    "source": "/document/content"
                },
                {
                    "name": "itemsToInsert",
                    "source": "/document/normalized_images/*/text"
                },
                {
                    "name":"offsets",
                    "source": "/document/normalized_images/*/contentOffset"
                }
            ],
            "outputs": [
                {
                    "name": "mergedText",
                    "targetName" : "merged_text"
                }
            ]
            },
            {
            "@odata.type": "#Microsoft.Skills.Text.SplitSkill",
            "textSplitMode": "pages",
            "maximumPageLength": 4000,
            "defaultLanguageCode": "en",
            "context": "/document",
            "inputs": [
                {
                    "name": "text",
                    "source": "/document/merged_text"
                }
            ],
            "outputs": [
                {
                    "name": "textItems",
                    "targetName": "pages"
                }
            ]
            },
            {
            "@odata.type": "#Microsoft.Skills.Text.LanguageDetectionSkill",
            "description": "If you have multilingual content, adding a language code is useful for filtering",
            "context": "/document",
            "inputs": [
                {
                    "name": "text",
                    "source": "/document/merged_text"
                }
            ],
            "outputs": [
                {
                    "name": "languageName",
                    "targetName": "language"
                }
            ]
            },
            {
            "@odata.type": "#Microsoft.Skills.Text.KeyPhraseExtractionSkill",
            "context": "/document/pages/*",
            "inputs": [
                {
                    "name": "text",
                    "source": "/document/pages/*"
                }
            ],
            "outputs": [
                {
                    "name": "keyPhrases",
                    "targetName": "keyPhrases"
                }
            ]
            },
            {
            "@odata.type": "#Microsoft.Skills.Text.V3.EntityRecognitionSkill",
            "categories": ["Organization"],
            "context": "/document",
            "inputs": [
                {
                    "name": "text",
                    "source": "/document/merged_text"
                }
            ],
            "outputs": [
                {
                    "name": "organizations",
                    "targetName": "organizations"
                }
            ]
            },
            {
            "@odata.type": "#Microsoft.Skills.Text.V3.EntityRecognitionSkill",
            "categories": ["Location"],
            "context": "/document",
            "inputs": [
                {
                    "name": "text",
                    "source": "/document/merged_text"
                }
            ],
            "outputs": [
                {
                    "name": "locations",
                    "targetName": "locations"
                }
            ]
            },
            {
            "@odata.type": "#Microsoft.Skills.Text.V3.EntityRecognitionSkill",
            "categories": ["Person"],
            "context": "/document",
            "inputs": [
                {
                    "name": "text",
                    "source": "/document/merged_text"
                }
            ],
            "outputs": [
                {
                    "name": "persons",
                    "targetName": "persons"
                }
            ]
            }
        ]
    }
要点:
请求的正文指定以下内置技能:
技能 说明 光学字符识别 识别图像文件中的文本和数字。 文本合并 创建“合并内容”,该内容重新合并以前分隔的内容,对于嵌入了图像的文档(PDF、DOCX 等)很有用。 图像和文本在文档分解阶段被分离。 合并技能通过将在扩充期间创建的任何已识别的文本、图像描述文字或标记插入到文档中从其中提取图像的同一位置来重新合并它们。 在技能组中处理合并的内容时,此节点包含文档中的所有文本,包括从未经过 OCR 或图像分析的纯文本文档。 语言检测 检测语言并输出语言名称或代码。 在多语言数据集中,语言字段可用于筛选器。 实体识别 从合并的内容中提取人员、组织和位置的名称。 文本拆分 将大段合并内容拆分为较小区块,然后调用关键短语提取技能。 关键短语提取接受不超过 50,000 个字符的输入。 有几个示例文件需要拆分才能保留在此限制范围内。 关键短语提取 提取出最相关的关键短语。 每个技能会针对文档的内容执行。 在处理期间,Azure AI 搜索会解码每个文档,以从不同的文件格式读取内容。 从源文件中找到的文本将放入一个生成的
content字段(每个文档对应一个字段)。 因此,输入将变为"/document/content"。对于关键短语提取,由于我们使用了文本拆分器技能将较大文件分解成多个页面,因此关键短语提取技能的上下文是
"document/pages/*"(适用于文档中的每个页面),而不是"/document/content"。
注意
输出可以映射到索引、用作下游技能的输入,或者既映射到索引又用作输入(在语言代码中就是这样)。 在索引中,语言代码可用于筛选。 若要详细了解技能集的基础知识,请参阅如何定义技能集。
步骤 3:创建索引
调用创建索引以提供用于在 Azure AI 搜索中创建倒排索引和其他构造的架构。
索引的最大组件是字段集合,其中的数据类型和属性确定了 Azure AI 搜索中的内容和行为。 请确保为新生成的输出提供了字段。
### Create an index
POST {{baseUrl}}/indexes?api-version=2024-07-01  HTTP/1.1
  Content-Type: application/json
  api-key: {{apiKey}}

    {
        "name": "cog-search-demo-idx",
        "defaultScoringProfile": "",
        "fields": [
            {
                "name": "content",
                "type": "Edm.String",
                "searchable": true,
                "sortable": false,
                "filterable": false,
                "facetable": false
            },
            {
                "name": "text",
                "type": "Collection(Edm.String)",
                "facetable": false,
                "filterable": true,
                "searchable": true,
                "sortable": false
            },
            {
                "name": "language",
                "type": "Edm.String",
                "searchable": false,
                "sortable": true,
                "filterable": true,
                "facetable": false
            },
            {
                "name": "keyPhrases",
                "type": "Collection(Edm.String)",
                "searchable": true,
                "sortable": false,
                "filterable": true,
                "facetable": true
            },
            {
                "name": "organizations",
                "type": "Collection(Edm.String)",
                "searchable": true,
                "sortable": false,
                "filterable": true,
                "facetable": true
            },
            {
                "name": "persons",
                "type": "Collection(Edm.String)",
                "searchable": true,
                "sortable": false,
                "filterable": true,
                "facetable": true
            },
            {
                "name": "locations",
                "type": "Collection(Edm.String)",
                "searchable": true,
                "sortable": false,
                "filterable": true,
                "facetable": true
            },
            {
                "name": "metadata_storage_path",
                "type": "Edm.String",
                "key": true,
                "searchable": true,
                "sortable": false,
                "filterable": false,
                "facetable": false
            },
            {
                "name": "metadata_storage_name",
                "type": "Edm.String",
                "searchable": true,
                "sortable": false,
                "filterable": false,
                "facetable": false
            }
        ]
    }
步骤 4:创建并运行索引器
调用创建索引器来驱动管道。 到目前为止创建的三个组件(数据源、技能集、索引)是索引器的输入。 在 Azure AI 搜索中创建索引器是运转整个管道的事件。
此步骤预期需要几分钟时间才能完成。 即使数据集较小,分析技能也会消耗大量的计算资源。
### Create and run an indexer
POST {{baseUrl}}/indexers?api-version=2024-07-01  HTTP/1.1
  Content-Type: application/json
  api-key: {{apiKey}}

    {
        "name": "cog-search-demo-idxr",
        "description": "",
        "dataSourceName" : "cog-search-demo-ds",
        "targetIndexName" : "cog-search-demo-idx",
        "skillsetName" : "cog-search-demo-ss",
        "fieldMappings" : [
            {
                "sourceFieldName" : "metadata_storage_path",
                "targetFieldName" : "metadata_storage_path",
                "mappingFunction" : { "name" : "base64Encode" }
            },
            {
                "sourceFieldName": "metadata_storage_name",
                "targetFieldName": "metadata_storage_name"
            }
        ],
        "outputFieldMappings" :
        [
            {
                "sourceFieldName": "/document/merged_text",
                "targetFieldName": "content"
            },
            {
                "sourceFieldName" : "/document/normalized_images/*/text",
                "targetFieldName" : "text"
            },
            {
                "sourceFieldName" : "/document/organizations",
                "targetFieldName" : "organizations"
            },
            {
                "sourceFieldName": "/document/language",
                "targetFieldName": "language"
            },
            {
                "sourceFieldName" : "/document/persons",
                "targetFieldName" : "persons"
            },
            {
                "sourceFieldName" : "/document/locations",
                "targetFieldName" : "locations"
            },
            {
                "sourceFieldName" : "/document/pages/*/keyPhrases/*",
                "targetFieldName" : "keyPhrases"
            }
        ],
        "parameters":
        {
        "batchSize": 1,
        "maxFailedItems":-1,
        "maxFailedItemsPerBatch":-1,
        "configuration":
            {
                "dataToExtract": "contentAndMetadata",
                "imageAction": "generateNormalizedImages"
            }
        }
    }
要点:
请求的正文包括对以前对象的引用、图像处理所需的配置属性以及两种类型的字段映射。
"fieldMappings"在技能组之前处理,它将数据源中的内容发送到索引中的目标字段。 使用字段映射将未修改的现有内容发送到索引。 如果两端的字段名称和类型相同,则无需映射。"outputFieldMappings"用于技能组执行后由技能创建的字段。 对outputFieldMappings中sourceFieldName的引用在文档破解或扩充创建它们之前并不存在。targetFieldName是索引中的字段,在索引架构中定义。将
"maxFailedItems"参数设置为 -1,指示索引引擎在数据导入期间忽略错误。 这是可接受的,因为演示数据源中的文档很少。 对于更大的数据源,请将值设置为大于 0。"dataToExtract":"contentAndMetadata"语句告知索引器自动从 blob 的内容属性以及每个对象的元数据中提取值。imageAction参数告知索引器从数据源中找到的图像中提取文本。"imageAction":"generateNormalizedImages"配置与 OCR 技能和文本合并技能相结合,告知索引器从图像中提取文本(例如,禁行交通标志中的单词“stop”),并将其嵌入到内容字段中。 此行为既适用于嵌入的图像(如 PDF 中的图像),也适用于独立图像文件(如 JPG 文件)。
注意
创建索引器会调用管道。 如果访问数据、映射输入和输出或操作顺序出现问题,此阶段会显示这些问题。 若要结合代码或脚本更改重新运行管道,可能需要先删除对象。 有关详细信息,请参阅重置并重新运行。
监视索引
提交“创建索引器”请求后,索引编制和扩充立即开始。 根据技能组的复杂性和操作,编制索引可能需要一段时间。
若要确定索引器是否仍在运行,请调用获取索引器状态来检查索引器状态。
### Get Indexer Status (wait several minutes for the indexer to complete)
GET {{baseUrl}}/indexers/cog-search-demo-idxr/status?api-version=2024-07-01  HTTP/1.1
  Content-Type: application/json
  api-key: {{apiKey}}
要点:
在某些情况下经常出现警告,但不一定意味着存在问题。 例如,如果某个 Blob 容器包含映像文件,而管道不处理映像,则会出现一条警告,指出映像未处理。
在此示例中,有一个不包含任何文本的 PNG 文件。 无法对此文件执行所有五个基于文本的技能(语言检测、位置的实体识别、组织、人员和关键短语提取)。 生成的通知将显示在执行历史记录中。
检查结果
创建包含 AI 生成的内容的索引后,请调用搜索文档,以运行一些查询来查看结果。
### Query the index\
POST {{baseUrl}}/indexes/cog-search-demo-idx/docs/search?api-version=2024-07-01  HTTP/1.1
  Content-Type: application/json
  api-key: {{apiKey}}

  {
    "search": "*",
    "select": "metadata_storage_name,language,organizations",
    "count": true
  }
筛选器可帮助你将结果缩小到感兴趣的项:
### Filter by organization
POST {{baseUrl}}/indexes/cog-search-demo-idx/docs/search?api-version=2024-07-01  HTTP/1.1
  Content-Type: application/json
  api-key: {{apiKey}}

  {
    "search": "*",
    "filter": "organizations/any(organizations: organizations eq 'Microsoft')",
    "select": "metadata_storage_name,organizations",
    "count": true
  }
这些查询演示了对 Azure AI 搜索创建的新字段使用查询语法和筛选器的多种方式。 有关更多查询示例,请参阅搜索文档 REST API 中的示例、简单语法查询示例和完整 Lucene 查询示例。
重置并重新运行
在开发的早期阶段,对设计的迭代很常见。 重置和重新运行有助于迭代。
要点
本教程演示了使用 REST API 创建 AI 扩充管道的基本步骤:数据源、技能组、索引和索引器。
其中介绍了内置技能,以及技能组定义,其中显示了通过输入和输出将技能链接在一起的机制。 此外,还提到需要使用索引器定义中的 outputFieldMappings,将管道中的扩充值路由到 Azure AI 搜索服务中的可搜索索引。
最后,介绍了如何测试结果并重置系统以进一步迭代。 本教程提到,针对索引发出查询会返回扩充的索引管道创建的输出。
清理资源
在自己的订阅中操作时,最好在项目结束时删除不再需要的资源。 持续运行资源可能会产生费用。 可以逐个删除资源,也可以删除资源组以删除整个资源集。
你可以在 Azure 门户中查找和管理资源,只需使用左侧导航窗格中的“所有资源”或“资源组”链接即可。
后续步骤
熟悉 AI 扩充管道中的所有对象后,接下来更详细地了解技能集定义和各项技能。